Using Text, Tabs, Panes, and Themes in Windows Terminal

When running Windows Terminal, you will notice that the text changes color as you enter it onto some command line. Thus, for example, PowerShell uses light-colored grey text to show version and activity information, white text for user input, cyan text for potential parameters, blue text for download URLs, and red text for error messages. As you get to know how Windows Terminal looks and feels when running some particular color scheme, you’ll learn how to zero in on what the text seeks to communicate through its color and appearance. You can also change color assignments to suit your needs and preferences.
Check Out the Other Windows Terminal Articles
This is the third article in a series on Windows Terminal (sometimes referred to as WT). Here’s a list of what this series covers (or plans to cover in future installments):
- Understanding and Using Windows Terminal: Gives a general description of what Windows Terminal is, how it works, and what it can do.
- Understanding and Using Windows Terminal Color Schemes: Explains the contents and behavior of Windows Terminal color schemes, with tools to display and inspect them.
- Using Text, Tabs, Panes, and Themes in Windows Terminal: This article.
- Using OhMyPosh to Customize the Windows Terminal Prompt: Explains how to download, install, and use Jan de Dobbeleer’s fascinating GitHub project to choose among glyph-driven, nerd font–based custom prompts for Windows Terminal (or build one’s own)
- Creating and Sharing Windows Terminal Profiles Across PCs: Explains how to export and import complex Windows Terminal environments across multiple PC instances (a few, or a fleet, as your needs may dictate).
Checking and Altering Windows Terminal Text Colors
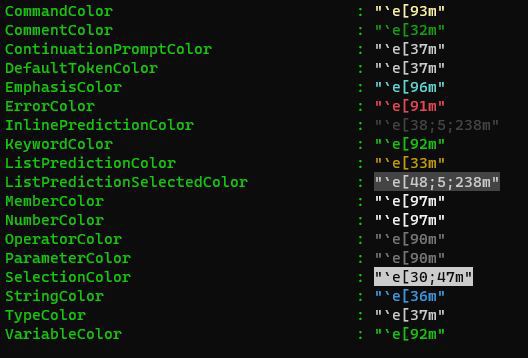
The built-in PowerShell commands Get-PSReadLineOption and Set-PSReadLineOption cmdlets provide ways to check and set specific text colors within Windows Terminal. Indeed, the Get-PSReadLineOption cmdlet by itself shows all the PowerShell text settings related to Windows Terminal text (and more). Figure 1 shows the output from the “Get” side of things:
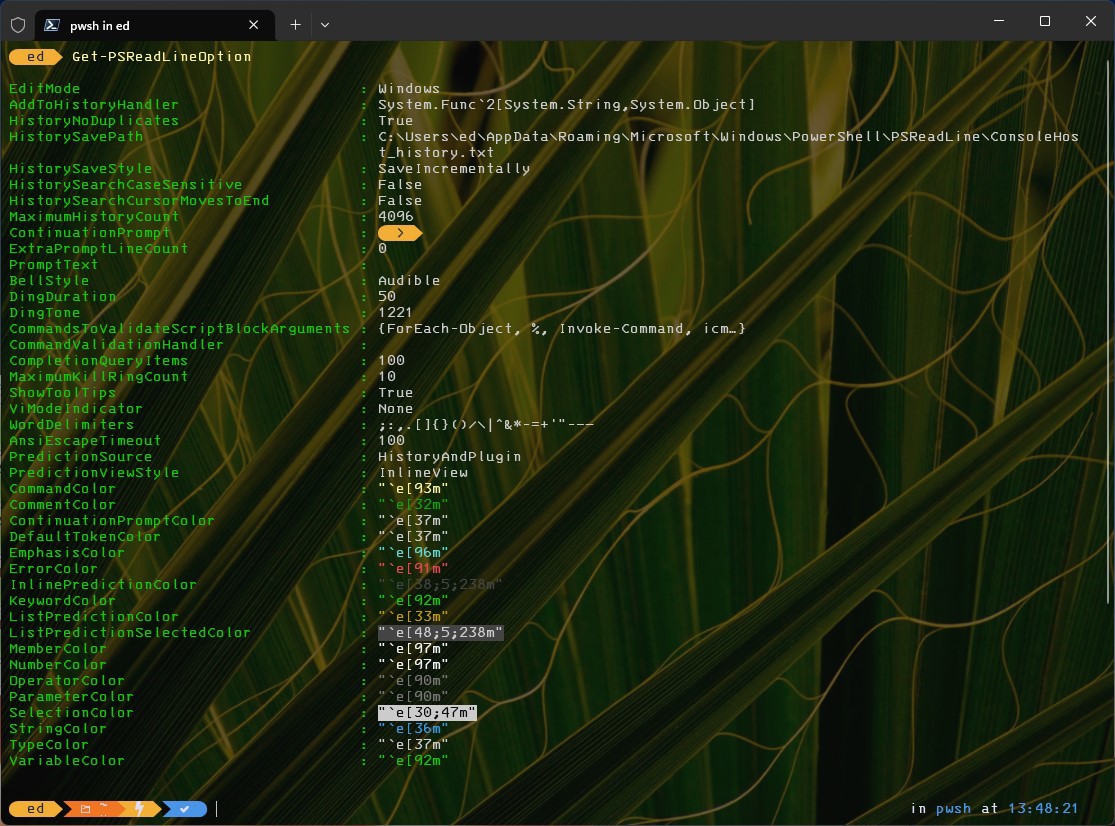
Repeating those lines in direct, readable text form this says (I added associated color names in curly braces at the far right):
| CommandColor | "`e[93m " | {white} | ||
| CommentColor | "`e[32m" | {green} | ||
| ContinuationPromptColor | "`e[37m" | {grey} | ||
| DefaultTokenColor | "`e[37m" | {grey} | ||
| EmphasisColor | "`e[96m" | {bright cyan} | ||
| ErrorColor | "`e[91m" | {bright red} | ||
| InlinePredictionColor | "`e[38;5;238m" | {dark grey} | ||
| KeywordColor | "`e[92m" | {bright green} | ||
| ListPredictionColor | "`e[33m" | {yellow} | ||
| ListPredictionSelectedColor | "`e[48;5;238m | {mustard} | ||
| MemberColor | "`e[97m" | {bright white} | ||
| NumberColor | "`e[97m" | {bright white} | ||
| OperatorColor | "`e[90m" | {bright black} | ||
| ParameterColor | "`e[90m" | {bright black} | ||
| SelectionColor | "`e[30;47m" | {black} | ||
| StringColor | "`e[36m" | {cyan} | ||
| TypeColor | "`e[37m" | {white} | ||
| VariableColor | "`e[92m" | {bright green} |
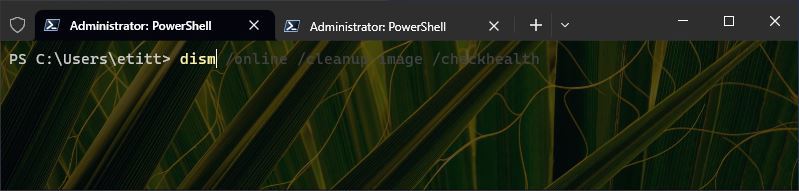
When I enter the word dism into Windows PowerShell, it looks at the command history to predict that the rest of the string will be /online /cleanup-image /checkhealth. Thus, dism shows up in white (CommandColor) and the rest of the predicted string in a barely visible dark grey (InlinePredictionColor), as shown in Figure 2.
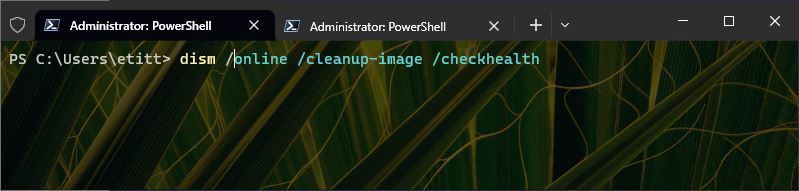
When I change the value of InlinePredictionColor to cyan, it’s much easier to read against my dark background, as shown in Figure 3.
The syntax to change the InlinePredictionColor is:
Set-PSReadLineOption -Colors @{ InlinePrediction = 'Cyan' }
After executing this change, the cyan text shows up much more effectively in Figure 3.
By experimenting with various settings and ASCI color names (for example, “cyan”) or escape sequences (for example, "`e[38;5;238m" for dark grey), you can tweak the color settings that come when you install a particular Windows theme and its associated color scheme. For a list of colors available in PowerShell, check out this Stack Overflow item List of all colors available for PowerShell. It provides color codes and escape sequences for the 16 most common colors used in many Windows color schemes, as shown in Figure 4.

ANSI Escape Characters and Sequences
If you refer back to Figure 1, you see character sequences in the PowerShell output from the Get-PSReadLineOption cmdlet for the various text colors that Windows Terminal (and PowerShell itself) use. Thus, for example, ErrorColor—used to denote error notifications and messages—is bright red and includes the characters "`e[91m". Let’s break this down into its constituent parts:
Outer double quote marks ("") tell you this is a literal string of characters.
`e[: Denotes the escape character. It marks the start of an escape sequence. That tells the terminal special handling applies to the characters in the rest of the sequence (everything up to, but not including, the close double-quote character).
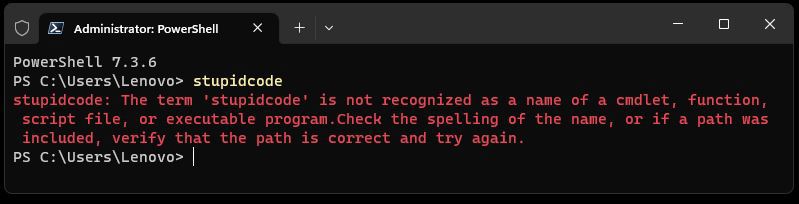
91: Is the ANSI Color Code for bright red, as shown in the preceding Figures 1 and 4. If you make a mistake in PowerShell/Windows Terminal it flags its response in that color, as in Figure 5. (I typed a nonsense string to provoke the “unrecognized input” error message, which appears in bright red.)
| Used with permission from Microsoft.
To use the escape character in PowerShell, in fact, the first three characters inside the literal string must be 'e[ (single quote—lower-case “e”—left square bracket) to flag an ensuing escape sequence. The first two characters are called the escape character, and the third is called the introducer. What follows afterward (until the closing double-quote mark) is the actual escape sequence. The number 91 denotes a color designation for bright red, where values 30-37 are foreground colors, and 90-97 are bright colors designed to stand out.
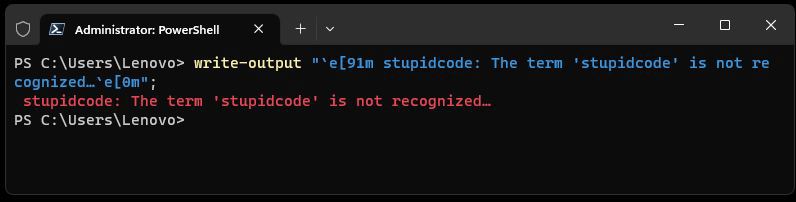
The concluding m actually signifies a function known as SGR, or Select Graphics Rendition. It accepts the preceding values (the color code 91 in this case) as input. The text to be displayed in this color follows next inside Windows Terminal, which is how the red string gets displayed in Figure 5 behind the scenes. As a working escape sequence, it would take a form like the following PowerShell cmdlet invocation (I’ve truncated the string where the ellipsis shows, and added a reset at the end of the string to turn normal handling back on when it’s finished):
write-output "`e[91m stupidcode: The term 'stupidcode' is not recognized…`e[0m";
Indeed, the concluding escape sequence shown—namely `e[0m—tells Windows Terminal to restore text to its normal color scheme. Otherwise, all terminal output would stay red going forward. Thus, using deliberate write-output commands in PowerShell to change text color, emphasis (bold, italic, and so forth), or handling must be undone at the end of any such escape sequence to avoid continuing—and probably unwanted—side effects. Remember this if you want to play at the command line! Figure 6 shows what this produces inside a Windows Terminal PowerShell session.
| Used with permission from Microsoft.
For a complete discussion of how escape sequences work in Windows Terminal, see the Microsoft Learn document Console Virtual Terminal Sequences. It explains cursor positioning, shape, and visibility; text formatting (the table in this section is especially noteworthy), color handling and screen colors, and a whole bunch more. Check it out: there’s a whole world of capability in these escape sequences.
Managing Tabs and Panes in Windows Terminal
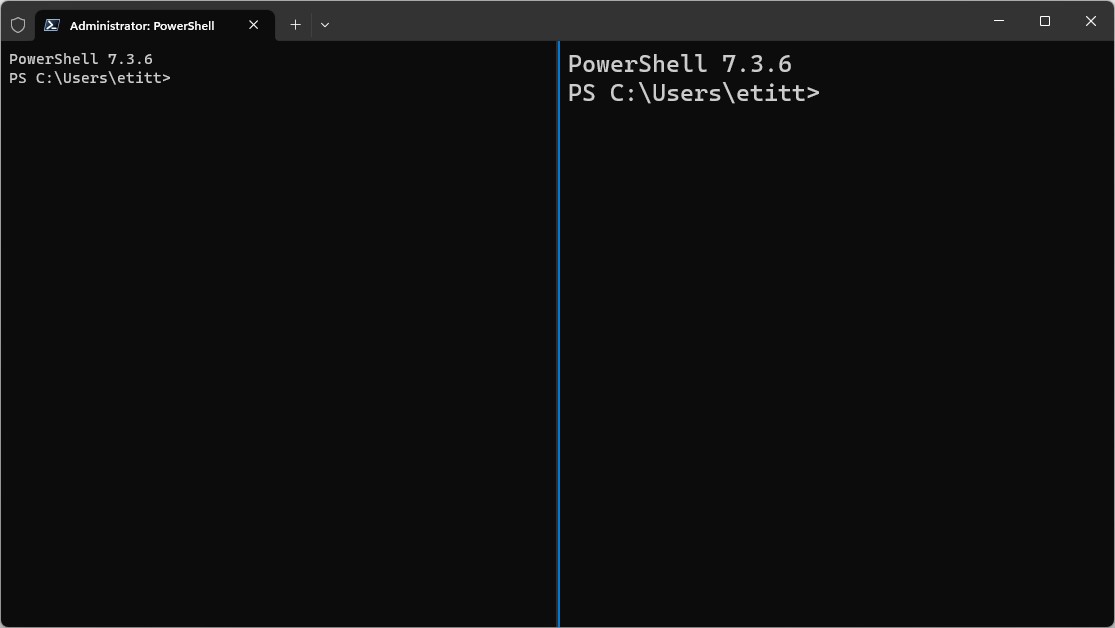
Working with tabs and panes in Windows Terminal is perhaps more interesting than one might first think. Indeed, driving the Windows Terminal interface through the keyboard is fairly straightforward for opening tabs and panes. The basic rule is: opening a new pane defaults to a vertical split. Thus the Alt+Shift+”Plus sign ‘+’” —I’ll write this as Alt+Shift+Plus going forward—takes an open PowerShell session and creates a second vertical pane to its right, as shown in Figure 7. (I typed the date command in the left-hand pane to show the date as I was working: August 7, 2023.)
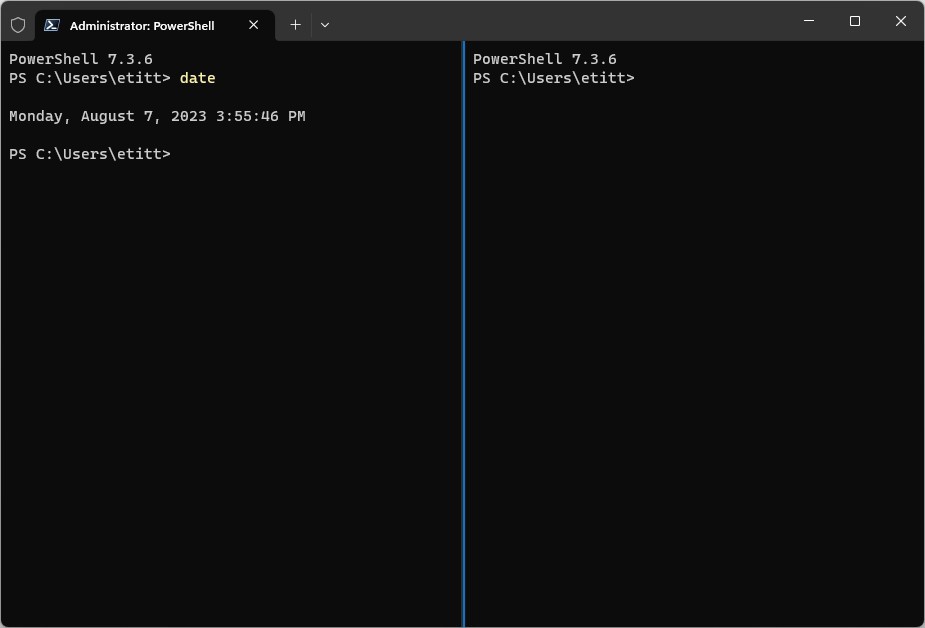
| Used with permission from Microsoft.
At this point, it’s helpful to know that Ctrl+Shift+W closes whatever open pane is the focus inside Windows Terminal. (To shift focus, Hold down the Alt key and use the arrow keys to move around; if only two tabs are open right, up and down arrows have no effect.) Note further, please, that Alt+SHIFT+Minus opens a horizontal tab to split the right-hand pane into upper and lower elements, as shown in Figure 8.
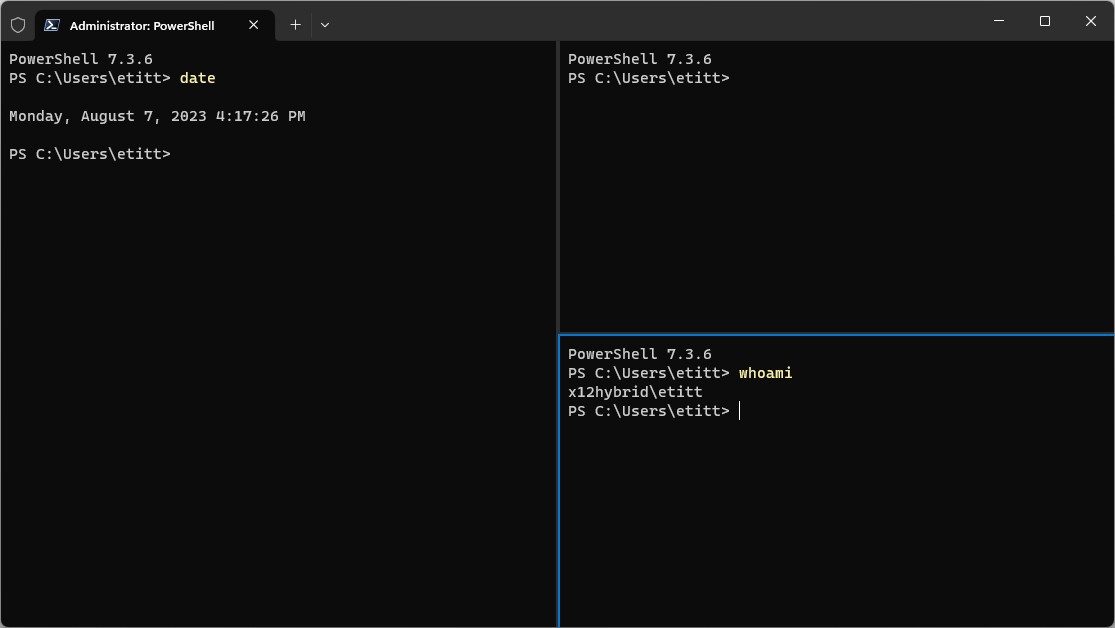
| Used with permission from Microsoft.
Another method to split panes is to hold the Alt key down while clicking the “Add tab” plus sign in the top-level “new tab” button (also denoted using a plus sign as you can see to the right of Administrator:PowerShell in Figure 8). Indeed, there are many ways to manage tabs and panes inside Windows Terminal. See the excellent Microsoft Learn tutorial Panes in Windows Terminal for many more ins and outs. This article covers a lengthy list of topics including:
- Creating a new pane
- Switching between panes
- Swapping panes
- Moving panes
- Changing split orientation
- Swapping panes (Preview)
- Moving panes (Preview)
- Changing split orientation (Preview)
- Resizing a pane
- Closing a pane
- Zooming a pane
- Marking a pane as read-only
- Customizing panes using key bindings (Note: To access the settings.json file quickly and easily, where key bindings must be stored, use the Ctrl+”comma ‘,’” key combo, then click the Open .JSON File button. Or, simply use Ctrl+Alt+Comma to have your default text editor open the default settings file directly: don’t forget to save your changes! Ctrl+Shift+Comma opens settings.json for whatever pane is currently in focus instead. It may be necessary to open and close Windows Terminal for such settings changes to “take.”)
There’s another alternative to this UI-driving approach. It relies on wt.exe, the program that calls Windows Terminal itself. Thus, for example, if you enter the string
wt -p "Windows PowerShell" ; split-pane -p "Command Prompt"
into the Run box (use WinKey+R to open), you will see a dual-pane Windows Terminal open up with PowerShell at the left and Command Prompt at the right, as shown in Figure 9.
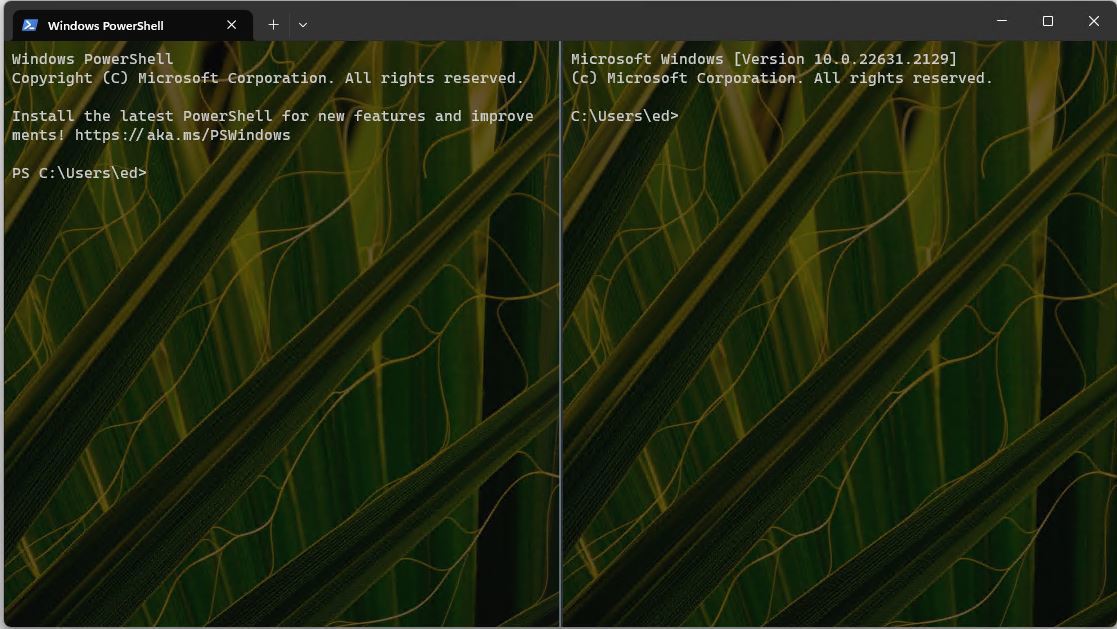
| Used with permission from Microsoft.
Learning to use the Windows Terminal command, wt.exe, is a surprisingly complex and interesting proposition. See the Microsoft Learn Documentation item Using command line arguments for Windows Terminal for lots of details, and some eye-catching examples and live demonstrations. It describes how to open new windows and panes, split panes horizontally and vertically, manage tab and pane focus, move and swap panes and, even, pass input into your default shell. Fascinating stuff!
Shortcuts for Most Windows Terminal Commands and Controls
Astute readers should recognize by now that most of Windows Terminal’s controls and settings may be accessed using keyboard shortcuts. I haven’t found a comprehensive Microsoft resource for the same, but the WebNots website has a good one entitled Keyboard Shortcuts for Windows Terminal app. For old or tired eyes (such as those belonging to your humble author), the Ctrl+Plus shortcut boosts font size, as you can see in Figure 10, which shows the default size on the left and a magnified font on the right.
| Used with permission from Microsoft.
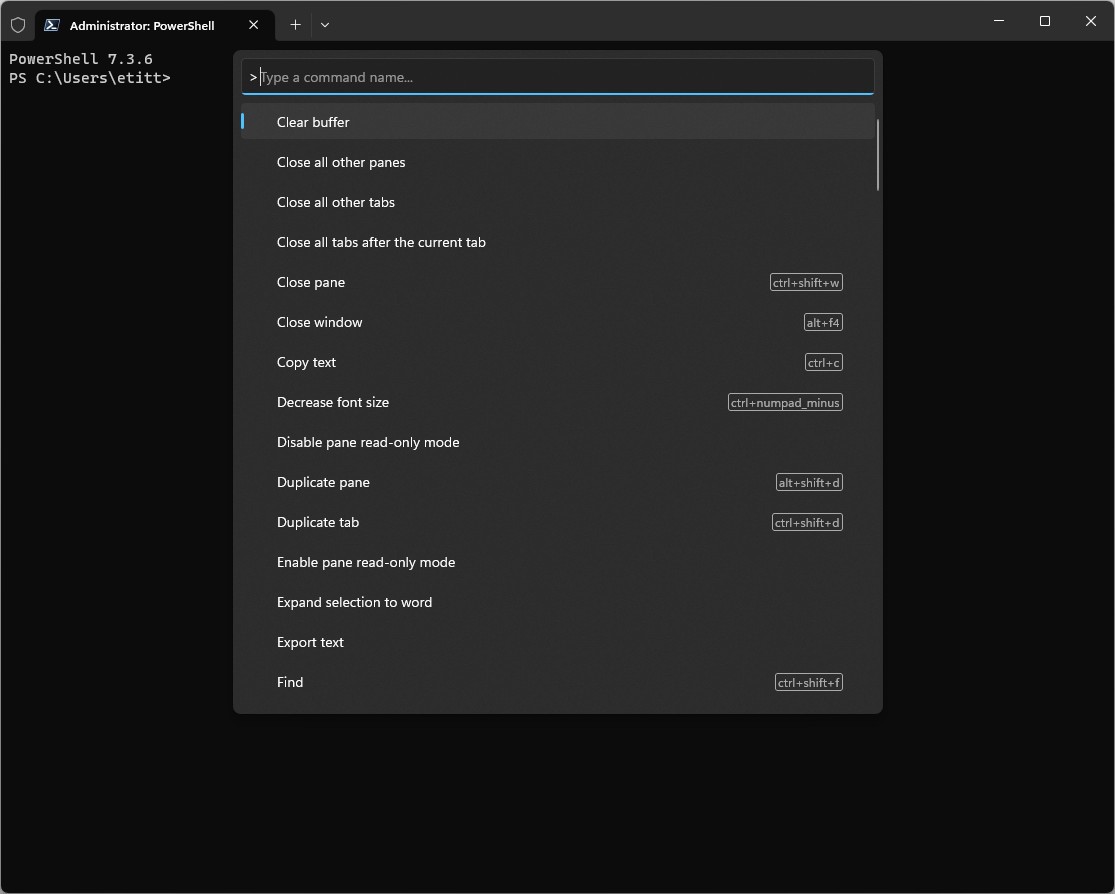
These Windows Terminal keyboard shortcuts are divided into helpful categories that include general Terminal shortcuts; Open command shortcuts; managing tabs, panes and windows; resizing Terminal app; navigation in Terminal; and using keyboard shortcuts in Terminal. Among my very favorites is the Command Palette, accessible using the Ctrl+Shift+P shortcut, as shown in Figure 11.
| Used with permission from Microsoft.
You can learn an awful lot about Windows Terminal by fooling around with Command Palette to see what it can do for (and to) your windows, panes, and more. Warning: Massive time-suck ahead!!!
Windows Terminal Themes
The technical underpinnings for Windows Terminal Themes are covered in great detail in the second article in this ongoing Windows Terminal series—namely Understanding and Using Windows Terminal Color Schemes. For the purposes of this article, it suffices simply to say that choosing and installing a Windows Terminal Theme provides the basis for the colors and text treatments that Windows Terminal uses.
To see how PowerShell uses colors, run the Get-PSReadLineOption command in a PowerShell session. You will see something like Figure 12 depending on your current default color scheme; for brevity, I start with line 26 of that output listing which starts with the word “CommandColor”.
| Used with permission from Microsoft.
This command is documented at MS Learn in the PowerShell command line reference for PSReadLine. The important colors for text appear in Example 4 in the first-linked item, associated with command line tokens as follows:
- Command: PowerShell cmdlet, program name, or compatible Windows command strings
- Number: Numeric value in a PowerShell command
- Member: Element in an array or other multi-value data item in a PowerShell command
- Operator: Mathematical, logical or text operator (e.g. +, -, =, &, …) in a PowerShell command
- Type: Data or argument type name in a PowerShell command
- Variable: Name associated with a variable known to or defined in PowerShell (often starts with $)
- Parameter: An input value for a PowerShell command
- ContinuationPrompt: A character or string that indicates additional input is needed on another line
- Default: Text style to use if unknown or not defined in any of the preceding tokens
If you look closely at Figure 12, you’ll see ANSI escape codes that define colors of the token types shown in the list. (ANSI escape codes and associated colors are also described in the second series installment, Understanding and Using Windows Terminal Color Schemes.)
The Windows Terminal Themes Gallery
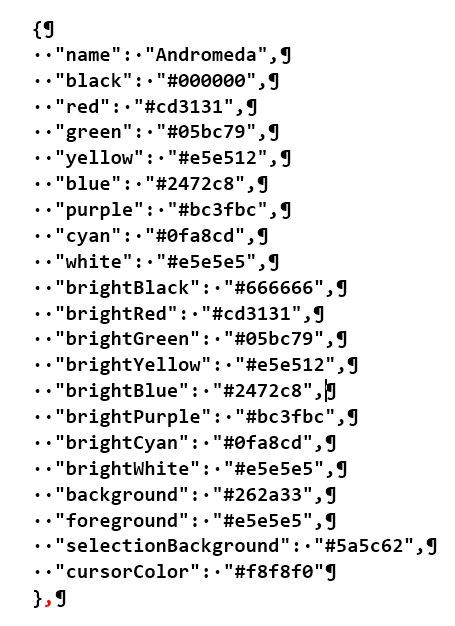
There’s no better place to go exploring Windows Terminal Themes than at the online gallery at a website named Windows Terminal Themes. If I count them correctly, there are currently 299 distinct named themes available there. These are easily installed into Windows Terminal. Look for the “schemes” section in that file. You can use the “Get theme” button on any theme page to add its contents to the Clipboard. Then you can paste its contents into the “schemes” section in your settings.json file; don’t put it in last position. Also, you need only add a comma after the closing curly brace (in red in Figure 13) to make it legal in the settings.json file.
| Used with permission from Microsoft.
As long as you save the change to settings.json, and then close and re-open Terminal, you should see the new theme name (Andromeda, in this case). You can see it selected in Settings > Defaults > Appearance > Color scheme in Figure 14. (Note the color bar to the left of the scheme name: this shows the eight regular colors on top and their bright variants below.)

| Used with permission from Microsoft.
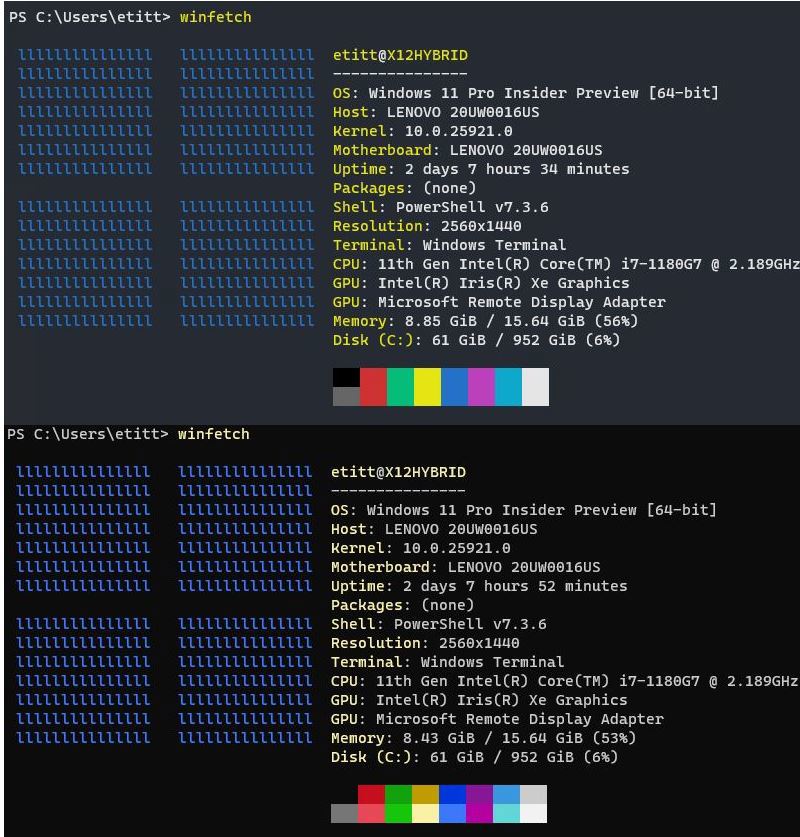
The GitHub utility winfetch shows the impact of the Andromeda scheme (top), which I place above the Campbell default in Figure 15 (bottom). You can see the color and output changes pretty well, if you look at the Windows 11 “character logo” different blues, the base output text (lighter vs. darker grey), and the color bar, especially the greens, yellows, blues (columns 5 & 7), purples and whites (last column).
| Used with permission from Microsoft.
The theme associated with a given Windows color scheme usually appears in its name (for example, “Solarized Dark” vs. “Solarized Light,” “Tango Dark” vs. “Tango Light,” and so forth). Basically, a dark designation means a dark background against which light-colored text appears. In deliberate contrast, a light designation means dark text against a light background. Windows users readily understand the difference between dark and light desktop themes: those same distinctions apply within Windows Terminal to light and dark variants on themes as well.
Customization Is Its Own Reward
The ways in which you can alter Windows Terminal’s look and feel are almost infinite in their variety. I’ve been working closely with this environment for more than two years on a daily basis, and still learn something new and interesting every time I dig in more deeply. In the remaining articles that follow in this series, I hope you’ll see what I mean.

Ed Tittel
Ed Tittel is a long-time computing industry writer, consultant, and occasional expert witness. He’s the author of over 100 computer trade books, countless articles, and other stuff. For more info, please visit https://edtittel.com.