Creating an Effective Microsoft 365 Copilot Plugin: A Comprehensive Guide

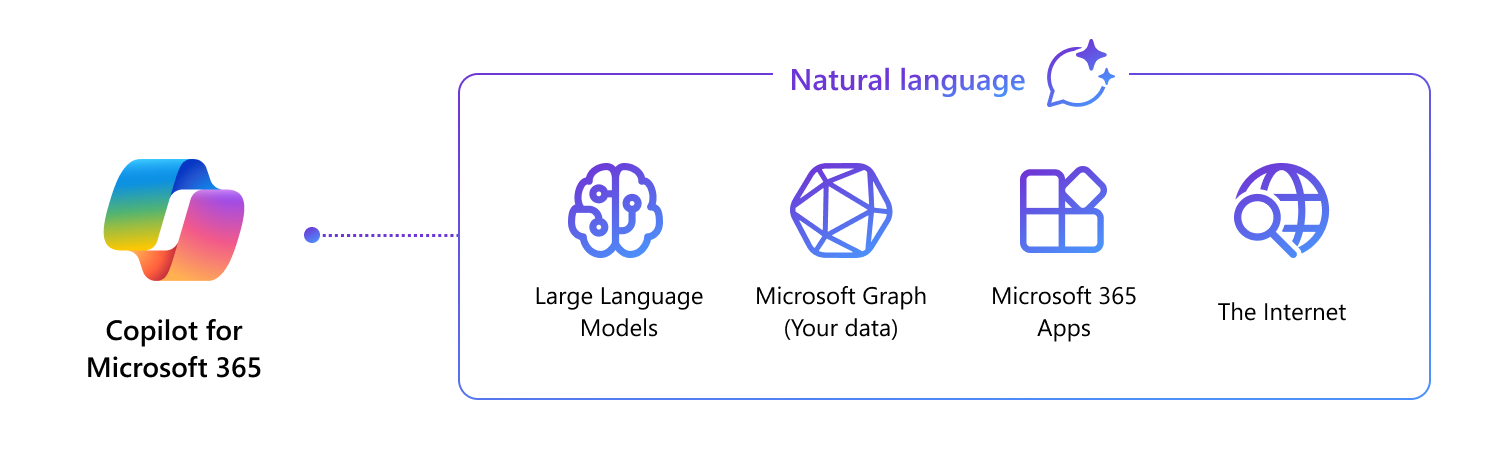
In the era of artificial intelligence and automation, the development of effective plugins for Microsoft 365 Copilot represents a significant leap in enhancing workplace productivity and efficiency. Microsoft 365 Copilot, an AI-powered assistant, leverages the power of large language models to offer advanced capabilities in understanding, summarizing, predicting, recalling, translating, and generating content. By extending Copilot through custom plugins and connectors, organizations can tailor this technology to fit their unique business needs, ensuring that their workforce stays ahead in an increasingly competitive landscape.
Understanding Microsoft 365 Copilot's Capabilities
Before diving into the development process, it's crucial to understand what Microsoft 365 Copilot is and what it can do. Copilot integrates seamlessly with Microsoft 365 applications, providing a range of functionalities that make everyday tasks more manageable. From drafting emails to generating reports, its AI-driven capabilities enhance user productivity significantly. Understanding these capabilities is the first step in determining how a custom plugin can complement and extend these features.
Assessing Your Plugin Requirements
The next step involves a thorough analysis of the organization's specific needs. This could be a simple task like managing calendar events more efficiently or more complex processes such as automating customer support interactions. Collecting feedback from potential users is vital in this phase, as it provides insights into the real-world challenges that the plugin can address.
Selecting the Best Extensibility Options
Depending on the identified needs, developers can choose between creating a plugin or a Microsoft Graph connector. While plugins are ideal for real-time interactions, Graph connectors are better suited for integrating and making enterprise data searchable. This decision is pivotal, as it determines the development path and the technologies that will be used.

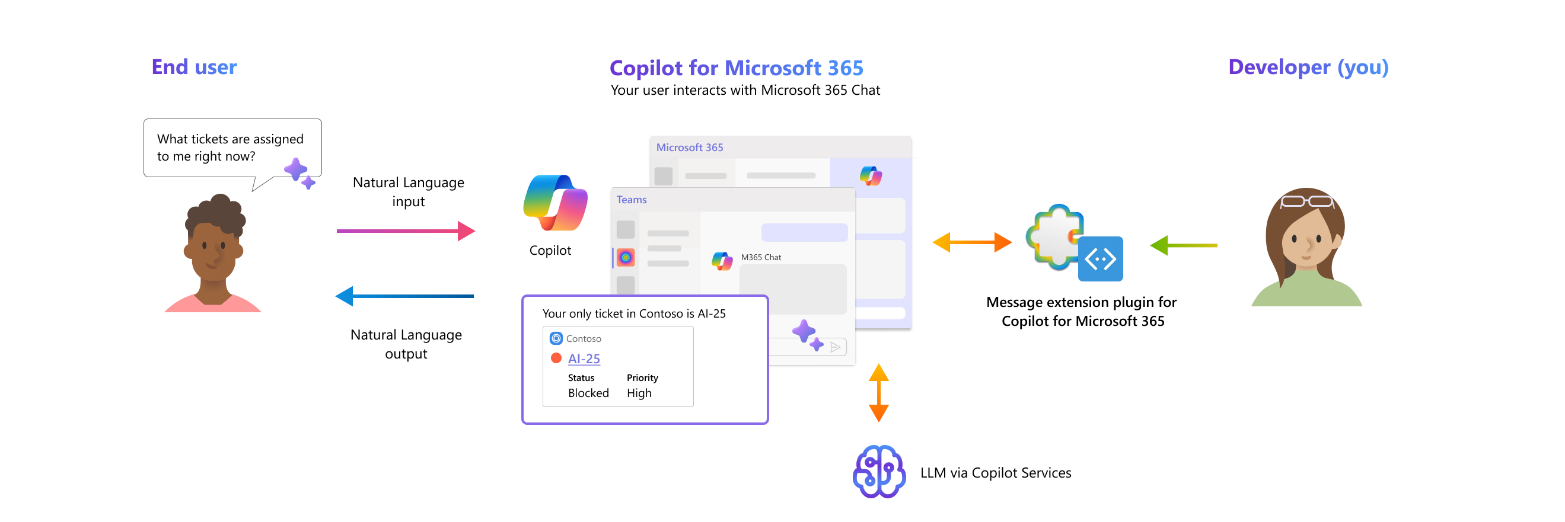
Developing a Teams Message Extension
Creating a Microsoft Teams message extension allows developers to integrate custom functionality directly into the Teams user interface, enhancing productivity and collaboration. This step-by-step guide will walk you through the process of creating a message extension using the Microsoft 365 Copilot extensibility platform.
Prerequisites
Before starting, ensure you have the following:
- A Microsoft 365 developer account and access to the Microsoft Teams admin center.
- The latest version of Node.js installed.
- The Microsoft Bot Framework Emulator for testing your bot locally.
- The Teams Toolkit extension for Visual Studio Code or command-line tools for Teams app development.
Step 1: Set Up Your Development Environment
- Install Teams Toolkit: If you're using Visual Studio Code, search for the Teams Toolkit extension in the VS Code marketplace and install it. For CLI tools, install them via npm:
npm install -g @microsoft/teamsfx-cli
- Create a New Teams App: Use the Teams Toolkit in VS Code or the CLI to create a new Teams app project. Select the "Bot" option when prompted, as message extensions are built on top of the Teams bot framework.
Step 2: Configure Your Message Extension
- Define Your Message Extension in the Manifest: Open the generated `manifest.json` file in your project. Add a `composeExtensions` section to define your message extension, including the commands it will support and the parameters those commands require.
- Implement Your Bot's Logic: In your bot's code, handle the message extension commands defined in your manifest. Use the Bot Framework's SDK to process user inputs and generate responses. Your bot will serve as the backend for the message extension, processing command requests and sending responses back to Teams.
Step 3: Register Your Bot with Microsoft Bot Framework
- Go to the Microsoft Bot Framework Portal: Register your bot to obtain a Microsoft App ID and password. These credentials are essential for your bot to communicate securely with the Teams platform.
- Update Your Project with the Bot Credentials: Add the Microsoft App ID and password to your project's `.env` file or your preferred configuration method. This step ensures your bot can authenticate with the Microsoft Bot Framework.
Step 4: Deploy Your Bot and Test Locally
- Start Your Bot Locally: Run your bot locally using the Teams Toolkit or by executing `npm start` in your project directory.
- Connect the Bot Framework Emulator: Open the Bot Framework Emulator and connect to your bot using the local endpoint URL provided by the toolkit or your npm start command.
- Test Your Message Extension in Teams: Use ngrok or a similar tool to tunnel your local development environment to the internet. Configure your Teams app manifest to use the ngrok URL and then install your app in Teams to test the message extension.
Step 5: Publish Your App
- Prepare Your App for Publication: Package your Teams app, including the updated manifest and any assets (icons, screenshots) required by the Teams app submission process.
- Submit Your App to the Teams App Store: Follow the Teams app submission process through the Teams admin center or your organization's app approval process.

Pros of Creating a Teams Message Extension:
Let’s review the benefits with creating your own Teams Message extension.
- Enhanced Collaboration: Directly integrates into Teams, facilitating real-time collaboration and communication without needing to switch contexts.
- User Engagement: Offers interactive capabilities such as action commands and search commands to engage users directly within their Teams workflow.
- Flexibility: Supports a variety of extension types, including bots, action-based commands, and search-based commands, allowing for a broad range of functionalities.
Cons of Creating a Teams Message Extension:
Let’s review the drawbacks.
- Limited Scope: Primarily focused on enhancing Teams conversations, which might not cater to broader business application needs outside of Teams.
- Dependency on Teams: The effectiveness and usage are heavily dependent on the organization's adoption and usage of Microsoft Teams.
Recommended Scenarios for Creating a Teams Message Extension:
- Real-time Collaboration Needs: Ideal for scenarios requiring immediate collaboration and communication, such as project management or customer support.
- Teams-centric Workflows: Best suited for organizations heavily reliant on Teams for day-to-day operations and looking to streamline workflows within Teams.
Create Plugins for Microsoft Business Applications
Creating plugins for Microsoft business applications can enhance the functionality of your business solutions, enabling custom integrations and features tailored to your specific needs. In this guide, we'll explore how to build plugins by focusing on three key areas: creating a custom prompt, creating a connector plugin, and creating a topic. Each of these components plays a crucial role in developing a comprehensive plugin for Microsoft business applications like Dynamics 365, Power Apps, and more.
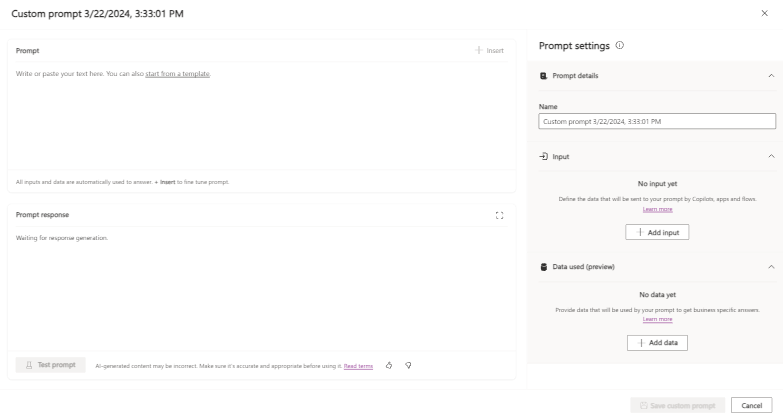
Step 1: Create a Custom Prompt (Preview)
Objective: Design a custom prompt to trigger specific actions within your plugin.
- Understand the Context: Begin by identifying the need for your custom prompt. What action do you want to trigger, and at what point in the application's workflow should it appear?
- Design the Prompt: Use the Power Apps or Dynamics 365 interface to design your prompt (figure 5). This involves specifying the text, layout, and any input fields that the prompt might require.
- Implement Logic: Write the logic that will trigger your custom prompt. This is typically done using JavaScript or C through the application's customization settings. The code will need to check for certain conditions or actions taken by the user to display the prompt.
Test: Thoroughly test the prompt in a development environment to ensure it appears at the right time and functions as expected.
Step 2: Create a Connector Plugin (Preview)
Objective: Develop a connector plugin to integrate external data sources or services with your Microsoft business application.
- Define Your Connector: Determine what external service or data source you wish to connect to and what data or functionality you want to bring into your business application.
- Use the Power Platform Connector: Leverage the Power Platform's custom connector feature. Start by navigating to the Power Platform Admin Center and selecting “Custom connectors” from the sidebar.
- Setup the Connector: Follow the wizard to define the connector's settings, including its name, authentication method, and the base URL for the API you're connecting to.
- Define Actions and Triggers: Specify the actions (data queries or commands sent to the external service) and triggers (events in the external service that should prompt actions in your business application) for your connector.
- Implement and Test: Write any necessary code for the connector's actions and triggers, then test the connector extensively to ensure it works as intended.

Step 3: Create a Topic (Preview)
Objective: Define a topic that organizes and triggers workflows or actions based on specific subjects within your application.
- Identify the Purpose of the Topic: Decide what workflows or actions the topic should trigger. This could range from customer service actions to data analysis tasks.
- Create the Topic in Power Automate: Use Power Automate to define your topic. Navigate to the Power Automate portal, and create a new flow. Select the “When a record is added or modified (preview)” trigger if you're working within Dynamics 365 or a similar trigger for other applications.
- Specify the Conditions: Define the conditions under which your topic will trigger actions. This involves setting up the necessary logic to identify when a record or event matches your topic.
- Attach Actions: Link the desired actions to your topic. This could involve sending notifications, updating records, or initiating workflows within your business application.
- Test and Refine: Test the topic thoroughly in various scenarios to ensure it triggers actions as expected. Refine your conditions and actions based on test outcomes (figure 7).

Pros of Creating Custom Plugins for Microsoft Business Applications:
Let’s review the benefits of creating custom plugins.
- Extensive Customization: Enables deep customization and extension of Microsoft business applications like Dynamics 365, Power Apps, and Power Automate, allowing organizations to tailor these applications to their specific business needs.
- Workflow Automation: Facilitates the automation of complex business processes, enhancing efficiency and productivity by reducing manual tasks and streamlining operations.
- Seamless Integration: Offers seamless integration capabilities within the suite of Microsoft business applications, ensuring consistent data flow and business logic across platforms.
Cons of Creating Custom Plugins for Microsoft Business Applications:
Let’s review the drawbacks of creating custom plugins.
- Development Complexity: Building plugins requires a solid understanding of the specific business application's API and development framework, which can steepen the learning curve.
- Maintenance Overhead: Custom plugins may require regular updates and maintenance to ensure compatibility with the latest versions of the business application, adding to the long-term overhead.
Recommended Scenarios:
- Custom Business Logic Implementation: Ideal for businesses needing to implement custom logic or processes that are not supported out of the box by Microsoft business applications.
- Advanced Integration Needs: Suitable for organizations looking to integrate their Microsoft business Applications with other internal or external systems in a deeply customized manner.
- Highly Customized Application Environments: Best for environments where the default capabilities of Microsoft business applications need to be extended or modified to meet unique business requirements.
Creating Microsoft Graph Connectors: A Step-by-Step Guide
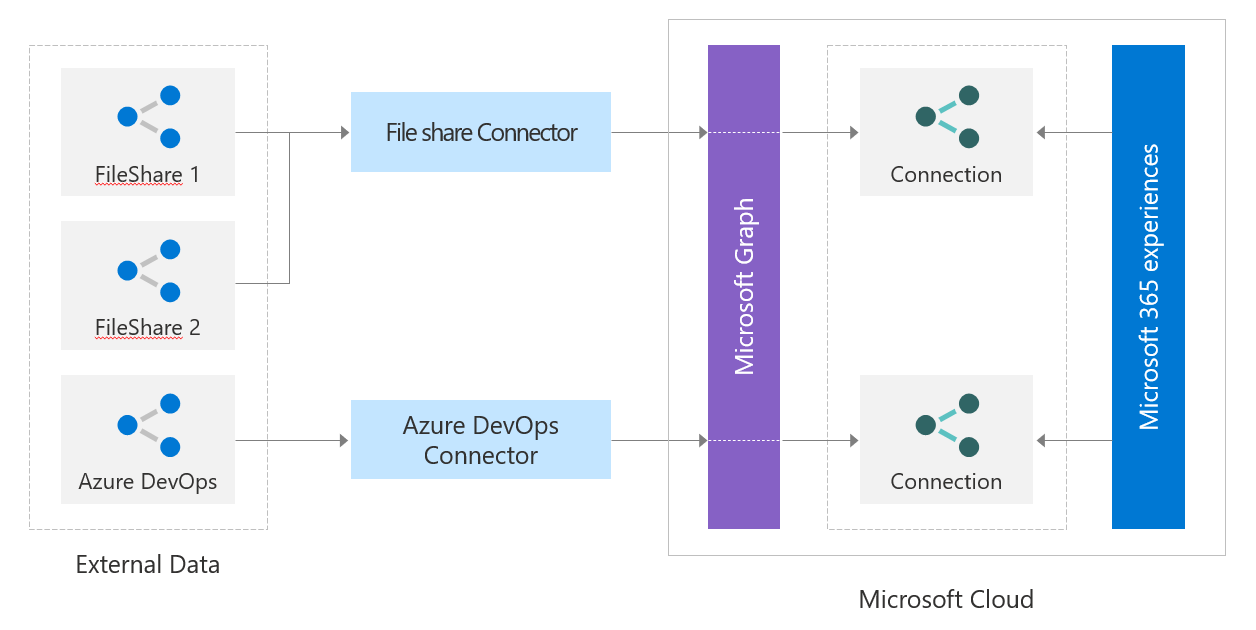
Microsoft Graph Connectors allow organizations to index third-party data so that it can be searched through Microsoft Search. This enables employees to find information across Microsoft 365 services, including SharePoint and Bing. Microsoft offers a range of out-of-the-box connectors for popular services, but also provides the flexibility to create custom connectors for bespoke or niche data sources. In this article, we'll explore how to utilize these connectors, starting with the out-of-the-box options and then moving on to creating custom connectors.
Creating Custom Microsoft Graph Connectors
When the out-of-the-box connectors don't meet your needs, you can create a custom connector. This involves using the Microsoft Graph API to index your data. Here’s a step-by-step overview of the process:
Step 1: Register Your Application
1. Azure Portal: Go to the Azure Portal and navigate to 'Azure Active Directory' > 'App registrations'.
2. Register an application: Click on 'New registration' and follow the prompts to register your application. Note the Application (client) ID and Directory (tenant) ID.
Step 2: Grant Permissions
1. API Permissions: In the app registration, go to 'API permissions' and add the permissions your application needs to read data and interact with the Microsoft Graph API.
2. Grant Admin Consent: Ensure that an administrator grants consent for the permissions.
Step 3: Create the Connector in Microsoft Graph
1. Choose a Development Language: You can use any language that can make HTTP requests to interact with the Microsoft Graph API. Microsoft provides SDKs for .NET, Java, JavaScript, and more.
2. Create a Connector: Use the Graph API to create a new connector object. You'll need to provide a name, description, and configuration details.
3. Implement Data Ingestion: Write code to push your data to the Microsoft Graph API. This will involve creating items and managing connections.
Step 4: Deploy and Test
1. Deploy Your Application: Make your application available on a server or cloud platform.
2. Test the Connection: Use the Graph Explorer or a custom client to test the connection and ensure data is being indexed correctly.
3. Monitor and Maintain: Once deployed, monitor the connector's performance and ensure its updated to accommodate any changes in the data source or Microsoft Graph API.
Pros of Creating Custom Microsoft Graph Connectors:
Let’s review the benefits of creating custom Microsoft Graph connectors.
- Unified Data Access: Microsoft Graph connectors enable organizations to connect and access data across Microsoft 365, including SharePoint, Microsoft Teams, and more, through a single unified API.
- Enhanced Insights and Productivity: By aggregating data from various sources, these connectors facilitate improved insights, search capabilities, and productivity tools within the Microsoft ecosystem.
- Simplified Integration: Provides a standardized method for accessing data across Microsoft services, simplifying the integration process and reducing the need for multiple, service-specific integrations.
Cons of Creating Custom Microsoft Graph Connectors:
Let’s review the drawbacks of creating custom Microsoft Graph connectors.
- Complex Configuration: Setting up and configuring Graph connectors to work with various data sources can be complex and may require detailed knowledge of the source systems and the Microsoft Graph API.
- Data Governance and Security: Ensuring data security and compliance with governance policies is critical when accessing and sharing data across services, which can add complexity to the deployment of Graph connectors.
Recommended Scenarios for Custom Microsoft Graph Connectors
- Data Aggregation and Search: Ideal for scenarios where there's a need to search and aggregate data from multiple Microsoft 365 services and applications, enhancing discoverability and insights.
- Cross-Platform Integrations: Suitable for organizations looking to integrate their Microsoft 365 suite with external services and databases, offering a more cohesive user experience.
- Enhancing Microsoft 365 Ecosystems: Best for businesses aiming to maximize the utility of their Microsoft 365 investments by enhancing connectivity and data flow between applications and services.
Conclusion
Developing a plugin for Microsoft 365 Copilot requires a deep understanding of the platform's capabilities, a clear identification of organizational needs, and a well thought-out development strategy. By following these steps, developers can create plugins that not only enhance the functionality of Microsoft 365 Copilot but also bring about a significant improvement in workplace productivity and efficiency. As the workplace continues to evolve, these plugins will play a crucial role in helping organizations stay agile and responsive to changing business dynamics.
This guide lays out the foundational steps for developing an effective Microsoft 365 Copilot plugin, empowering organizations to harness the power of AI in their daily operations.
References

Rubén Toribio
Rubén Toribio is a software developer with over 13 years of experience in the field, specializing in web development using Microsoft technologies such as SharePoint, .NET, and Azure. He is also Microsoft Certified: Azure Developer Associate and Microsoft Certified: SharePoint Developer, demonstrating his expertise in these areas.
Rubén has a deep understanding of SharePoint development and extensibility, building custom solutions. Throughout his career, Rubén has been involved in numerous complex projects. He is highly motivated, constantly seeking out new opportunities to learn and stay up-to-date with.
Rubén is passionate about sharing his knowledge and helping others succeed. He is an active member of the tech community, regularly participating in speaking engagements, training sessions and workshops.