Understanding and Using Windows Terminal Color Schemes

Within a Windows Terminal environment, a named set of display characteristics is called a color scheme. It can cover all or some of the command lines that run inside Windows Terminal, including Command Prompt (also known as cmd.exe), Windows PowerShell, Ubuntu Bash (via Windows Subsystem for Linux), and more. Any color scheme typically includes a name, cursor colors (that is, the cursor itself and its selection background), background and foreground colors for text, and a color palette that defines 16 or more specific colors used within a color scheme by associating names (for example, black, blue, cyan, and others) with specific color codes (usually six hexadecimal digits, of the form “#0C0C0C” for black as an example).
Check Out the Other Windows Terminal Articles
This is the second article in a series of topics on Windows Terminal. The first is an overview of Windows Terminal. The remaining articles in the series will cover the following subjects:
- Using Text, Tabs, Panes, and Themes in Windows Terminal: Explains how to inspect, set, and change text and background colors in Windows Terminal, how to split the display into horizontal and vertical panes, and more.
- Using OhMyPosh to Customize the Windows Terminal Prompt: Discusses Jan de Dobbeleer’s outstanding OhMyPosh add-in for PowerShell. OhMyPosh uses nerd fonts to provide extraordinary and interesting visual effects at the command line, including nearly five dozen themes, each with its own color scheme and output style.
- Creating and Sharing Windows Terminal Profiles Across PCs: Explains how you can synchronize and maintain the same look, feel, and capabilities for Windows Terminal across multiple physical or virtual PCs.
Exploring the Default Windows Terminal Color Scheme
By default, a color scheme named “Campbell” applies to Windows Terminal. It’s defined in the schemes array in Windows Terminal’s settings.json file. The Color Schemes documentation at Microsoft Learn presents the color scheme in a more organized way. If you examine the actual file, however, these items are arranged in purely alphabetical order. This is how the Customize Settings tutorial presents the Campbell color scheme (reproduced verbatim):
{
    "name" : "Campbell",
   "cursorColor": "#FFFFFF",
   "selectionBackground": "#FFFFFF",
   "background" : "#0C0C0C",
   "foreground" : "#CCCCCC",
   "black" : "#0C0C0C",
    "blue" : "#0037DA",
    "cyan" : "#3A96DD",
   "green" : "#13A10E",
   "purple" : "#881798",
    "red" : "#C50F1F",
   "white" : "#CCCCCC",
   "yellow" : "#C19C00",
   "brightBlack" : "#767676",
   "brightBlue" : "#3B78FF",
   "brightCyan" : "#61D6D6",
   "brightGreen" : "#16C60C",
   "brightPurple" : "#B4009E",
   "brightRed" : "#E74856",
   "brightWhite" : "#F2F2F2",
   "brightYellow" : "#F9F1A5"
},
The information in the color scheme is surprisingly straightforward, especially as laid out above. It names the color scheme, defines the cursor and selection background colors, background and foreground colors, and then associates red, green, blue (RGB) color codes with the 16 named colors shown. Of those 16 named colors, 8 are in the primary spectrum, and another 8 serve as “bright” variants of that spectrum.
Color scheme selection in Windows Terminal is simple, if fairly limited. Figure 1 shows all nine of the color schemes built into Windows Terminal by default, of which Campbell (with the blue vertical line at top left) is the one selected, also by default.
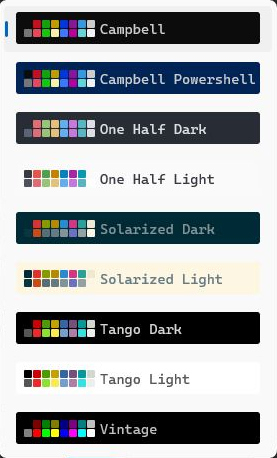
| Used with permission from Microsoft.
Each color scheme shows a color bar to the left of its name. The first eight colors in the top row correspond to the primary colors from the preceding schemes array in settings.json. The next eight colors in the bottom row correspond to their bright variants. These can be a little hard to see well, so let’s use a software tool to show what a color scheme looks like in a little more detail. This is called winfetch and is covered in the next section.
Introducing Winfetch
Obtaining and using winfetch is incredibly easy. Just visit its GitHub project page, where you’ll find detailed installation instructions (and lots of other documentation). Interestingly, as I was researching this article, I was able to use winget install winfetch to install the program on some of my PCs; later on, this request produced a “package not found” error. It’s still worth a try. If it doesn’t work when you try it, the command Install-Script winfetch works inside PowerShell with equal ease. As you can see in Figure 2, this does require some grants of permission (one for script installations, another for repository access) on at least some Windows PCs.

| Used with permission from Microsoft.
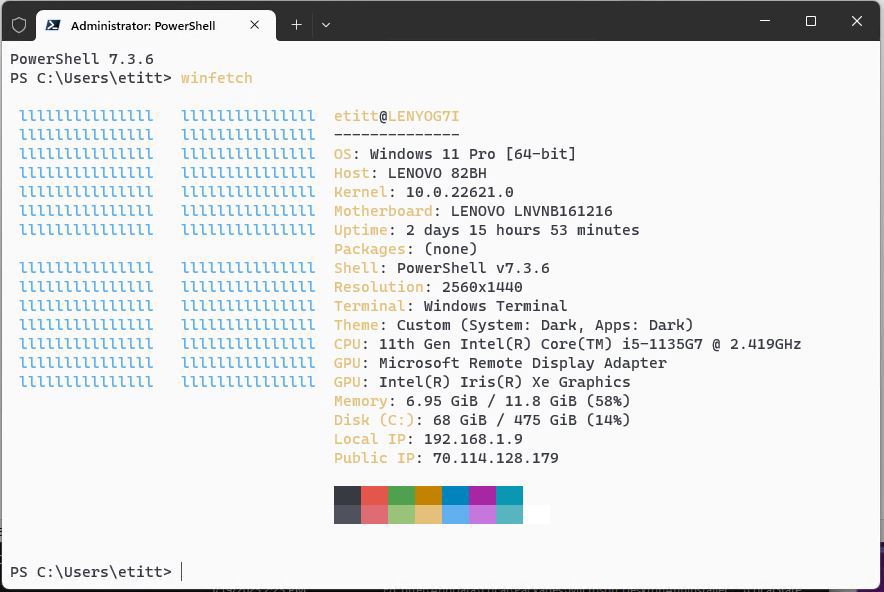
When you subsequently run winfetch in PowerShell (or another command line), it shows its real value. As you can see in Figure 3, it provides a variety of information about its host PC. It also shows various text treatments from the default color scheme. And do please notice the color bar item at the bottom of its display, which shows the 16 colors defined in the schemes array spelled out in the preceding section of this article.
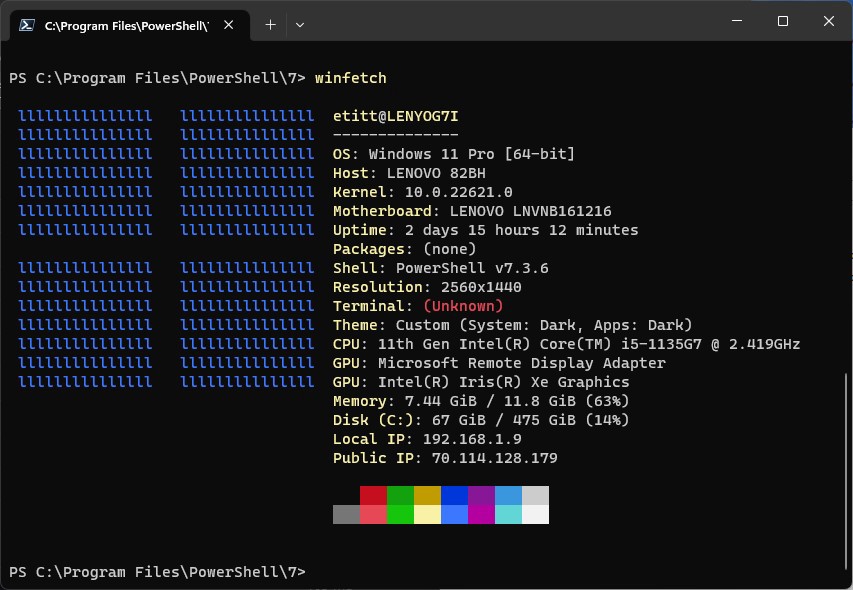
| Used with permission from Microsoft.
Winfetch provides various details about the host operating system (Windows 11 Pro 64-bit, in Figure 3). It also provides the host name, identifies the OS kernel, motherboard and more. It shows various text treatments based on the color scheme and includes all 16 colors from the Campbell color scheme, with the primary colors on the top row and their bright variants beneath. Figure 4 shows the same thing for Windows 10.
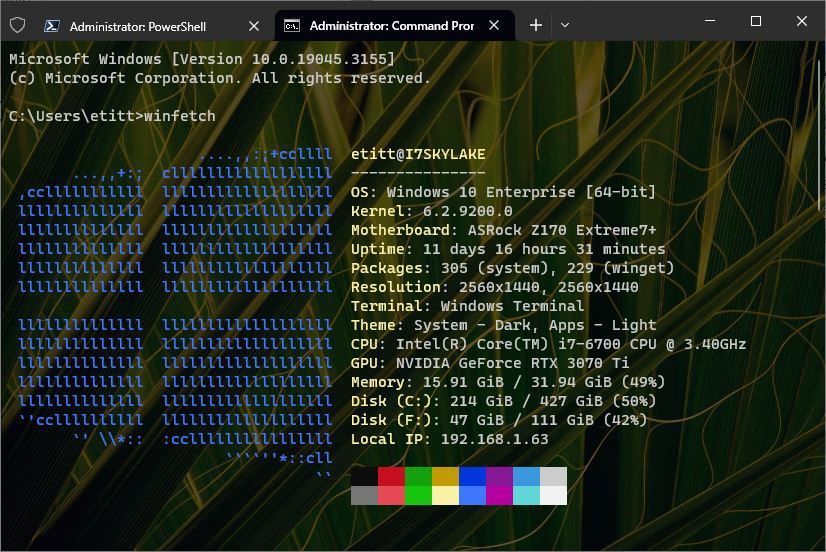
There are a few things to notice about these two preceding figures. First, the character map on the left is a character-based “OS logo” of sorts. (Windows 10 uses various characters and is less rectilinear; Windows 11 uses only the lower-case “l” character and uses four “perfect squares” that are 13 characters wide and 7 lines deep.) Notice further that Terminal shows in Figure 3 in red text as “Unknown” on Windows 11, but as Windows Terminal on Windows 10.
As I worked on this article, the Microsoft PowerShell team fixed this, and it now shows Windows Terminal as well. I had just updated PowerShell to a new version—namely, 7.3.6—as I was writing, and it seems to have thrown off Windows Terminal detection in Windows 11, though only briefly.
Because I have Chocolatey (another package manager) installed on the Windows 10 PC but not on the Windows 11 PC, the former shows two package counts (one for system, the other for winget), while the latter shows no package count at all. All these differences hint at the wealth of configuration options one can use with winfetch. That’s a pretty deep subject you’ll find covered well in the GitHub documentation under the Configuration heading. For this article, we just care about how the text and color bar look, as evidence of the color scheme in use. I’ll go into much greater detail in my next planned Window Terminal article, which is devoted to customizing how it handles appearance for text, themes, background, and a whole lot more.
Changing Color Schemes in Windows Terminal
This is a matter of working with the items shown in Figure 1 (the predefined color schemes included with Windows Terminal). It may also involve other items if you add new definitions to that collection (covered in the next section of this article). For now, let’s switch from Campbell to something else. Click through these selections inside Windows Terminal.
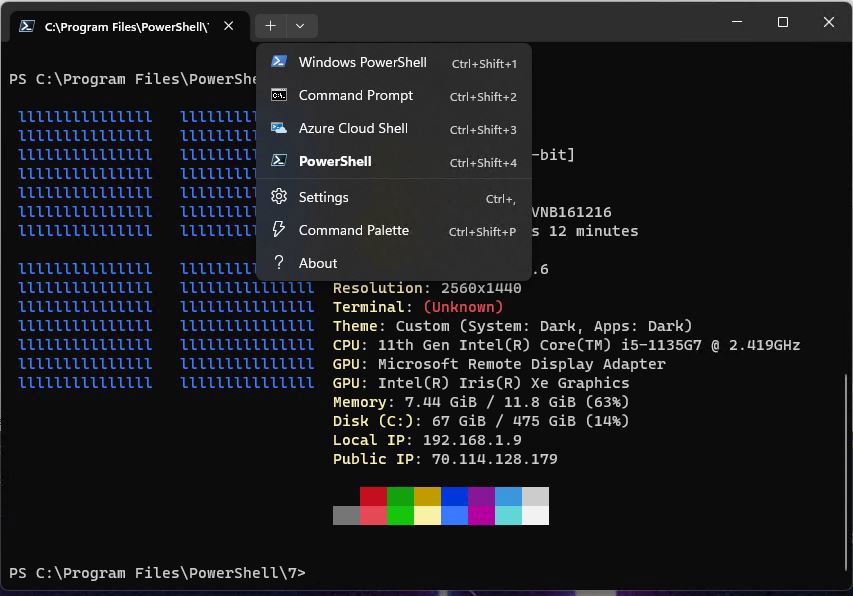
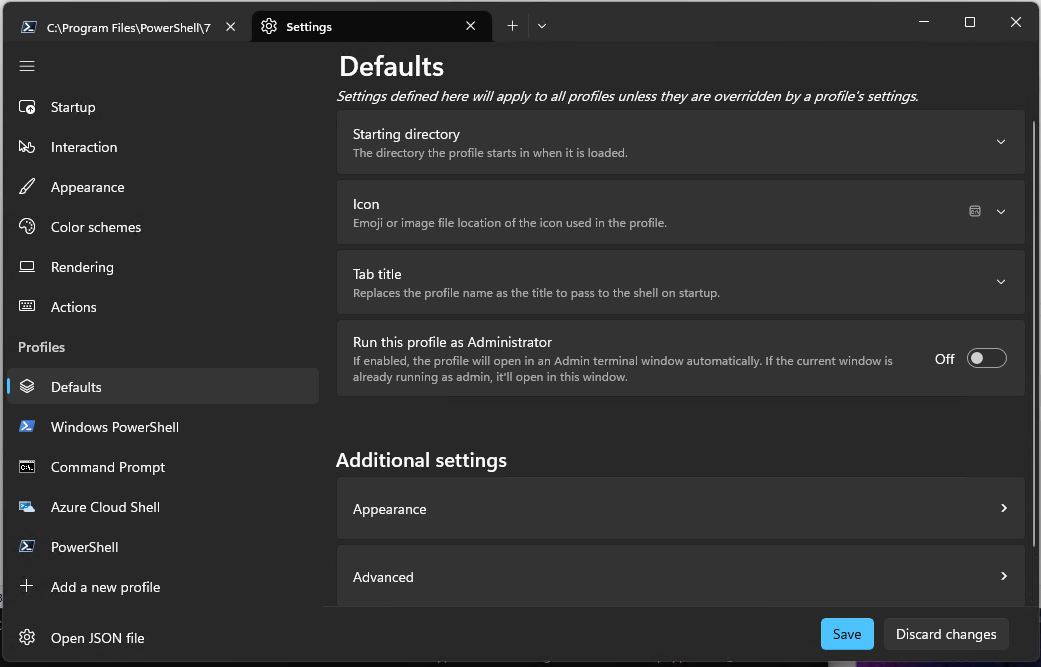
Click the down-caret in the menu bar, and then select Settings from the pop-up menu, as shown in Figure 5.
When the Settings page opens in a new pane, go to Profiles in the left-hand column. Under Profiles, select Defaults, as shown in Figure 6.
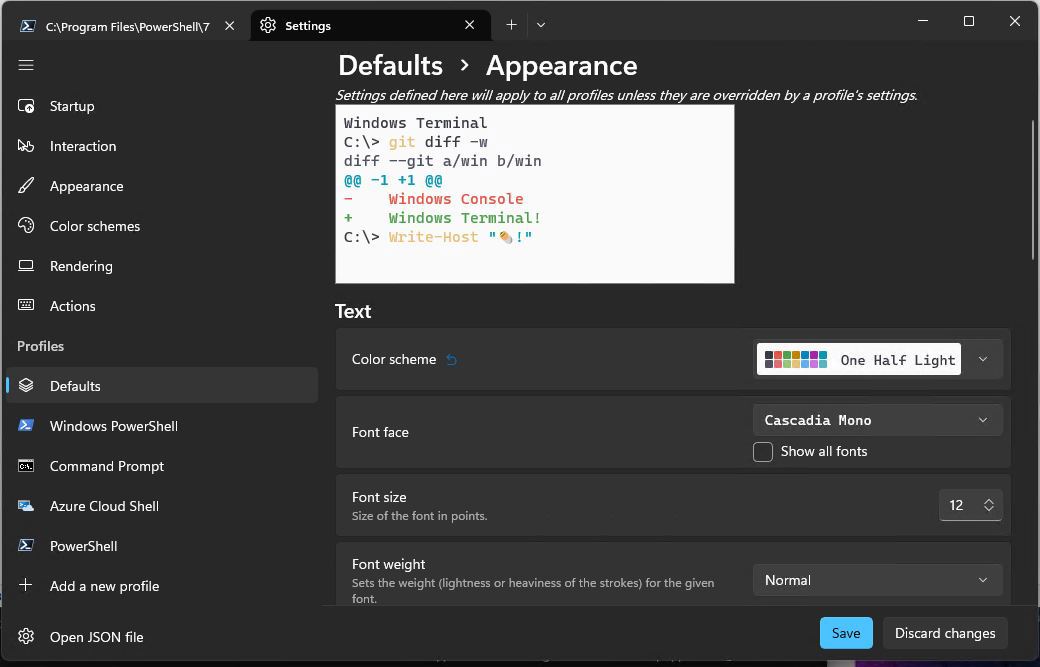
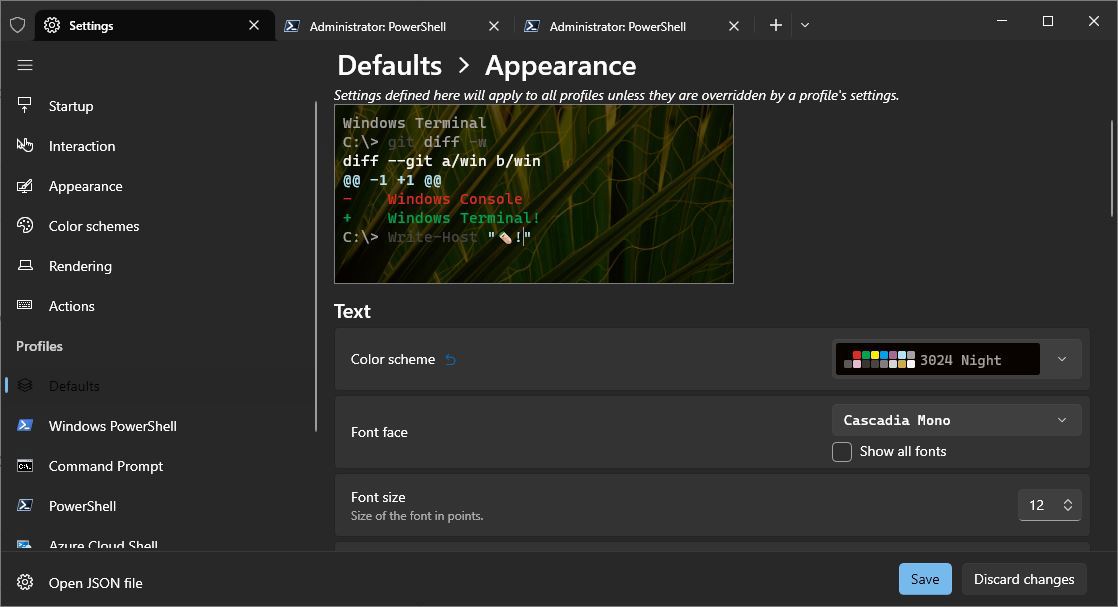
Underneath Additional settings, click the right-caret at the right-hand side of Appearance. You’ll see the various text treatments and the color scheme currently selected, as shown in Figure 7.

To the right of Color scheme, click the down-caret to see the same list that appeared in Figure 1. Choose the item named One Half Light, and then select Save at the bottom of the pane. Figure 8 shows what this looks like.
When you open a new PowerShell window, run winfetch again. It will show you something quite different from Figure 3 (Windows 11) or Figure 4 (Windows 10). That’s what you see in Figure 9.
I can’t say that I much care for this color scheme (the highlight text in the mustard yellow color is hard to read), but the color palette in the color bar is pretty nice. You can mess around with the other options in the dropdown list shown back in Figure 1 to see if you like any of the others. For this article, I’m reverting to the Campbell default. I must confess, I also prefer white text on a black background to the other way around.
What makes winfetch helpful for trying out new Windows selections is that it gives you a consistent, soon-familiar display where you can quickly and easily observe the look and feel of a new color scheme after making it the default, as described in the preceding steps. Don’t be shy about reverting to Campbell if you don’t like what you see. There are plenty of other options out there, as I will soon explain.
Exploring the Range of Windows Terminal Color Schemes
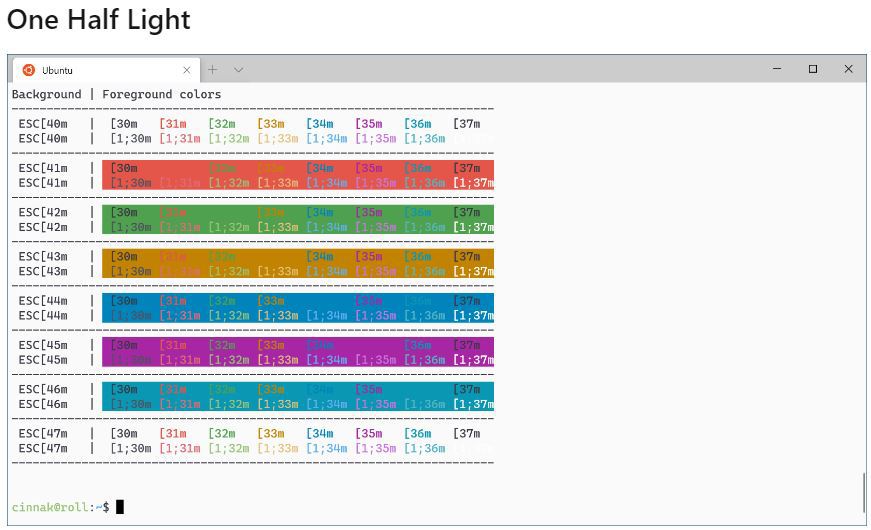
Fortunately, all the built-in color schemes are depicted in the Windows Terminal Customize Settings documentation, under the heading Included color schemes. There, you’ll see output from a tool named—prosaically enough—ColorTool.exe. (Read more about it in this August 2017 MS Developer blog post.) This tool shows the color palette for background and foreground colors pretty comprehensively. Figure 10 depicts a sample for the One Half Light color scheme shown in Figure 9 as output from ColorTool when chosen as the default color scheme. Don’t ask me why this output comes from the Ubuntu bash shell: I don’t know, either.
There are at least several other online galleries for Windows Terminal color schemes available online. The Microsoft Learn Custom Terminal guide includes several, starting with the Frosted Glass heading, but also Raspberry Ubuntu and Retro Command. You’ll find hundreds of color schemes (as part of more comprehensive Windows Terminal themes) at the Windows Terminal Themes website. (Hint: Select the Colours tab at upper right to see a ColorTool display for each theme as you flip through them.)
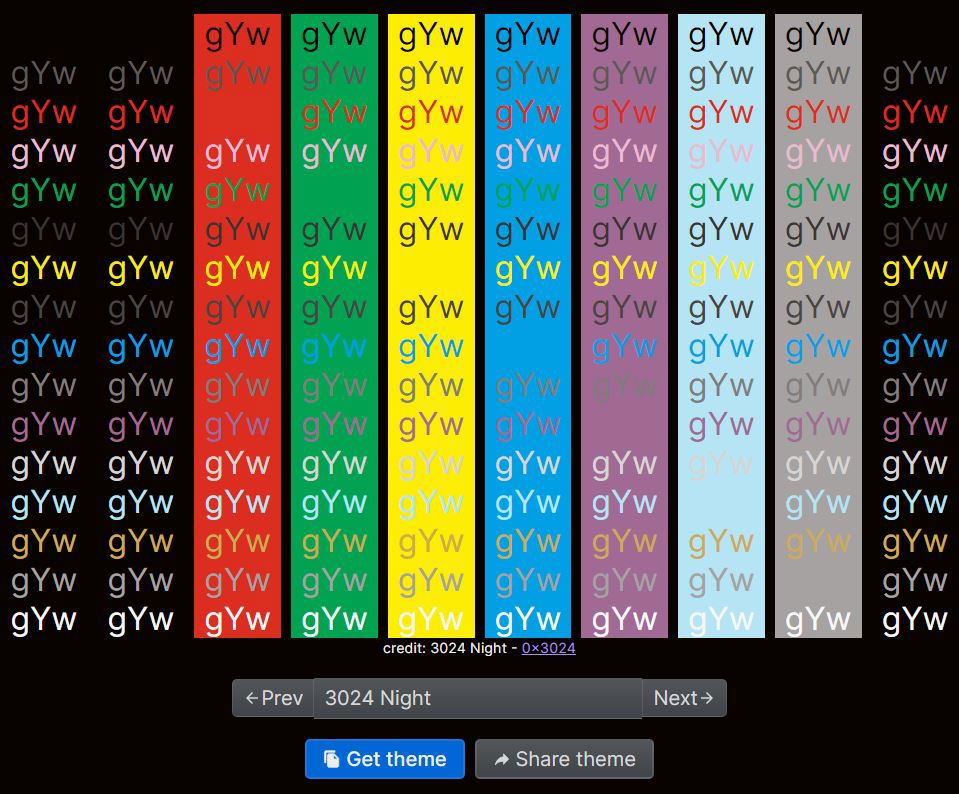
The Get theme button at lower left produces a text file containing JSON markup for a Windows Color scheme. Also, these files can be converted into .ini format versions fairly easily. Just convert the hex strings therein into three decimal values; each two-digit element from left to right converts into a corresponding decimal number in the comma-separated strings. I performed this conversion for the 3024 Night color scheme, which appears at the top of Figure 11’s .\colortool -s output.
Overall, it’s easiest to cut and paste the contents from this site’s Get theme button right into your settings.json file, inside the schemes array. (Be sure to add a comma after the preceding close curly brace character “}” to make it parse correctly.) Figure 12 shows the complete ColorTool output for the 3024 Night color scheme immediately thereafter.

OK, Then: ColorTool Comes Into Play
As you can see from Figure 12, the GitHub ColorTool project provides a way to show color details about the current color scheme in use inside Windows Terminal. It also provides a variety of other displays and capabilities, and a way to change default (and command shell–specific) color schemes inside Windows Terminal. Microsoft uses this in its own documentation, so it’s obviously helpful for depicting color scheme details.
Note: The “gYw” string that appears in each column cell stands for green yellow white and is meant to show what type looks like with specific combinations of foreground (text) and background colors. If you can’t see a text string, that usually means it’s the same color as the background (not missing).
ColorTool is both easier and harder to install and use than winfetch. One need only download and unpack the ZIP file into a folder to make ColorTool.exe available for use. It sets up a subsidiary schemes directory where it stores all the color schemes it can access. If you create or download a new scheme, cut and paste it into the schemes array in settings.json, and copy it into ColorTool’s schemes directory. That way it shows up in Settings > Profiles > Defaults > Appearance > Color scheme but is also available to ColorTool. It’s a bit of a pain, but one worth bearing, for the added review and color scheme capabilities it affords. Figure 13 shows the Color scheme picker inside Windows Terminal after I added 3024 Night into the settings.json file, saved it, and then closed and re-opened Windows Terminal into a PowerShell session.
Creating a Color Scheme of Your Own
My advice: grab the download from the Windows Terminal Themes site for some theme that’s close to the color scheme that you want to build. Next, use the Get theme button to save its JSON markup from there. You can paste it into settings.json and transform it into an .ini file to make it available to ColorTool.
Or, get to know the iTerm2-Color-Scheme GitHub tool, and use it to grab definitions and create your own customized .itermcolors files (and corresponding JSON markup for cut and paste into settings.json). It’s an interesting row to hoe, but one you can work your way through given some time, thought, and energy. Personally, I was perfectly fine with using the JSON markup from Windows Terminal Themes. It’s your Windows PC (or PCs, or even fleet): you can do what you think best. But the possibilities, as the old saying goes, are endless. Surely there’s a color scheme calling your name out there or waiting for you to craft it yourself. Time to get cracking!

Ed Tittel
Ed Tittel is a long-time computing industry writer, consultant, and occasional expert witness. He’s the author of over 100 computer trade books, countless articles, and other stuff. For more info, please visit https://edtittel.com.