Introduction to Power Platform Connectors

As digital transformation accelerates throughout organizations of all sizes, the ability to integrate, automate, and optimize critical business processes has become more important than ever. Microsoft Power Platform has emerged as an exceptionally powerful suite for achieving these objectives. Power Platform is a comprehensive set of applications, services, and connectors that offers a unified, low-code platform for building end-to-end business solutions. It is comprised of four main components – Power BI, Power Apps, Power Automate, and Power Virtual Agents, each designed to fulfill specific business needs.
Power Platform was designed from the ground up to integrate with other cloud applications like Office 365, Dynamics 365, and Azure, as well as a wide range of third-party apps and other software-as-a-service (SaaS) platforms. Its low-code approach empowers users of all skill levels to create, deploy, and manage sophisticated business applications.
In this series, we will take a deep dive into the extensibility features of Power Platform connectors, providing an end-to-end guide on how to create, deploy, manage, maintain, and publish your own custom connectors.
Overview
There are two types of custom connectors in the Power Platform ecosystem – one that provides Power BI extensibility to external data sources, and another that expands the capabilities of Power Automate, Power Apps, Power Virtual Agents, and Azure Logic Apps beyond that which is available by default. In this series, we will be exploring the latter type of connector and will simply refer to them as “connectors” or “custom connectors” with the assumption that we are referring to Power Automate, Power Apps, Power Virtual Agents, and Azure Logic Apps. For information on connectors for Power BI, visit the official Microsoft documentation at https://learn.microsoft.com/en-us/power-bi/connect-data/desktop-connector-extensibility.
Most people learn best by consuming small chunks of information, implementing that knowledge, then expanding into more advanced concepts once we have established a firm foundation. Therefore, the topic of custom connectors will be broken down into a series of ten articles, each one building on the previous entry. They will move from basic to more advanced topics as the series progresses. This will make it easy for novices to start from the beginning and build their knowledge base, while those with a solid grasp of the fundamentals can skip ahead to the topics that interest them.
The general outline of the series is as follows:
- Introduction and Overview (this article)
- Connector Fundamentals
- Basic Building Blocks: Security, Actions, Requests, and Responses
- Advanced Capabilities: Triggers, References, and Policies
- Finishing Touches: Customization and Extensibility
- Staying In Control: Versioning and Change Management
- The Big Picture: Performance, Hosting, and Scalability
- Making It Official: Publishing, Certification, and Deployment
- Going All In: Commercialization and Monetization
- Lessons Learned: Tips, Tricks, and Advanced Techniques
Background
Before delving into the specifics of how connectors function, it is important to establish a baseline understanding of what connectors are, what they do, and what problems they solve. In the broadest sense, connectors are like bridges, linking different applications and services together to facilitate the exchange and transformation of data. They serve as the translators, speaking the language of each system, and ensuring a seamless flow of information across various platforms.
Connectors play a crucial role in the exchange of data between internal and external systems. Businesses often use many applications and services, each generating and processing its own data. Without connectors, this data remains isolated within the respective application or service, making it difficult to automate processes across multiple platforms. Connectors bridge this gap, enabling these disparate systems to talk to each other, share data, and synchronize actions.
View Full Size
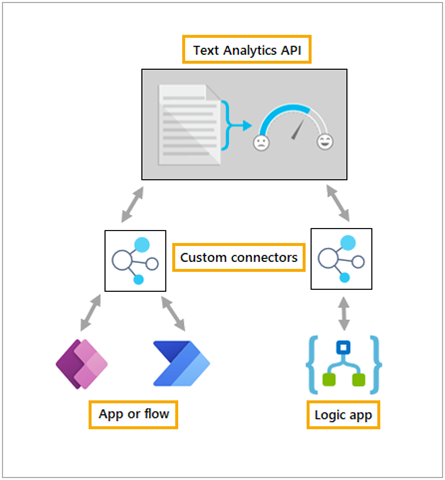
In the context of Power Platform, connectors expand the capabilities of Power Apps, Power Automate, Power Virtual Agents, and Azure Logic Apps by enabling them to communicate and interact with a wide array of other software applications, be they part of the Microsoft ecosystem, like Azure and Dynamics 365, or external services like Salesforce, Google, ServiceNow, and many more. The core value of Power Platform connectors lies in their ability to support streamlined, automated workflows, and richer, more comprehensive apps, without the need for complex code. This opens endless possibilities, even for users without a background in programming, to craft custom solutions that cater to their unique business requirements.
Functionality
A connector establishes a communication mechanism between Power Platform and a remote system. It provides a set of endpoints, also known as paths, which enable the exchange of data between the two systems. These actions are exposed as configurable elements within the user interface. In the case of Power Automate, this results in actions that the user can configure via familiar form elements like text boxes, drop down selections, checkboxes, and the like. In Power Apps, they are surfaced as dotted-notation expressions that can be associated with form elements and rules, similar to how a form field value is referred from another field in the app (for example, Form1.TextBox1.value).
When an action or expression associated with a connector is executed, the Power Platform infrastructure issues a web request to the associated endpoint, passing the user-supplied data to the remote system in a format that system expects. Organizations that host such systems are typically referred to as Application Programming Interface (API) Providers and the endpoints they expose for external communications are known simply as APIs. When the remote system receives an API request from Power Platform, it replies with a response, which is either the requested data or a message indicating why the request could not be processed.
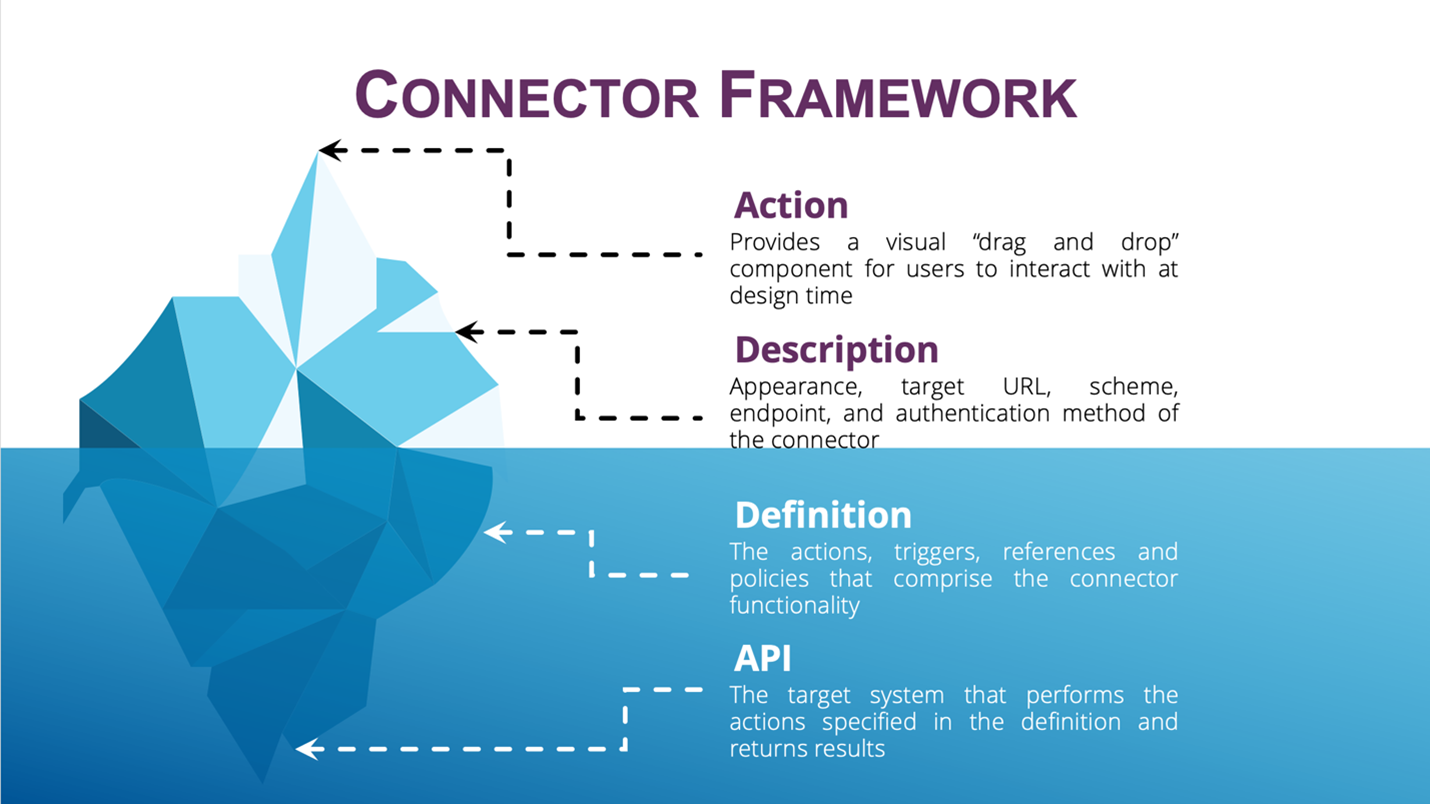
The response follows a pre-determined formatting convention that the connector describes, so that Power Platform knows how to process it. The data or message in the response is then relayed to the flow or app for use in other actions, display in a screen element, or some other operation as the maker determines. The underlying structure for the entire process, from determining what web address the request is sent to, what authorization mechanism is required, what kind of request is needed, and how the request/response messages are formatted, is all determined by the connector definition.
This mechanism provides a great deal of flexibility in extending Power Platform to meet a wide range of business requirements. By obscuring the technical details of how the remote system communication functions within the connector definition, end users are not burdened with the complexities of constructing raw HTTP requests and parsing response objects. Highly complex operations can be surfaced as a few simple inputs and outputs. This drastically reduces the learning curve and makes it much easier for even casual users to build advanced solutions. Connectors are portable, working equally well in Power Automate, Power Apps, and Azure Logic apps without modification. They are also standardized, deriving their base configuration from the widely adopted Open API specifications that most API providers support.
Benefits
Connectors expose a vast array of capabilities and enable a single platform to serve as the hub for data exchange across a multitude of systems. In fact, every user who has built a flow that sends an email via Outlook, retrieves data from a SharePoint list, creates a message in Teams, or inserts a record into a table in Dataverse is already using Power Platform connectors. All these experiences, along with over 1,000 more available in the Power Platform gallery (https://learn.microsoft.com/en-us/connectors/connector-reference/), are made possible via the connector framework. There are many familiar names that have published connectors for Power Platform, including Adobe, DocuSign, Twilio, Salesforce, Box, Cisco, and more.
Perhaps the most tangible and easily recognizable benefit of connectors is the flexibility they provide in designing business solutions. Makers, the users who construct flows and apps in Power Platforms, are not constrained to out-of-the-box features or actions made available only by Microsoft and certified connector publishers. Neither are they dependent upon developers for custom “Pro Code” components that may take weeks or even months to create. There are many connectors created by independent publishers that provide integration with popular sites like AccuWeather, Discord, Etsy, GIPHY, GitHub, the U.S. National Parks Service, Quickbase, and more. Most SaaS platforms offer API extensibility that follows the Open API specification for simple inclusion in a custom connector and REST-based web services are available for many on-premises software applications. There is no practical limit to the number and type of data sources that can be included in a business solution that leverages the Power Platform connector framework.
Another highly desirable benefit of connectors is the ability to create solutions that meet a very specific need, satisfy a niche market, or fit a tightly defined use case. Most automation platforms are designed to service the most common needs of the average user or operate only within the platform upon which they are hosted. This is understandable from a commercial perspective, but it limits the possibilities for customers whose requirements don’t fit within those constraints. Connectors facilitate even the narrowest of use cases by allowing users to create their own extensibility points to interface with private, highly secured, industry-specific, and custom applications.
Connectors can also help to reduce the cost of building complex business solutions, especially when there are many makers in an organization with varying levels of technical ability. Whereas some individuals may be comfortable crafting HTTP POST operations, headers, query string arguments, and JSON objects, most business users have skill sets that lie elsewhere and simply need to solve a problem as quickly and efficiently as possible. Approaching an overburdened IT department for help from developers is often the antithesis of quick and efficient, whereas bringing in outside technical resources can be quite costly. Connectors are the ideal solution to this dilemma. They provide an easily configurable, drag and drop experience for makers. They also extend out-of-the-box capabilities by using standardized methods that do not require professional code. It may look that way to the uninitiated. As you will discover in this series, however, anyone with a bit of patience and foundational knowledge can create a custom connector. No programming skills are required.
Security
The primary concern when connecting two disparate systems is to ensure that the exchange of data is secure (or, at least, as secure as possible given the operating parameters and limitations). There are many recognized and widely adopted standards for secure data exchange on the web. Those most commonly in use by API providers, and thus most applicable to the connector framework, are OAuth and API Keys. I will delve into the mechanics of how these work in part three of this series. It’s important, however, to understand the high-level concepts of how connectors are secured, before embarking on the journey to build a custom connector from scratch.
Within Power Platform, the security aspects of a connector are exposed in the user interface as connections. This terminology can be confusing. and the way that the security mechanisms are implemented is often less than desirable. To begin with, each connector defines how Power Platform will authorize requests to the target system. Multiple actions associated with different connectors can exist within a single flow or app. Each group of actions, regardless of where or in what order they are implemented, must have a connection that provides the target system with the desired credentials. This can be a simple string of letters and numbers, like a password, generated from the API provider’s system, or a more complex token exchange in an OAuth flow. In either case, whenever a connector action is invoked, there must be a pre-configured connection that stores the authorization details.
Power Automate, Power Apps, Power Virtual Agents, and Azure Logic Apps all prompt the maker to create a new connection that includes the authorization information, or choose from an existing one, whenever a connector action is added for the first time. Each maker who edits a flow or app must configure their own connections; however, connections can be shared with other makers; also, when a flow or app is shared, its connections are also shared. This is important because one of the first challenges that multiple collaborators on a solution experience is a warning message informing them that the app requires connection access and that they need to request it. This is also a stumbling block for makers who create a solution and then attempt to run it as a different account (typically a service or other non-licensed user account). What is really being communicated is that the connector is looking for authorization details within a connection in the context of the user who is running the flow, so the associated connection needs to be updated and saved. An easy solution to a simple problem, but the user interface and messages leave some room for improvement in this area.
For example, assume that Sally is creating an approval flow for customer invoices. She needs to alert an approver in HR via an SMS text message when an invoice has not been approved by the due date, so she adds the Twilio connector. Twilio uses an API Key as its authentication mechanism, so Power Automate immediately prompts her to enter a key. She signs in to the company Twilio account, retrieves the key from their developer portal, pastes it into the connection dialog, and gives the connection a name. Power Automate then saves it as a new connection in Sally’s list of connections. So far, so good.
Sally then reaches out to Bill so he can edit the flow to add a few more actions. Sally and Bill have already been collaborating on the process, so Bill sees the flow in his dashboard; however, since connections are associated to individual users, he doesn’t see the new Twilio connection that Sally created. He opens the flow and sees the new Twilio action, but to implement it he also needs to configure a connection. Bill doesn’t have access to the Twilio developer portal to get the key, so he’s stuck and cannot continue. Sally can resolve this problem by sharing the connection with Bill, similar to how she shared the flow. This way, he doesn’t have to go through the creation process himself, and the key remains secure.
From a high-level perspective, the most relevant data point regarding security is that connectors use the same standardized methodology as most modern web-based SaaS platforms. OAuth and API keys are the de facto mechanisms for authorizing system-to-system API communication over standard internet protocols, with OAuth considered to be more secure but also more difficult to configure and manage. Most API providers support both mechanisms and it’s possible to use either when creating a custom connector. Power Platform also supports basic authentication. It’s best to avoid this, however, since it transmits usernames and passwords in clear text.
Use Cases
Owing to the inherent flexibility of connectors there is almost no limitation to the types of business problems that can be solved or the types of applications that can be created with them. The possibilities are as endless as the creativity of the maker and the requirements of the business. There are, however, some common uses cases that comprise the bulk of connector implementations, including the following:
- Data integration: Connectors integrate data from various sources, from on-premises databases to cloud-based apps, into a central platform. This can be particularly useful in a Power App that collects data from multiple sources to provide a comprehensive dashboard, overview, or snapshot.
- Business process automation: In Power Automate, connectors can create automated workflows between applications and services. For example, a user might create a flow that automatically saves email attachments from Outlook to an on-premises document management system.
- Building custom applications: With Power Apps, connectors enable the integration of data from a variety of sources, allowing users to create tailored applications that meet specific business needs. A common use case might be building an app that pulls customer data from Dynamics 365 and combines it with product inventory data from an external system.
- Customer service: Power Virtual Agents can use connectors to access data needed to provide intelligent and personalized customer support. For instance, a virtual agent might access a customer's previous orders from an e-commerce platform to help troubleshoot a delivery issue.
- Project management: Connectors can integrate project management tools like Azure DevOps, Jira, or Asana with other business apps, automating updates and reports, and improving visibility across different teams.
- Sales and marketing: Integration of CRM systems like Dynamics 365, Salesforce, or HubSpot with other platforms (such as email, social media, and analytics) can automate and enhance marketing efforts, lead tracking, and sales processes.
- HR operations: HR platforms like Workday, Paycom, Zenefits, or local HR systems can be connected with other tools to automate processes like onboarding, time tracking, performance management, and more.
- IT operations: Connectors can help automate common IT tasks, like user account creation or ticket management by linking IT service management tools with platforms like Active Directory or Azure AD (recently renamed Entra ID).
Skills and Prerequisites
The custom connector creation wizard in Power Platform provides an excellent graphical user interface for creating a new connector. Behind the scenes of its next > next > finish simplicity, the wizard’s primary purpose is to generate a set of definition files in JavaScript Object Notation (JSON) or Yet Another Markup Language (YAML) format, full of curly braces, indentations, URLs, and other programmer-specific elements. This can cause concern at first glance, especially because the wizard makes it easy (and, in some cases, necessary) to edit these files. As we all know, however, looks can be deceiving.
When broken down into consumable chunks, and armed with a little bit of background knowledge, connector definition files can be quite easy to follow and understand, even for those who do not have much technical know-how. It is not at all required that you understand the syntax rules of JSON or the differences between an HTTP POST and GET operation. It certainly helps, and if you already know these things then you’ll be a step ahead of the game, but it won’t prevent you from understanding what a third-party connector does or creating a custom one for your own purposes.
As this series progresses, I will go deeper into the unavoidable technical aspects. From the outset, however, you only need a good idea of what you want your connector to do, what system or systems it connects to, how those systems are secured, what data the user must provide to receive a result, and what that result should look like. All the details will come together and make sense as I walk you through each step of the process.
Costs
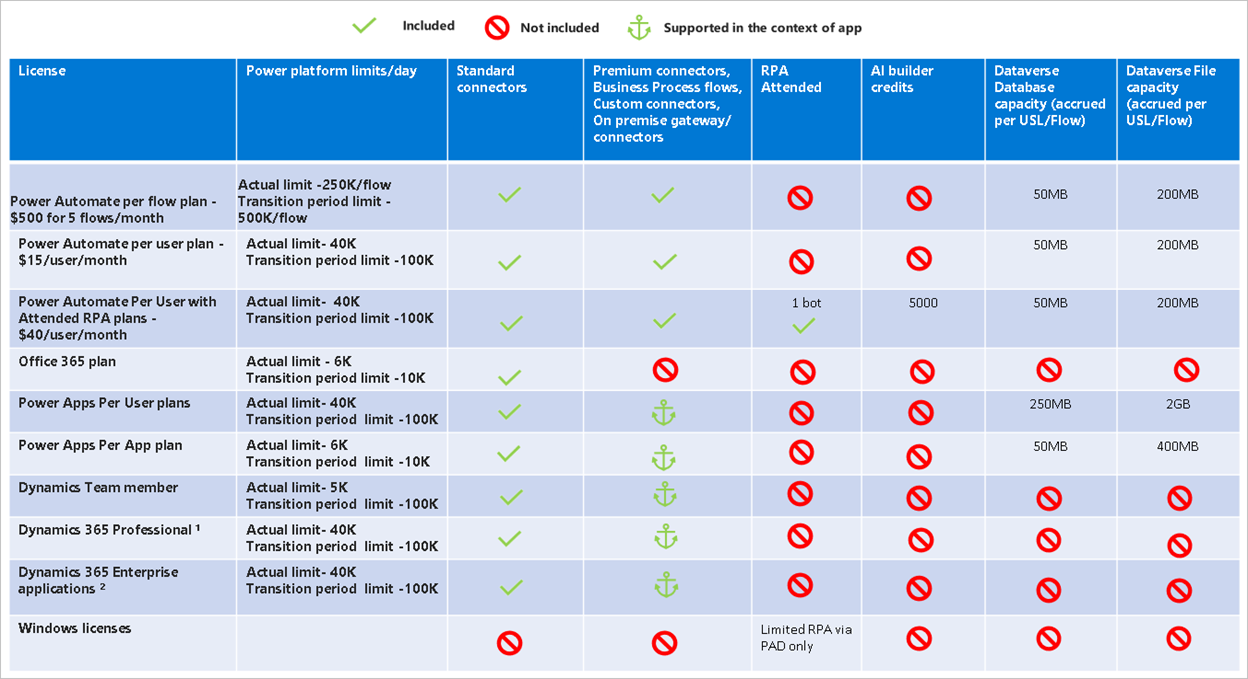
At present, deploying custom connectors requires a premium license, but of course there is always more to the story where licensing entitlements are involved. That premium license requirement may not actually result in higher costs. It may be that your organization already has the requisite licenses to facilitate custom connectors or that switching plans can provide that benefit without additional spend. There are also developer and trial plans that allow custom connector creation and usage for a fixed period before purchase is required. And, of course, price varies based on the type of agreement your organization has with Microsoft. The only way to know what additional license cost will be required, if any, is to consult with your Microsoft account representative.

View Full Size
Licensing is certainly one part of connector-related expenses but there may be other, less obvious, costs involved. For example, if the connector that you are creating interfaces with a third-party system, the provider may charge for access to their APIs or for the amount of data transferred. If the connector targets internal systems, is heavily used, or offered to external developers and partners, it may be necessary to provision cloud infrastructure to support it. There may also be licensing considerations for supporting software, databases, networking components, and other related elements. Just as there is a great deal of flexibility in what each connector can do, there is likewise no one-size-fits-all answer to what each one will cost.
It is worth pointing out that there is a category of connectors marked as Standard that do not require a premium license to consume. These are typically either owned by Microsoft or available as commercial offerings by independent software vendors (ISVs) and often require a separate purchase agreement outside of Power Platform. The ISV is responsible for all the costs of running, hosting and maintaining the connector and has committed to a significant investment to gain Standard status. It is certainly possible to become a commercial provider and release your connectors for broad consumption in the marketplace. I will explore this topic in greater depth towards the end of this series.
Getting Started
Before diving into the various aspects involved in the creation of a custom connector, there are a few preliminary tasks that, once completed, will make the entire process less complex and easier to understand. First, if you have never looked at a connector definition, now would be a good time to do so. All certified and independent publisher connectors are documented in a GitHub repository maintained by Microsoft at https://github.com/microsoft/powerplatformconnectors. If you are new to GitHub and collaborative source code control in general, have no fear – it’s a bit geeky but for the purposes of viewing definition files it is easy enough to navigate. From the repository home page, click on the certified-connectors folder to view the list of connector folders within.
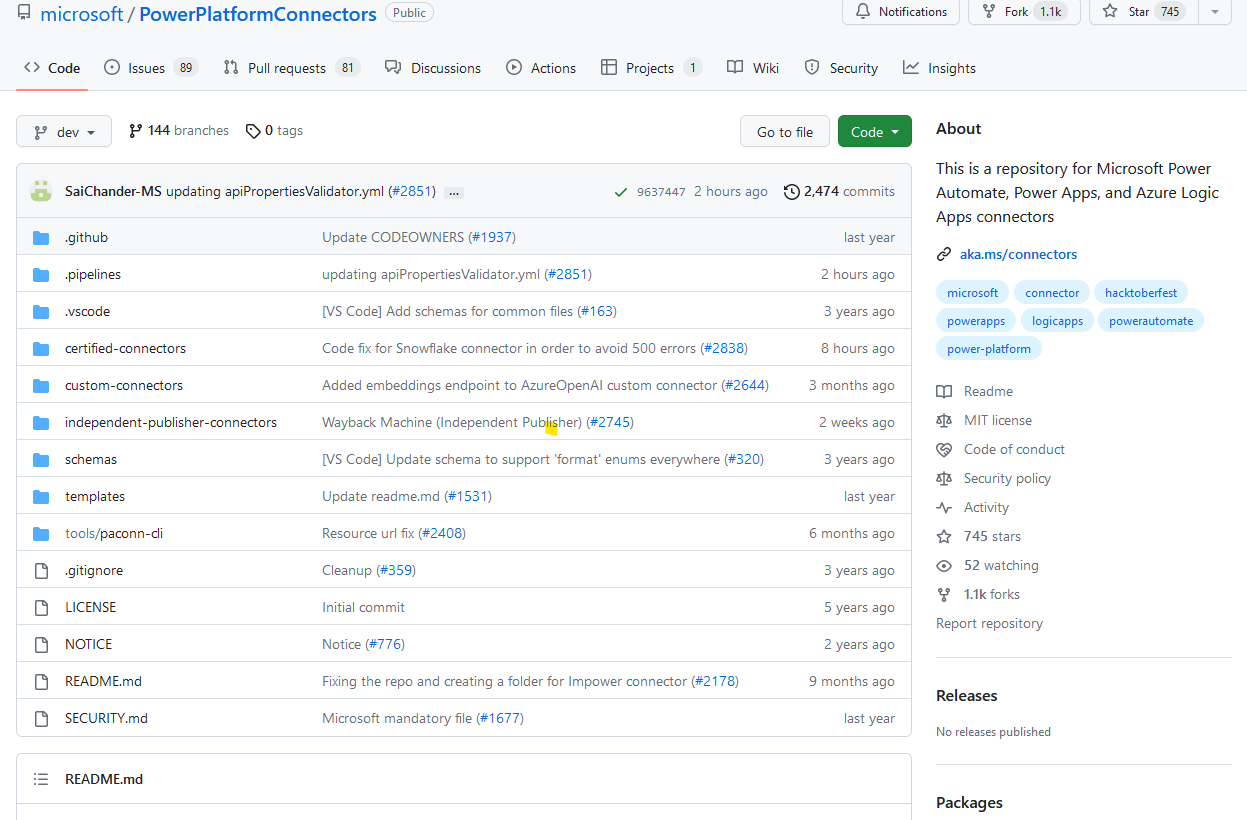
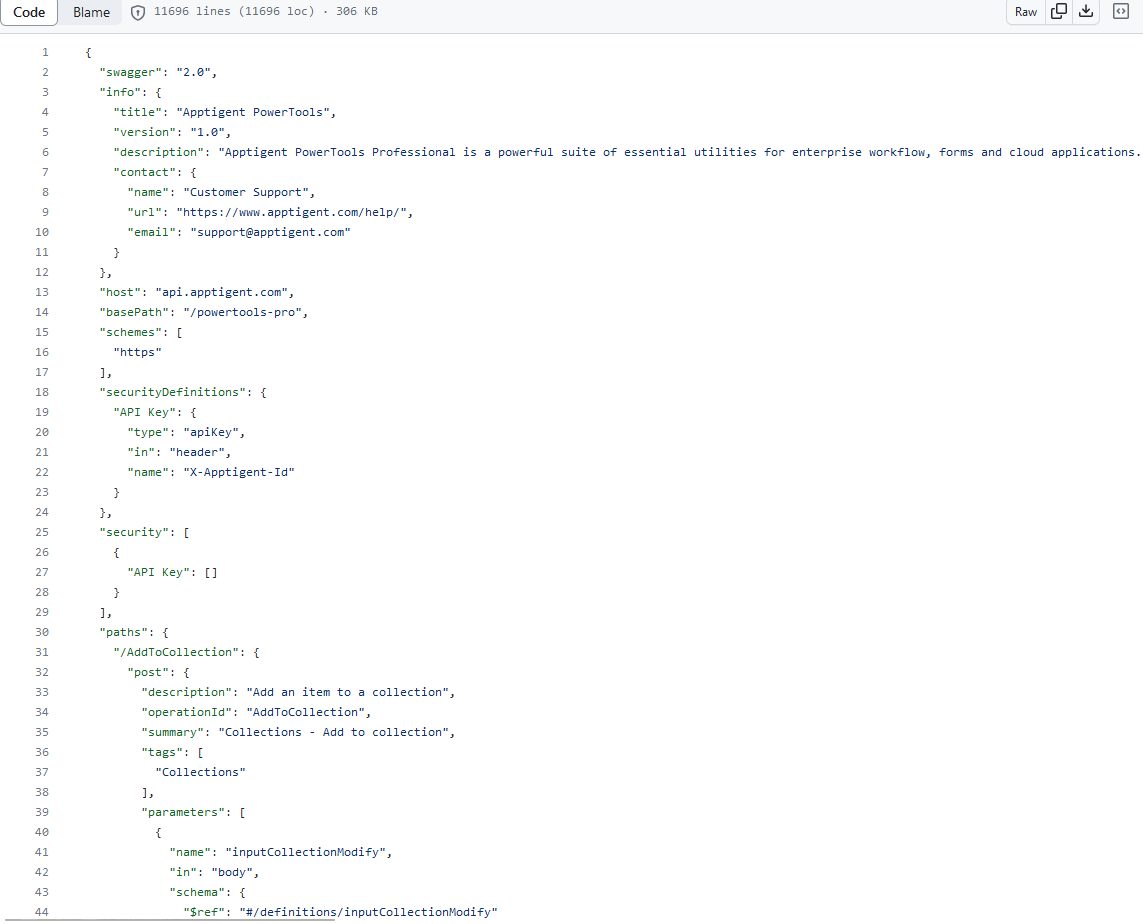
Each connector folder contains several files that the connector publisher provides, but they all follow a defined format and have mostly the same artifacts depending upon what type of connector it is and what it does. Click any connector folder, and then open the file named apiDefinition.swagger.json. The underlying definition will be displayed in JSON format. For the moment, do not be overly concerned that the file contents look a lot like code and that is just not your thing. Look instead for the commonalities between the various connector definitions.
Each definition has top-level groupings like info, paths, security, host, and the like, recognizable by the indentation of child elements beneath them. These contain the information that tells Power Platform how the connector works, much of which is generated by the creation wizard (but may need to be edited manually depending on connector complexity). Some of this information is self-evident based on what has already been covered in this article. For example, the security section will likely have an API Key or OAuth entry to specify which authorization mechanism is being used, as discussed in the preceding security topic. The info section contains the basics like the connector title, description, and contact information. In paths, the actual API endpoints are described with a relative URL (that’s a path without the leading “https://” and domain name syntax) along with HTTP verbs like get, post, or put. There are also parameters, schemas, and responses within each path. Fear not; all of these elements will be explained in detail later. The most important part of this task is to get an idea how similar each of the definitions are, how they all contain a common set of groupings, and how a path element is the basis of a form with inputs that is displayed as an action in a flow (or expression in an app).

View Full Size
The next step is to determine what system the connector will communicate with, what API endpoints it provides, which security mechanisms are supported, and how requests and responses are formatted. This maps directly to elements within the definition file. API providers publish documentation that describes the operation of each endpoint, including the HTTP operation that it uses, how the incoming request should be structured, what the response format looks like, the type and format of each parameter, and so on. After glancing through a few connector definitions, this documentation will begin to look somewhat familiar. You will see GET and POST operations, relative URLs, objects that define parameters as strings, numbers, or dates, required header parameters, and accepted authorization types. If you are working with an internal development team to publish connector-compatible endpoints for your own applications, the provider documentation will provide a basis for how they should describe the APIs they are building. It will quickly become evident how, at least from a planning perspective, this API information can translate into a custom connector.
Finally, begin thinking about how makers and end users will interact with the connector actions during the design process. This includes what fields they must fill in, what data types are appropriate for each field, what descriptions and hints can help them supply the proper data, what order the inputs are presented in, where a list of choices could be more appropriate then a blank textbox, what fields should be included in the action output, the type of data included in each one, what field names would be the most informative, and so on. The results of this planning exercise will determine how you put together the elements that Power Automate renders into an action form or how the expression is structured in Power Apps. We will cover each of these in more depth as the series progresses; for the time being, a rough outline or quick diagram with notes will suffice.
Conclusion
Power Platform connectors are a powerful tool for integrating applications and automations with a wide range of internal and external data sources. They can bridge the gap between disconnected systems, consolidate data repositories, add critical features to key business processes, and much more. They are flexible, customizable, cost effective, and secure. Every part of an organization can benefit from the additional capabilities that connectors provide without the need to engage developers or learn how to write code. Getting started begins with a high-level review of how connectors are structured, what capabilities a custom connector should provide, and how the users will interact with those capabilities.
In part two of this series, I’ll walk you through the fundamentals of creating a custom connector using the design wizard, break the underlying structure down into easily understandable components, identify the back-end infrastructure requirements, and see how connectors can be easily tested and validated within the maker experience.

Eric Shupps
Eric Shupps is the founder and CTO of Apptigent, a leading provider of cloud-based software solutions for Microsoft, Salesforce, and more. Eric has worked in the industry for more than 30 years, primarily focused on Microsoft software and services, as a consultant, administrator, architect, developer and trainer. He co-hosts the Community CloudCast, has authored numerous technology articles, and speaks at user group meetings and conferences around the world.