How to Create Mail Flow Rules With Exceptions

In this four-part series, I discuss the elements of a mail flow rule—available in the Microsoft 365 Exchange admin center (EAC)—and explain how you can implement them in your organization.
It is recommended that you read these articles in the order they have been written.
- How to Create Mail Flow Rules Using the Microsoft 365 Exchange Admin Center and Windows PowerShell
- How to Create Mail Flow Rules from Scratch Using the Microsoft 365 Exchange Admin Center and Windows PowerShell
- How to Create Mail Flow Rules that Reduce Outlook Meeting Notifications Using the Microsoft 365 Exchange Admin Center and Windows PowerShell
- How to Create Mail Flow Rules with Exceptions Using the Microsoft 365 Exchange Admin Center and Windows PowerShell (this article)
In my second article of this series, I explained how to create mail flow rules from scratch without any exceptions. Now I’ll focus on exceptions to the mail flow rules. They override the rule under specific circumstances; they also help you specify which messages to exclude or exempt from the rule being configured.
To understand exceptions better, I’ll walk you through a use case and create a mail flow rule that mitigates the issues arising from it.
Use Case
Let’s assume an organization’s new hires are subjected to phishing attacks where the attacker, posing as a member of the HR team, requests personal information. The attacker has HR’s details (like display name) and is using an email address [noreply123XXX@w4l0XX.onmicrosoft.com] very similar to the email address your HR team uses [noreply@w4l0s.onmicrosoft.com] for sending emails that don’t require a response. Now how would you stop this attack?
Of course, you have to increase your organization’s security measures. But as an immediate workaround, you can also create a mail flow rule where you can personally monitor these emails and let only legitimate emails pass through to your new hires.
The rule should be configured such that the mail passes through to new hires if and only if the mail is received from the legitimate email address. This means you have to set the legitimate email address as the only exception that lets the emails go through. The rest of the mail flow rule (conditions and actions) should work towards diverting the mail to you for inspection.
Let’s see how to implement this rule.
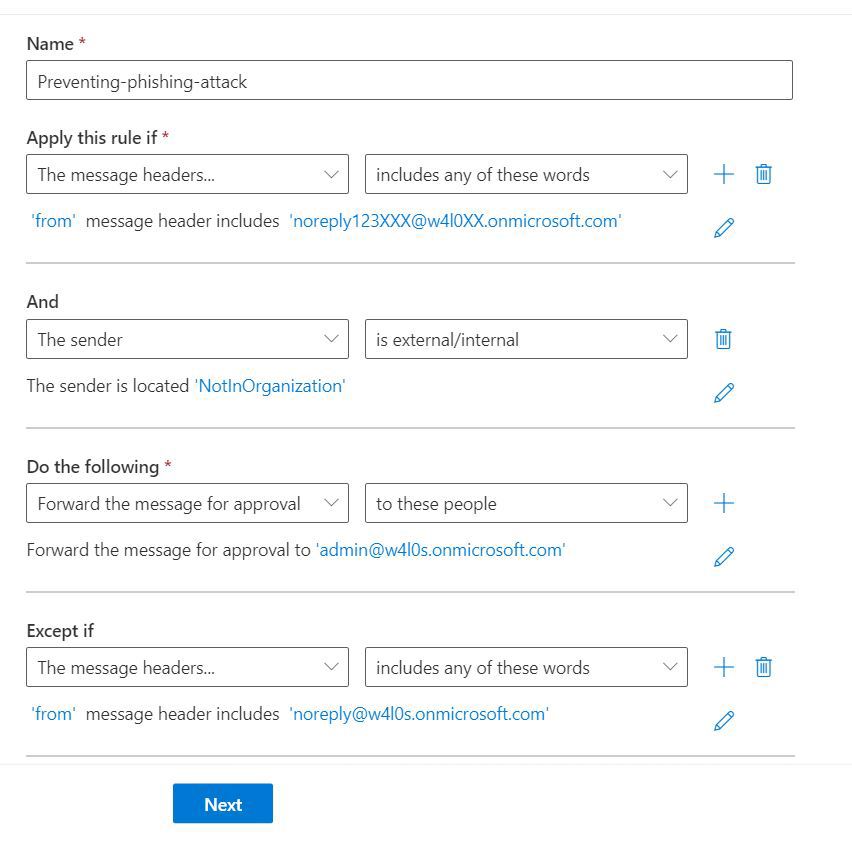
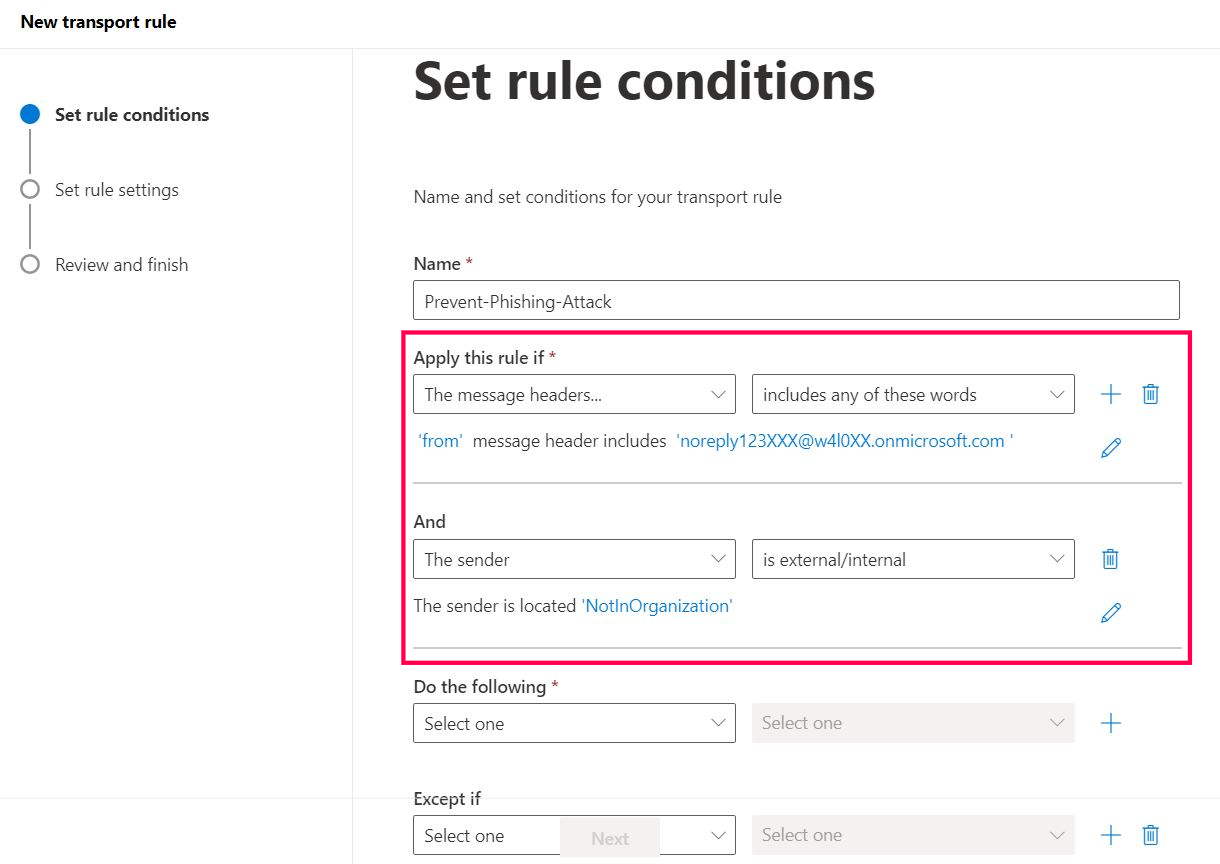
Figure 1 shows a snapshot of the mail flow rule that I am going to configure.
Preliminary Notes
Before getting started, keep the following in mind:
- The information in this article is useful only if you know how to work with mail flow rules to a certain extent. To find the mail flow rule feature and to use predefined templates for creating mail flow rules, read How to Create Mail Flow Rules Using the Microsoft 365 Exchange Admin Center and Windows PowerShell. To create mail flow rules from scratch, read How to Create Mail Flow Rules from Scratch Using the Microsoft 365 Exchange Admin Center and Windows PowerShell.
- I am not going to explain how to configure the rule from the ground up, as I have already done so in How to Create Mail Flow Rules from Scratch Using the Microsoft 365 Exchange Admin Center and Windows PowerShell. Instead, I am going to focus only on the most crucial part of configuring these rules—that is, setting the “from” message header to the malicious email and configuring the exception.
Prerequisites
You need to have either a global administrator or Exchange administrator role.
Setting the Message Header to Match the Malicious Address (to Stop Malicious Emails from Reaching New Hires)
To set your mail flow rule’s condition as Apply this rule if the message header contains the from address as <malicious email address>, configure the message header by doing the following.
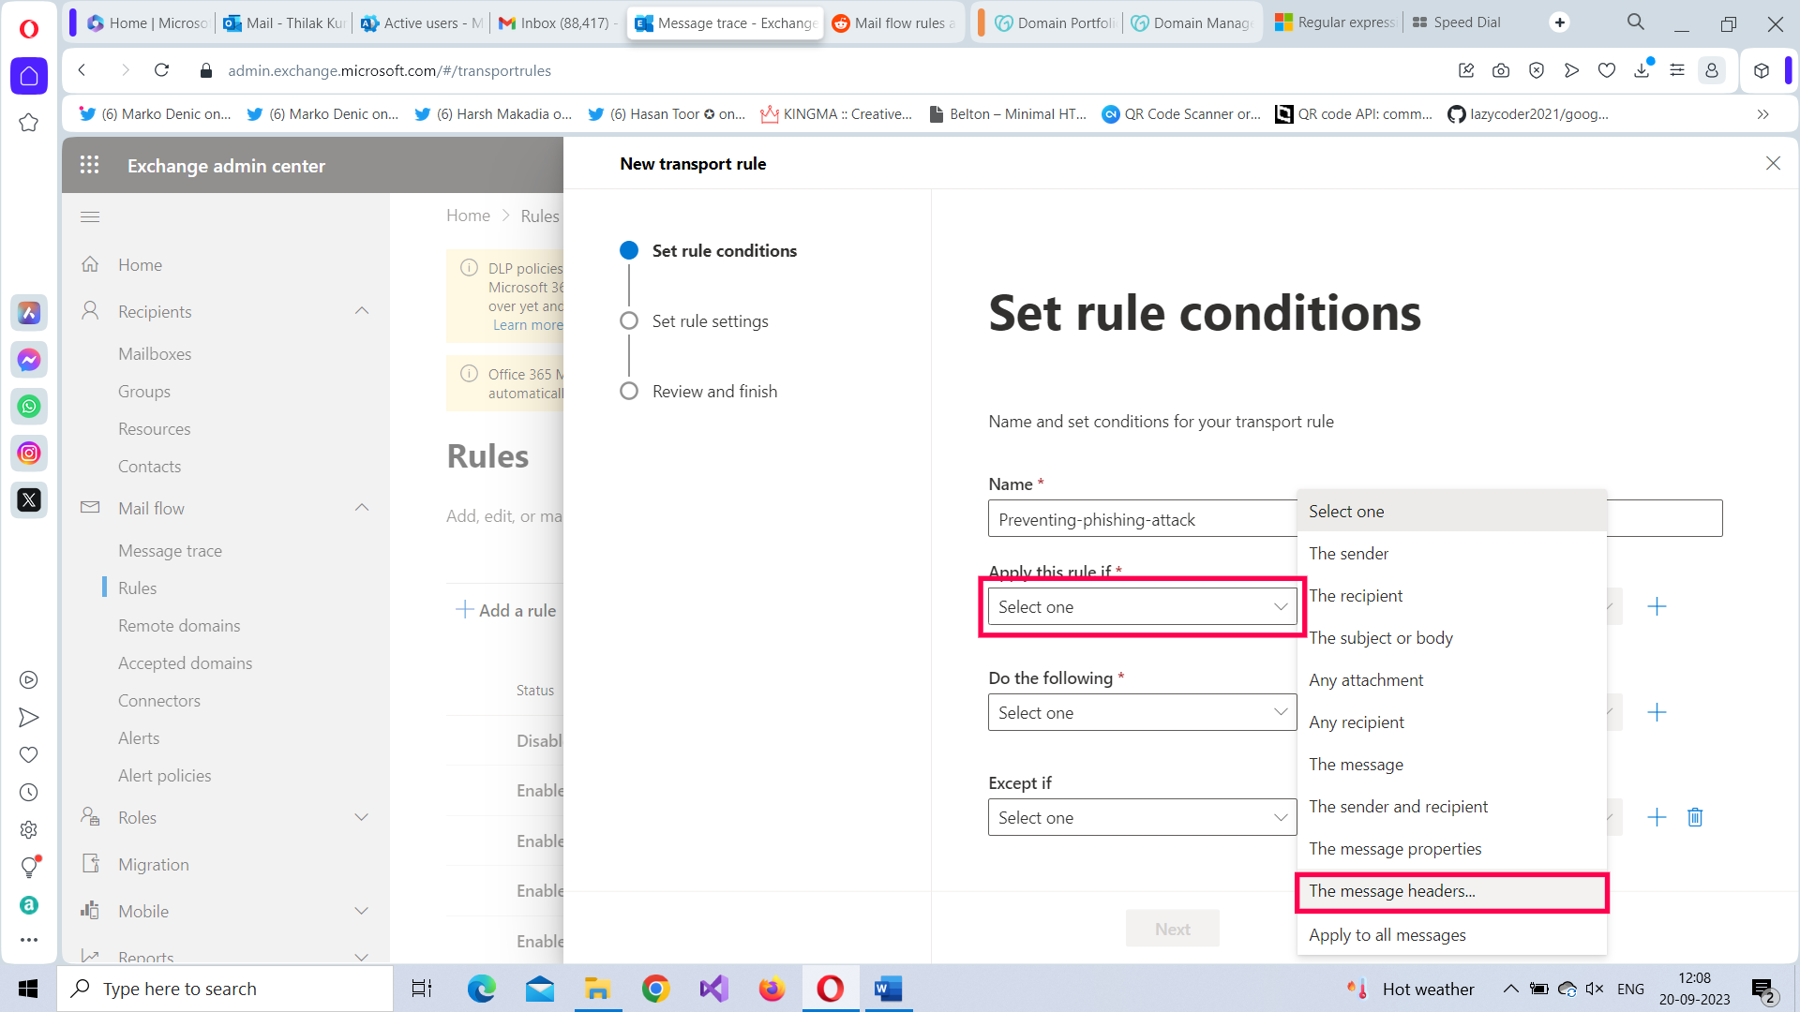
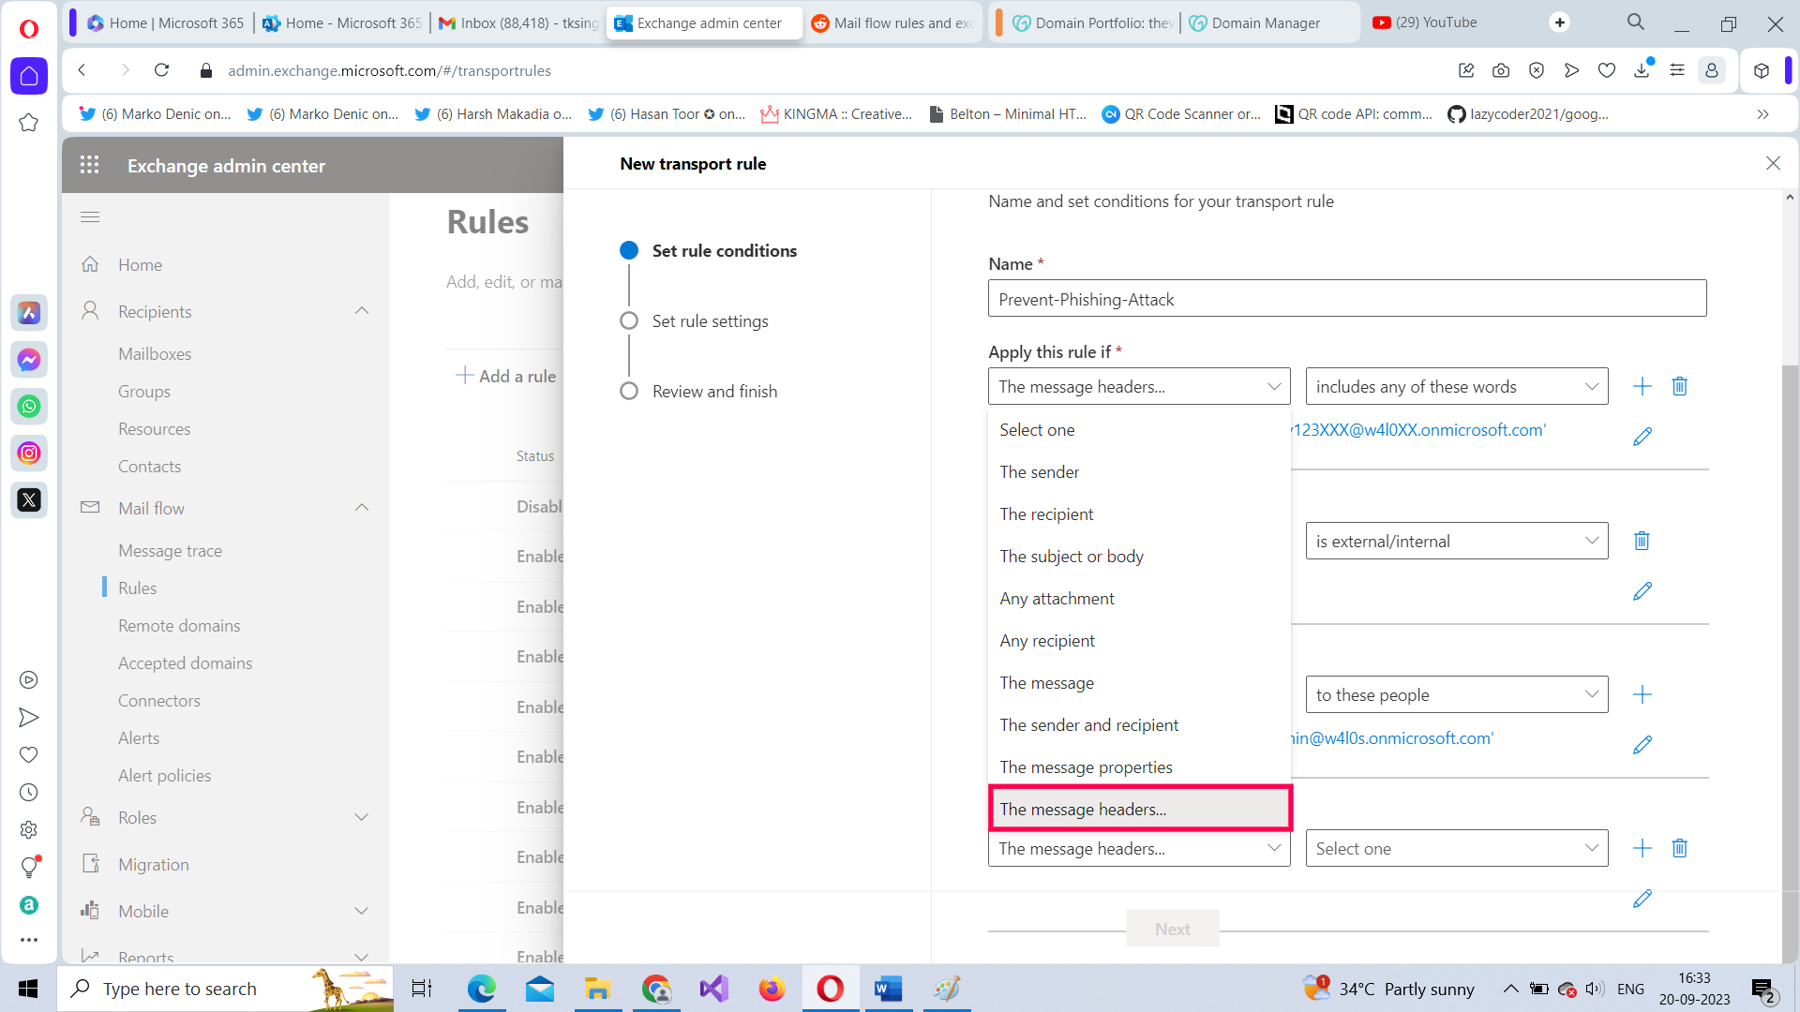
From the Apply this rule if* dropdown, select The message headers option, as shown in Figure 2.
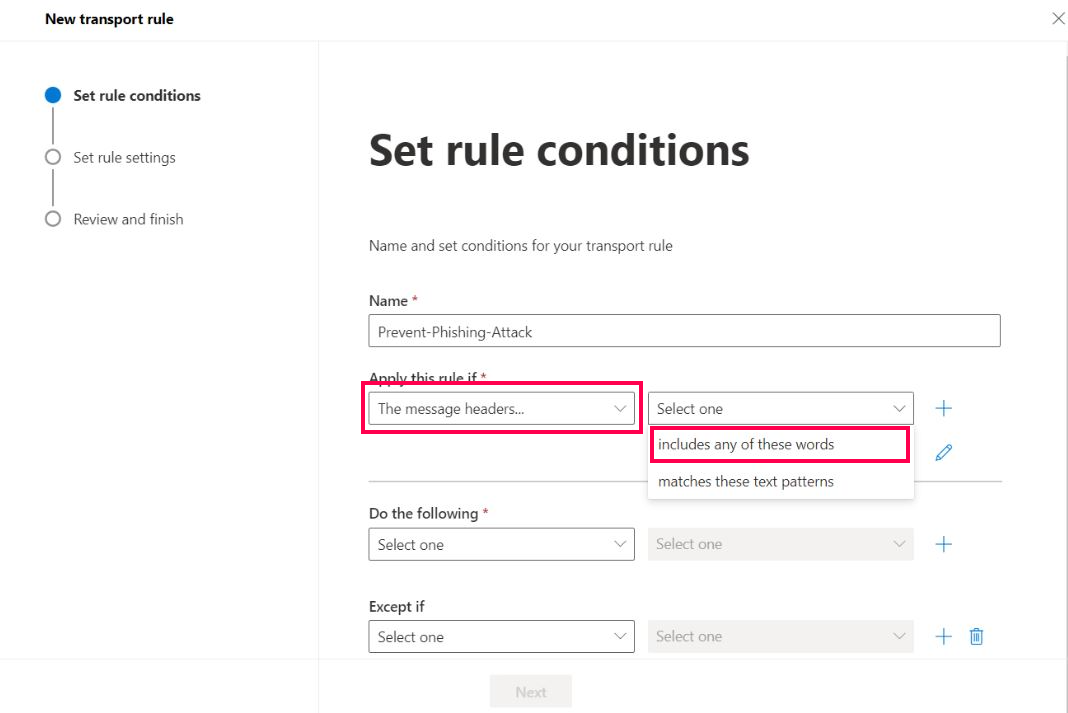
To set The message headers value, select includes any of these words as shown in Figure 3.
Select the Enter text link, as shown in Figure 4,
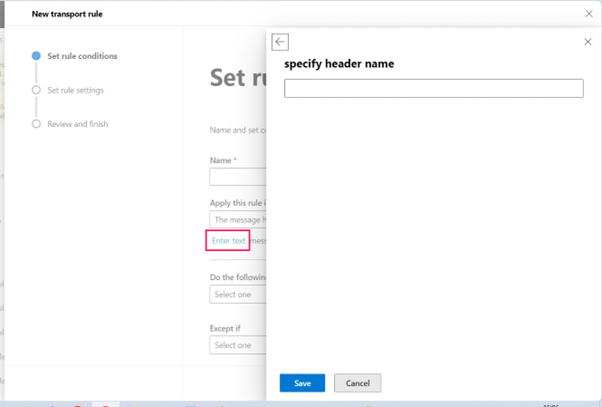
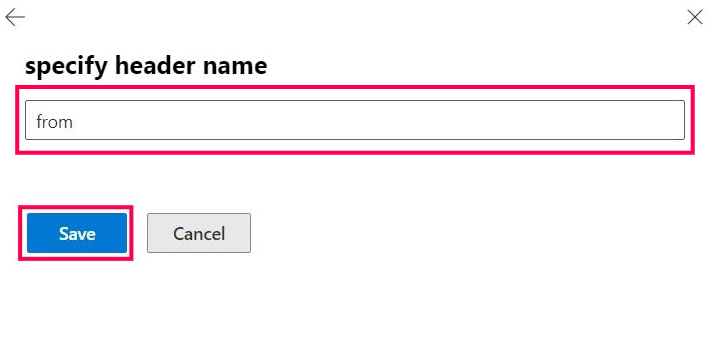
Set the header name as from, as shown in Figure 5, and then save it.
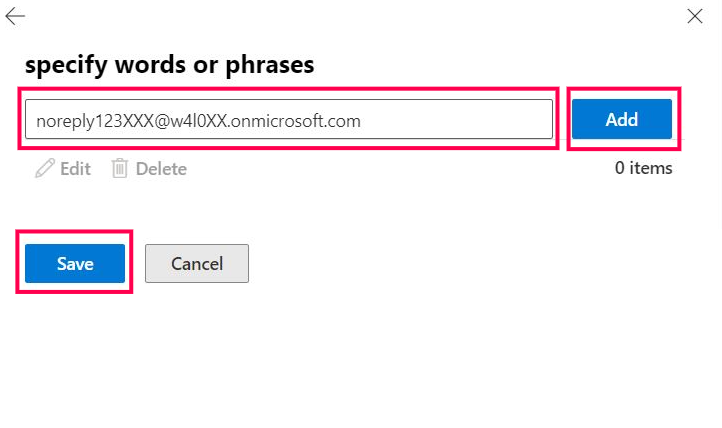
Select the second Enter text link, set the header value as noreply123XXX@w4l0XX.onmicrosoft.com (the malicious email address), select Add, and then save it, as shown in Figure 6.
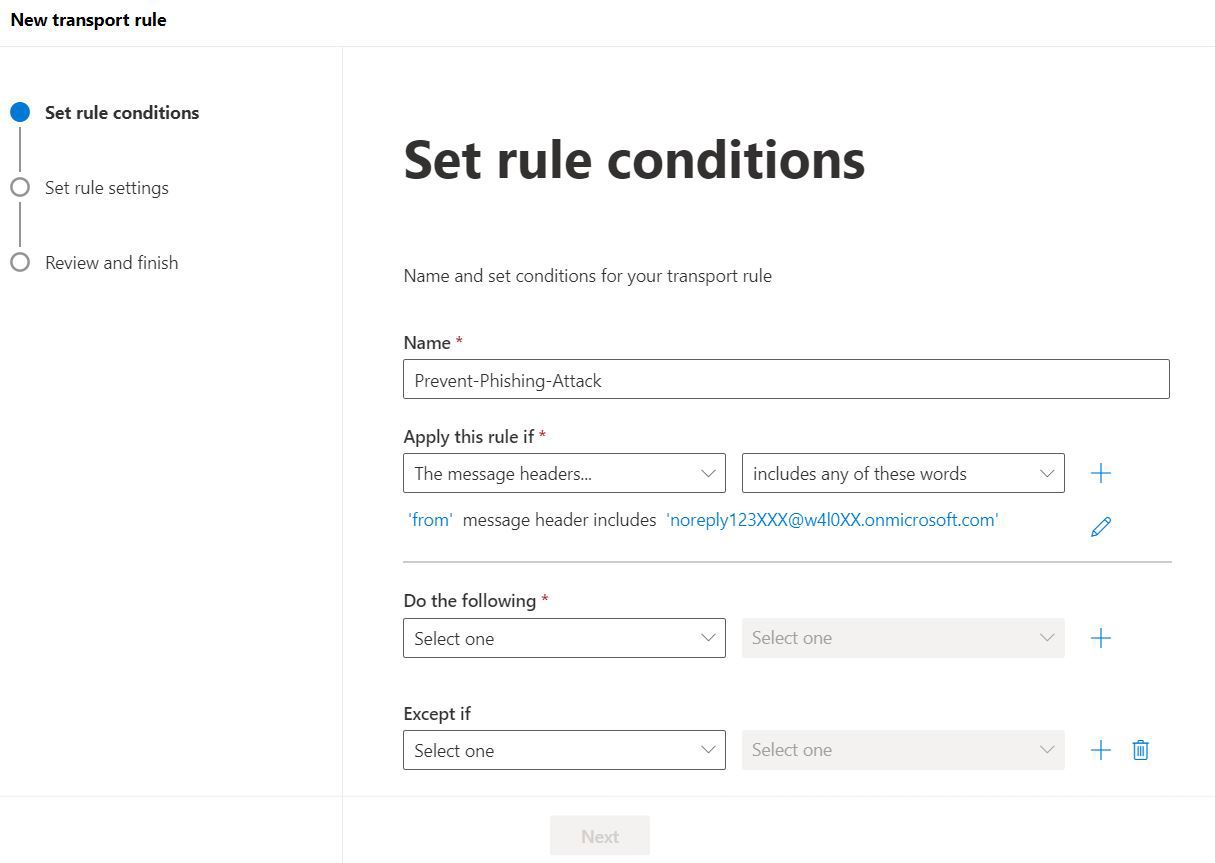
Your mail flow rule should now look like the one shown in Figure 7.
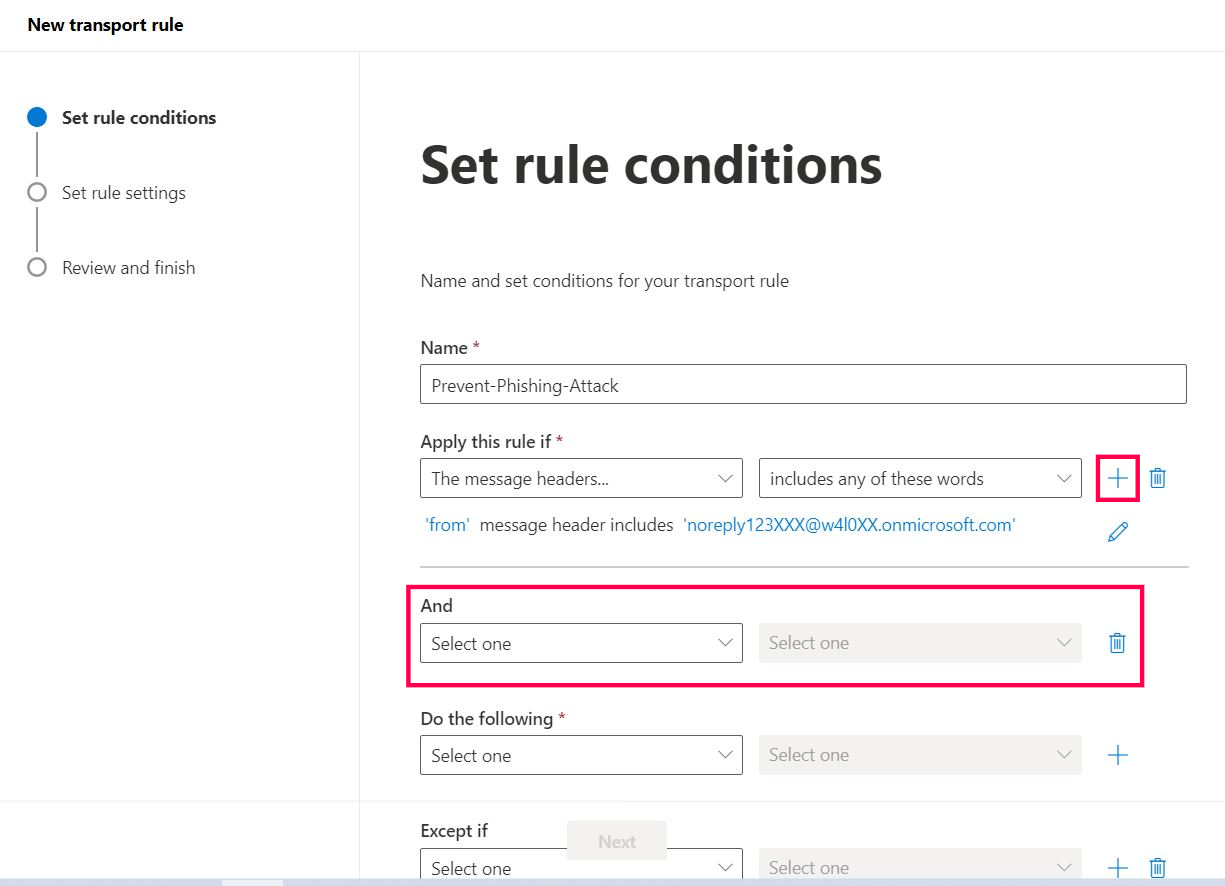
Note: Just to be safe, I’ll add another condition that looks for emails coming from outside the organization because emails from your HR team would be considered internal emails.
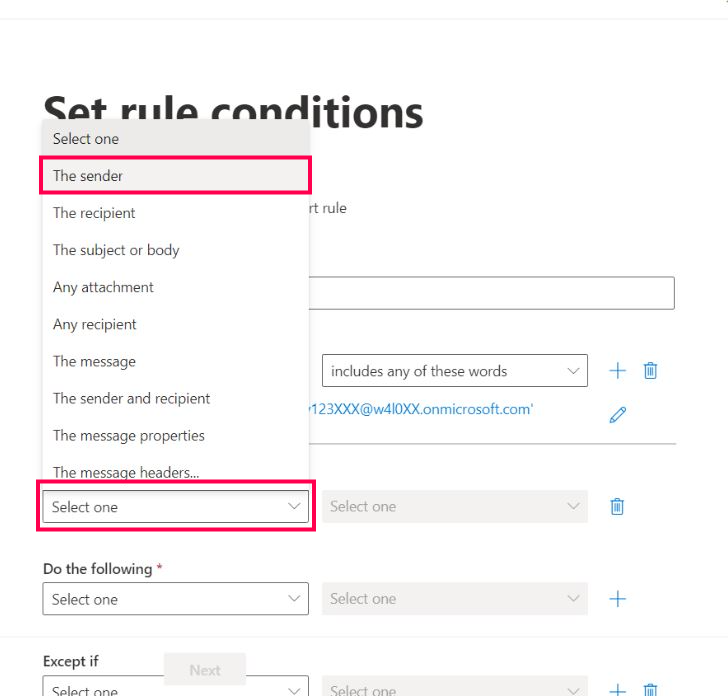
Select the + button. Doing so opens another condition setting, as shown in Figure 8.
Select The sender option, as shown in Figure 9.
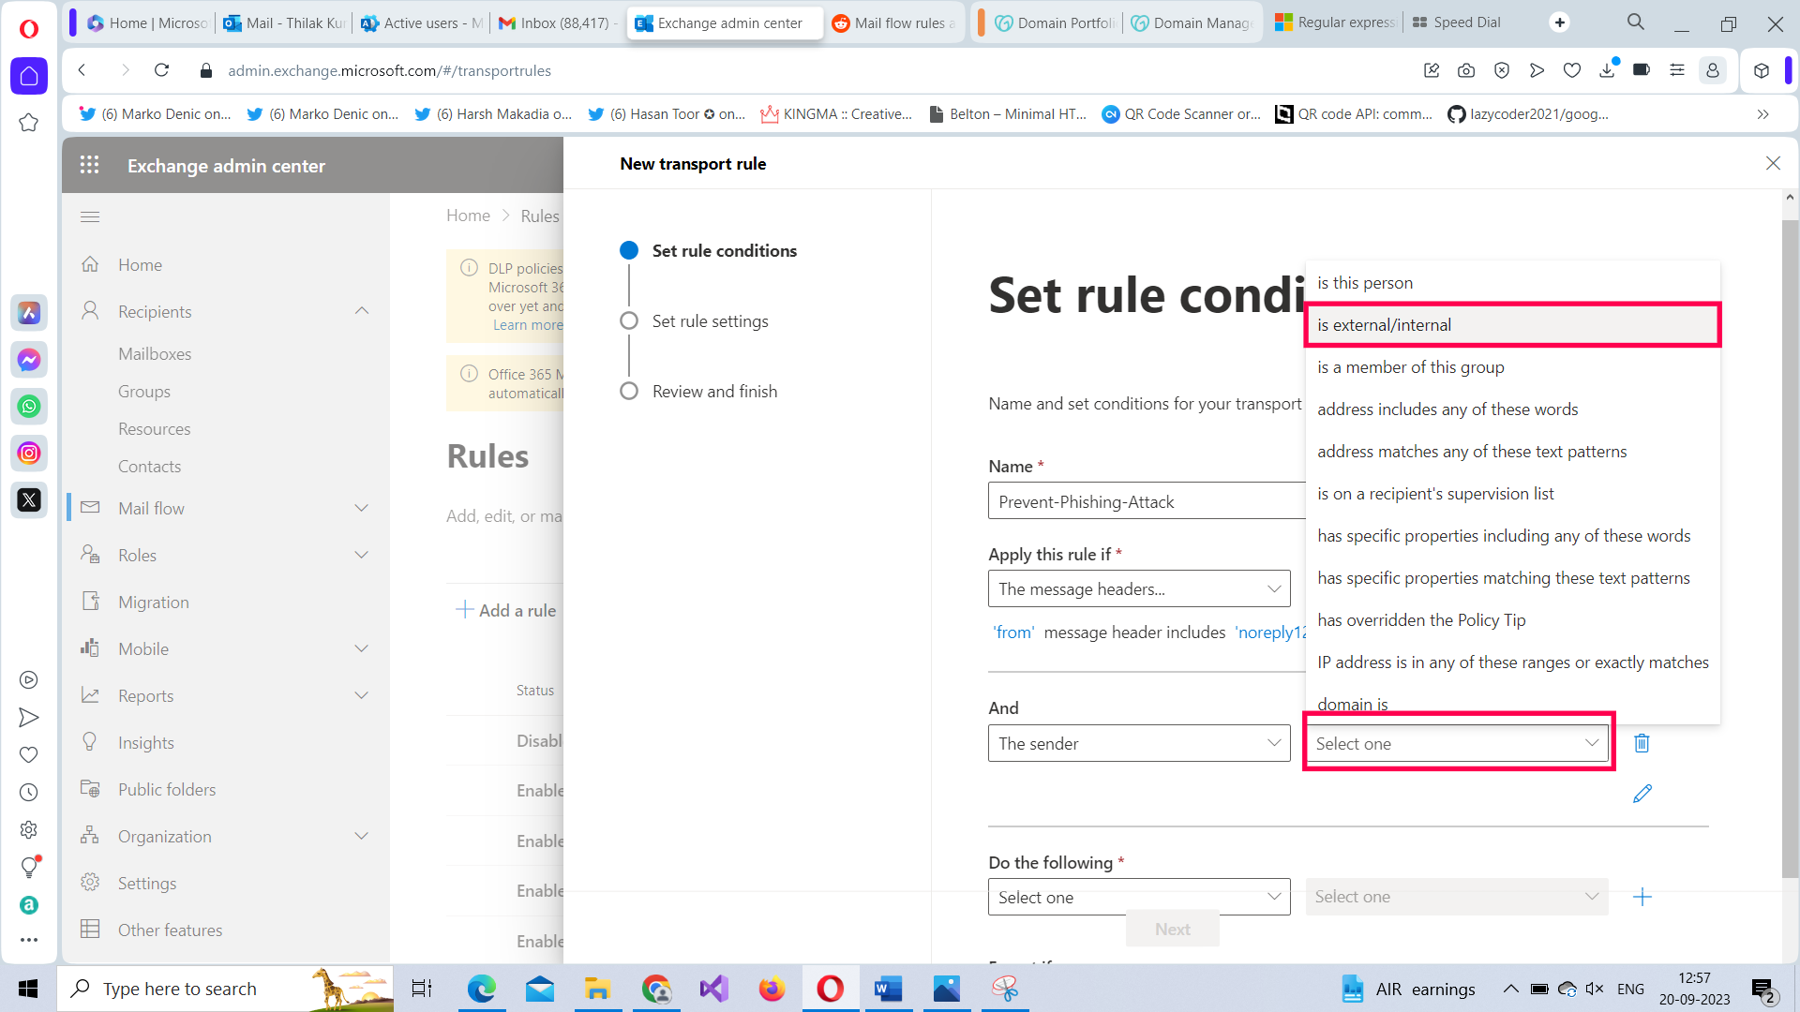
Select The sender value as is external/internal, as shown in Figure 10.
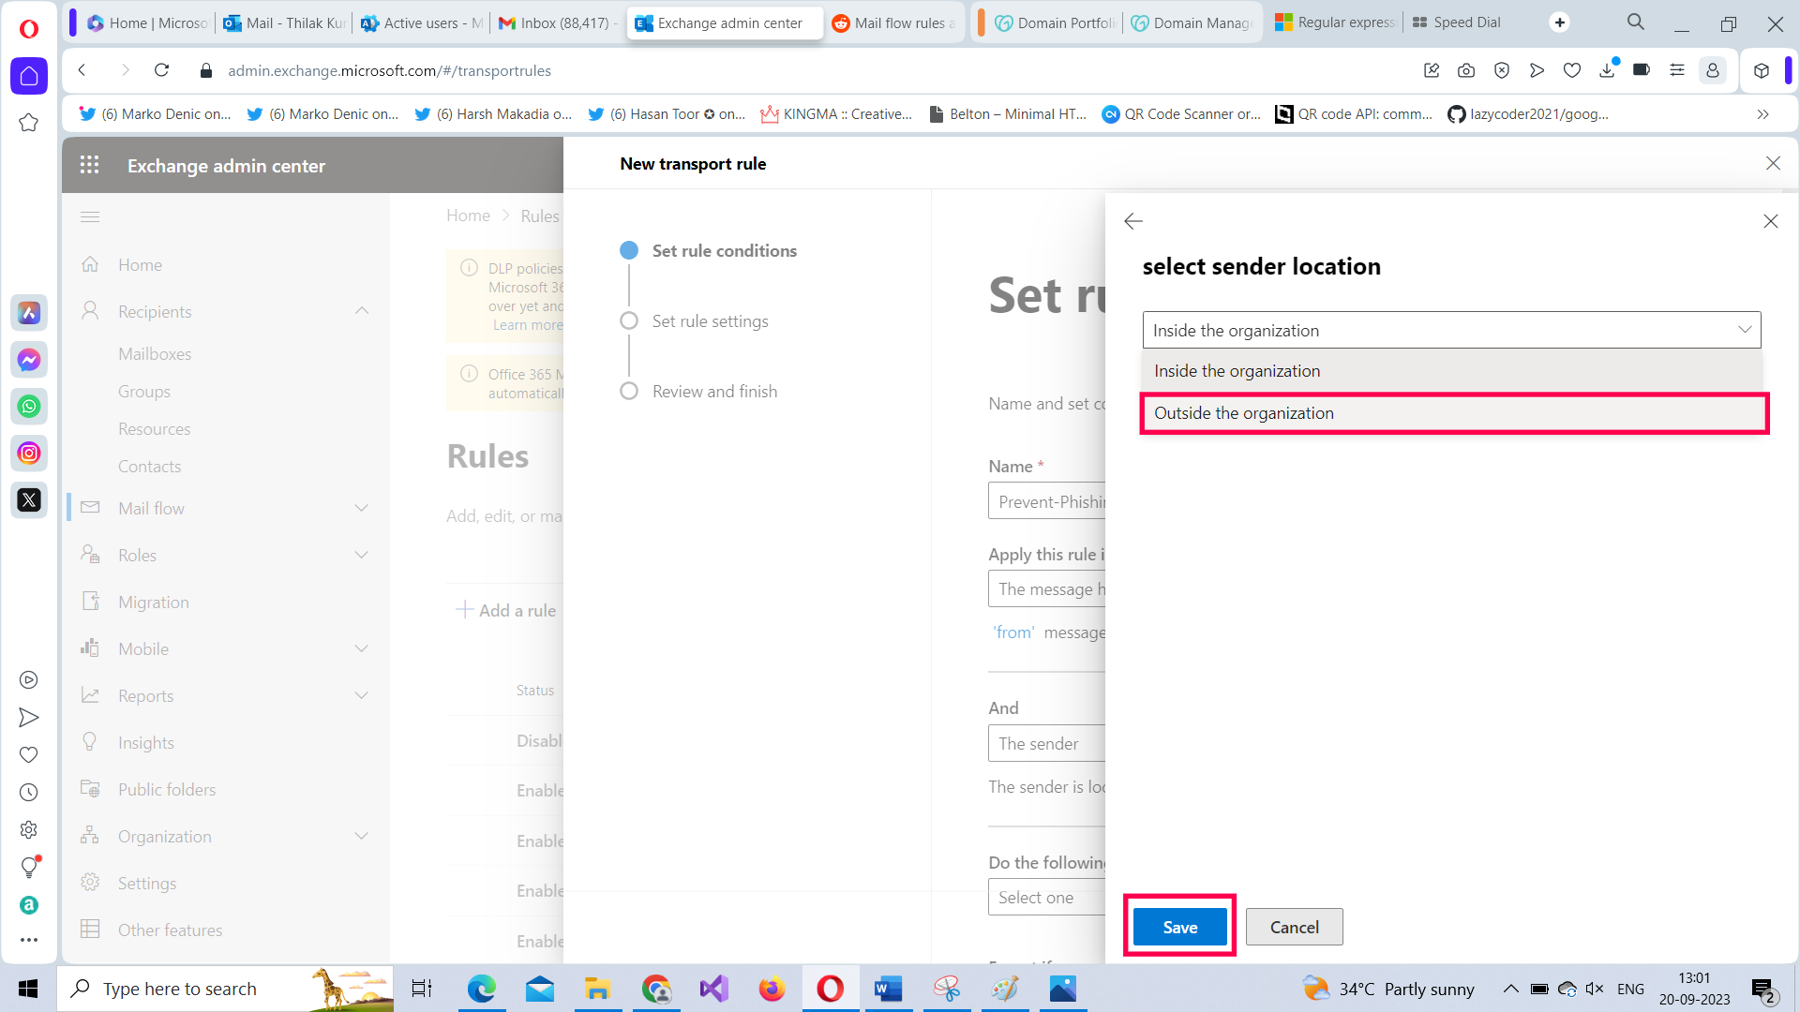
From the select sender location dropdown, select the Outside the organization option and save it, as shown in Figure 11.
Your mail flow rule should look as shown in Figure 12.
Configuring the Action of Forwarding the Malicious Emails to Yourself for Inspection
To configure the action of forwarding the emails coming from the malicious email address to yourself for further examination, follow these steps.
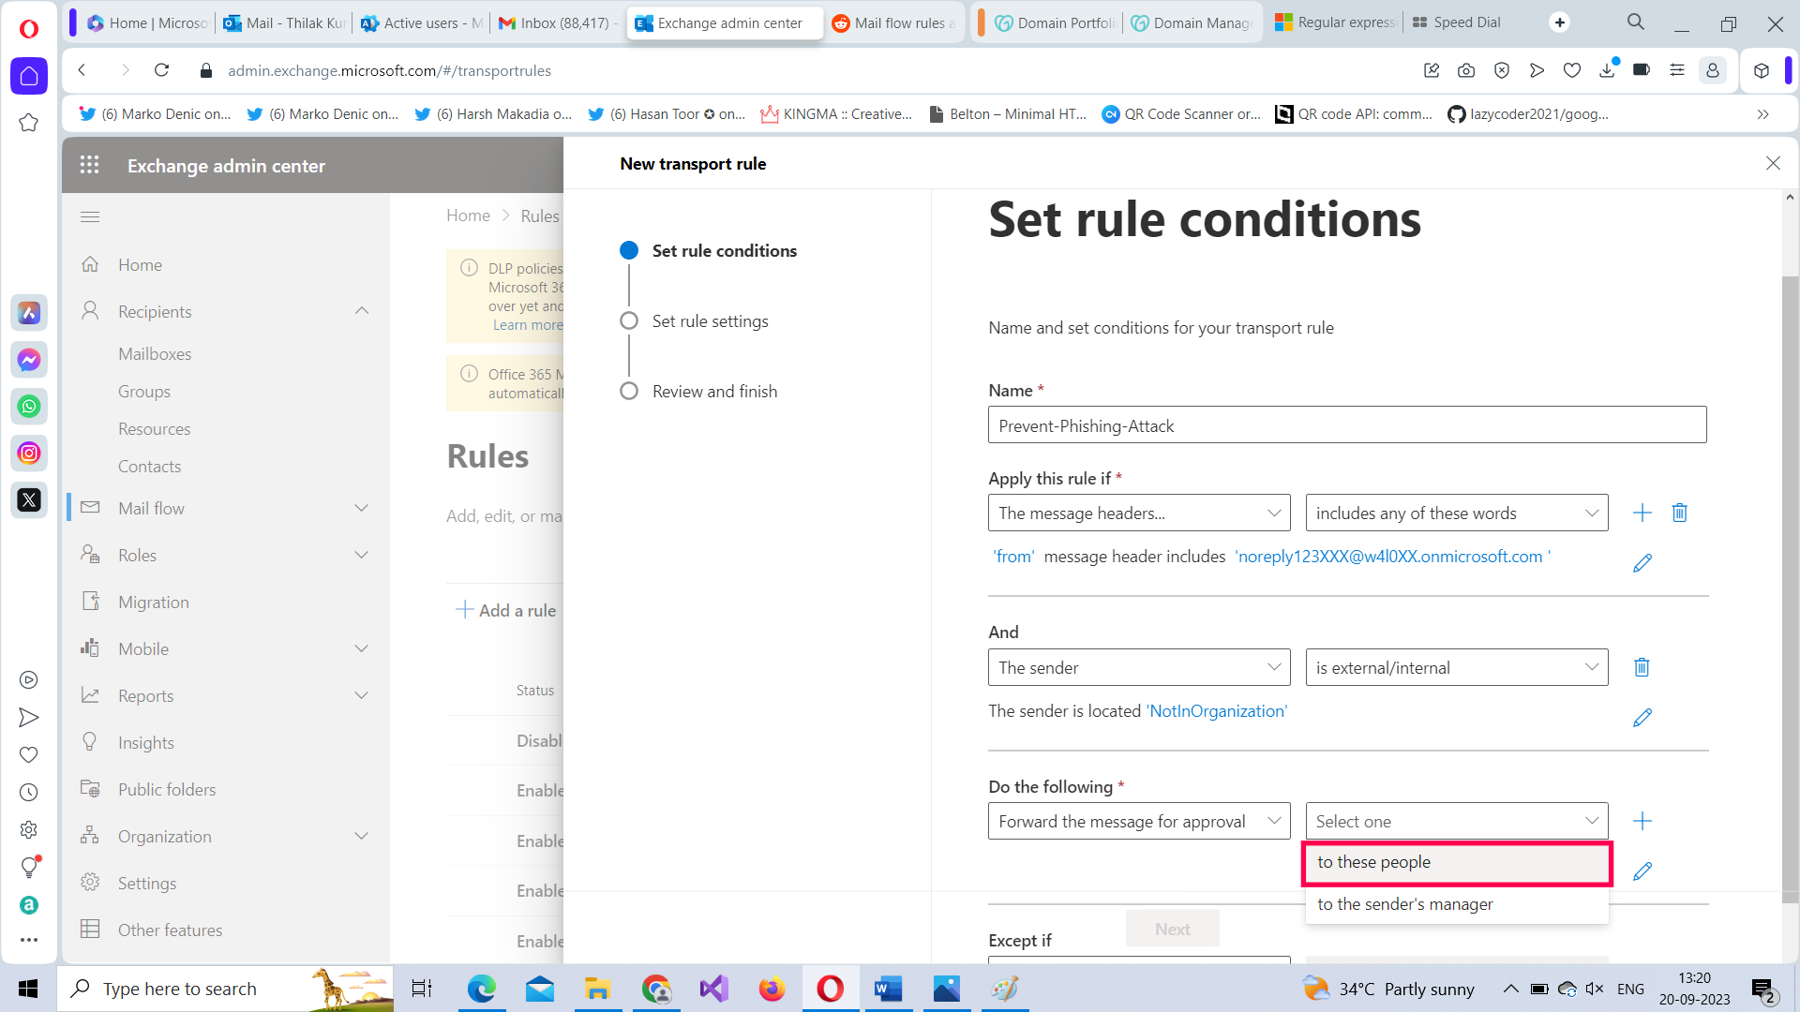
From Do the following dropdown, select Forward the message for approval option, as shown in Figure 13.

For the Forward the message for approval value, set it as to these people, as shown in Figure 14.
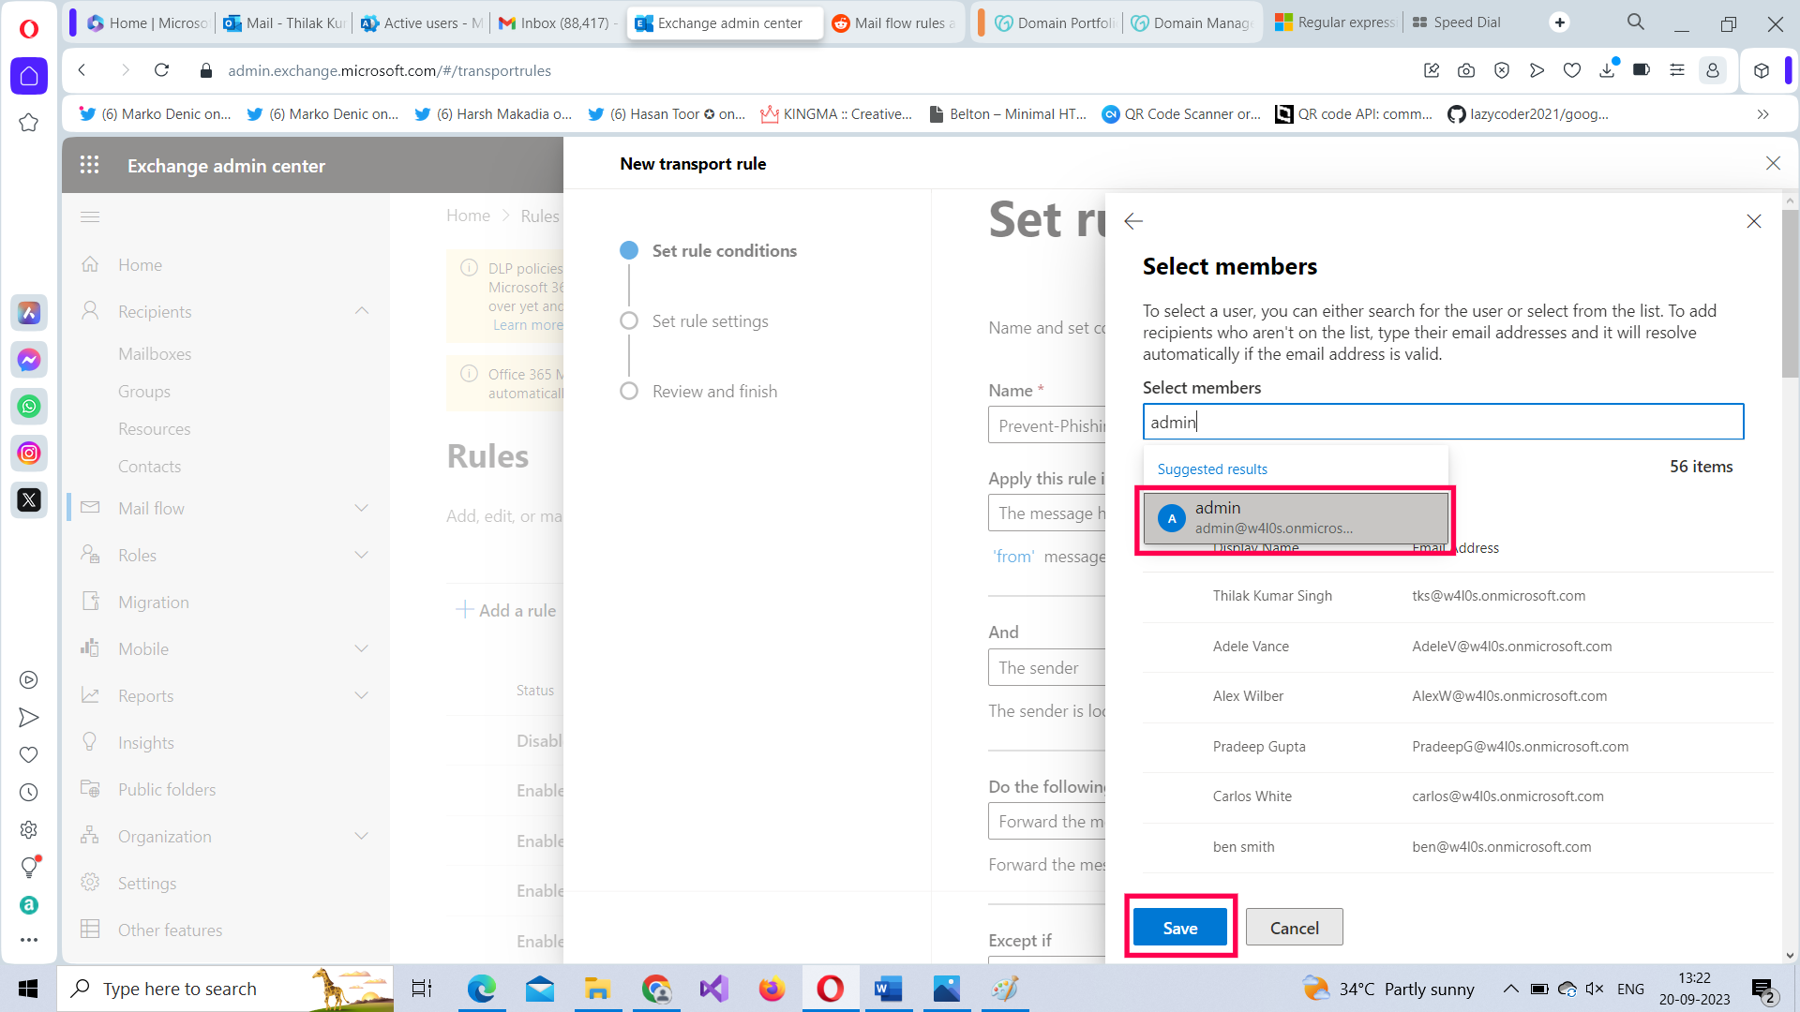
Select the user who is going to monitor these malicious emails, and then save the rule setting, as shown in Figure 15.
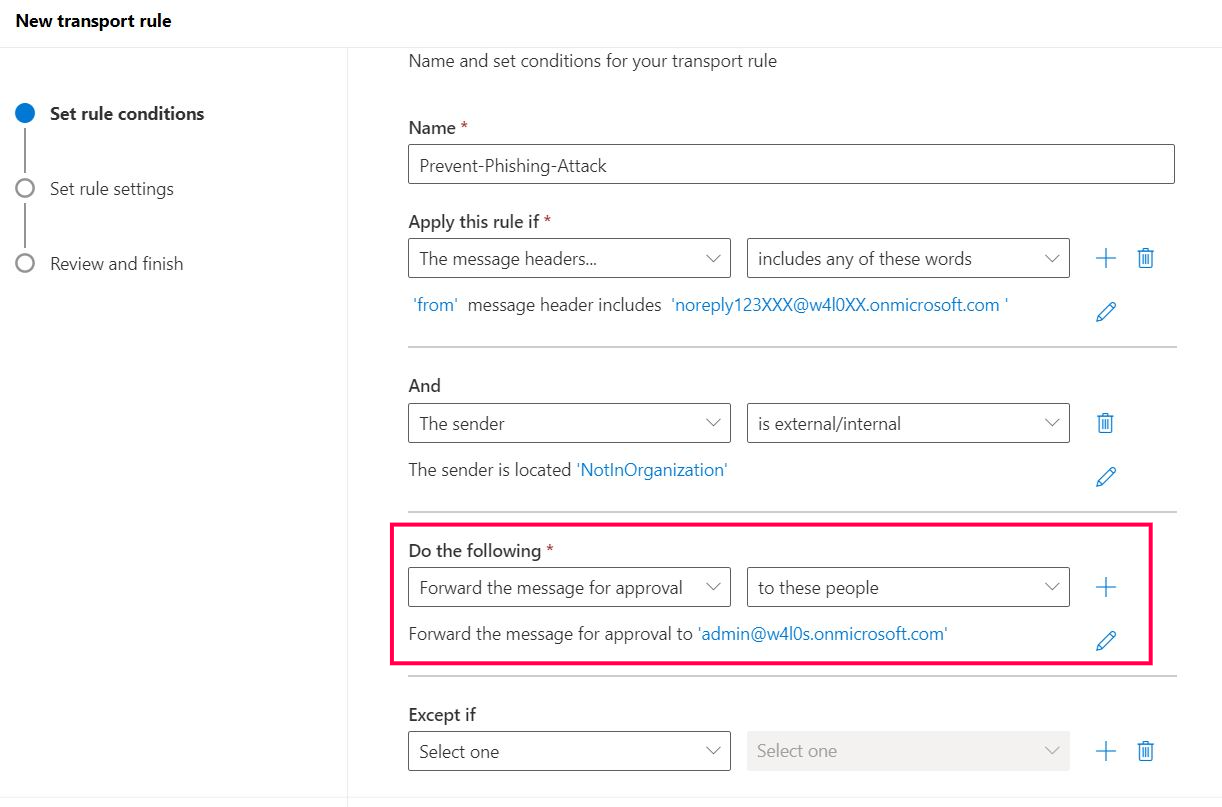
The mail flow rule should look as shown in Figure 16.
Configuring the Exception That Lets Emails from the Legitimate Email Address Go Through to New Hires
To configure the exception for this rule, which lets emails from the legitimate mail address go through directly to new hires, follow these steps.
From the Apply this rule if dropdown, select The Message Headers option, as shown in Figure 17.
For The message header value, select includes any of these words, as shown in Figure 18.

Select the Enter text link and set the header name as from, and then save it, as shown in Figure 19,

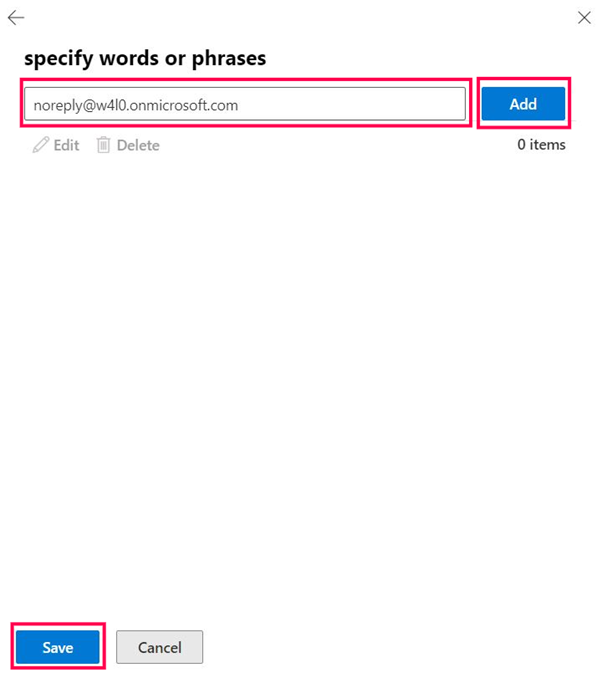
Select the second Enter text link and set the header value as noreply@w4l0.onmicrosoft.com (the legitimate HR email address), select Add, and then save it, as shown in Figure 20.
Your mail flow rule should now look like the one shown back in Figure 1, with the configured conditions, action, and the exception ready to implement once you configure the rule’s settings.
Note: To configure the mail flow rule’s settings, read How to Create Mail Flow Rules from Scratch Using the Microsoft 365 Exchange Admin Center and Windows PowerShell.
Configuring the Same Rule With PowerShell
To create the same mail flow rule using Windows PowerShell:
- Run your Windows PowerShell as an administrator.
- Connect to Microsoft 365 Exchange Online using the Connect-Exchange cmdlet. Read How to Connect to Microsoft 365 Exchange Online With PowerShell for more information.
- Run the following, as shown in Figure 21: New-TransportRule "Preventing Phishing Attack" -From <noreplyxxx@xxx.contoso.com> -FromScope NotInOrganization -SetAuditSeverity 'High' -ModerateMessageByUser <admin@contoso.com> -ExceptIfFrom <noreply@contoso.com>.

How Does the Script Work?
Let’s break down the script:
- Use the New-TransportRule cmdlet for creating the mail flow rule.
- Pass in the name of the rule within double quotes, as shown earlier in Figure 21.
- Set the -From parameter value to noreplyxxx@xxx.contoso.com.
- Set the -FromScope parameter value to NotInOrganization.
- Set the -SetAuditSeverity parameter value to High.
- Set the -ModerateMessageByUser parameter value to <admin@contoso.com>
- Set the -ExceptIfFrom parameter value to <noreply@contoso.com>
To find out whether the rule has been successfully created, run the Get-TransportRule <name of the rule> command.
Note: (3) and (4) are conditions; (5) and (6) are actions; (7) is the exception.
Possible Errors You Might Face
Here are some possible errors you might face and ways to rectify them:
- Whitespace in your mail flow rule’s name: Ensure you name your mail rules without any whitespace between them, as this can throw errors. Remember that whitespace causes errors only when you are creating your rules using the Microsoft 365 Exchange admin center, not when you are using PowerShell.
- Typos in your message header and message header value: Ensure you get the message header and its value right. You should enter them exactly as it has been provided in this article. If not, you won’t be able to save/run your rule successfully.
- Not running your shell as administrator: Select the PowerShell program from the Windows start menu and choose Run as administrator, as shown in Figure 22.

- Execution Policy set to restricted mode: Execution policy setting determines the script execution rights for the current user. If you are logging in for the first time, chances are this is set to ‘restricted’ mode. Ensure the execution policy is set to RemoteSigned (which allows you to execute your scripts) by running the Set-ExecutionPolicy RemoteSigned command.
Note: To check your current script execution rights, run the Get-ExecutionPolicy command.
- Typos in your PowerShell script: You can run into typos even while copying/pasting scripts. So, it’s best to save your scripts in separate .ps1 files and execute them. This not only saves time but also prevents your script from running into unnecessary errors.
Conclusion
This is the last article in this mail flow series. I began by explaining what Microsoft 365 Exchange mail flow rules are and implemented one using predefined templates. Later, I focused on how to create mail flow rules from scratch. Then the focus shifted to complex mail flow rules involving message headers. In this final part, I explained how exceptions can play a critical role in configuring mail flow rules.

Thilak Kumar Singh
Thilak Kumar Singh is a trainer who believes in teaching about IT in the simplest possible way with more emphasis on visual mode of learning. He firmly believes in democratizing IT knowledge, especially of Microsoft solutions, in which he specializes as a trainer and consultant.
He observes that in this era dominated by cloud computing and collaboration, where IT has reached users unimaginable hitherto, IT knowledge must not be an obscure science, but rather be available to anyone who wishes to engage with IT.