How to Create Mail Flow Rules That Reduce Outlook Meeting Notifications
In this four-part series, I discuss the elements of a mail flow rule—available in the Exchange admin center (EAC)—and explain how you can implement them in your organization.
It is recommended that you read these articles in the order they have been written.
- How to Create Mail Flow Rules Using the Microsoft 365 Exchange Admin Center and Windows PowerShell
- How to Create Mail Flow Rules from Scratch Using the Microsoft 365 Exchange Admin Center and Windows PowerShell
- How to Create Mail Flow Rules that Reduce Outlook Meeting Notifications (this article)
- How to Create Mail Flow Rules with Exceptions
When your Microsoft 365 users create a meeting via Outlook on the web, they can get bombarded by unnecessary meeting-related notification emails. For example, user X has accepted your meeting invite, user Y is out of office, etc.
The attendees themselves might find the meeting details in their inbox a bit distracting when they can always look in their calendars for any upcoming meetings. Plus, there are reminders about upcoming meetings anyway.
So, in this article, I’ll focus on creating two mail flow rules that address the issues that both the meeting convener and the attendees face.
For those who like to watch and learn, check out the 9-minute video at the end of this article.
Preliminary Notes
Before getting started, keep the following in mind:
- This article is useful only if you know how to work with mail flow rules to a certain extent. To find the mail flow rule feature and use predefined templates for creating mail flow rules, read How to Create Mail Flow Rules Using the Microsoft 365 Exchange Admin Center and Windows PowerShell. To create mail flow rules from scratch, read How to Create Mail Flow Rules from Scratch Using the Microsoft 365 Exchange Admin Center and Windows PowerShell.
- I am not going to explain how to configure rules from the ground up, since I have already done so in How to Create Mail Flow Rules from Scratch Using the Microsoft 365 Exchange Admin Center and Windows PowerShell. Instead, I am going to focus on the most crucial part of configuring these rules, which is how to set the message headers for successfully implementing them.
- I have set the sender as an individual user for demo purposes. A more efficient way is to allocate a dedicated shared mailbox (that can be shared among a group of meeting conveners) for sending out meetings that do not require attendees’ responses.
Prerequisites
You should possess the global administrator or Exchange administrator role.
Use Case 1: Setting Meeting Response as Accepted by Default (Solution to the Meeting Convener Issue)
To configure a mail flow rule that saves the meeting convener from receiving unnecessary meeting notifications and responses like ‘accepted,’ ‘out of office,’ ‘busy at the scheduled time,’ etc., you should configure the rule’s conditions as shown in Figure 1.
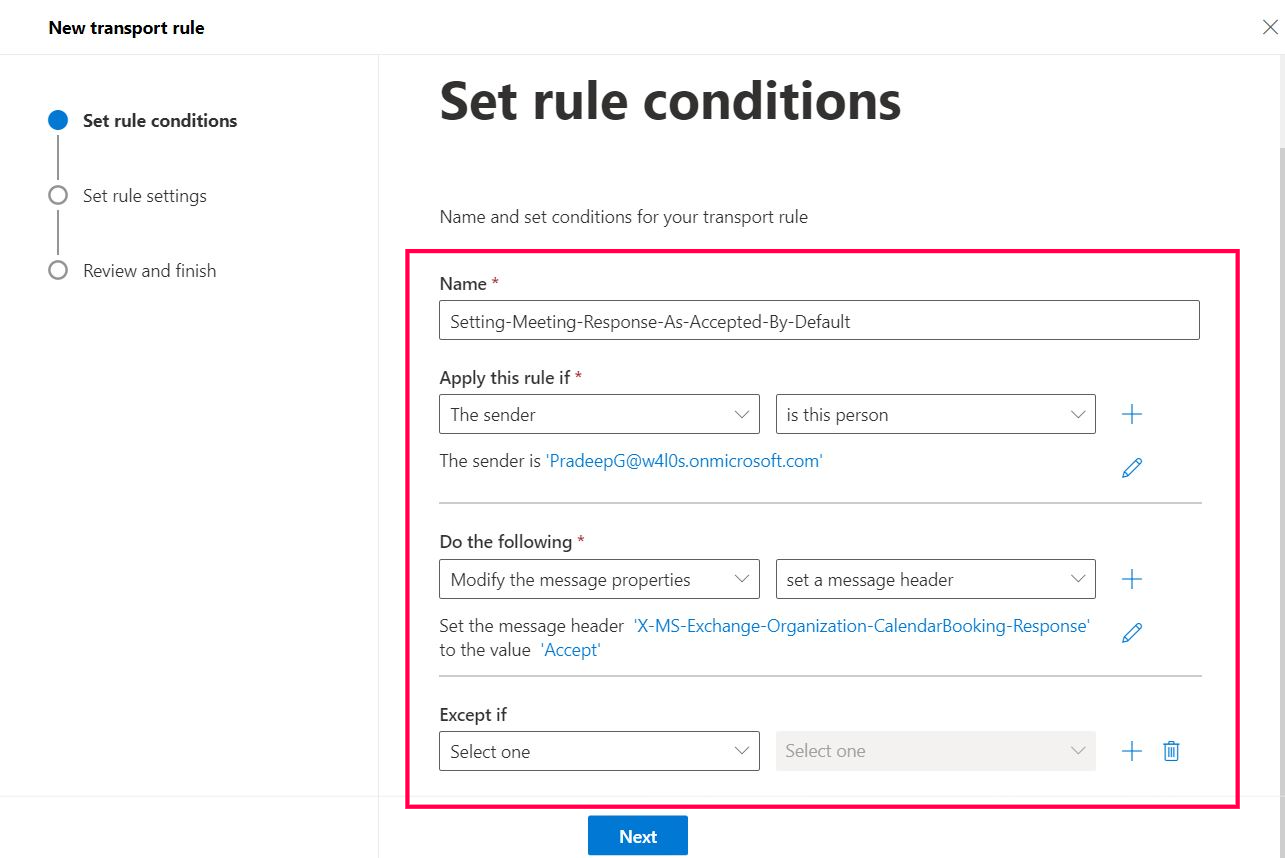
Setting the Message Header
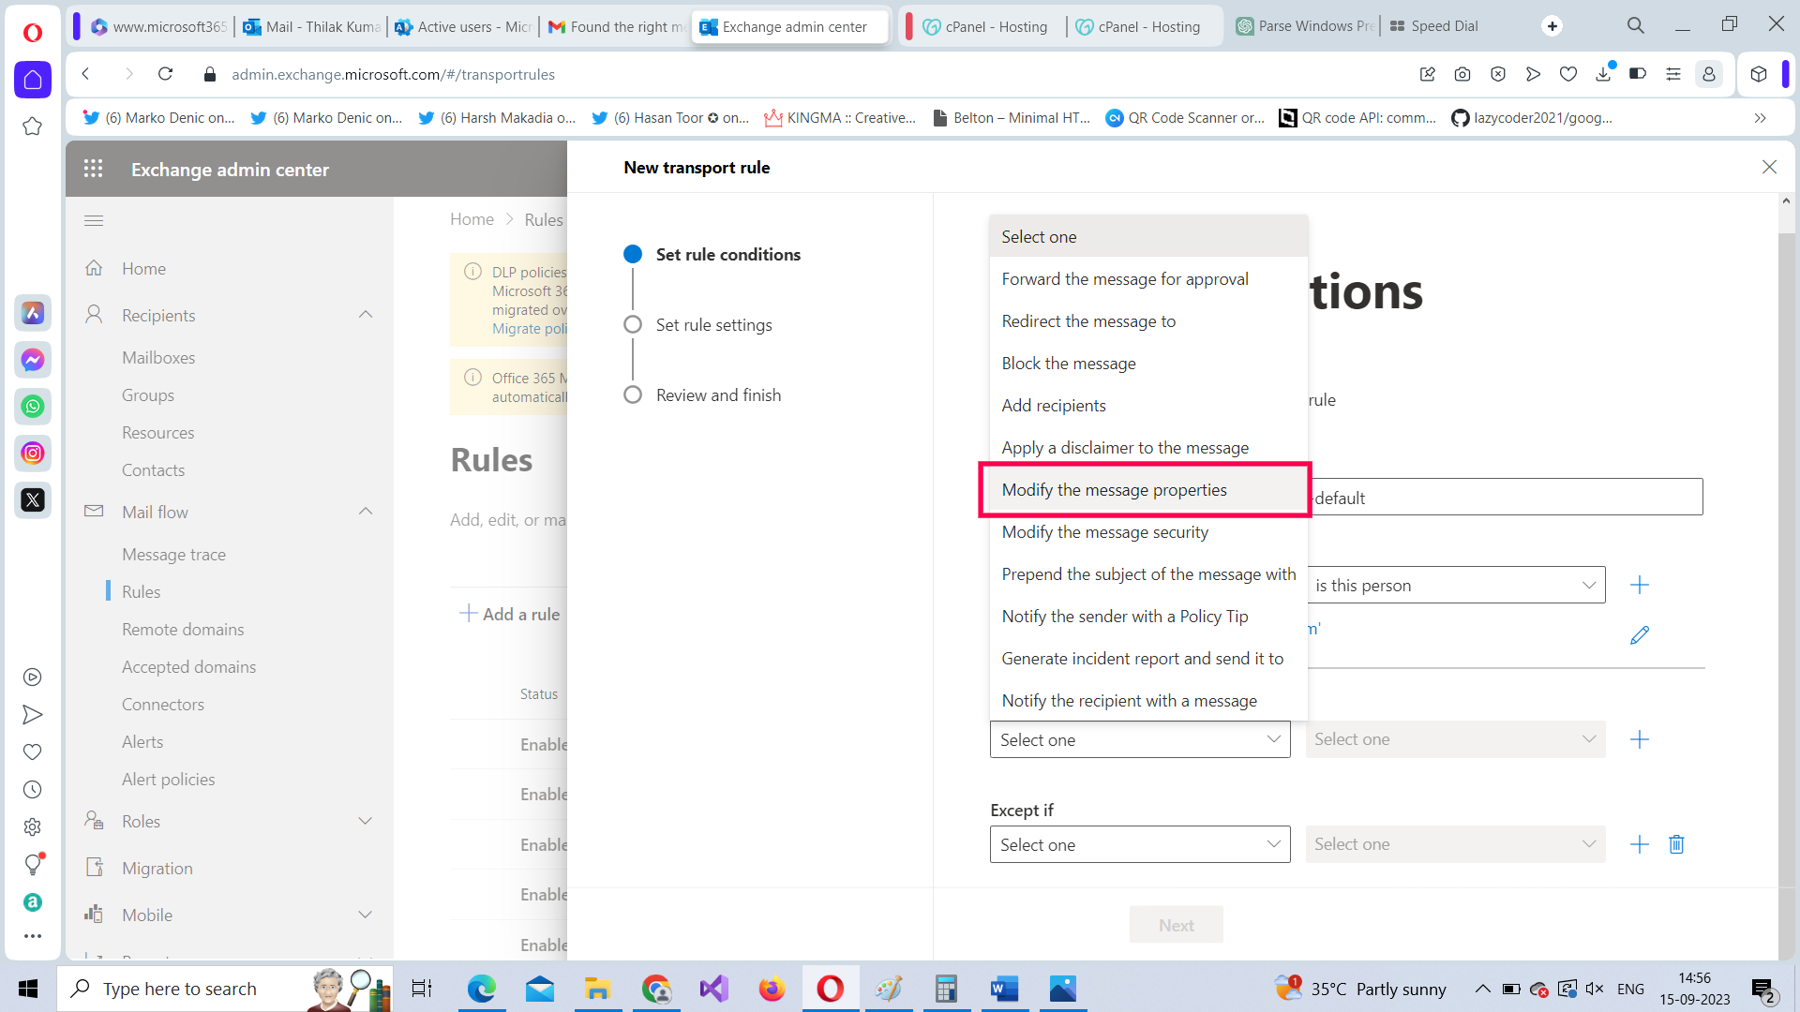
After you add a name for the mail rule and set the values of Apply this rule if in the drop-down menus, configure the message header. From the Do the following dropdown, select Modify the message properties, as shown in Figure 2.
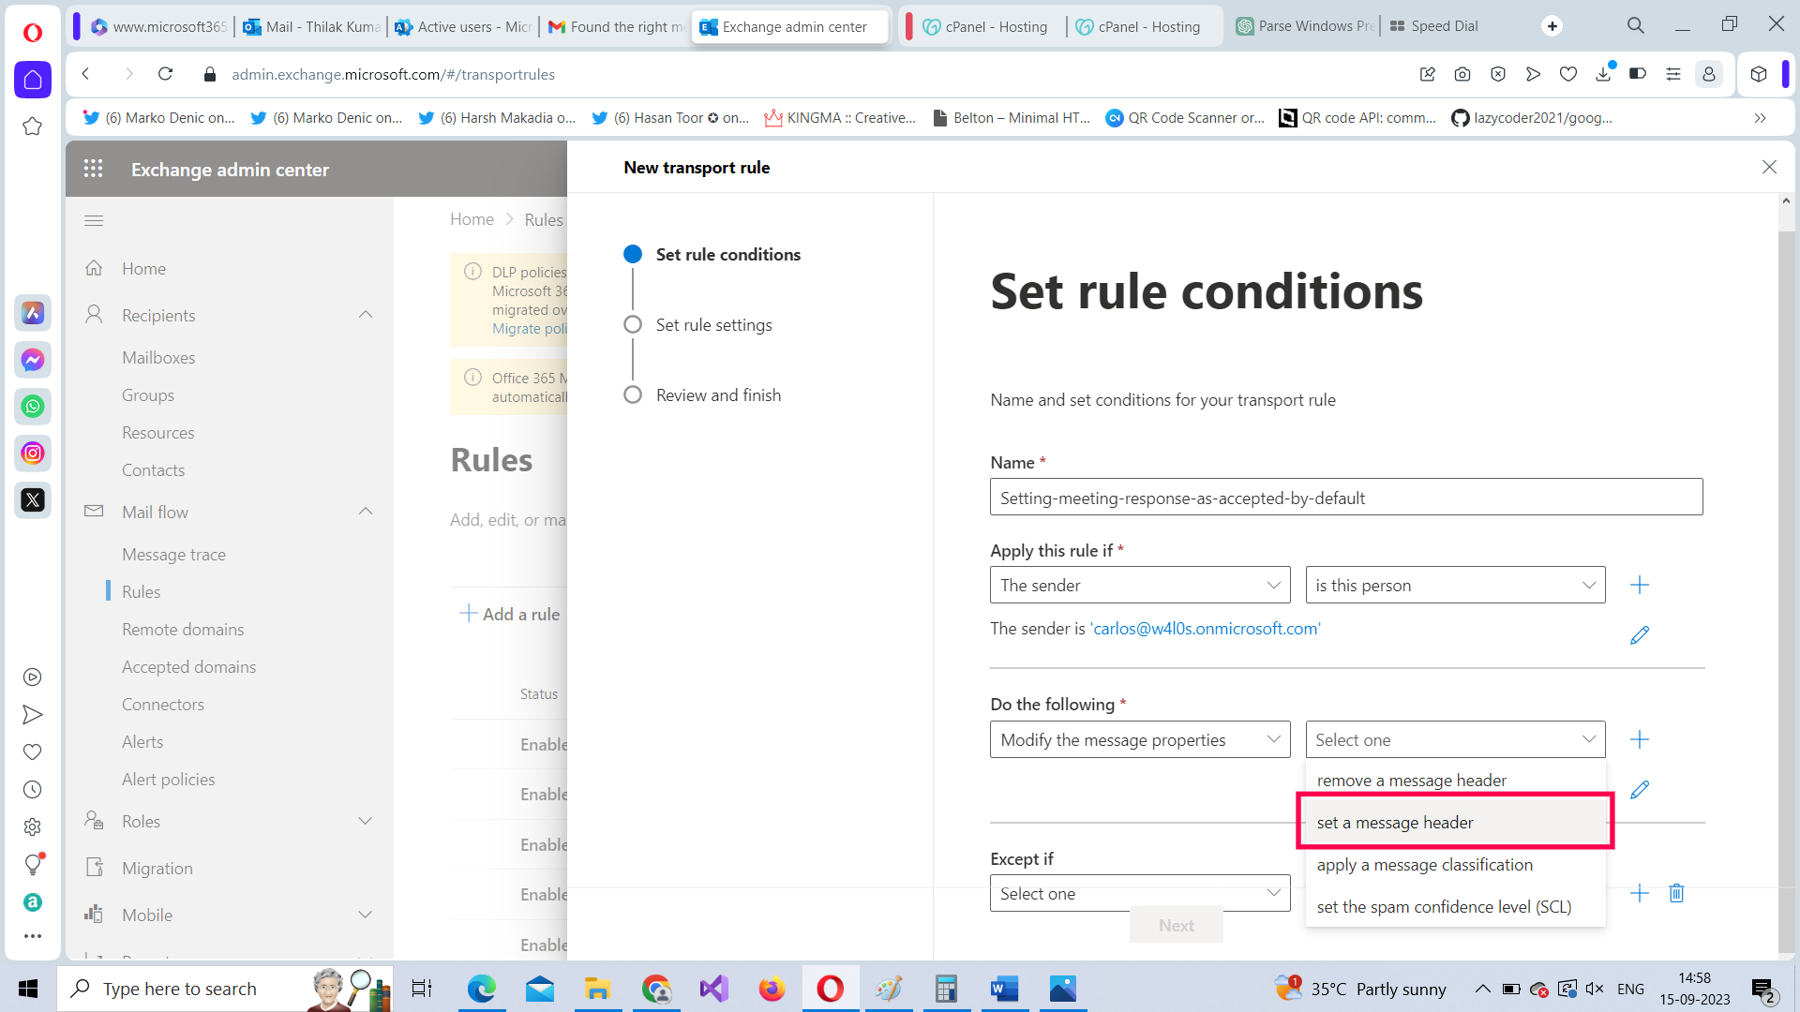
For Modify the message properties, select set a message header option as the value, as shown in Figure 3.
Your mail flow rule pane at this point should look like the one shown in Figure 4.
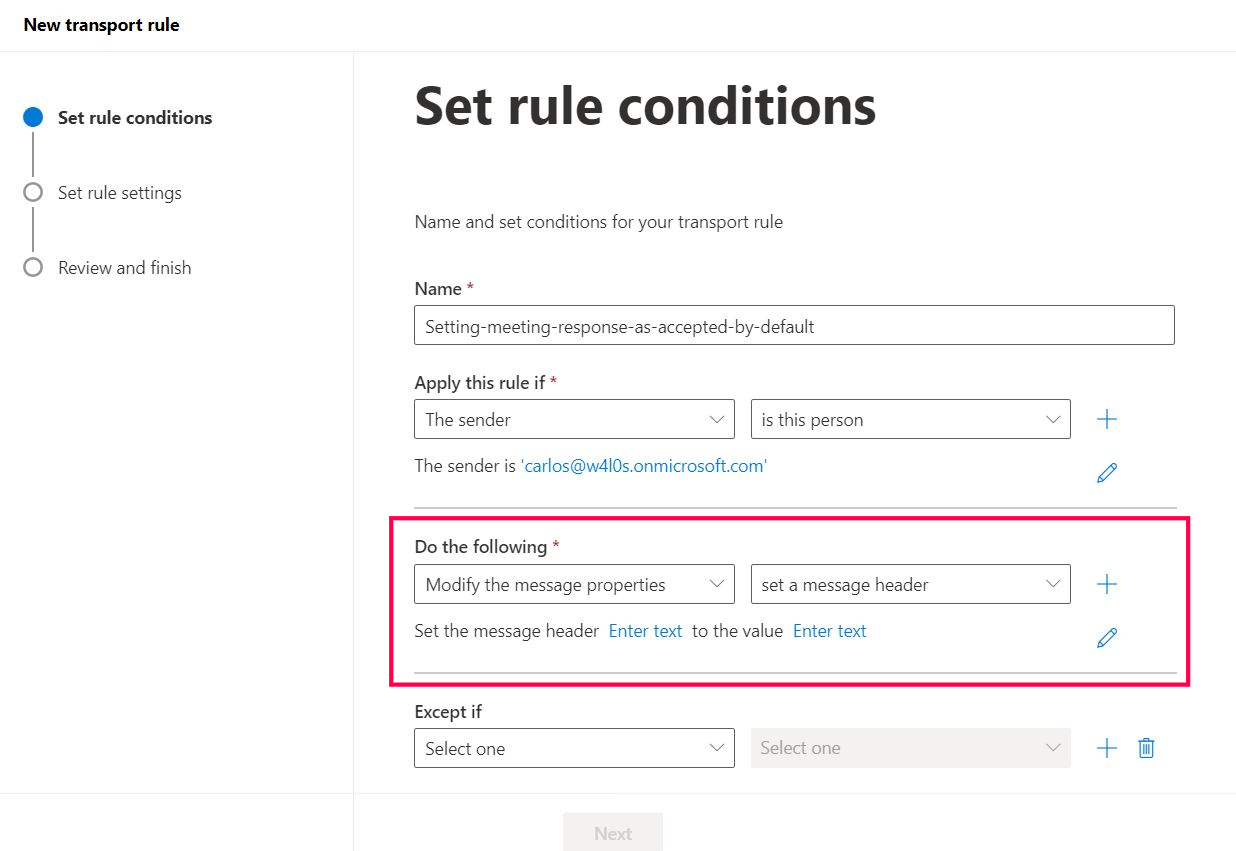
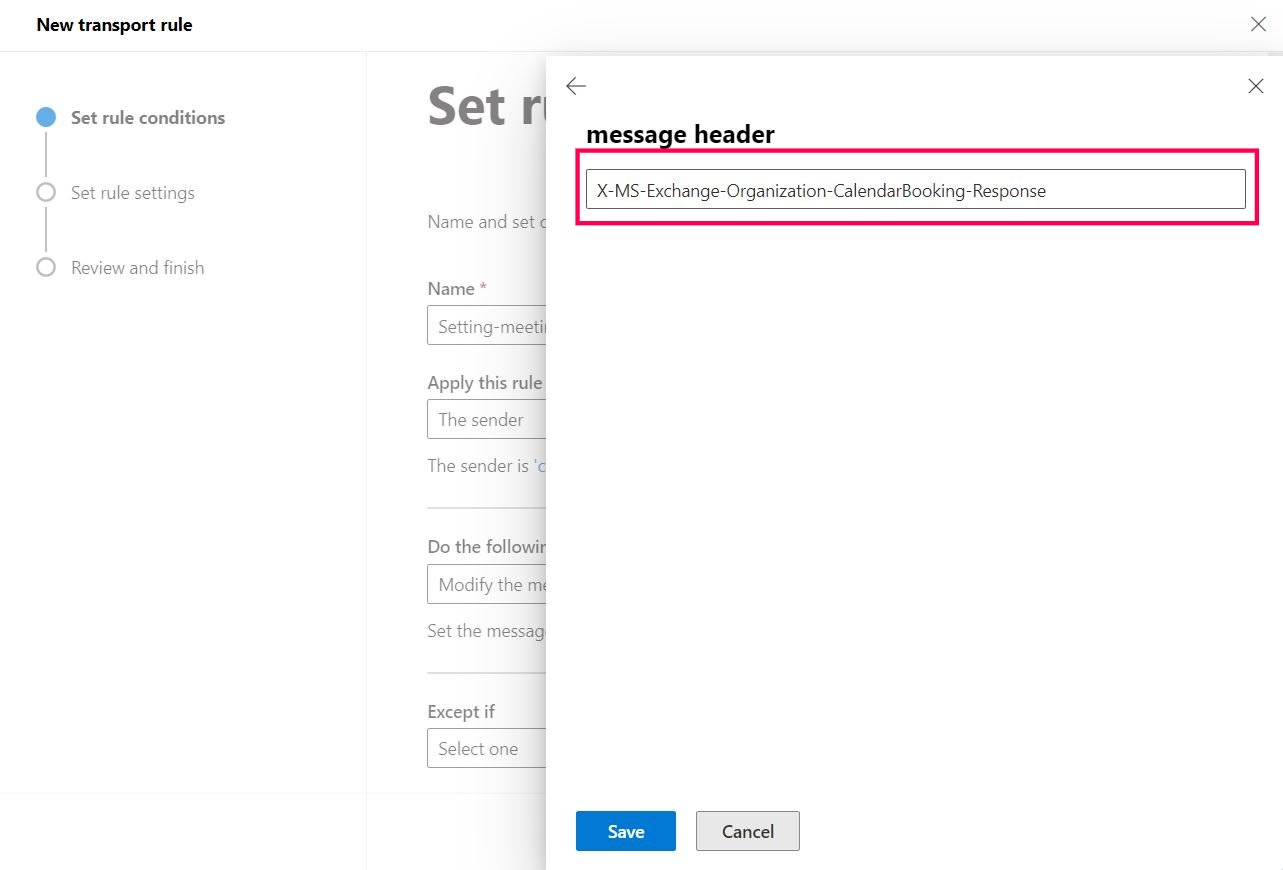
Select the first Enter text link (Figure 4) and enter the message header parameter as X-MS-Exchange-Organization-CalendarBooking-Response, as shown in Figure 5, and select Save.
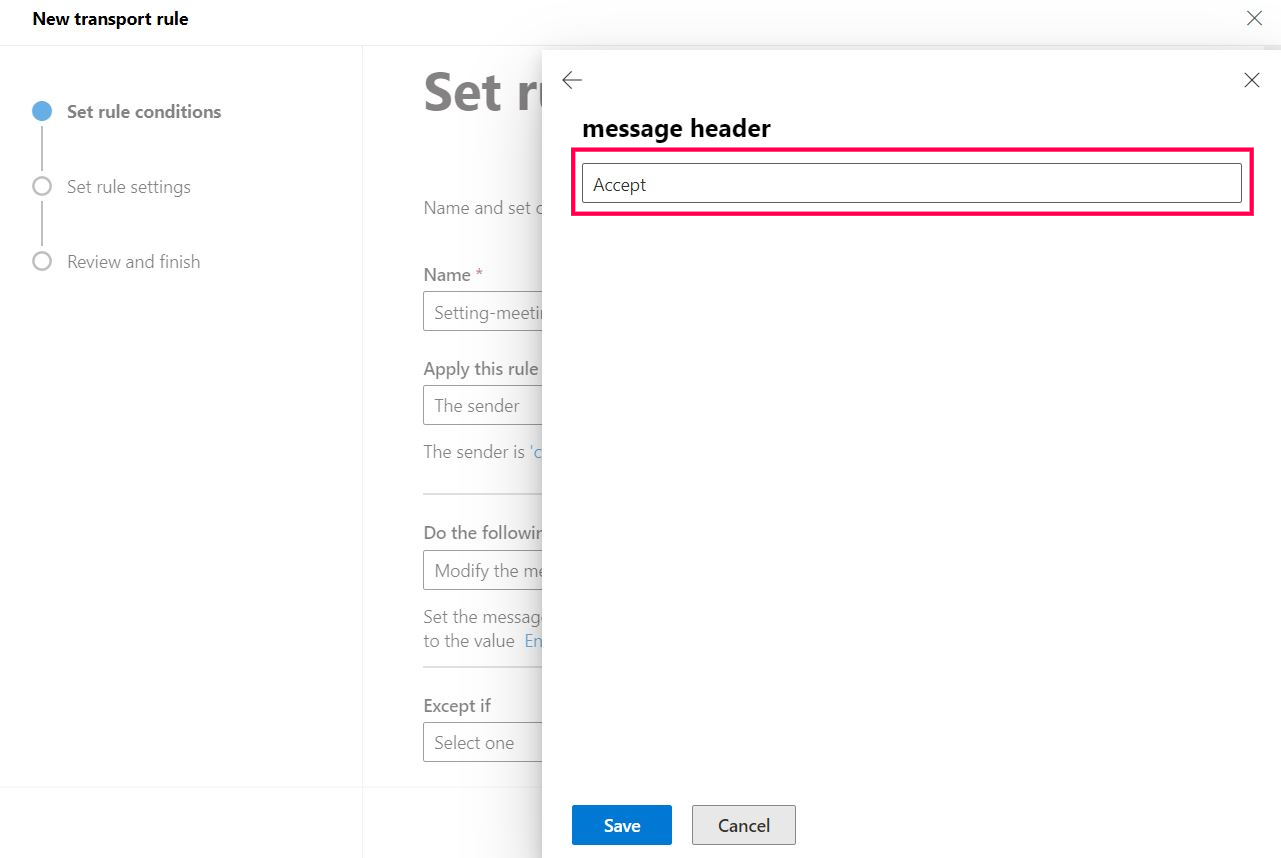
Select the second Enter text link (Figure 4), enter the message header parameter’s value as Accept, as shown in Figure 6, and select Save.
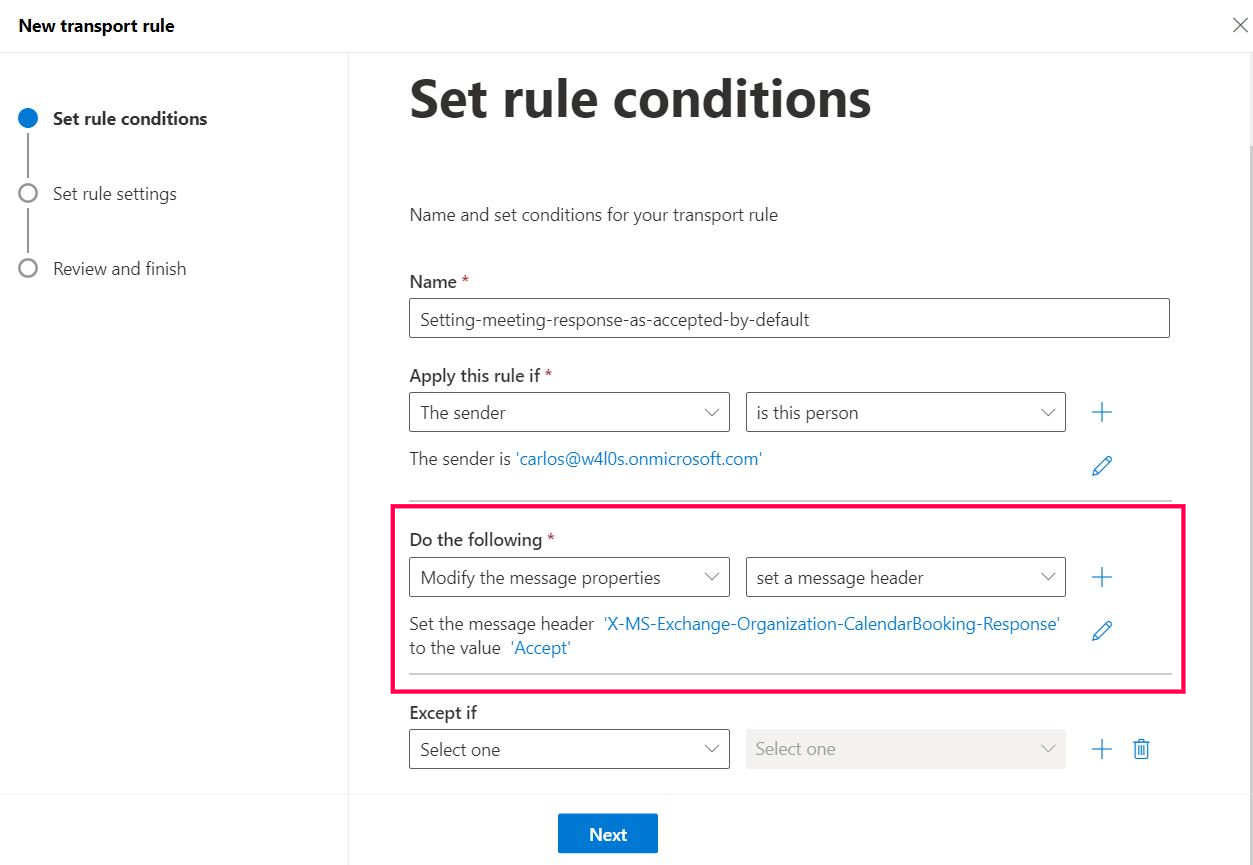
Your mail flow rule pane at this point should look like the one shown in Figure 7.
Select Next and proceed with configuring the settings for the rule. To configure a mail flow rule’s setting, read How to Create Mail Flow Rules from Scratch Using the Microsoft 365 Exchange Admin Center and Windows PowerShell. After you configure the rule, test whether it works.
Testing Whether the Configured Rule Works
To test whether the configured rule works:
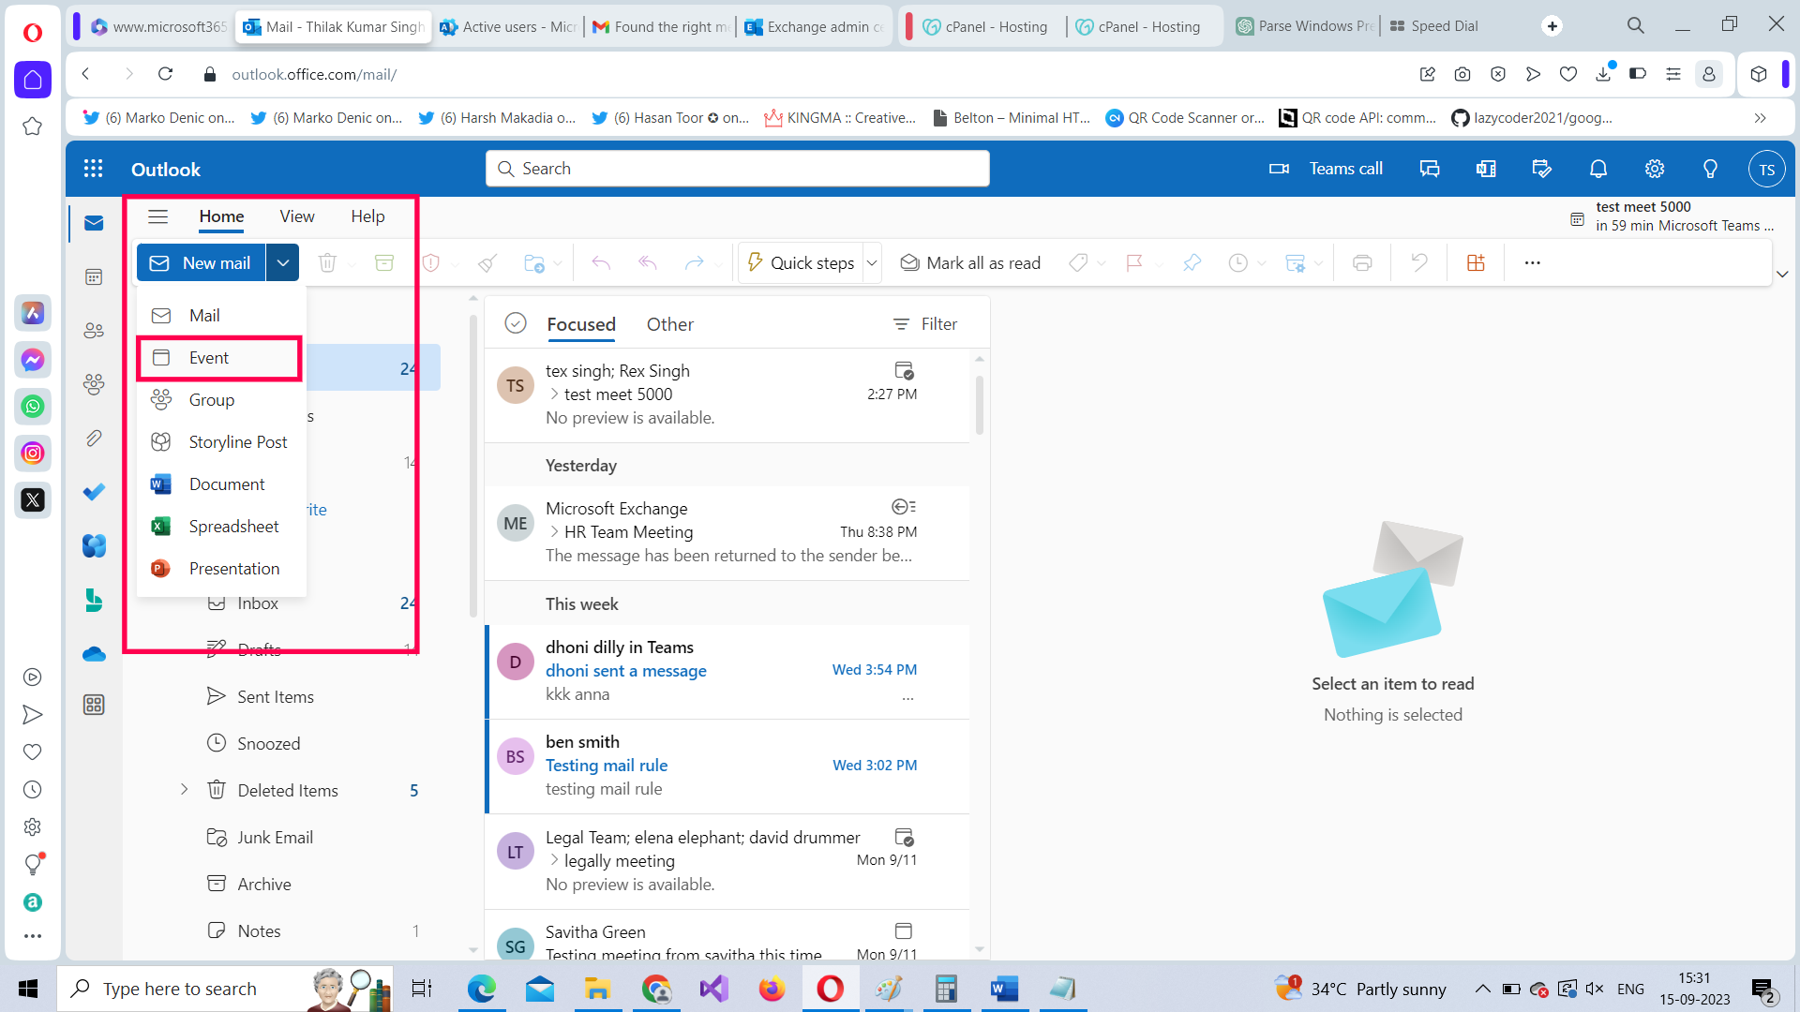
Sign in with the sender account (which was granted the rights to set meetings with accepted as the default response) and access Outlook on the web. Next, set up a meeting by selecting New mail > Event, as shown in Figure 8.
Fill in the meeting’s details, as shown in Figure 9, and then select Send.
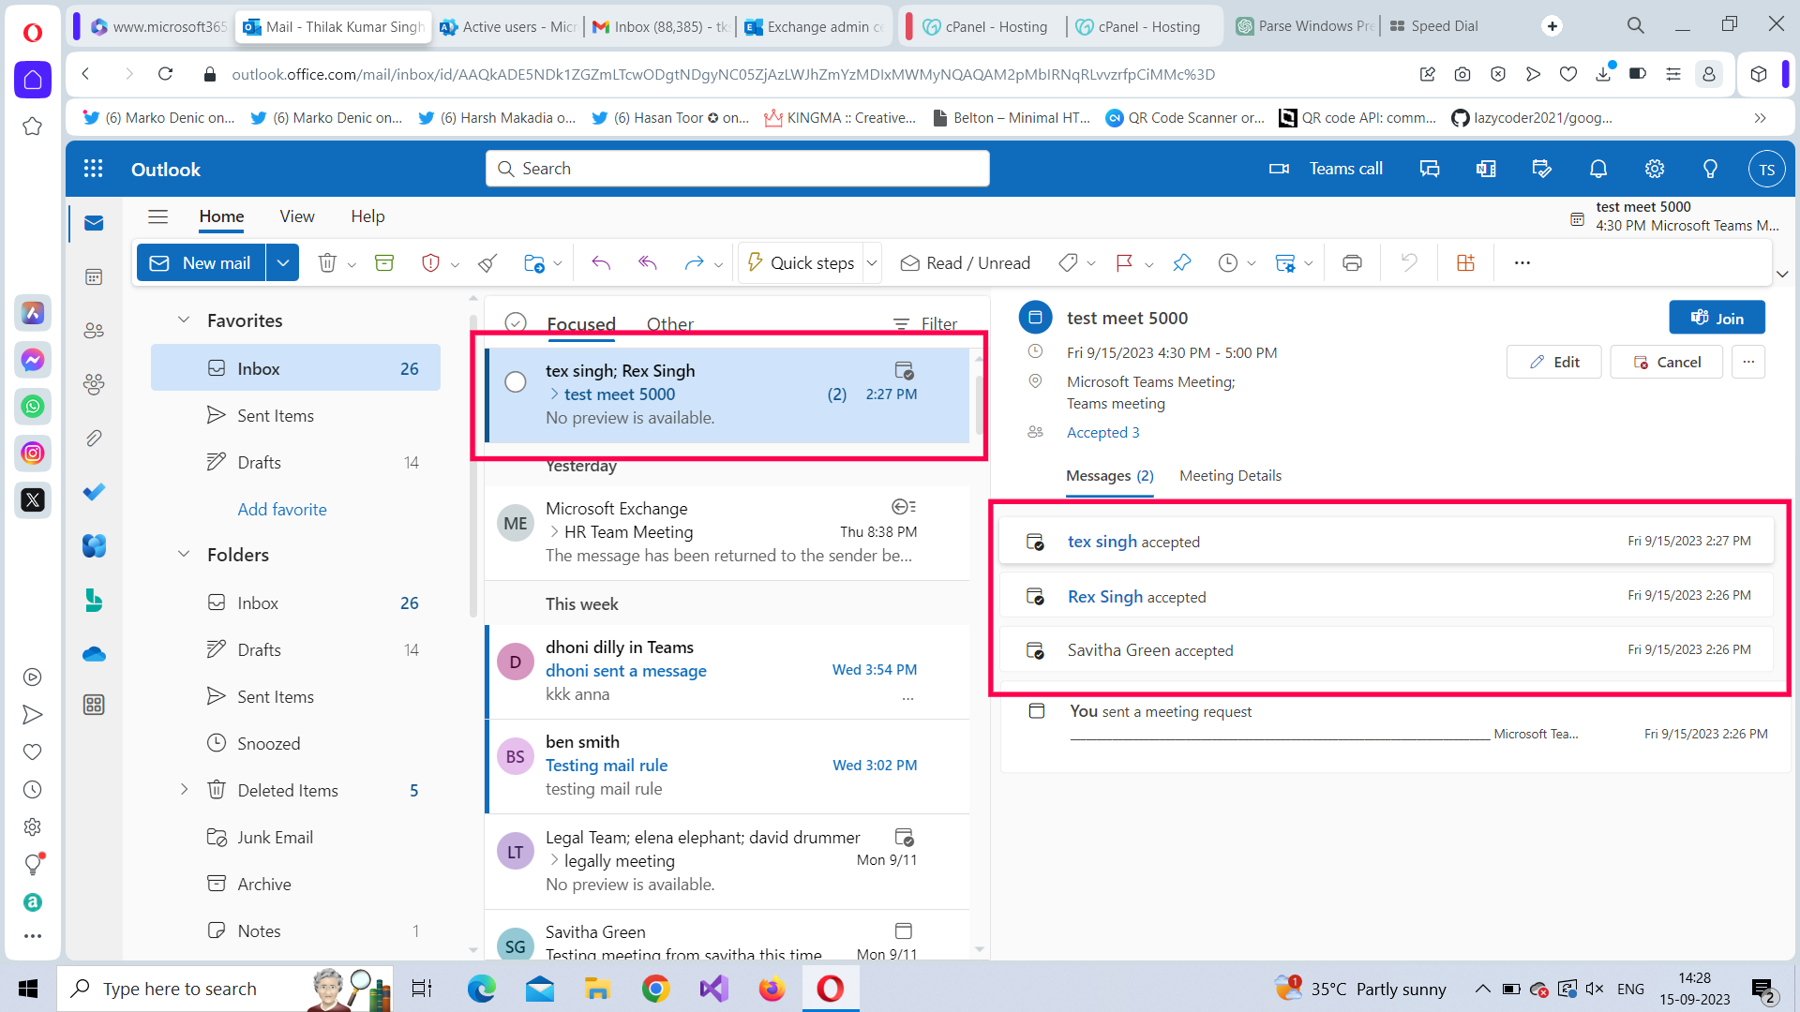
Wait for a few minutes and you’ll get an all-accepted meeting response, as shown in Figure 10. This is the only meeting-related attendee response you will get, instead of the usual user X accepted, user y declined, and similar annoying meeting responses from your attendees.
Creating the Same Rule Using PowerShell
To create the same mail flow rule using PowerShell:
- Run your Windows PowerShell as an administrator.
- Connect to Microsoft 365 Exchange Online using the Connect-Exchange cmdlet. Read How to Connect to Microsoft 365 Exchange Online With PowerShell for more info.
- Run the following, as shown in Figure 11:
New-TransportRule -Name "Setting Meeting Response as Accepted by Default" -From "rex@w4l0s.onmicrosoft.com" -SetHeaderName "X-MS-Exchange-Organization-CalendarBooking-Response" -SetHeaderValue Accept

How Does the Script Work?
Let’s break down the script:
- Use the New-TransportRule cmdlet for creating the mail flow rule.
- Pass in the name of the rule within double quotes, as shown earlier in Figure 11.
- Set the -From parameter value to rex@contoso.com.
- Set the -SetHeaderName parameter value to X-MS-Exchange-Organization-CalendarBooking-Response.
- Set the -SetHeaderValue parameter value to Accept.
To find out whether the rule has been successfully created, run the Get-TransportRule <name of the rule> command.
Note: (3) is the condition and (4) and (5) are the actions. This rule does not have any exceptions.
Use Case 2: Adding Meeting Details Directly to the Attendees’ Calendar (Solution to the Attendee Issue]
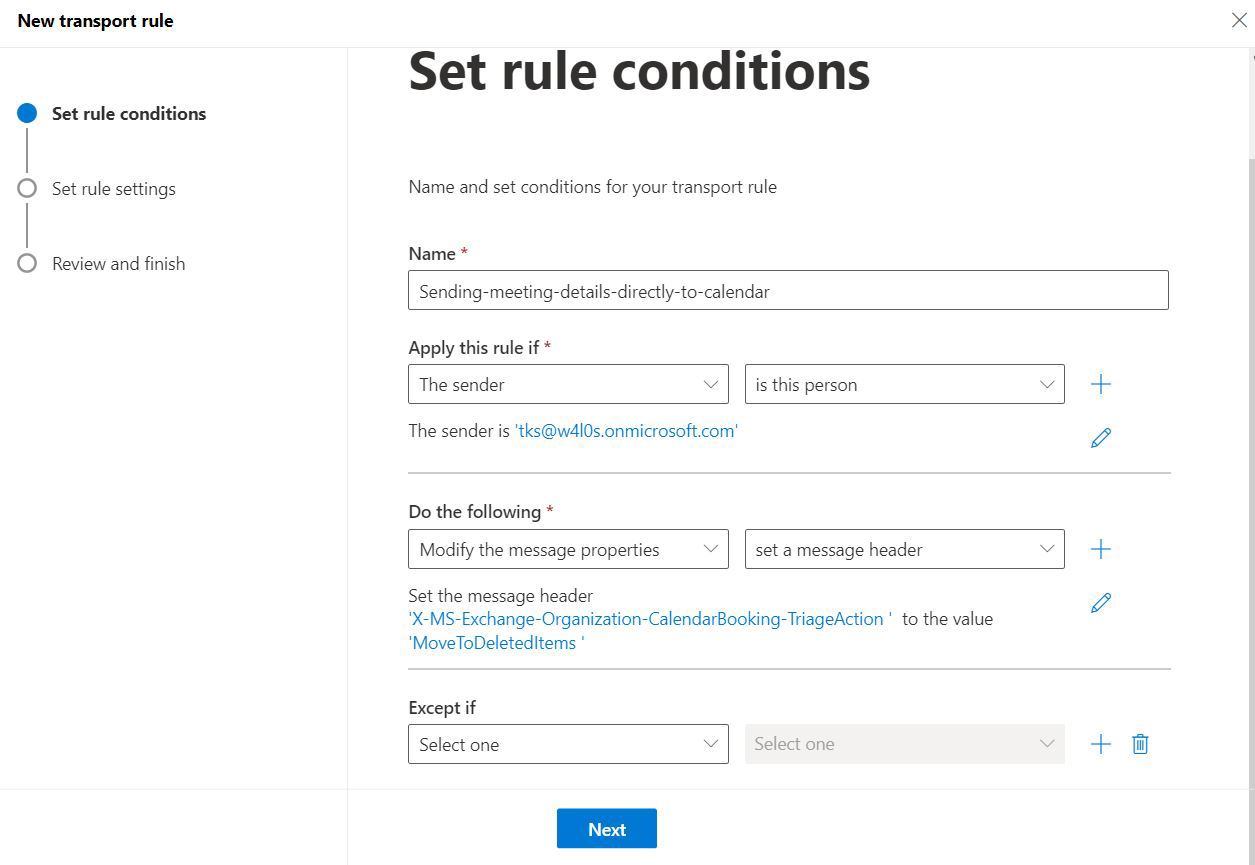
To configure a mail flow rule that sends the meeting details directly to the attendee calendar (without sending them to the attendees’ inbox), configure the rule’s conditions as shown in Figure 12.
Setting the Message Header
After you add a name for the mail rule and set the values of the Apply this rule if dropdowns, configure the message header.
From the Do the following dropdown, select Modify the message properties, as shown in Figure 13.

Select set a message header option as the value for the Modify the message properties parameter, as shown in Figure 14.
Your mail flow rule pane at this point should look like the one shown in Figure 15.
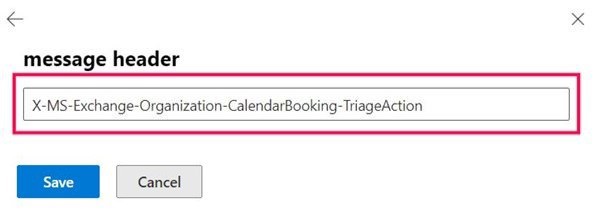
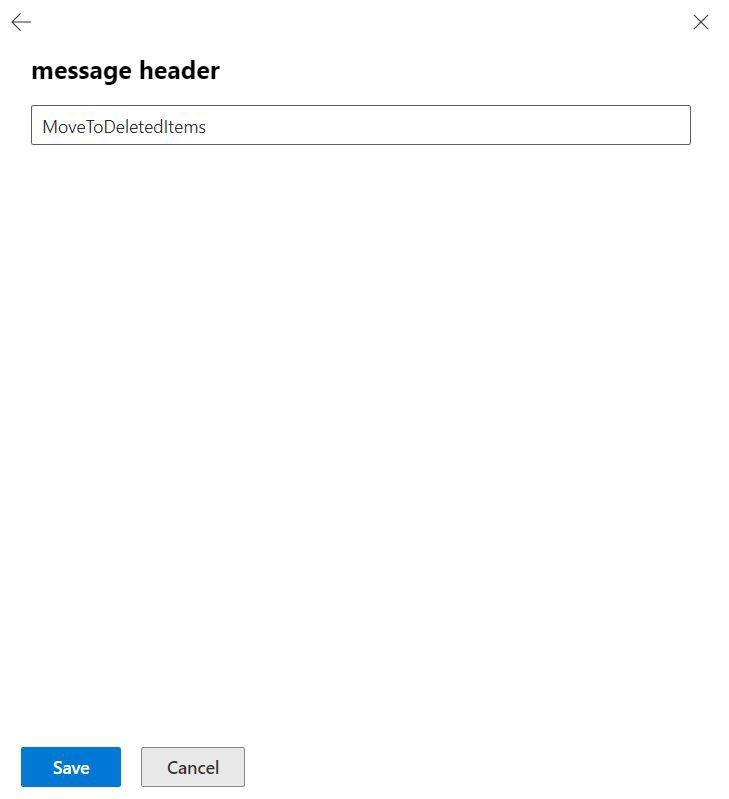
Select the first Enter text link (Figure 15), enter the message header parameter as X-MS-Exchange-Organization-CalendarBooking-TriageAction, as shown in Figure 16, and then select Save.
Now select the second Enter text link (Figure 15), enter the message header parameter’s value as Accept, as shown in Figure 17, and then select Save.
Your mail flow rule pane at this point should look like the one shown in Figure 18.
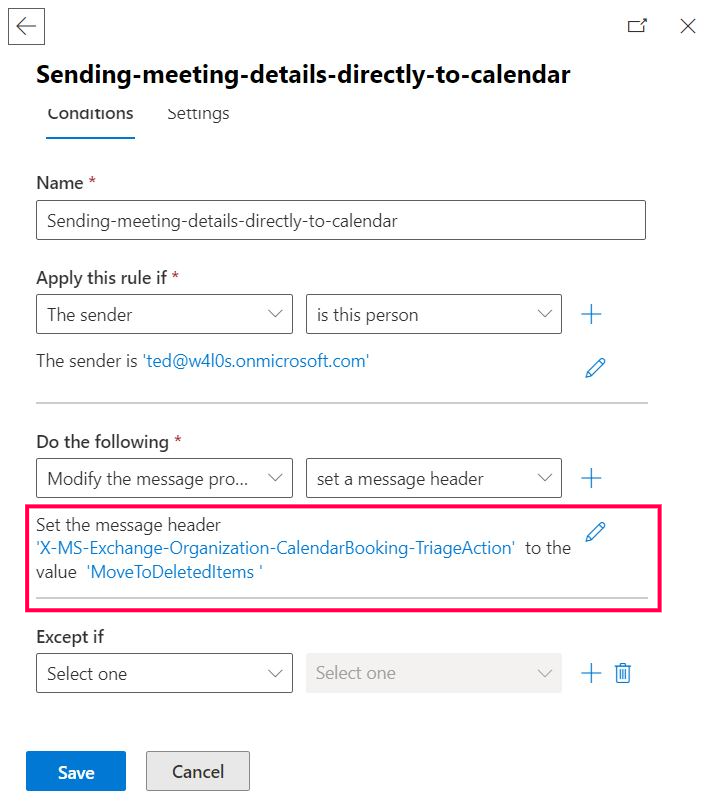
Select Next and proceed with configuring the settings for the rule. To find out how to configure a mail flow rule’s setting, read How to Create Mail Flow Rules from Scratch Using the Microsoft 365 Exchange Admin Center and Windows PowerShell. After you configure the rule, test whether it works.
Testing Whether the Configured Rule Works
To test whether the configured rule works:
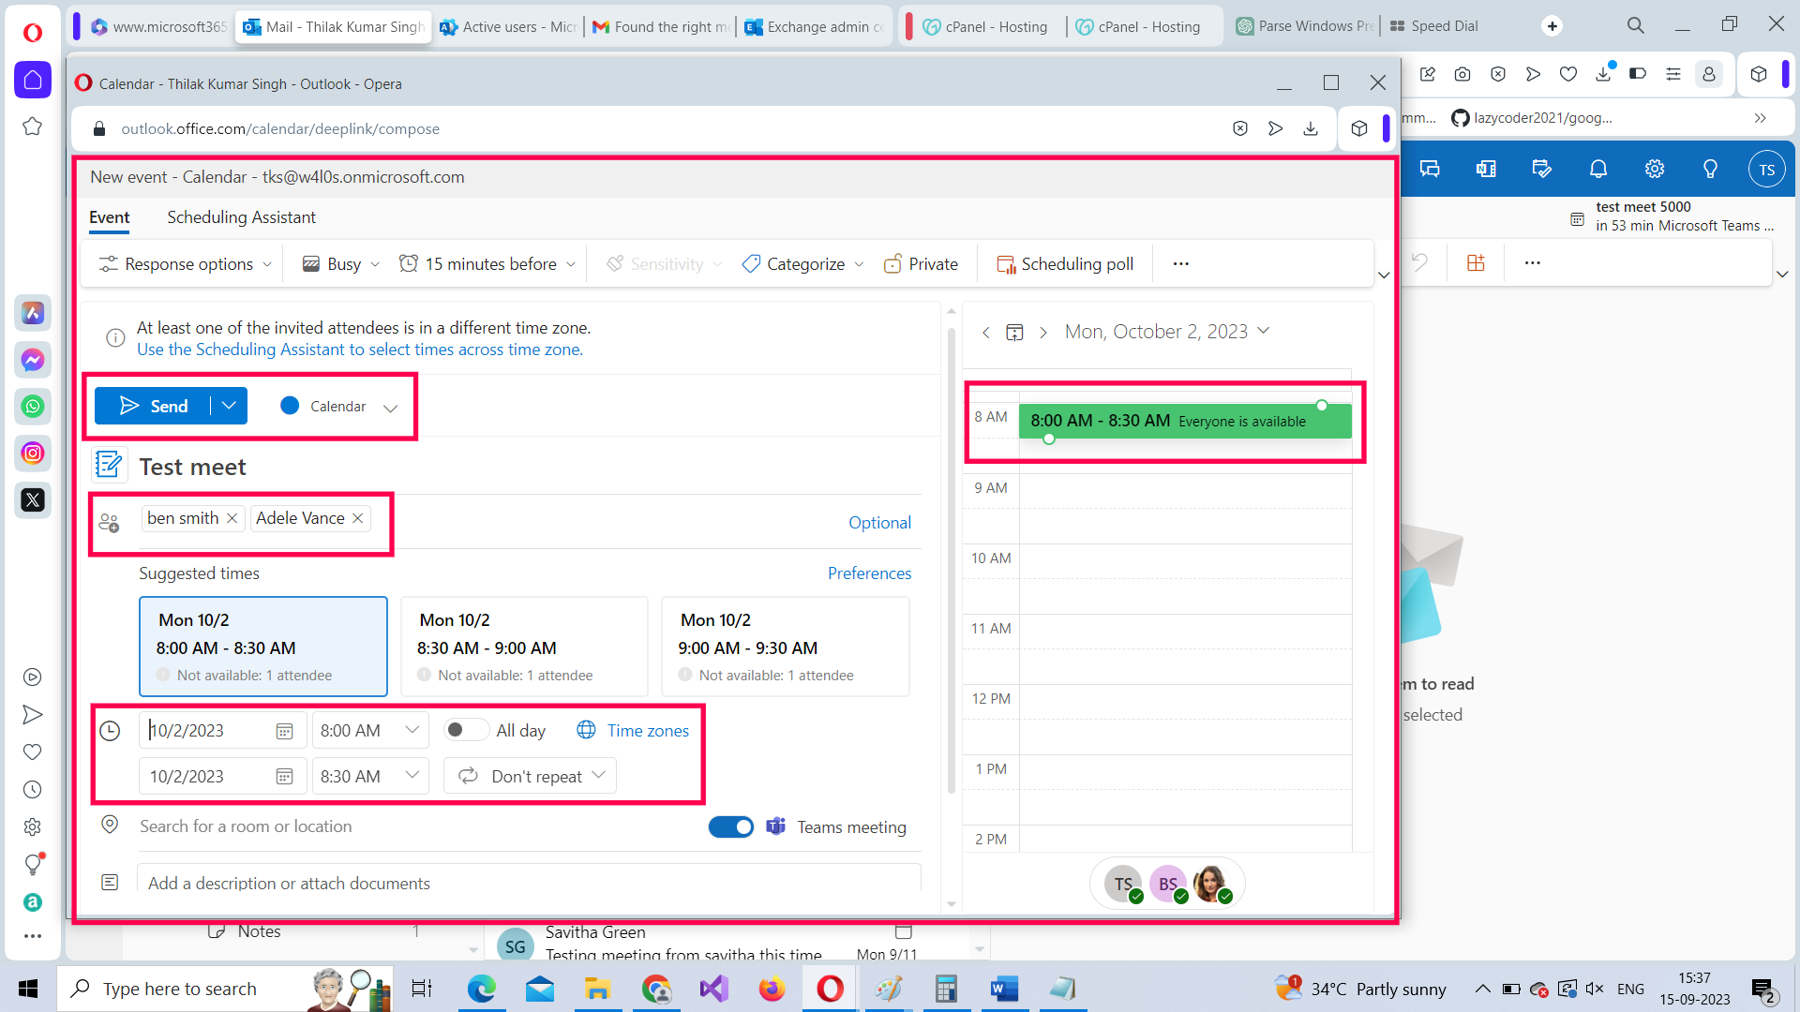
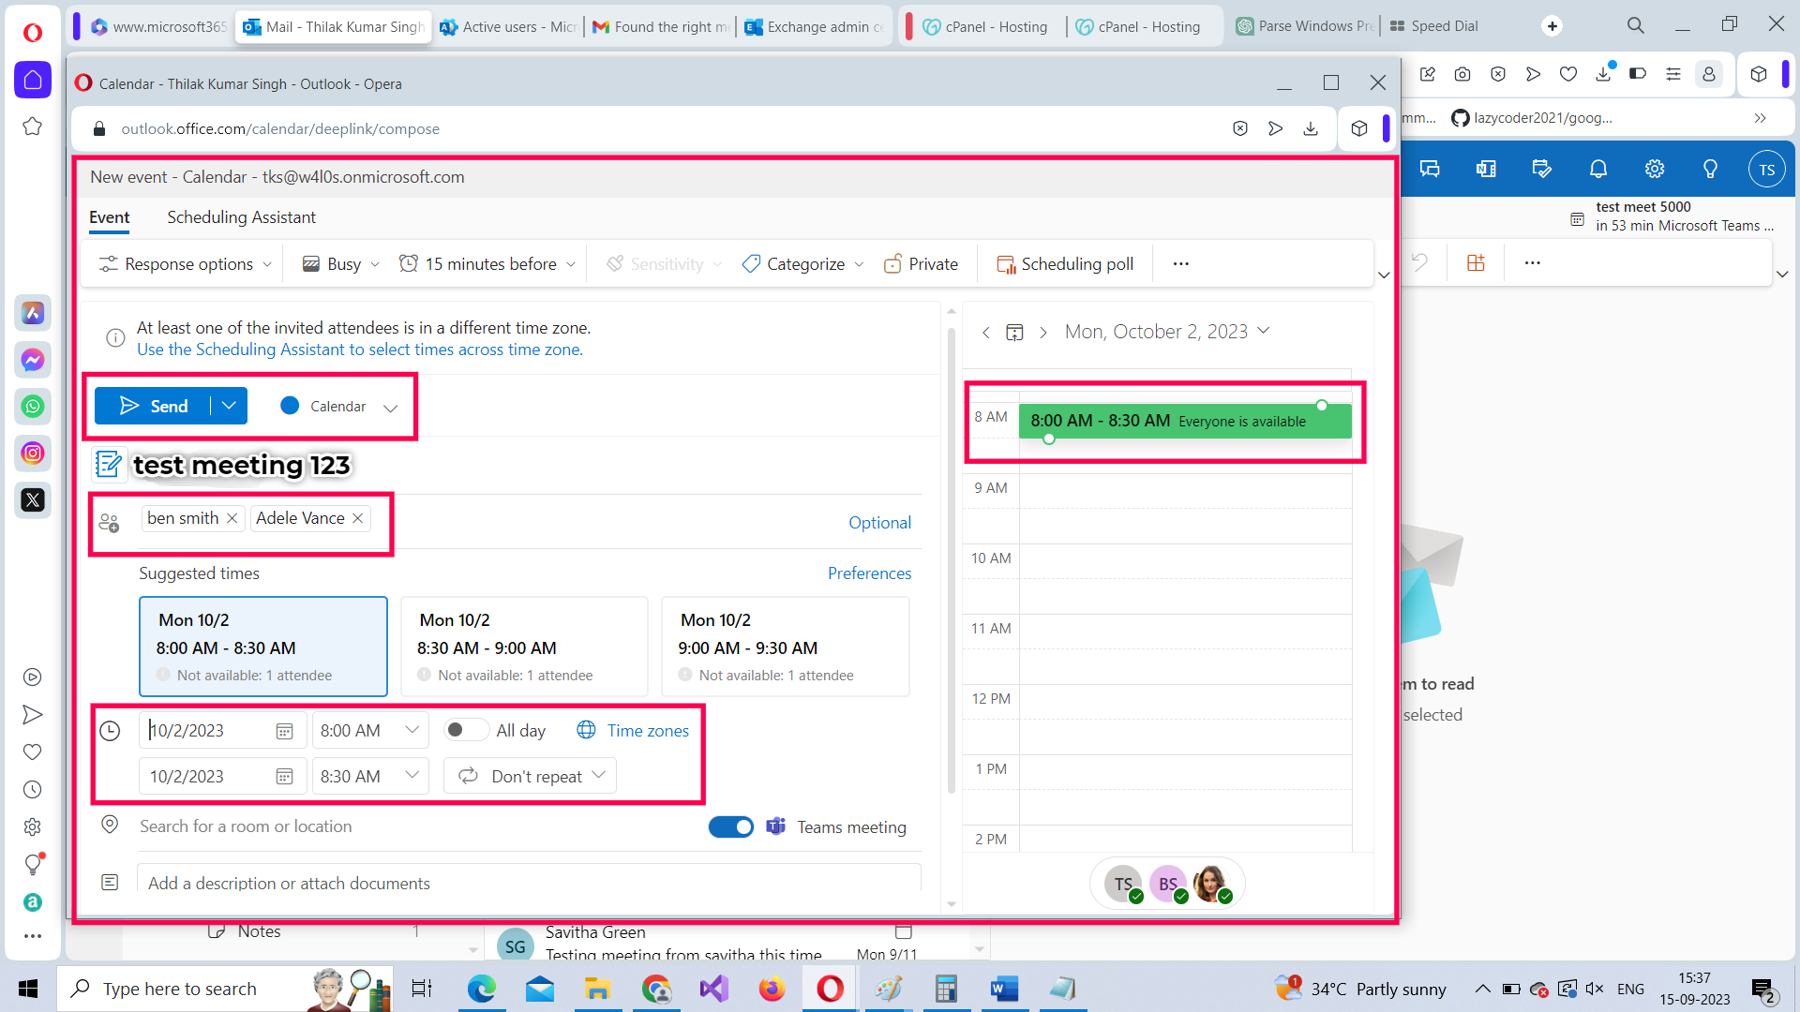
Sign in with the sender account (which was granted the right to send meetings directly to the attendee calendar) and access Outlook on the web. Next, set up a meeting by selecting New mail > Event, as shown in Figure 19.

Fill in the meeting’s details as shown in Figure 20, and then select Send.
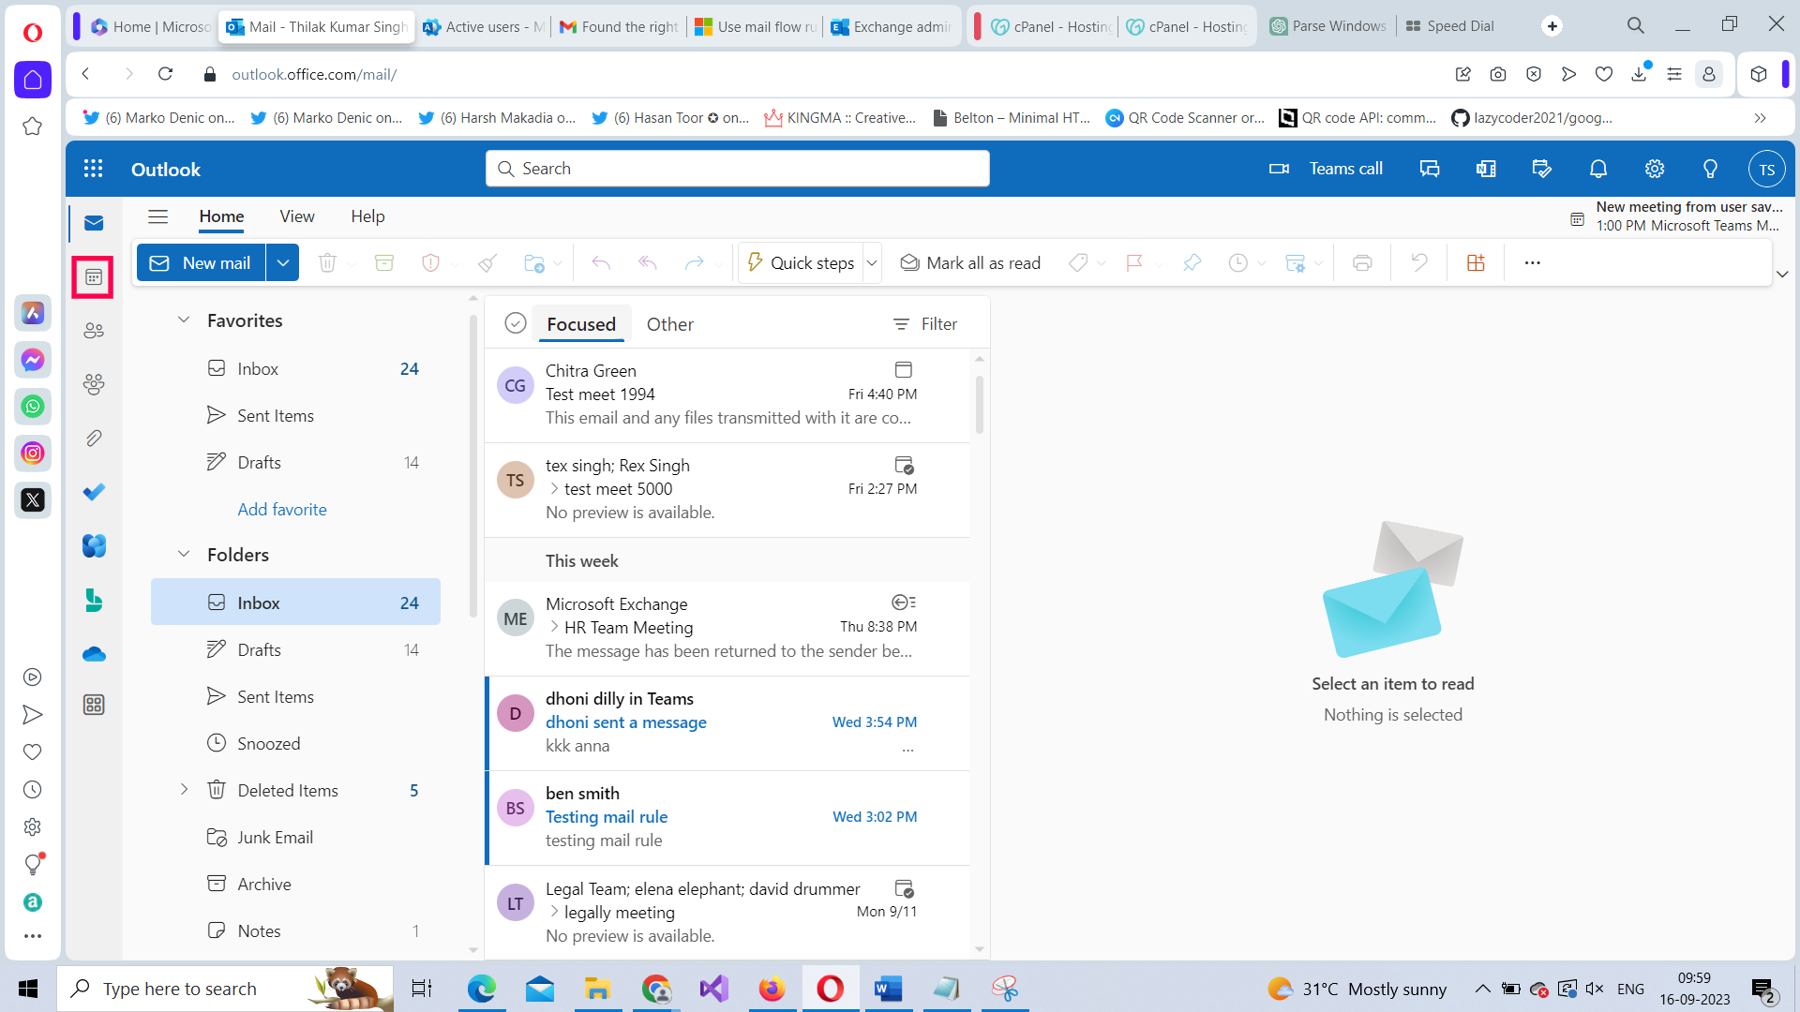
Sign out and sign in using one of the meeting attendee accounts. You’ll notice there is no meeting-related notification mail in the inbox. Now go to the user’s calendar by selecting the calendar tab, as shown in Figure 21.
Notice that the meeting details get listed in the user’s calendar, as shown in Figure 22.
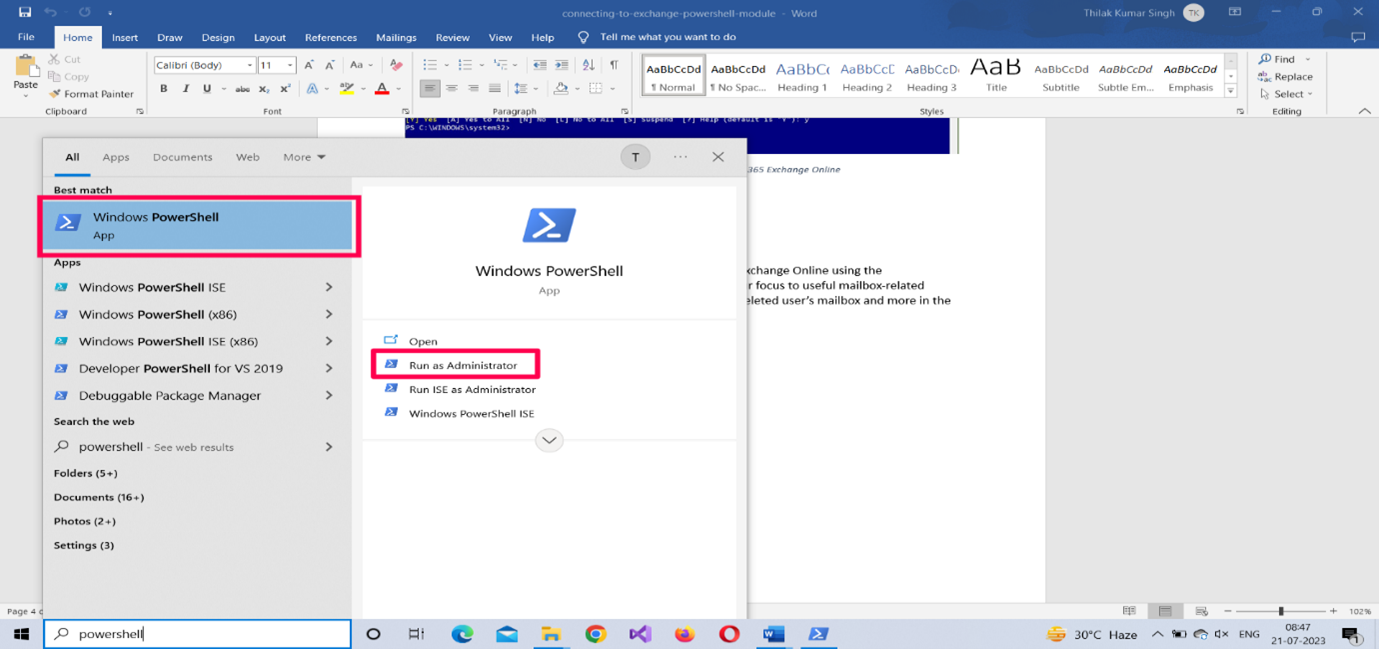
Note: You can still locate the meeting details in the Deleted Items folder of the user inbox as shown in Figure 23. If you remember, you set the message header value of the mail flow rule as MoveToDeletedItems. So, the meeting details were automatically moved to the Deleted Items folder, to save the user from unnecessary meeting-related notifications.
Creating the Same Rule Using PowerShell
To create the same mail flow rule using PowerShell:
- Run your Windows PowerShell as an administrator.
- Connect to Microsoft 365 Exchange Online using the Connect-Exchange cmdlet. Read How to Connect to Microsoft 365 Exchange Online With PowerShell for more info.
- Run the following, as shown in Figure 24:
New-TransportRule -Name "Send meeting details directly to calendar" -From farah@w4l0s.onmicrosoft.com -SetHeaderName "X-MS-Exchange-Organization-CalendarBooking-TriageAction" -SetHeaderValue MoveToDeletedItems

How Does the Script Work?
Let’s break down the script:
- Use the New-TransportRule cmdlet for creating the mail flow rule.
- Pass in the name of the rule within double quotes, as shown earlier in Figure 24.
- Set the -From parameter value to farah@contoso.com.
- Set the -SetHeaderName parameter value to X-MS-Exchange-Organization-CalendarBooking-TriageAction
- Set the -SetHeaderValue parameter value to MoveToDeletedItems.
To find out whether the rule has been successfully created, run the Get-TransportRule <name of the rule> command.
Note: (3) is the condition and (4) and (5) are the actions. This rule does not have any exceptions.
Possible Errors You Might Face
Here are some possible errors you might face and ways to rectify them:
- Whitespace in your mail flow rule’s name: Ensure you name your mail rules without any whitespace between them, as this can throw errors. Remember that whitespace causes errors only when you are creating your rules using the EAC, not when you are using PowerShell.
- Typos in your message header and message header value: Ensure you get the message header and its value right. You should enter them exactly as it has been provided in this article. If not, you won’t be able to save/run your rule successfully.
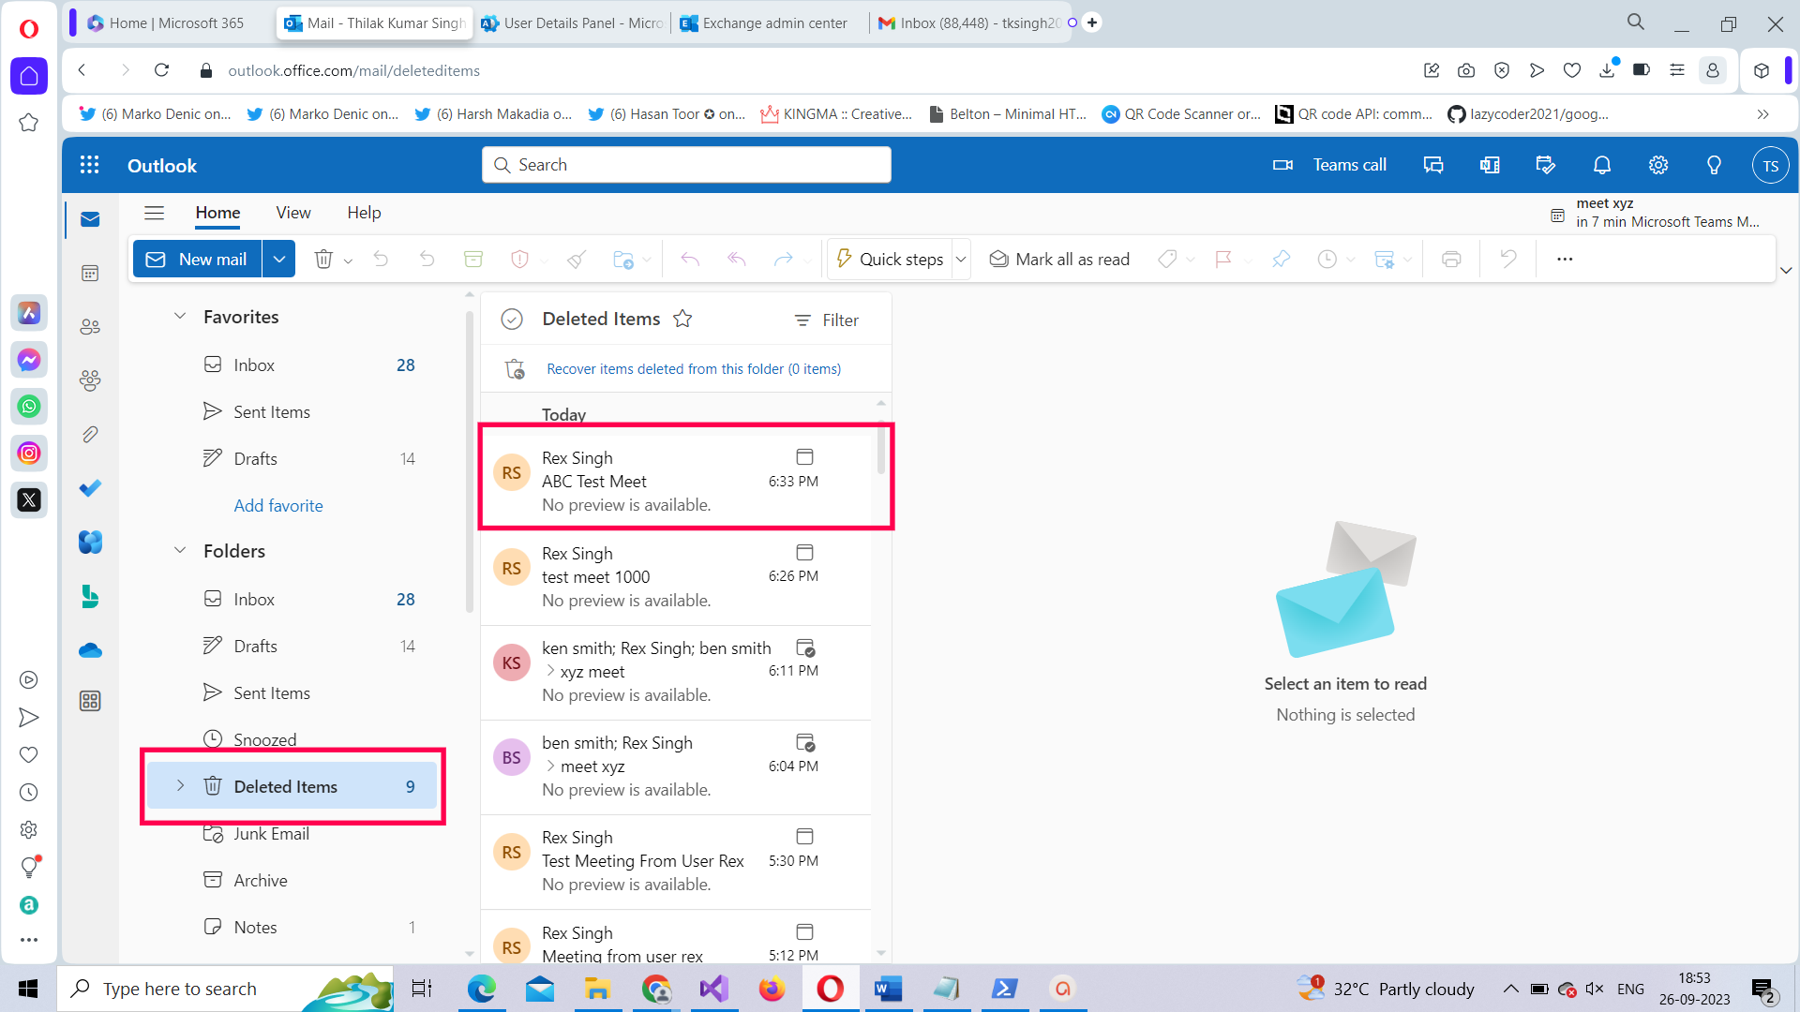
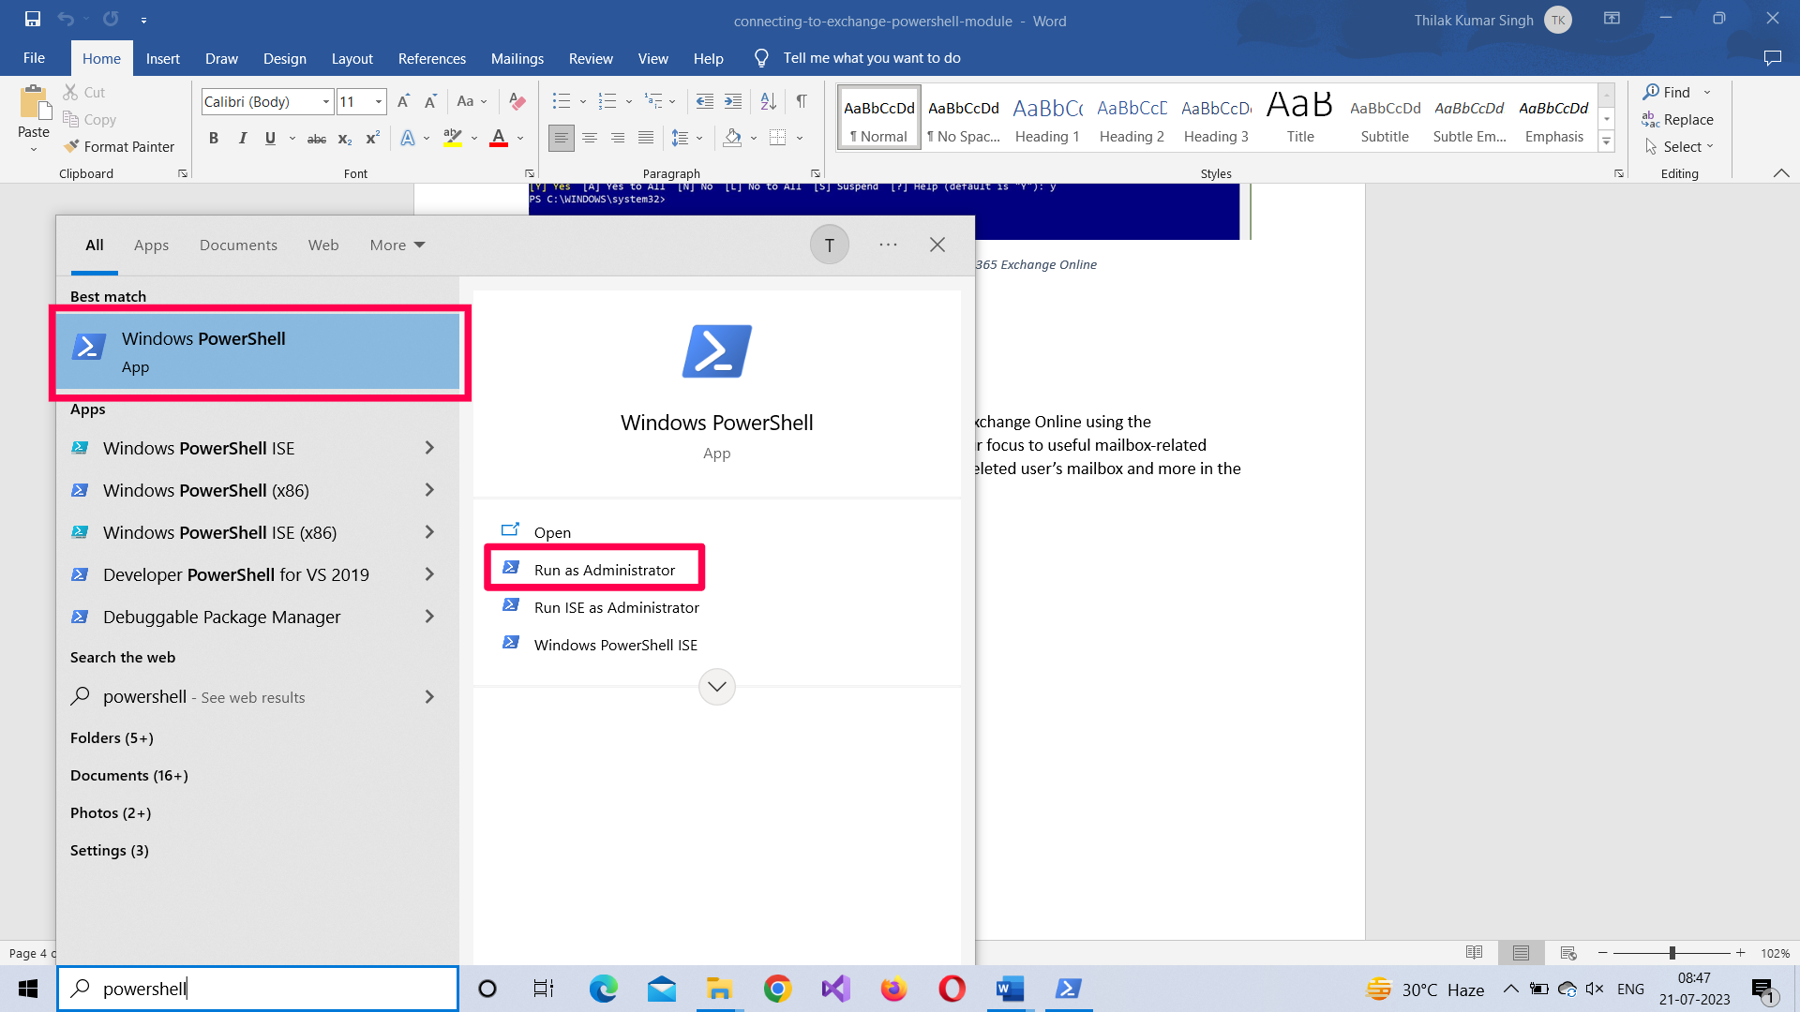
- Not running your shell as administrator: Select the PowerShell program from the Windows start menu and choose Run as administrator, as shown in Figure 25.
- Execution Policy set to restricted mode: Execution policy setting determines the script execution rights for the current user. If you are signing in for the first time, chances are this is set to ‘restricted’ mode. So, ensure the execution policy is set to RemoteSigned (which allows you to execute your scripts) by running the Set-ExecutionPolicy RemoteSigned command.
Note: To check your current script execution rights, run the Get-ExecutionPolicy command.
- Typos in your PowerShell script: You can run into typos even while copying/pasting scripts. So, it’s best to save your scripts in separate .ps1 files and execute them. This not only saves time but also prevents your script from running into unnecessary errors.
Conclusion
In the final part of this series on mail flow rules, let’s focus on the part that I have ignored so far – the exceptions. Let’s create a couple of mail flow rules with exceptions this time and see how they can be useful in overriding the configured mail flow rule when the situation demands it.
For Those Who Like to Watch and Learn
The following is a 9-minute video version of this article. It shows you how to create mail flow rules that reduce Outlook meeting notifications using the Microsoft 365 Exchange admin center and PowerShell.


