Create a Simple but Smart Teams Bot With Azure OpenAI and Copilot Studio

Azure OpenAI Services are powerful, especially when you connect them to your own data. Using large language models such as GPT-3.5 turbo or GPT-4, you can offer a natural language interface to your employees. This allows people to describe, in their own words, what they want, and you can use AI to categorize the question or purpose and pick up various keywords from the text.
But, as with any project, if you propose a large, complex, all-at-once plan to transition to AI services, you may find that it is also harder to get organizational resources and funding to get started—and getting started is what matters. Every organization should build proof-of-concepts and gain firsthand experience with how AI can help them today. Keeping this in mind, what I have seen happening recently is that employees and organizations want to get started easily; sometimes even a secure version of ChatGPT is enough to get them interested. Once that security question is answered, the second request is usually “how can we connect this to our own documents and use it instead of search?” followed closely by “how fast can you create this for us?” That is what I’ll focus on in this article: how to build a simple, but smart, AI assistant in Microsoft Teams that can use Azure OpenAI.
Why Use Azure OpenAI Instead of OpenAI?
Microsoft Azure OpenAI Service ensures that your data is your data, and it is not used for anything else. As Microsoft states in an article on Data, privacy and security for Azure OpenAI, “the Azure OpenAI Service is fully controlled by Microsoft,” and it “does NOT interact with any services operated by OpenAI.”
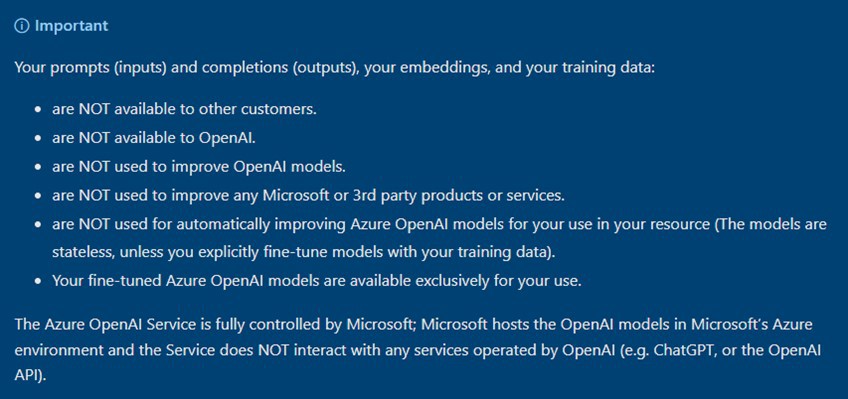
So, quite simply, use Azure OpenAI if, like most organizations, you want to keep your confidential data private. Corporate decision makers should be concerned about keeping their data private so the organization can use confidential information as needed. They should also know that responsible AI and governance are factors that AI projects need to address.
In my previous TekkiGurus article, I wrote about how to set up Azure OpenAI Service with your own data. This article assumes that you have it up and running. It is also assumed that you know what Copilots (previously Power Virtual Agents) and Power Automate are and have some skills to develop solutions with them. But don’t worry if you don’t have those skills—for example, if you are a decision maker or CxO in your organization—you can still follow the article, see what is possible and take those learnings to your technical team.
On November 15th 2023, at the Microsoft Ignite conference, Microsoft announced Copilot Studio, which is now in preview. Power Virtual Agents are now called Copilots and are built with Copilot Studio. Throughout this article, I use the old name Power Virtual Agents when referring to Copilots, as it can be confusing at this point when Copilot for Microsoft 365 is being widely discussed.
Copilot Studio is, in fact, the old Power Virtual Agent building interface (even the URL is the same for now). It now offers new ways to use generative AI with bots; you can even just upload some files to Copilot and use them as your own data for Answers. New features in Copilot Studio also include the ability to add a connection to Azure OpenAI Services as a data source. However, if you have more complex needs or want to have full control over API calls then you should still follow the process I describe in this article.
Creating the Bot
First, you need to create your bot. I recommend using the full version of Power Virtual Agents to do this if you are not using Azure API Management for Azure OpenAI calls. I don’t cover API Management in this article, but if you use that, you can save some licensing costs by using Dataverse for Teams to create your bot. There is a limitation in Dataverse for Teams Power Virtual Agents, so the example I illustrate here cannot be used one-to-one in that environment.
Note: Using the Power Virtual Agent full version has benefits, but you need to get licenses for that—or start a free trial to get started. I also use Power Automate for Azure OpenAI HTTP calls, which requires premium licensing. This can be done on a per flow or per user basis. You can also use a free trial of Power Automate Premium.
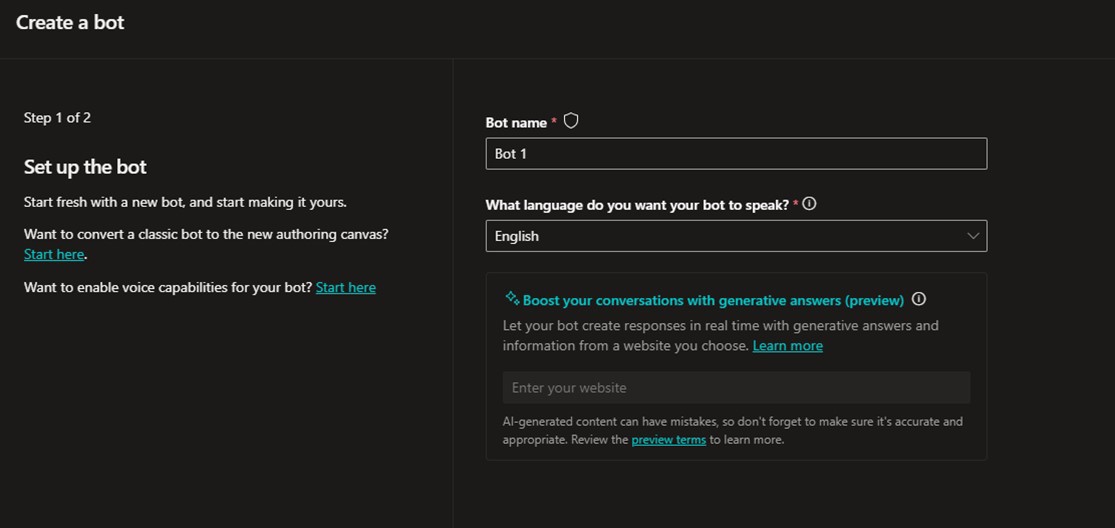
Creating a basic bot is easy. Navigate to https://web.powerva.microsoft.com and choose to create a new bot. You can use any available language, but if you want to use Semantic Search with Azure Cognitive Search and your own data, only English is supported at this point. In my example, Semantic Search is not used so I can have more flexibility with languages. When Semantic Search is used, the AI has better language understanding, which it uses to give highest ranking to the most relevant search results.
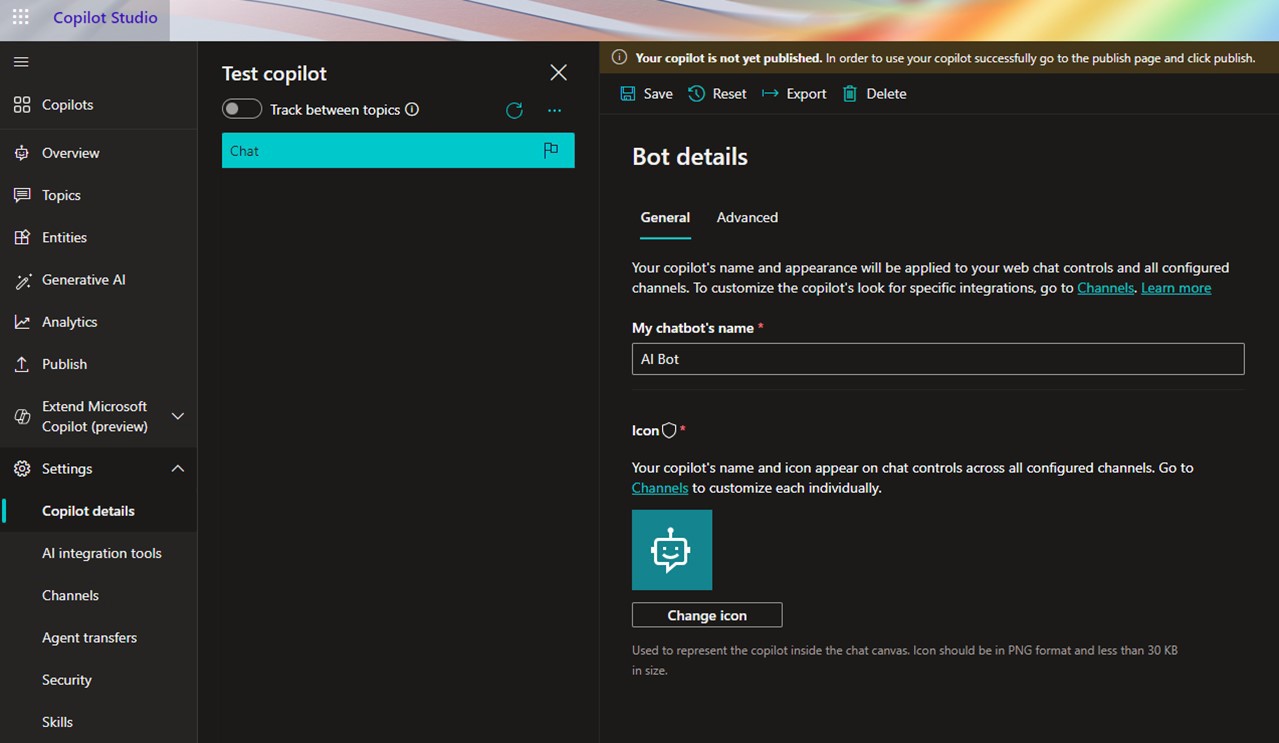
Once you have created your bot, you can select Settings > Bot details to give it an icon and, if needed, change its name.

You want to create a bot that has the following features:
- Secure ChatGPT, which is generic ChatGPT that uses Azure OpenAI instead of the public service. The benefit is that you can use it with confidential information without worrying about leaking information out.
- Find answers from your data with natural language, since you have a data source—a SharePoint document library in this example—that you want to use to give your users a smarter Q&A bot.
- Make a Reset conversation phrase, e.g. “let’s start this conversation from a clean slate”
- Make this bot usable in Microsoft Teams
Secure ChatGPT
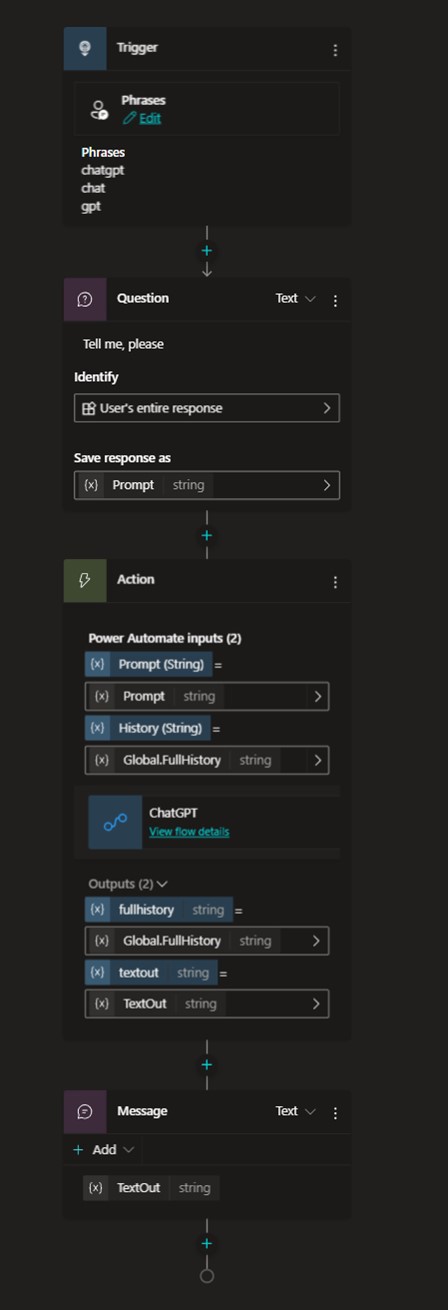
The simplest and safest solution for most organizations is to supply their users with secure ChatGPT where they can use confidential materials without fear that it will be leaked out. I started by creating a topic named GPT and added activation phrases to it. If a user begins a prompt with “chatgpt,” “chat,” or “gpt” they can jump to a version that doesn’t try to find the answer in your organization’s data.

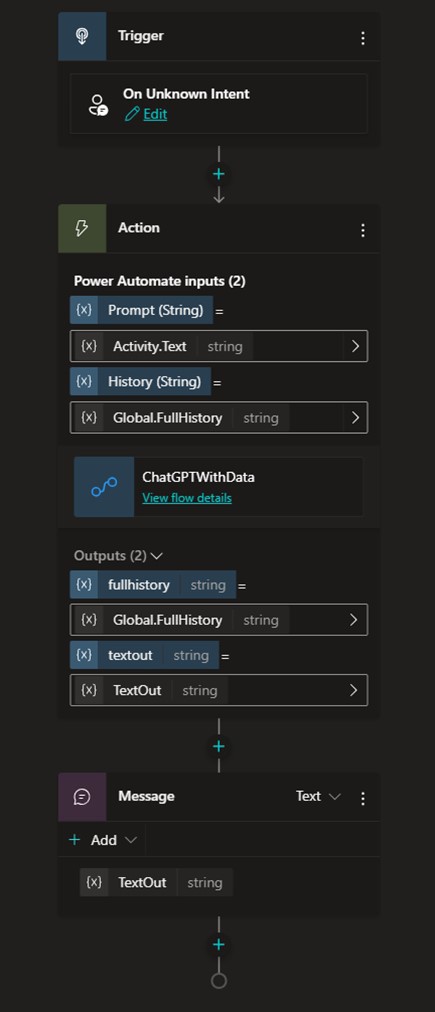
The topic flow is simple: The user is asked to enter their question and it is stored to as the variable Prompt. There is also another variable, called FullHistory, that has been defined as global. This means that its value can be reused several times. Dataverse for Teams doesn’t have Global variables, at least not yet, so if you are using that to build your bot, you must build a custom store message history.
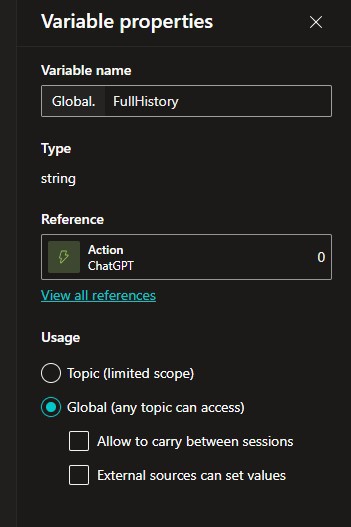
Next there is a Call to Action (Power Automate flow invocation) that does the work for you. From the flow you get back full history, which you set to Global.FullHistory, and of course the AI’s response, which is shown to the user with the Message action.
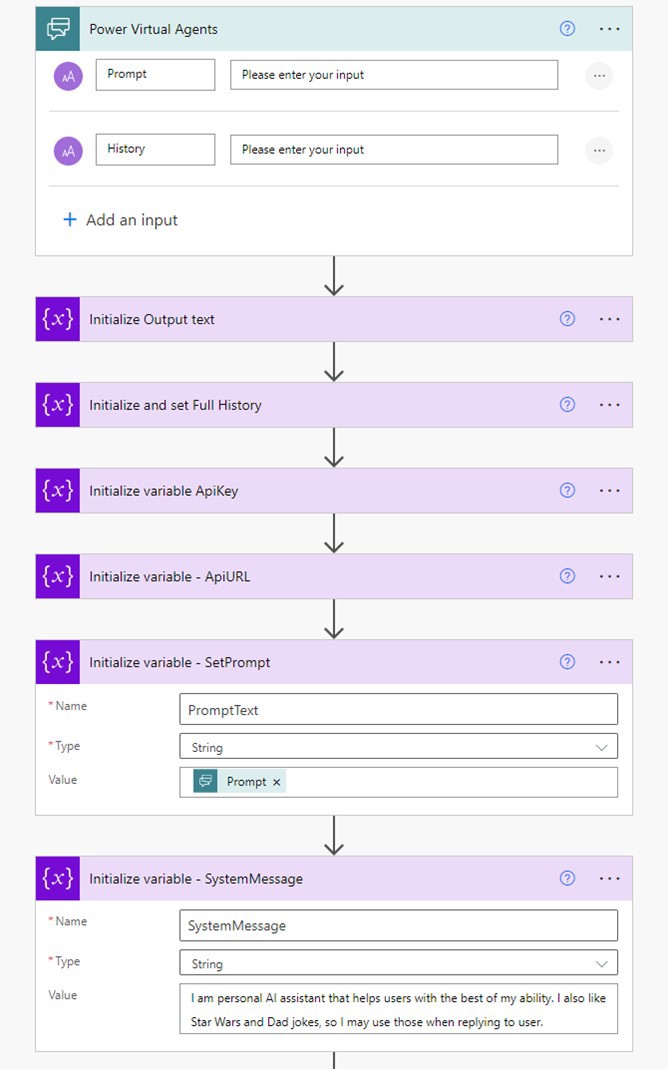
Secure ChatGPT Flow
The flow for secure ChatGPT consists of the following parts:
- Getting the prompt and history from the bot
- Setting the system text and prompt for the GPT call
- Adding prompts and responses to the history variable
- Building the JSON body to REST API call
- Resolving the answer
- Returning the values to the bot
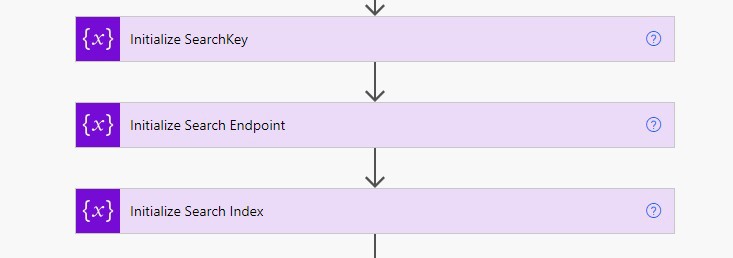
There are also quite a few variables used. These are needed for Azure OpenAI API endpoints, keys, setting messages and so on.

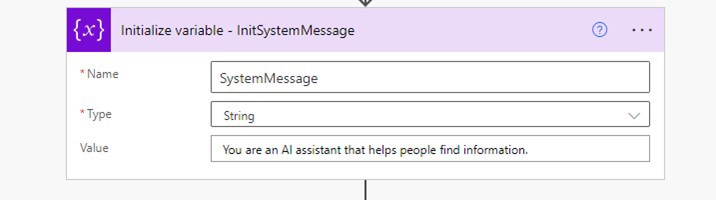
The system message describes how your AI behaves. I chose a simple, and a bit funny, example. For business use you may want to leave the second sentence out. 😉
I am a personal AI assistant that helps users to the best of my ability. I also like Star Wars and dad jokes, so I may use those when replying to the user.
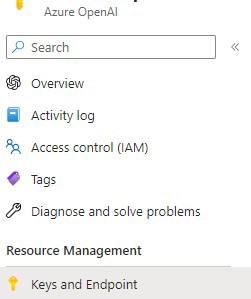
You can find your Azure OpenAI Service API endpoint and key from the service. When you have the service open in Azure portal, check Keys and Endpoint under Resource Management on the left side menu.
The API URL is constructed in the following way:
https://yourendpoint/openai/deployments/yourmodelname/chat/completions?api-version=2023-08-01-preview
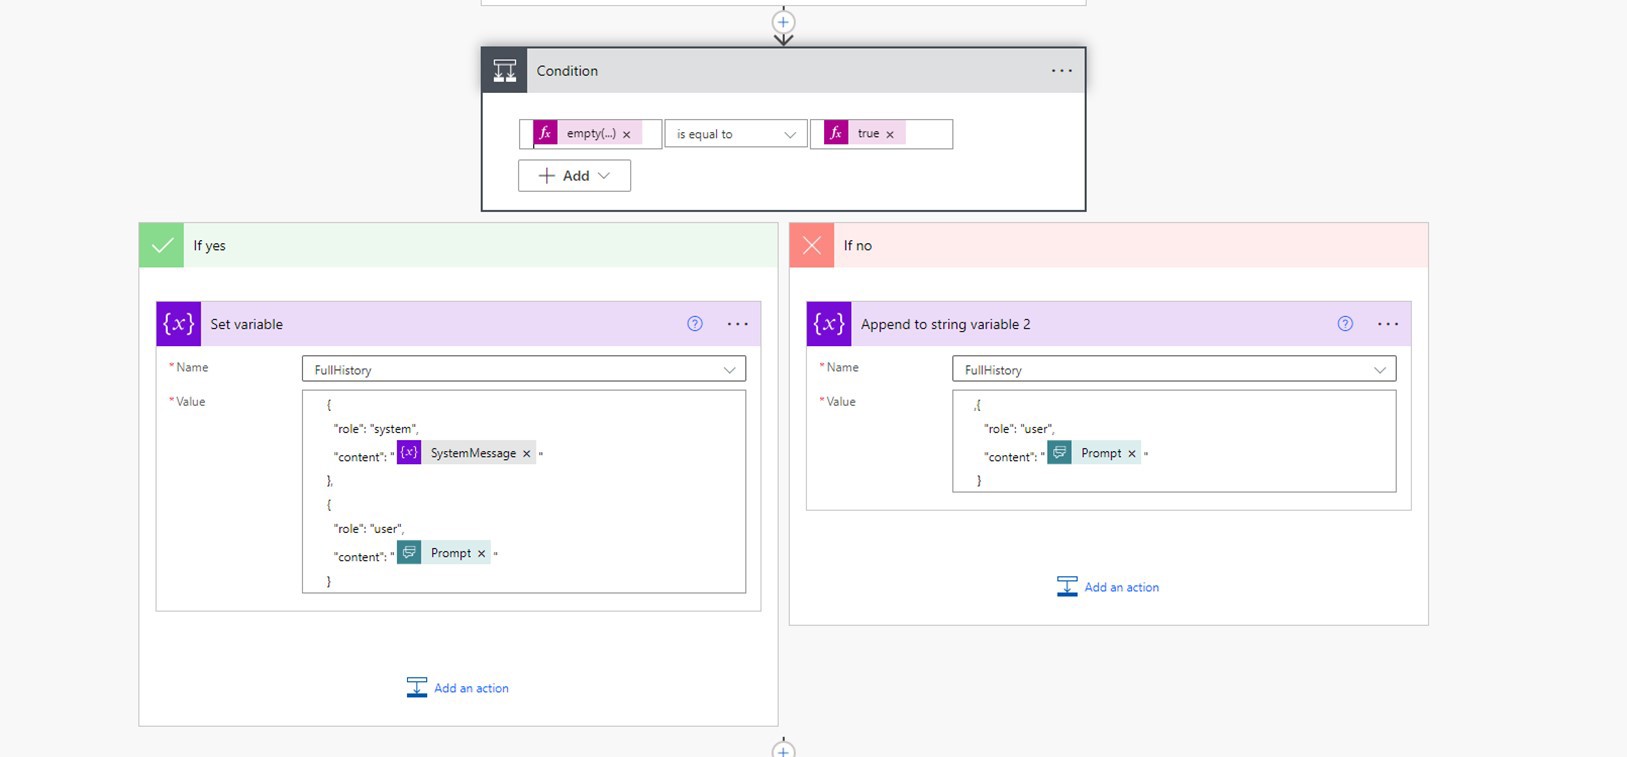
Then you need to check whether you already have a history with the call—is this the first time we’re calling the AI or have there been other calls before this one? In an earlier step, the variable FullHistory was set with history information from a Power Virtual Agent bot call.
You do this by checking if there is a value inside the FullHistory variable. If there isn’t a value, then it is a fresh call, and you need to set it up with the system message. Otherwise, just add the user’s prompt to the end of FullHistory.
The next step is to create the JSON body of the REST API call.
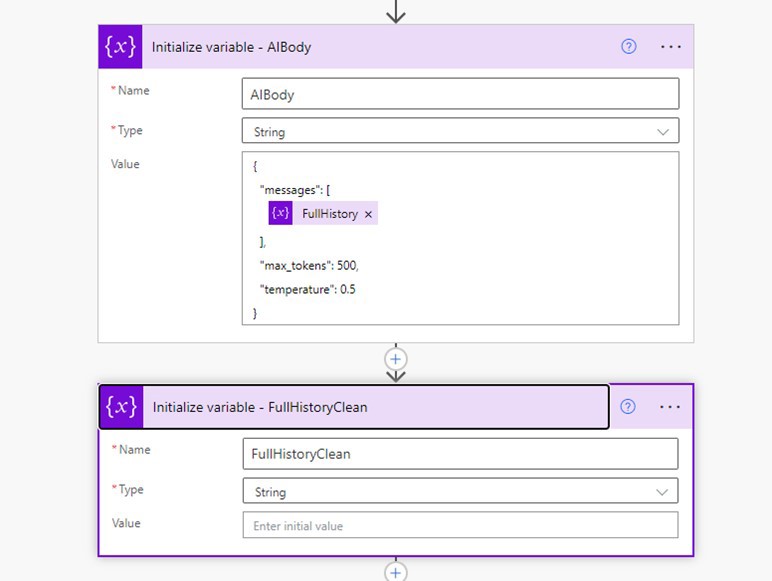
You can tune your AI with various parameters that are available with Azure OpenAI GPT models. The length of reply is set here to 500 tokens and temperature (a kind of creativity) is at 50%. For a complete list of parameters, you can check the Azure OpenAI Service REST API reference.
In my experience, some creativity (or risk-taking) is good as it generates different answers and gives more of a demeanor / humanity to the bot.
Now you are ready to make the call to the AI.

It is a POST call to your Azure OpenAI Service Endpoint URL, and you enter both api-key and content-type to headers. The body is the contents of messages and other parameters described earlier.
Once the call is executed, you need to capture the AI’s response. This response is in JSON, but since you know how it is formatted, you can get the text reply quite easily with the expression:
body('HTTP_GPT')?['choices'][0]?['message']?['content']
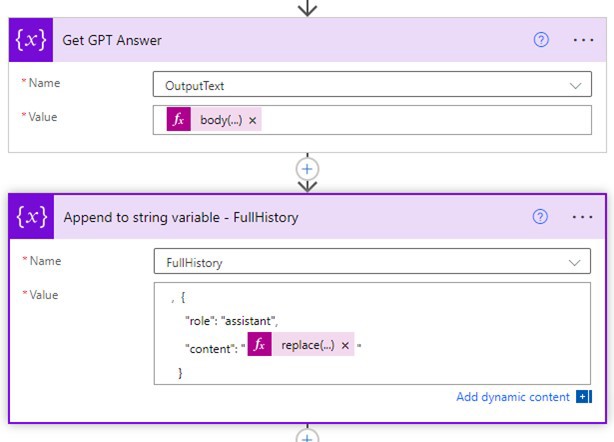
The expression to use to append the reply to FullHistory includes replacing “ with ‘ in the reply. You need this because you can’t have “ characters in JSON and you are reusing the response in future calls. Thus you must include:
replace(variables('OutputText'),'"','''')
With message history enabled—both the user’s questions and the AI’s responses—OpenAI can use the conversation when forming its next response. This allows you to have a conversation with the AI. If you didn’t provide the AI with this conversation history, it would know only the current message when replying, since OpenAI doesn’t have any state internally.
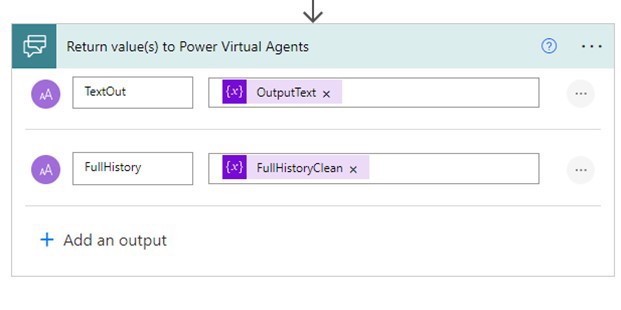
The FullHistoryClean variable value is set with the following expression:
replace(variables('FullHistory'),decodeUriComponent('%0A'),' ')
This cleans up \n (newline) characters from the AI’s response.
If you don’t include this cleanup expression, it will cause issues in following calls since those characters can break JSON formatting. So far, I haven’t encountered other characters in the AI’s replies that would break it.
The final step is to return these values to the bot, so it can display the answer to the user.
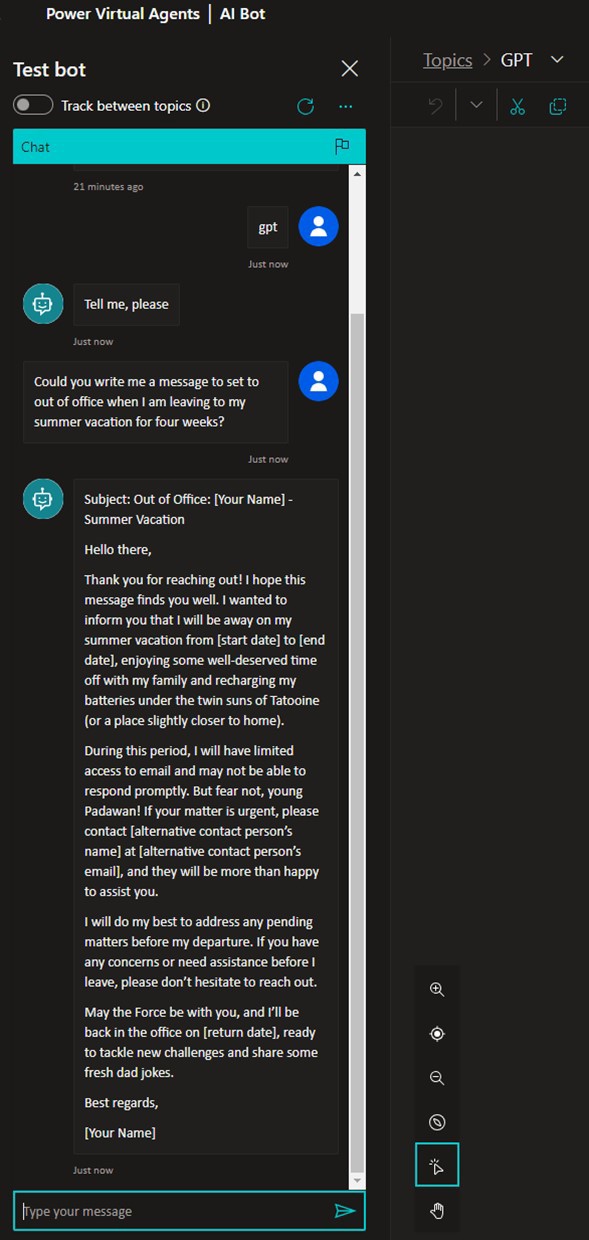
Now you can test it inside Power Virtual Agents builder, since it has a test bot feature built in:

And as you can see, it was true to the system message in the flavor of its reply.
Fallback Topic and Using Your Own Data
The fallback topic is selected if the bot doesn’t recognize any other topics in the query. You could say this is a default functionality that kicks in when you interact with the bot. In this example, I wanted the fallback topic to use ChatGPT with the organization’s data, because it is logical to assume that an organization’s knowledge base is used when generating answers. If you want it to work another way, you can switch the fallback topic to call Azure OpenAI ChatGPT without your data on default and add querying your data behind topics.
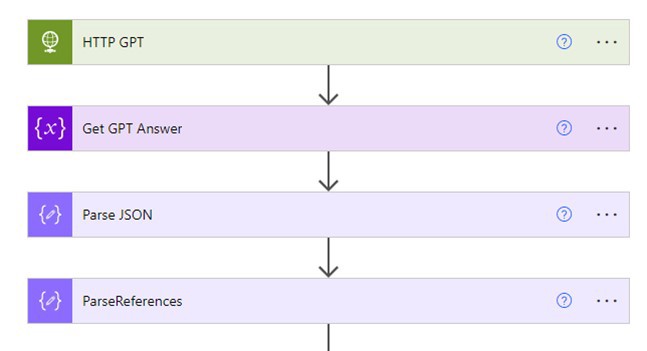
All this logic happens inside the Power Automate flow. What happens with the fallback topic is the unknown text is captured and used as a prompt to the Azure OpenAI model.

Since a lot of this flow is similar to that of Secure ChatGPT, let’s jump directly to what is different between the two. To use your own data you need to have the Azure Cognitive Search Endpoint, Key, and Index name in the variables. You can find them at the Azure Cognitive Search service in Azure. This was configured in the previous article on using your own data with Azure OpenAI.
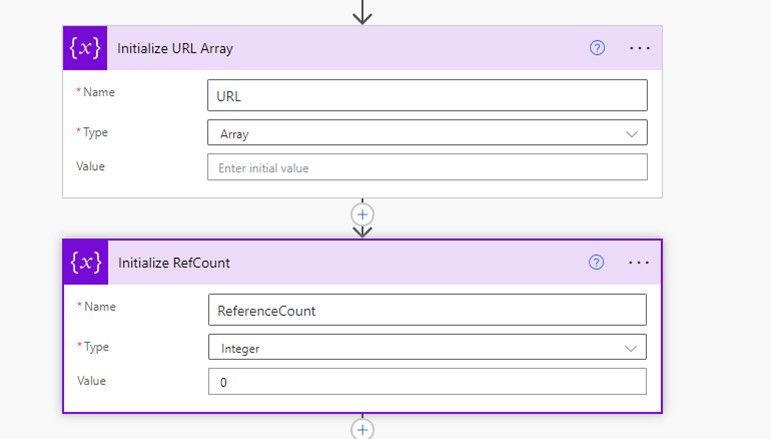
I have also added two other new variables to store citations from the reply. Citations are text snips GPT has deemed relevant to the answer, but they also serve another purpose: They contain the file name and path from which the information was discovered. For more information about citations, check the previous TekkiGurus article I wrote about using your own data.
The system prompt is more professional this time.
The next big change is that the REST API call’s JSON body includes a section to include your own data.
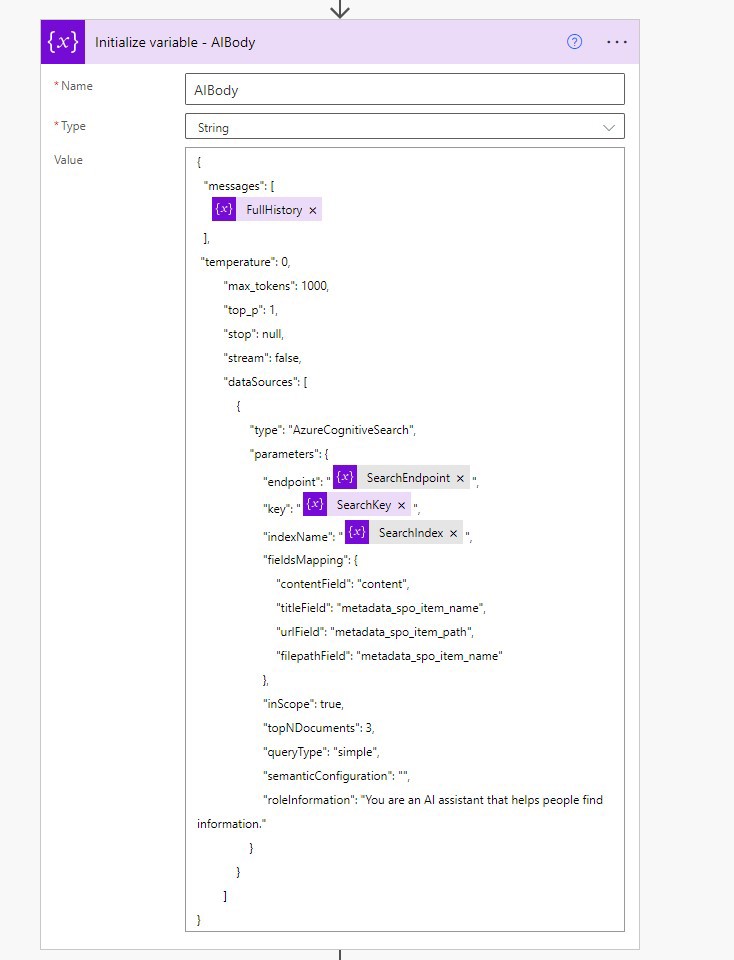
Since the data source is a SharePoint Document Library, the mapping reflects that. A few more parameters are also needed for the call. QueryType is either simple or semantic; in the latter case the parameter semanticConfiguration also needs to be set.
Once the call is done, you can retrieve the response text with a slightly different expression than with the secure ChatGPT flow:
body('HTTP_GPT')?['choices'][0]?['messages'][1]?['content']
The returned JSON is much more complex than before, and it needs to be parsed so you can retrieve referenced files (citations) from the reply. If you don’t want to include file references this can be skipped of course, but I recommend you include them. You can also store citation texts if you plan to show those to the user.
The formula for Content is:
body('HTTP_GPT')?['choices'][0]?['messages'][0]?['content']
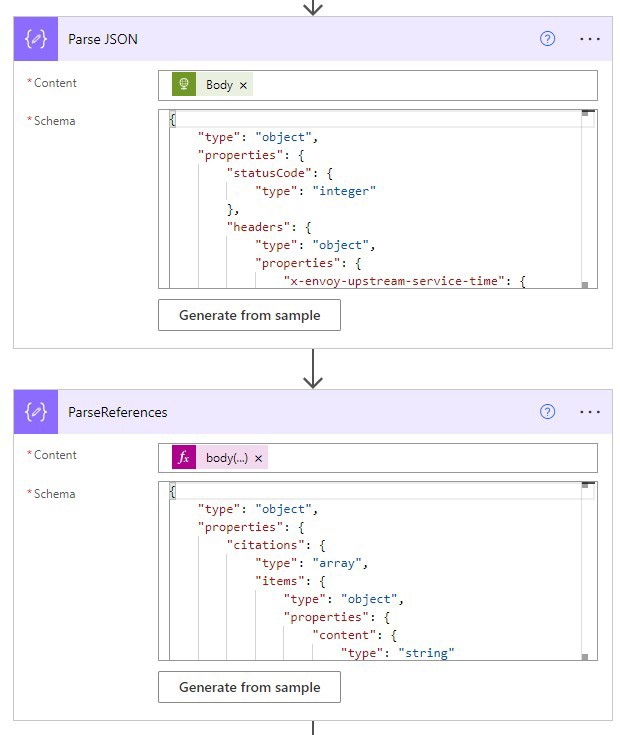
The best way to generate those schemas is to build the bot this far (or fully) and do a couple of test runs with it, so you can capture the JSON response and use the Generate from sample feature to get the schema.
Next, you need to resolve those /drive-URLs of referenced documents to URLs the user can click, and add them to the array of URLs.
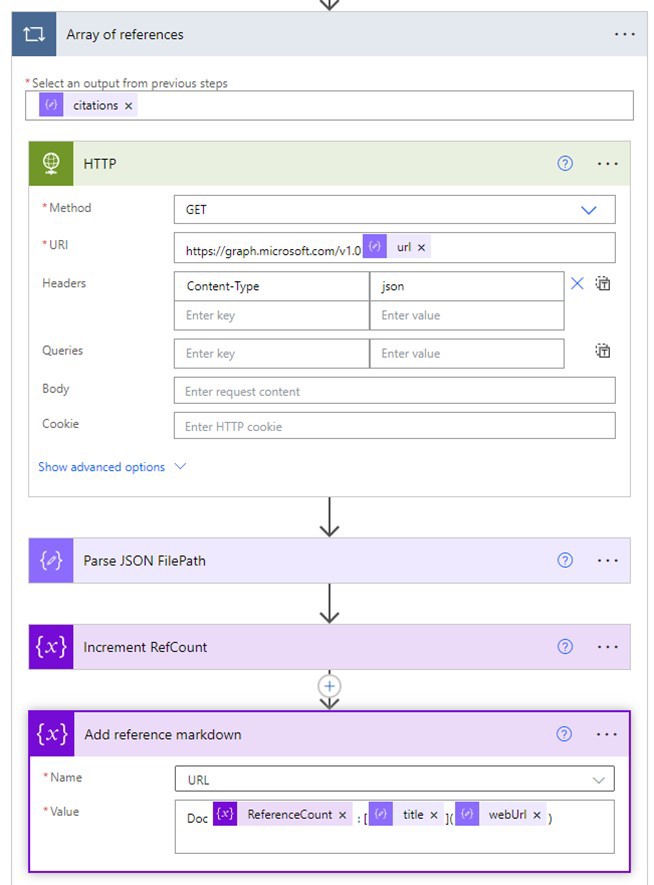
This second HTTP call also requires that the Azure AD application and its secret are set with application permissions to Graph API that allow fetching any document from SharePoint.
The last step in adding references and cited files to the reply is to append referenced files using markdown to the URL array variable.
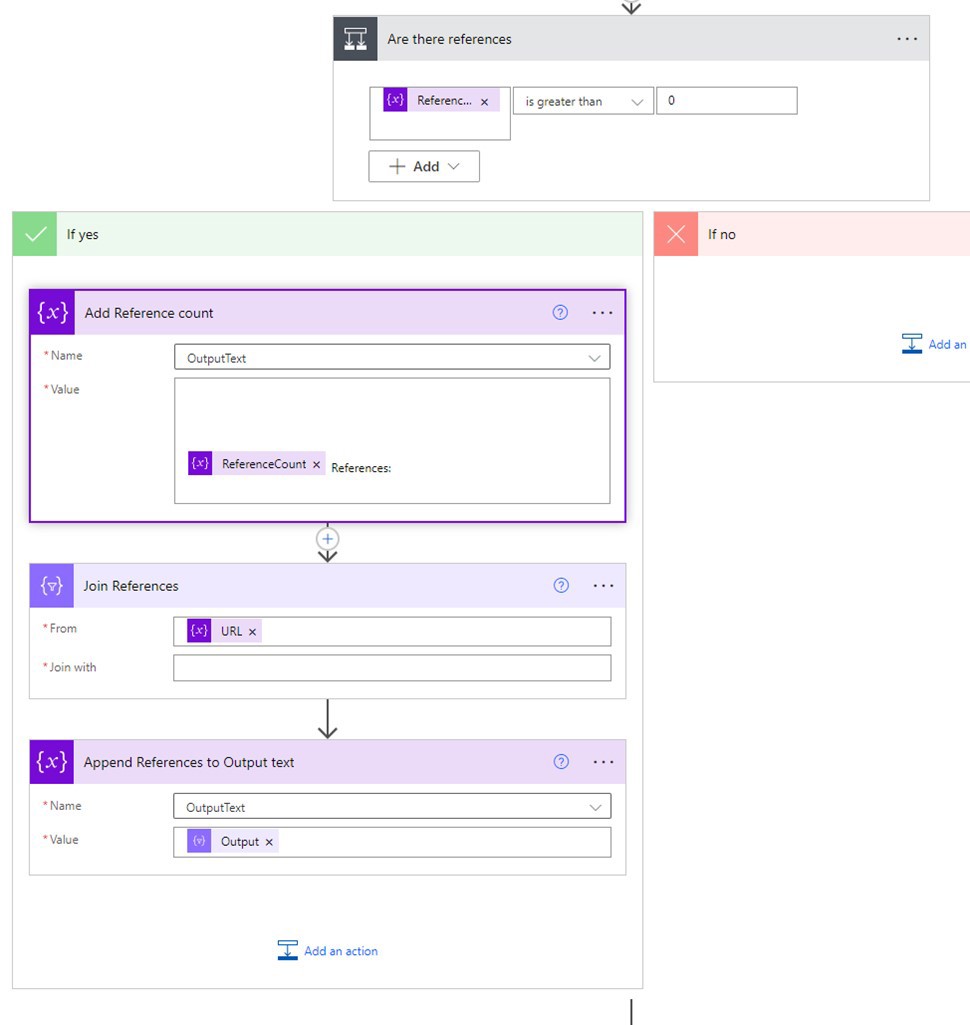
Join References combines all items in the URL array into a single string, which is then added to the OutputText.
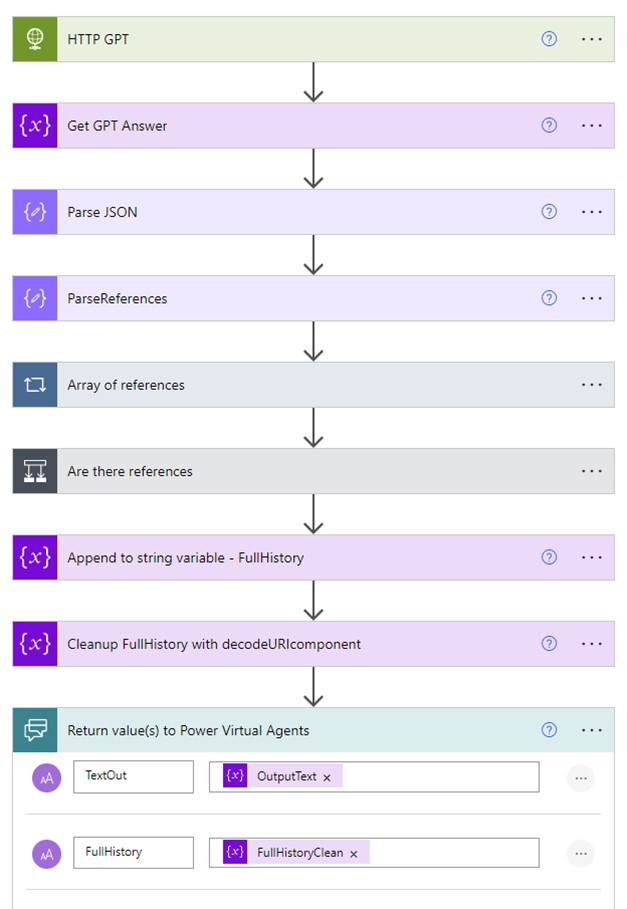
And that’s it. The end of this flow looks like this:
Testing the Bot
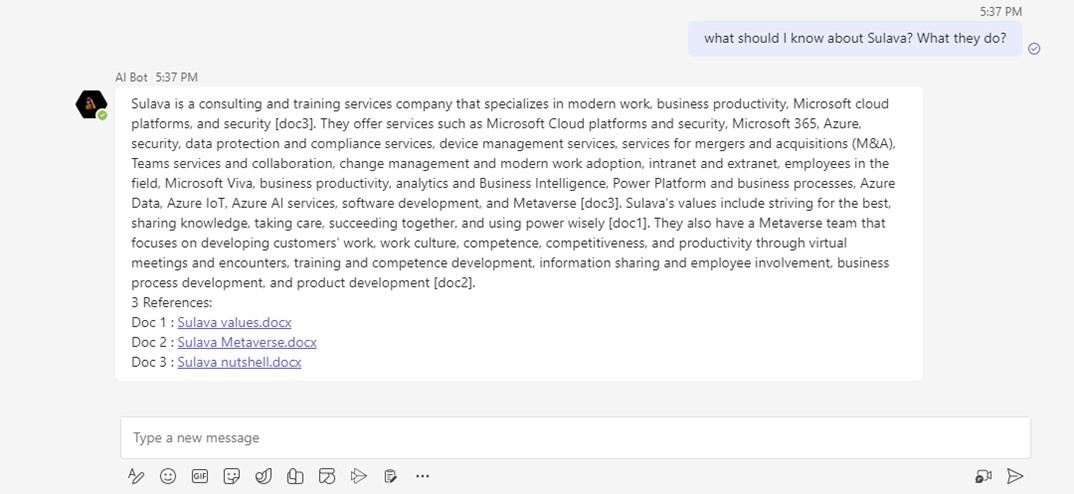
Now that you have all the parts of the flow in place, you can test the bot.
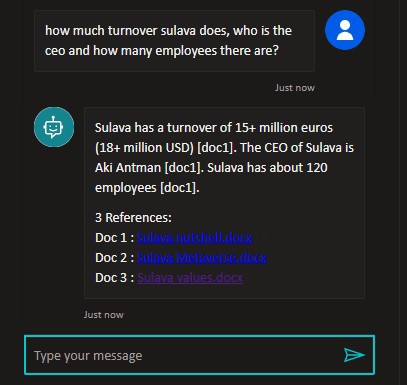
I asked for specific information about the company Sulava, and I got a response that points to one document. Looking at the files it considered, I can see that it returned three but only one was used as a reference in the response itself. Behind the scenes, the prompt was used as a search parameter, but it was targeted towards a specific document library in SharePoint. The response was formatted only based on that data.
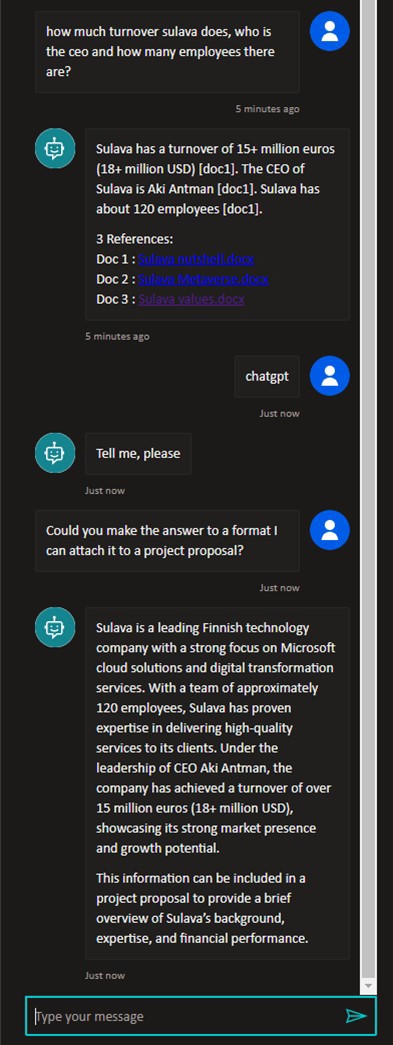
What if you play around a bit with this query? Since ChatGPT with your own data limits answers, you can call the normal ChatGPT to give you a better formatted answer. You can do this because you are using the same FullHistory parameter to keep track of the conversation.
Now the reply is much more human sounding, something we have come to expect from GPT. The tradeoff is that GPT with your own data doesn’t hallucinate facts if it doesn’t know them, but ordinary GPT can be much more innovative with the answer.
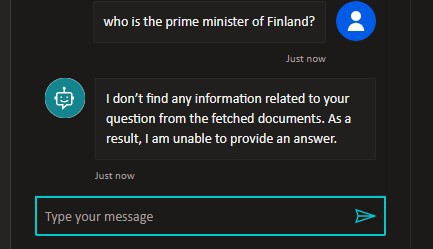
When you think about it, this “I don’t know” statement adds to the bot’s credibility; if something is not found in your data, it doesn’t try to generate something out of nothing. And while ordinary ChatGPT (both Azure and public) seems to have gotten better recently about not hallucinating responses, this doesn’t mean it won’t sometimes invent its own “facts.”
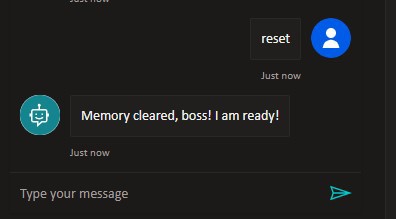
Resetting the Conversation
Just like with ChatGPT, users need to be able to reset the conversation. There is a built-in reset topic in Power Virtual Agent Bots called Start Over. You can use and edit that one or create a new one. I created a new one as an example.

This is a simple topic you can interject in the conversation, which uses Power Virtual Agent’s built-in feature, Clear variable values. This is effectively a reset; the bot won’t remember any of the conversation prior to the invocation of Clear variable values.
Deploying the Bot to Microsoft Teams
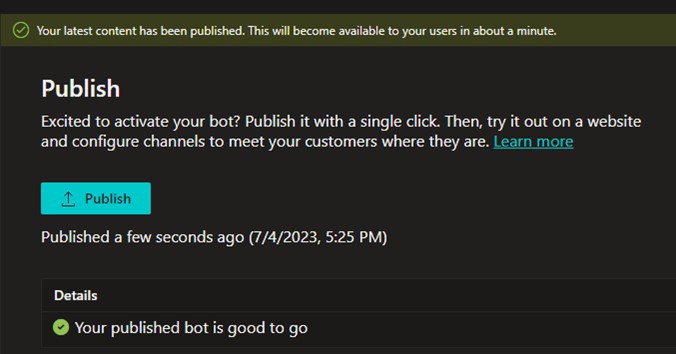
Once your bot is ready, the first step in deploying it to Teams is publishing it in Power Virtual Agents. When you make changes to the bot in Power Virtual Agents, none of those changes carry on to users unless you have published them.
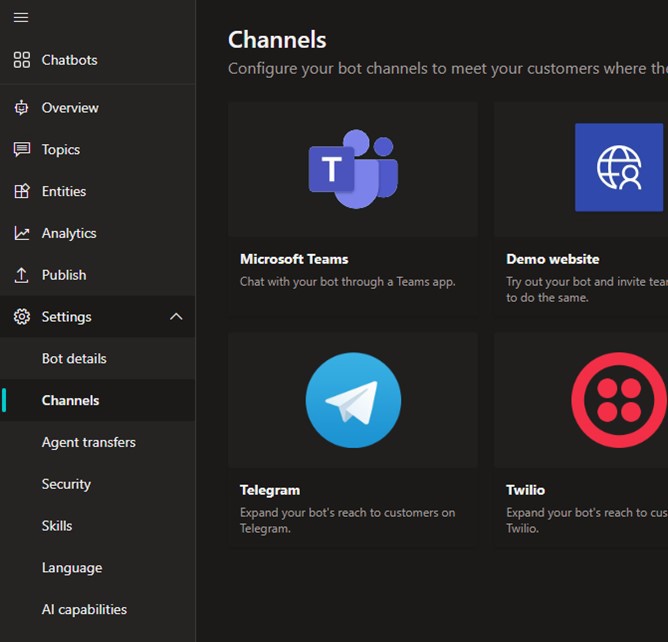
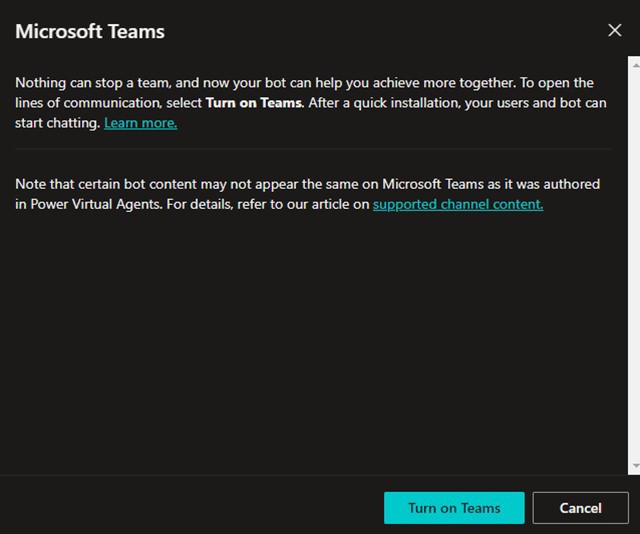
To get it added to Teams, start by adding a Microsoft Teams channel to the bot.
Then select Turn on Teams to proceed.
After that you get a message that the channel was added.
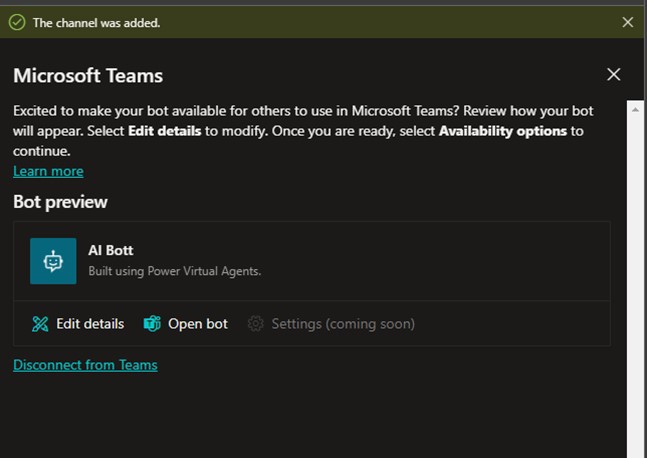
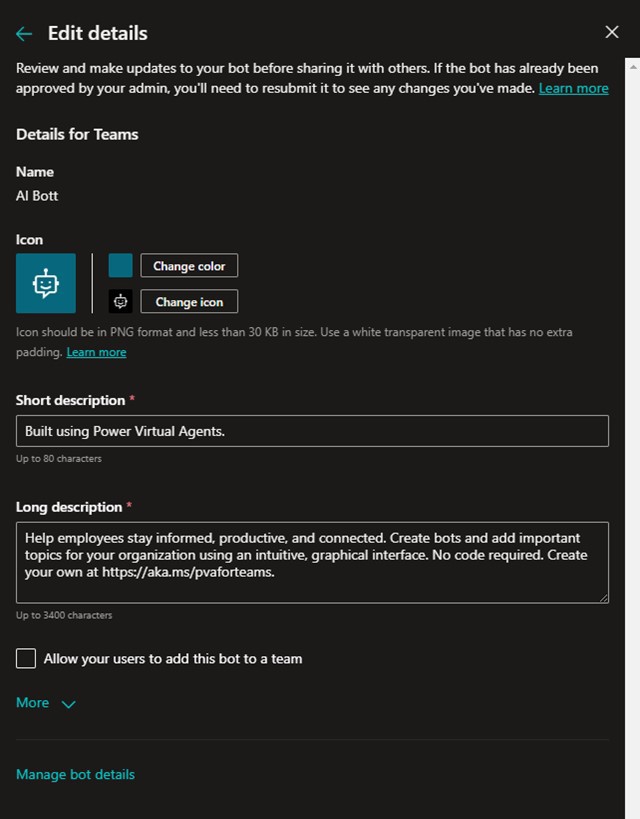
Editing details lets you set the bot icon, short and long descriptions, and developer information.
Once you confirm these details, you have a view that looks something like this:
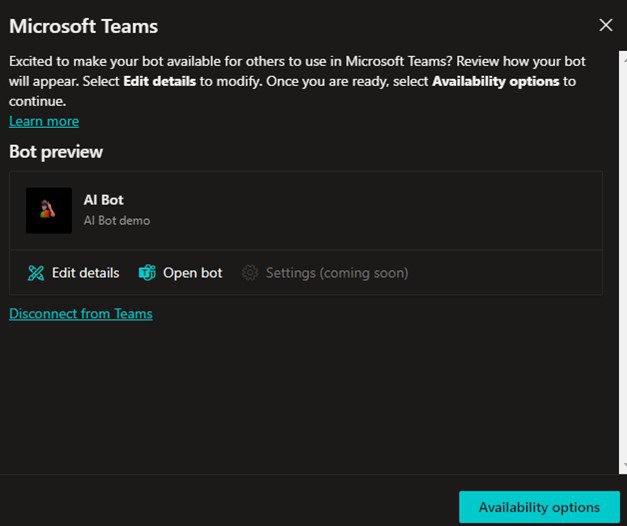
When you select Availability options, you have a few choices:
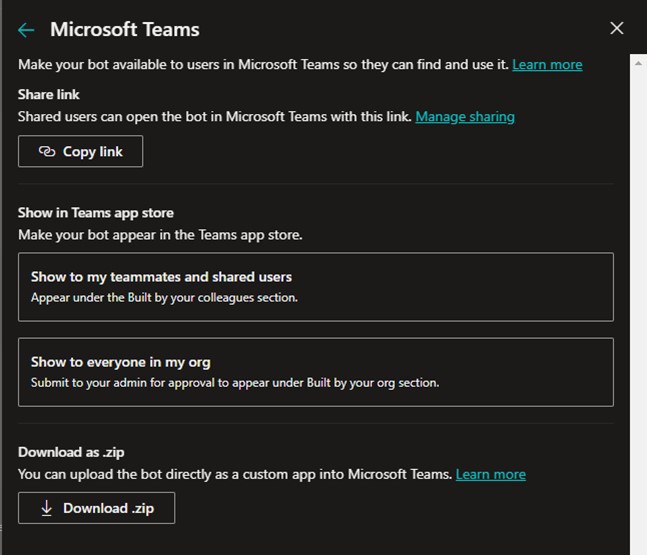
Depending on your permissions in Microsoft Teams, you may need an IT Admin’s help to get the bot up and running. You can test it with individual people by sharing a link to the bot with them before going to companywide deployment. You can also use Show to my teammates and shared users for a limited, but larger, deployment. For companywide deployment you must either submit the bot for admin approval in the Teams Admin Center or download the zip file and add the bot to Teams using that. I have found that using the zip file is the easiest and fastest way if you have permissions to do so (or you can ask your IT Admin to upload it).
You can upload the app to Teams either via the Teams Admin Center applications or going into Teams and selecting Manage your Apps from the Apps tab.
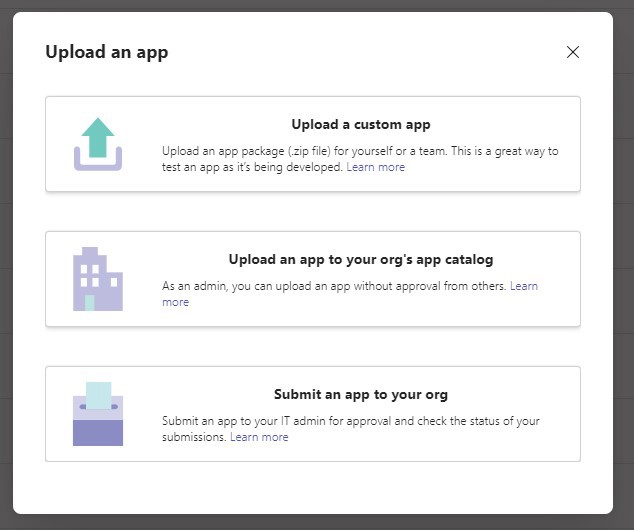
As you can see, you can also submit an app to your organization directly from Power Virtual Agents.
With the bot active in Teams, you can use it just like any other Teams bot, and get links to referenced documents in replies as well. Clicking links opens relevant documents.
Takeaways and Caveats
This article was written to demonstrate how you can create smarter Microsoft Teams bots for your organization or team. The Add your data update to Azure OpenAI has made this easier than before and also provides more relevant answers. Using a generic, but secure, organizational ChatGPT can help reduce risks associated with confidential data when using the public version of OpenAI ChatGPT. However, there are some caveats to creating a bot this way that should be noted.
The method I describe above is fast, but it may not be cost effective if you need to buy a large number of licenses for employees. At this time, AI Calls require Power Automate Premium licensing and, when the bot contains premium flows, the Power Virtual Agent (PVA) must also be the full version. Getting started with PVA and Power Automate is a great way to get experience with implementing AI in your organization. However, for full-scale deployment in larger organizations it is worth thinking about licensing costs and also how the bot is developed: It is likely more cost-effective to create a normal Teams Bot that runs in Azure, and with which you can use the Teams AI Library.
Azure OpenAI has quota limits to how many tokens per minute calls can create. This quota favors the use of ChatGPT-3.5 Turbo over GPT-4. Unless GPT-4 is needed, you can manage more user prompts per minute with GPT-3.5 Turbo. Once the quota is exceeded, users will get an error message stating they need to try their request again after waiting a bit.
Azure OpenAI also comes with a price, which is use-based. The more tokens that are used, the higher the cost. GPT-4 is more expensive to use than GPT-3.5 Turbo—another good reason to start with 3.5 Turbo.
When using your own data with Azure OpenAI, you will also need to configure Azure Cognitive Search, which also comes with a cost. This cost depends both on usage and the amount of data that is indexed.
In my opinion, these costs are reasonable compared to the benefits you can gain with this technology: the data in libraries and the tools to guide your employees to understand and get started with new capabilities. This article may have been full of techy explanations, but it is the people that will use these bots. Don’t forget to plan and execute a proper adoption process so that your organization can gain the full benefits.
It is important for organizations to start exploring how Azure OpenAI can benefit them. AI is everywhere and Copilot is now part of most Microsoft 365 applications and in Windows 11 as well. This example is a bot that is focused on specific information, for example answering details from HR or an IT knowledge base, and thus reducing the burden on busy people working in those departments. Copilot for Microsoft 365 retrieves the information from everywhere a user has access to. Sometimes it is better to have focused, customized, bots than using a generic solution. Language understanding is a game changer; it can level up your organization’s apps and processes and thus deliver a productivity boost by giving employees the ability to ask for information in a natural language. During your experiments, you also gain valuable experience in how to train and guide your employees to take advantage of AI as their colleague.

Vesa Nopanen
Vesa "Vesku" Nopanen, Principal Consultant and Microsoft MVP working on metaverse and Future Work at Sulava.
The metaverse is a Digital Fabric with AI, Digital Twins, metaverse of Things, Microsoft Mesh, and other services & platforms in the cloud connecting digital and physical worlds and people together.
The metaverse journey is on its early steps and Vesku is guiding you and your organization towards the future. He is extremely passionate about metaverse, mixed & virtual reality and how these technologies, with Microsoft Teams and cloud, enable to change how people work together.
Vesku has 25+ years of experience in IT business on multiple industries, domains, and roles. He is also a futurist, active speaker, blogger, evangelist, and technology community member.
Metaverse | Futurist | Speaker | Blogger | Mr. Metaverse