Using Your Own Data With Azure OpenAI

One of the latest features of Microsoft Azure OpenAI is the ability to add your own data, a feature that went to public preview in June 2023. This enables you to feed your own documents to the AI and get answers based on those documents, a process called grounding AI to your data. For example, if you add data from a specific domain, such as law or healthcare, you can get more correct and relevant answers to questions related to that domain. This article will show you how to use the Add your data feature and what benefits it can bring to your AI projects.
For those who aren’t familiar with Microsoft Azure OpenAI, it is a service that allows you to access OpenAI's powerful pretrained language models (such as GPT-3.5, GPT-4, Codex, and embeddings) in your own apps and solutions. These models can be easily used and adapted to various tasks, such as content generation, summarization, semantic search, and more. Azure OpenAI is the result of a collaboration between Microsoft and OpenAI, a research organization dedicated to creating artificial intelligence. Microsoft and OpenAI share a vision of democratizing AI and making it possible to embed it into various organizational needs and processes. By using Azure OpenAI, you can leverage the cutting-edge research and innovation of OpenAI with the security and reliability of Microsoft's cloud platform.
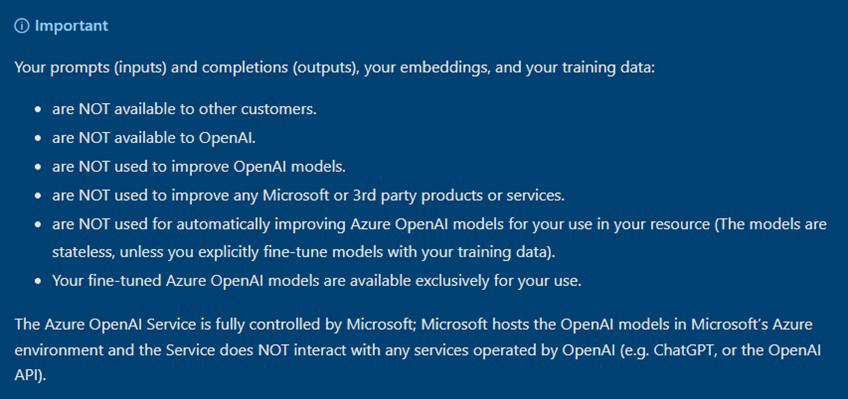
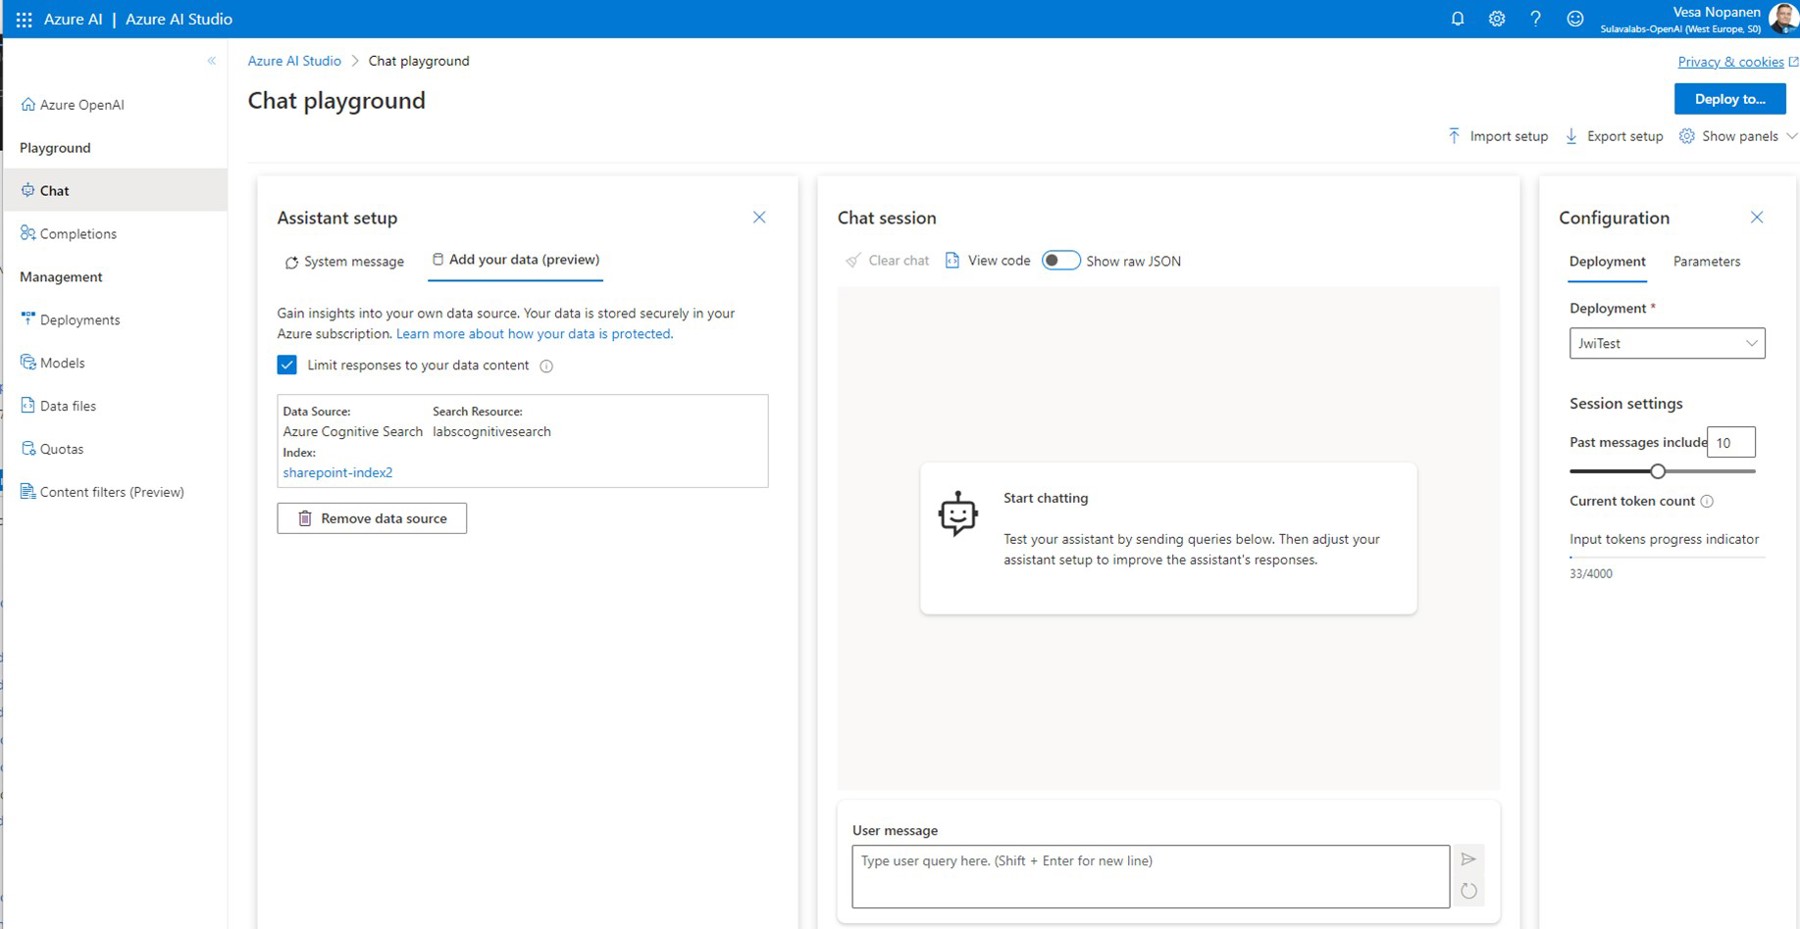
Given the most common use of OpenAI as a web-based chat interface, it is natural to be concerned that Microsoft might be sharing or using whatever data you input. However, Azure OpenAI ensures that your data is your data, and it is not used for anything else (see the note at the bottom of figure 1). Microsoft has released an article on data, privacy, and security for the Azure OpenAI Service.
Adding Your Data
The data ingestion process happens in Azure AI Studio. This tool also lets you manage, explore, and customize AI models using a web-based interface. In Studio you can deploy and experiment with AI models, train selected models further with fine-tuning, manage quotas and content filters, and more. Using Studio’s Playground feature on chat and completions you can experiment, evaluate, and tune your system message and prompts easily and quickly. Studio is a user interface that is usually used by admins, developers, consultants, and power users. It is not a user interface for end users.
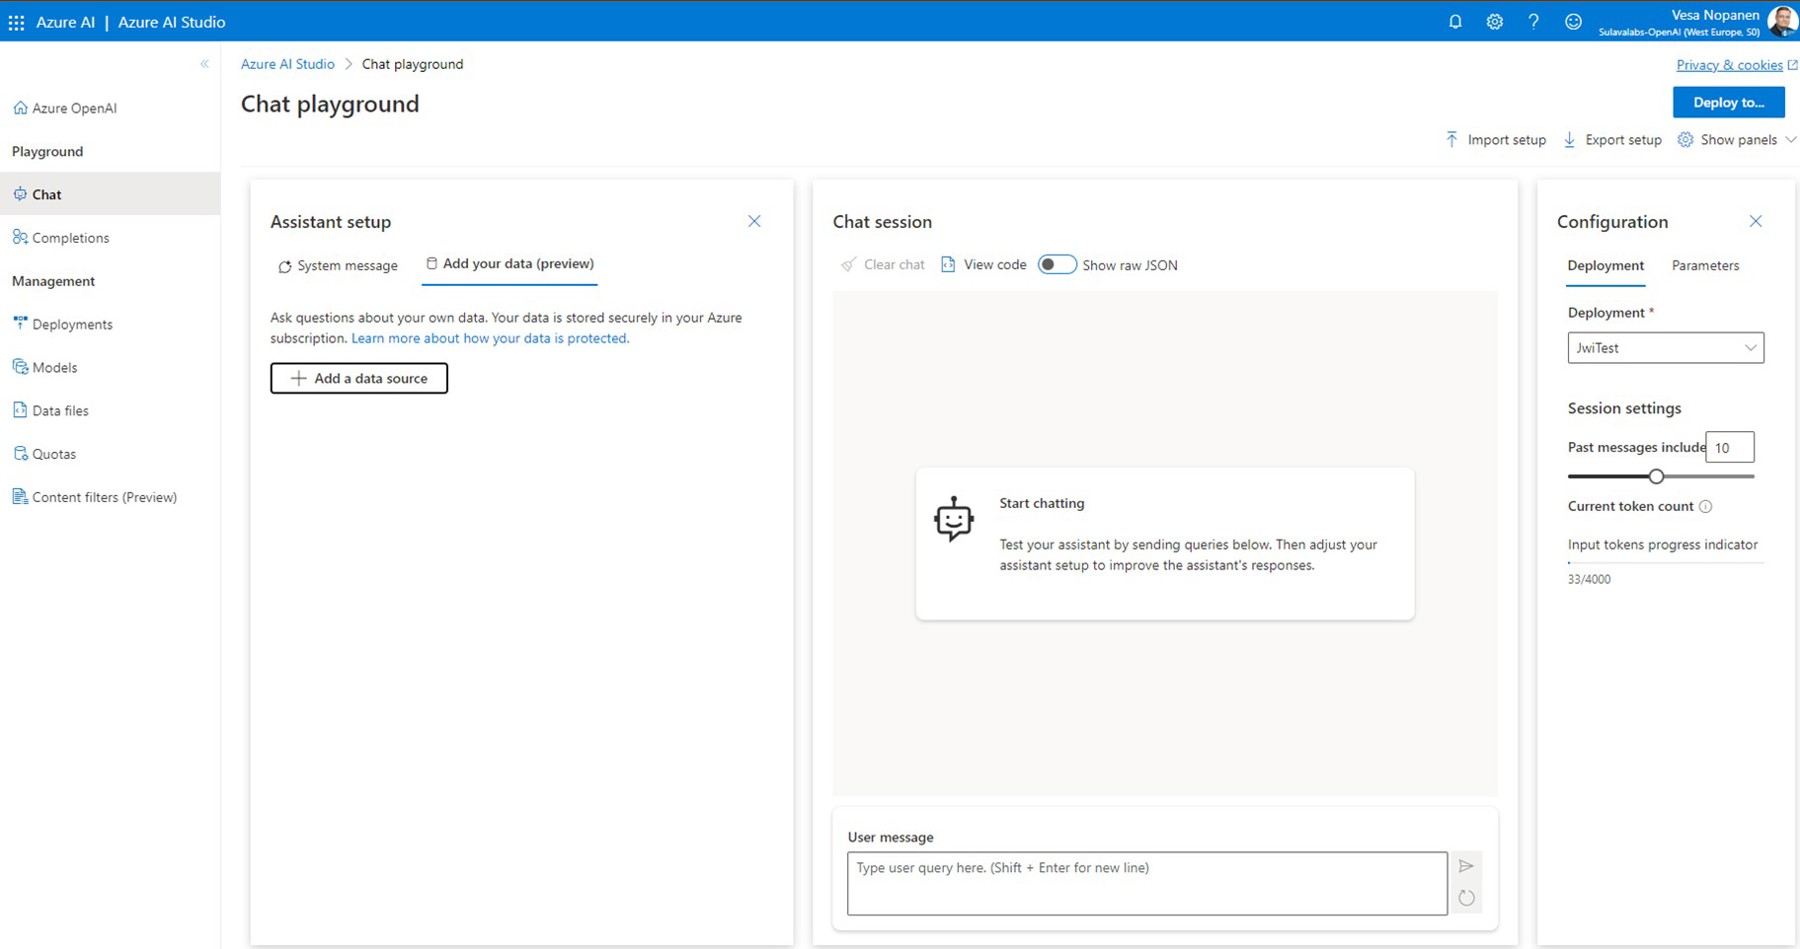
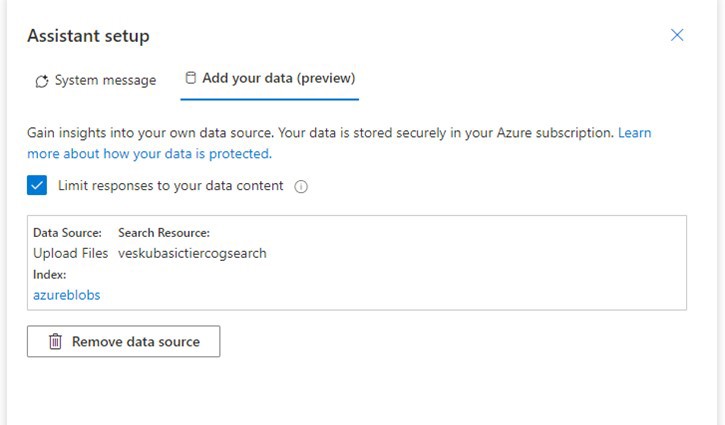
When you are select Chat in Azure AI Studio, you can see Add your data (preview) in the Assistant setup. There, you can add a data source, which allows you to ask questions about your own data.
It is important to understand that Azure AI Studio is not making changes to your model or configuration. This is purely for experimenting and proof-of-concepting how your data source can be used. With AI Studio it is also possible to deploy a simple web chat application where this configuration is used so it can be used for testing and experimenting by a wider number of people in your organization.
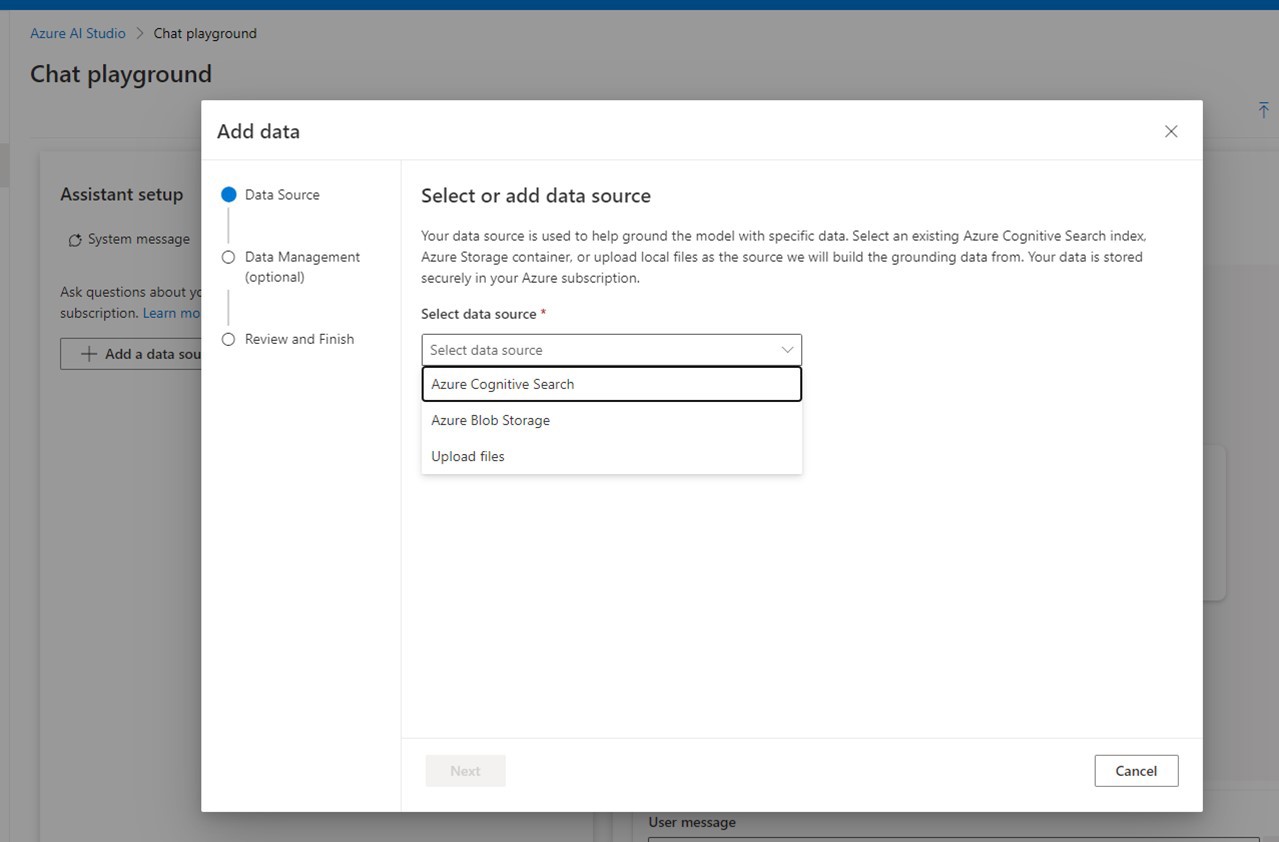
When you select + Add a data source you are taken to the wizard that walks you through the process.
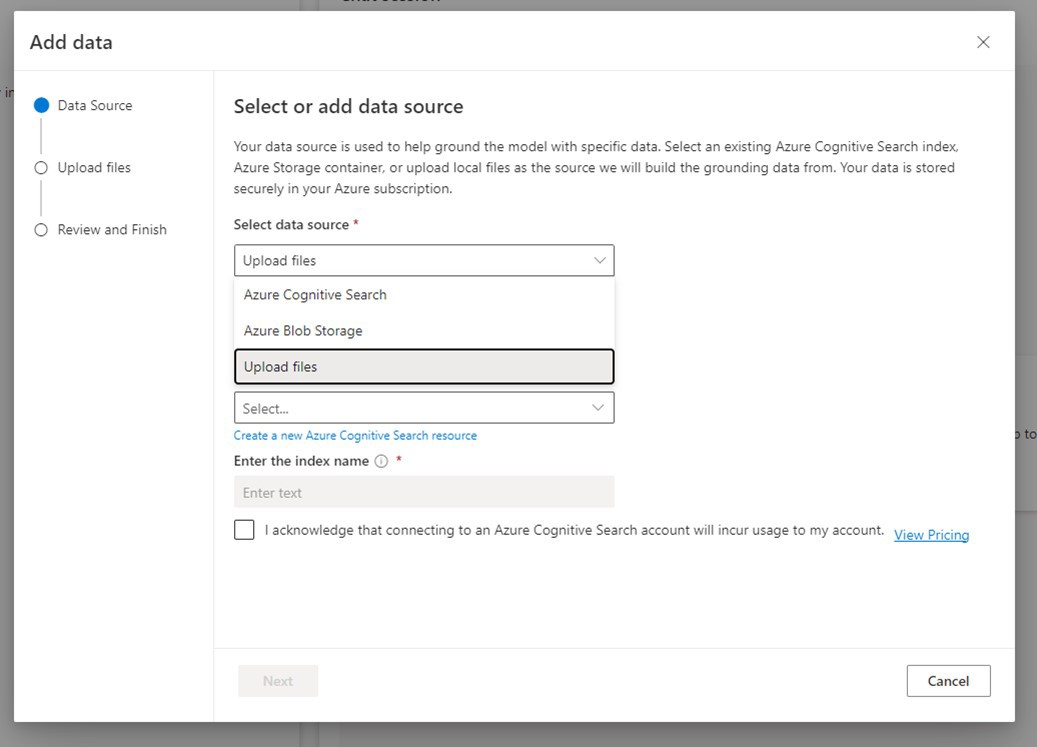
You can choose between three options: Azure Cognitive Search, Azure Blob Storage or Upload files. In reality all these rely on Azure Cognitive Search, so you can leverage your existing Cognitive Search Indexes or, if you are setting up Blob Storage, create new ones. The wizard makes it easy to see what it takes to set these up, and you can use it to deploy simple web chat applications with different setups.
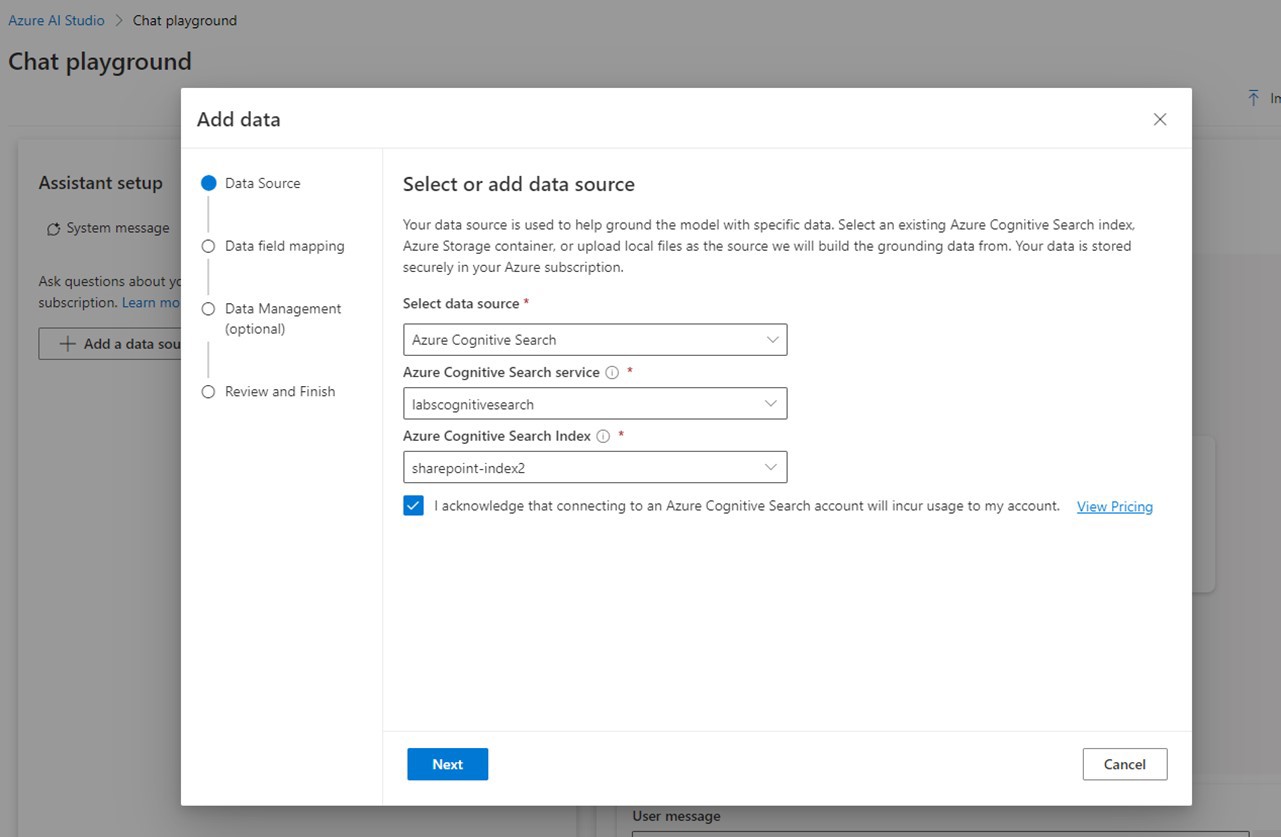
In this example, I already have an existing Azure Cognitive Search service and index that can be used. If you don’t have one, then create it before proceeding.

Once you have selected the data source, select your Cognitive Search service and the index you are using. These services do add costs, as your Azure Cognitive Search service needs to be a paid one—free tier is not supported.
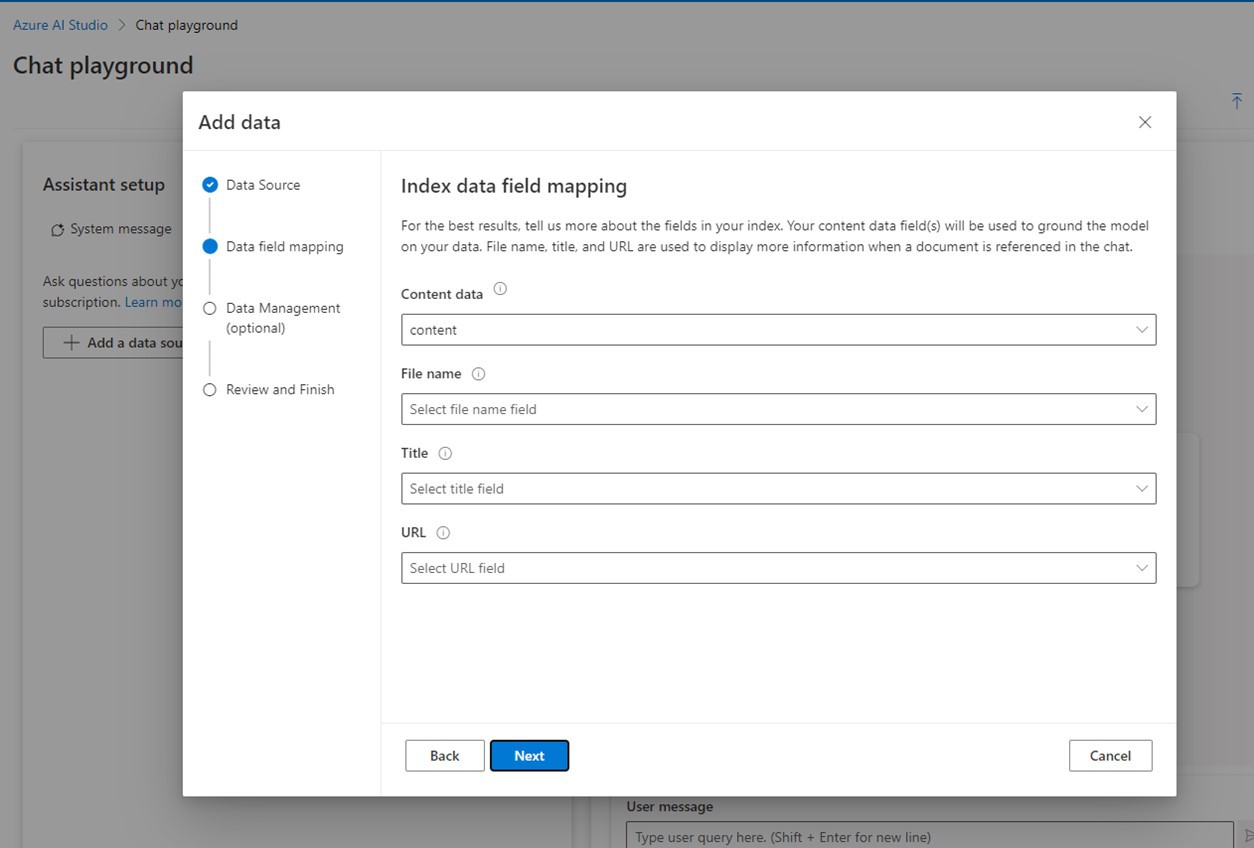
Once you have selected your index, select Next to map index fields for grounding. This is quite simple, since you only have four fields to map: Content data (which includes document text content in index), File name, Title and URL. Note that it’s not necessary to map all four fields.

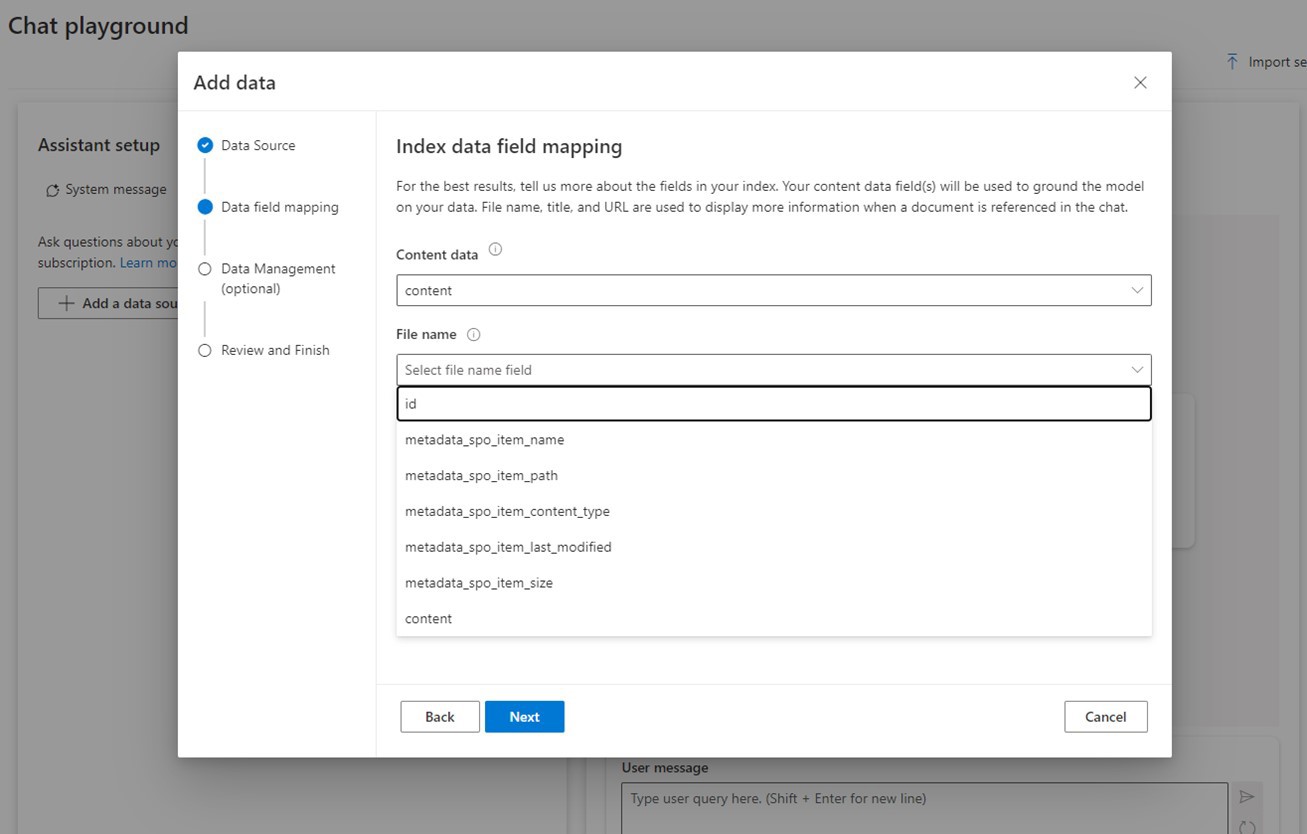
Since my Cognitive Search service data source was a SharePoint document library, I see these field names. Since I didn’t include a Title field in the index, I chose to map the document name for both the File name and Title fields. The final version looks like this:

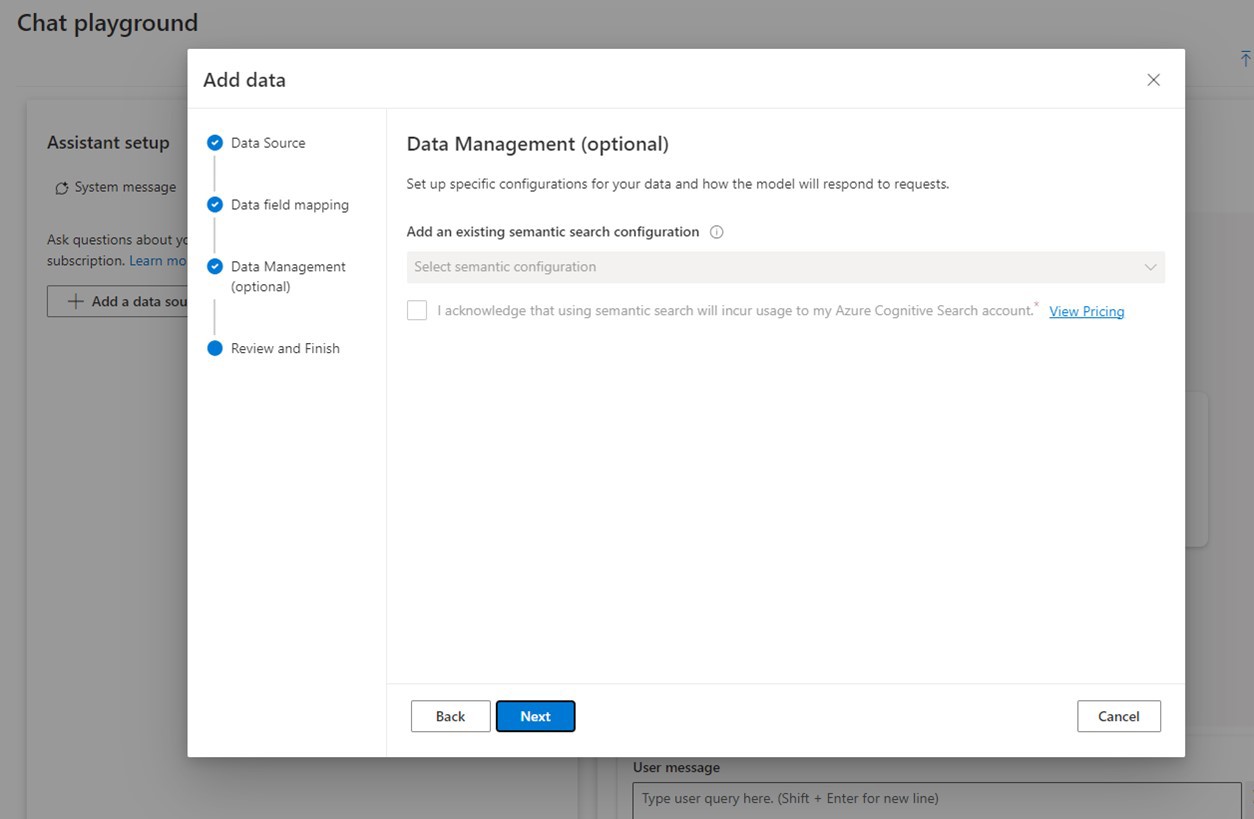
Setting up semantic search—called Data Management in the wizard—is optional. If you have a semantic search configuration set up, you can use it. Only English language is currently supported; I opted to leave it out from this setup, as I use different languages. Semantic search does improve results, so if your materials are in English, I recommend setting that up. Note, however, that you may have additional costs with Semantic search.
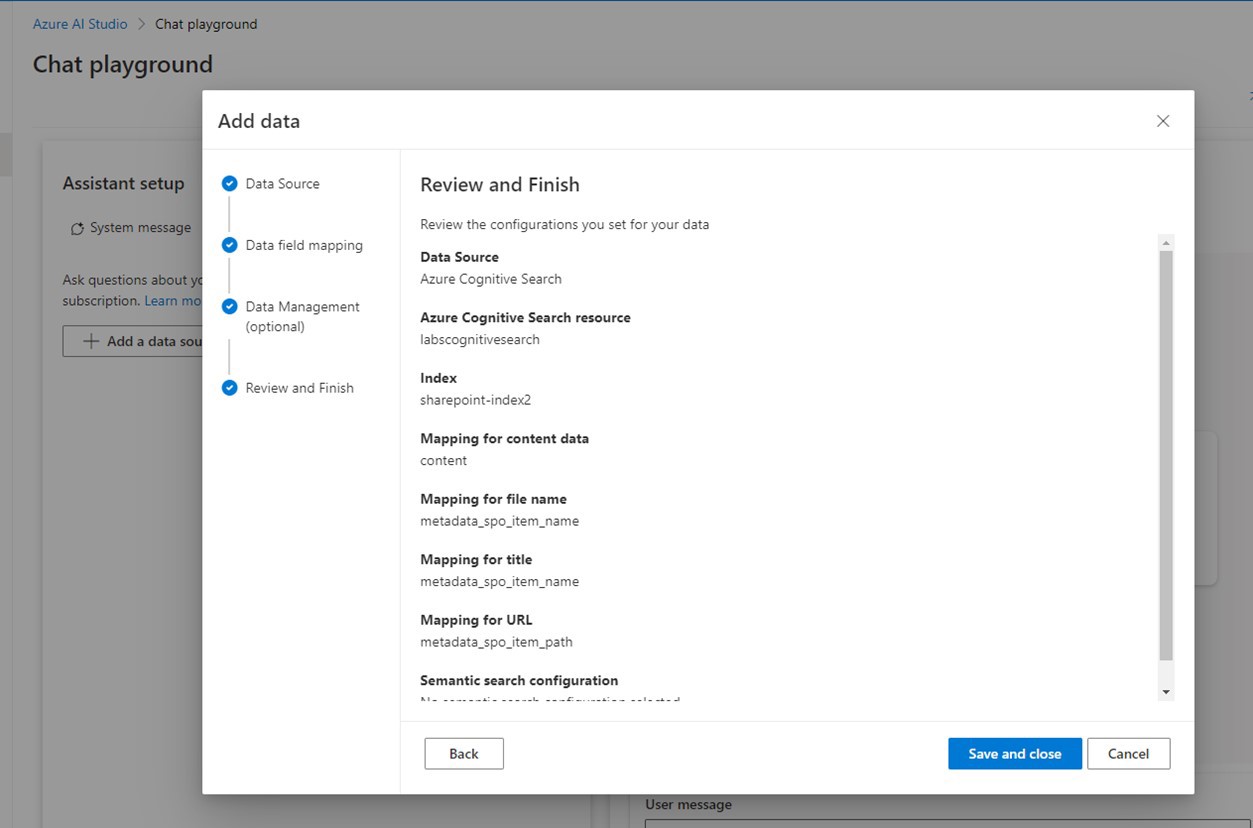
And finally, Review and Finish the setup. Before enertaining wild architecture thoughts of setting up Azure OpenAI and Cognitive Search services at different Azure tenants, keep in mind that Cognitive Search service needs to be in the same tenant as your Azure OpenAI service & AI Studio.

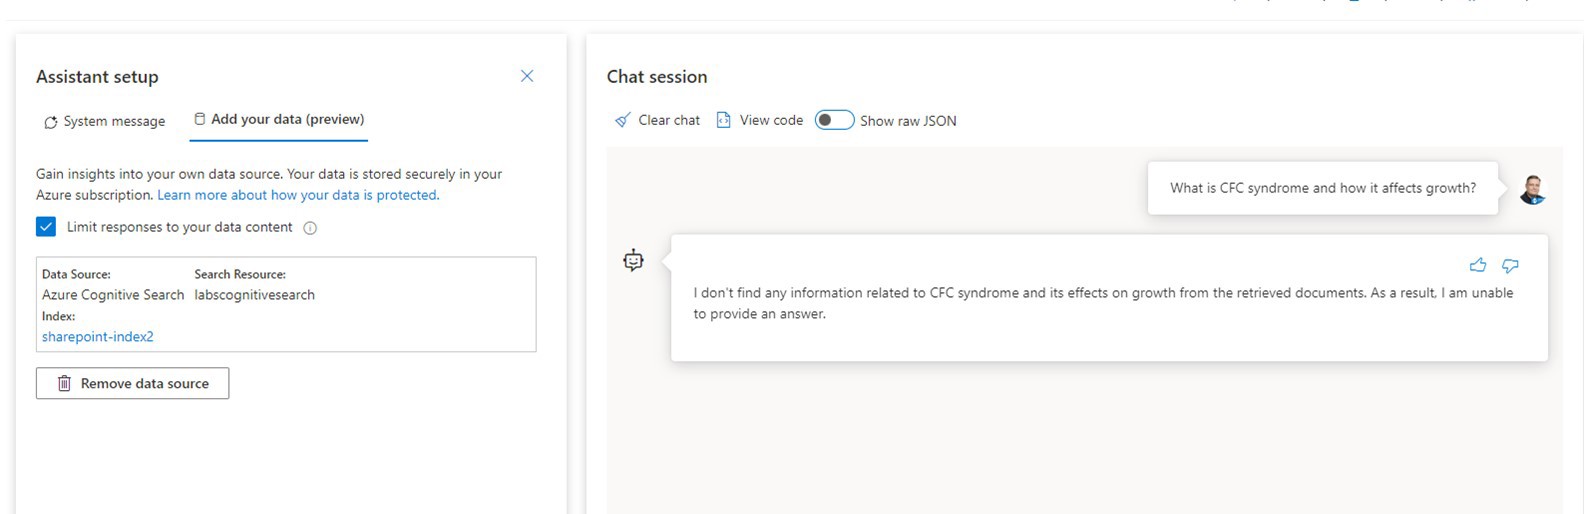
At this point we can see the configured data source in the Chat playground. You can control results by ticking Limit responses to your data content. If you have that option on, AI will let you know if it hasn’t found the answer from your data source, instead of trying to hallucinate something that doesn’t exist (if you are not familiar with the current state of generative AI, yes, hallucination is a real problem). For some use cases you may want to turn this option off to combine the knowledge inside the AI model with your own data. Conversely, when the option is on, you know the answer is always coming from your data source documents.

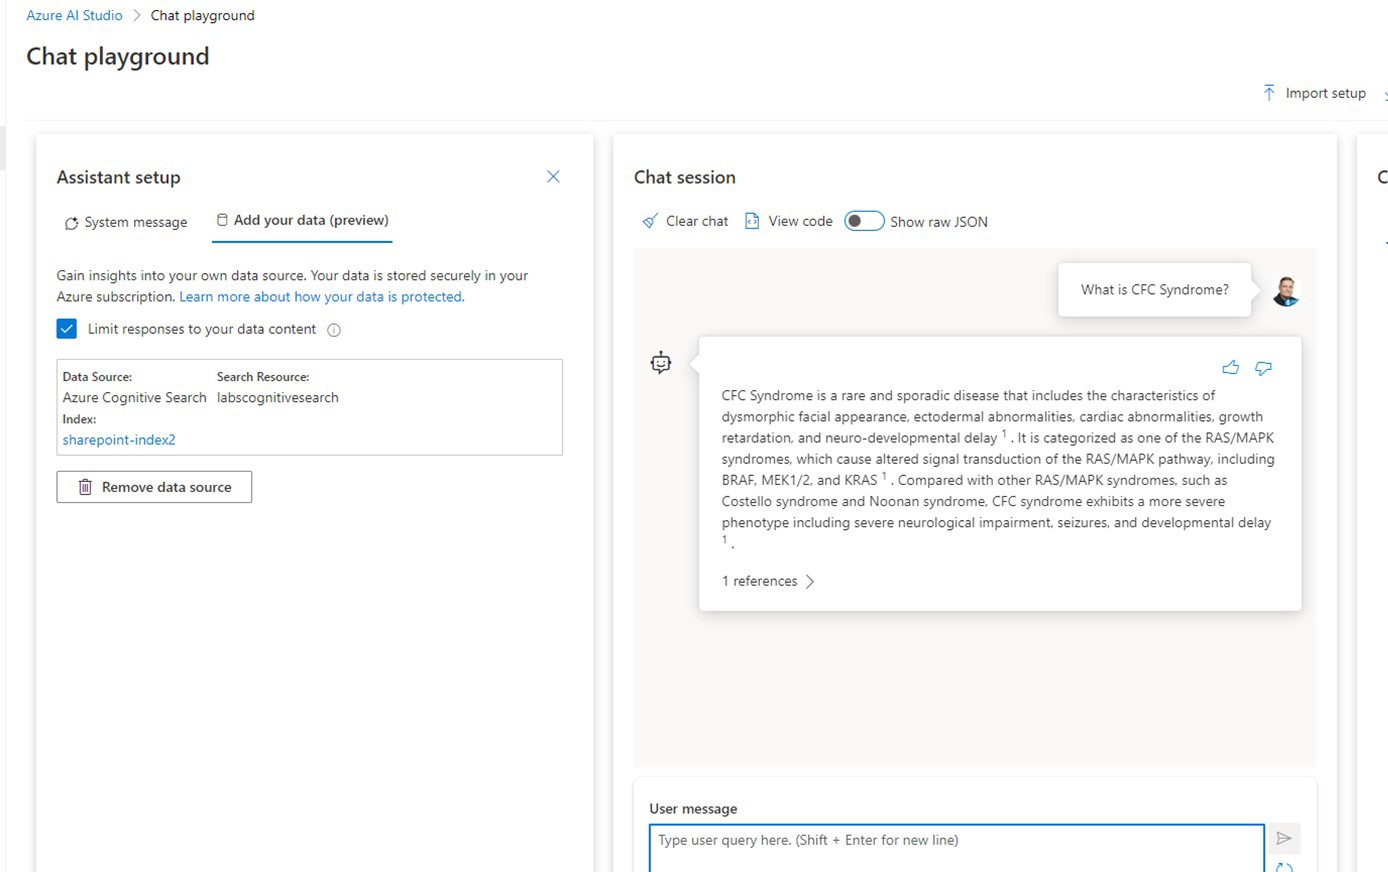
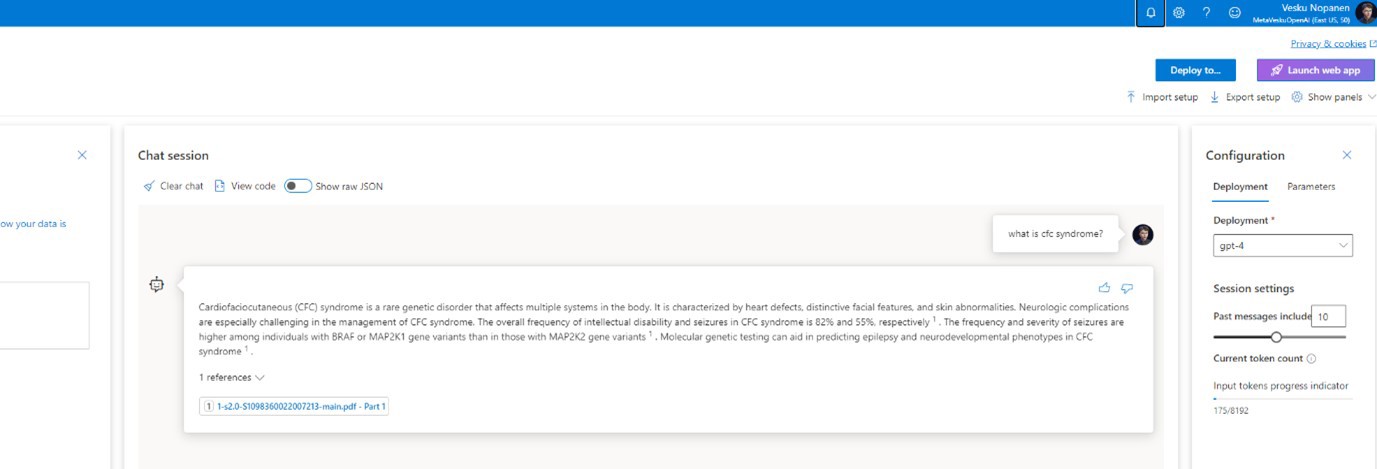
When I test it out, I can see AI Studio is including references to documents automatically. It also highlights where in the text the result was found. In my demo materials I used a few open access documents from Science Direct related to a rare genetic disorder. Using healthcare research article materials was also a good test of how AI actually performs with a specific, more difficult domain than general information.

When references are selected, you can see the files that supplied the answer. Selecting the file name opens the Citations side panel. All these features are built into Azure AI Studio to showcase how Add your data can be used.
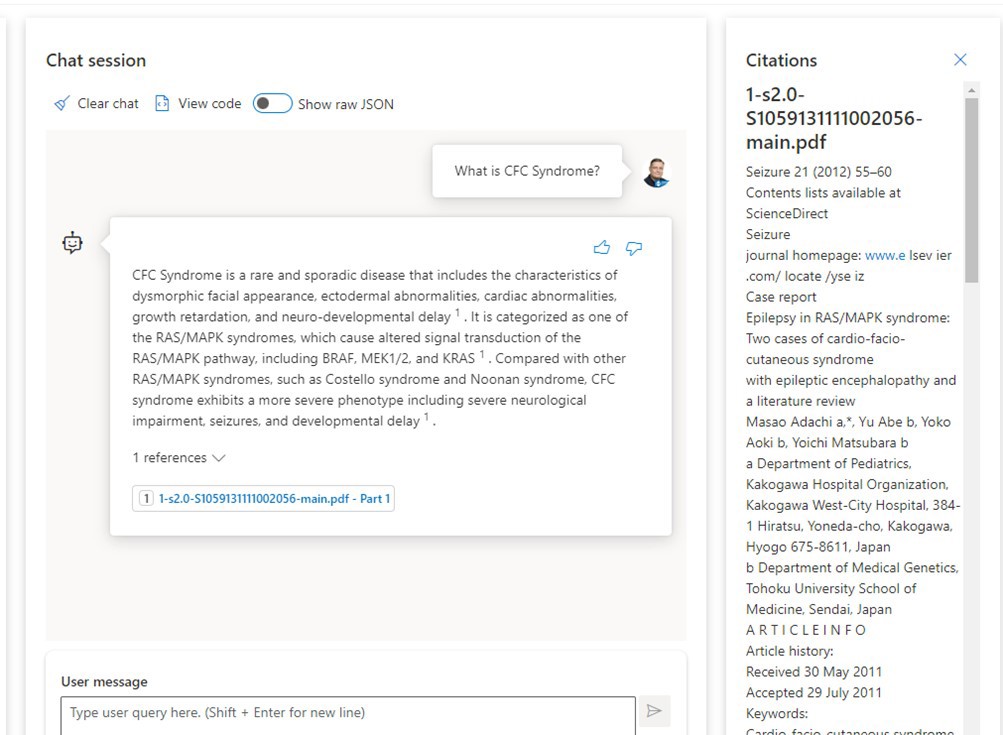
Citations are in fact included in the dataset API calls receive. We will touch more on that later.
Deploying a Simple Web Chat Application
Once you are happy with your data source, back in the Chat playground you can select the Deploy to... button on the top right.

Doing this will start a wizard that creates a web application to Azure that uses this chat configuration.
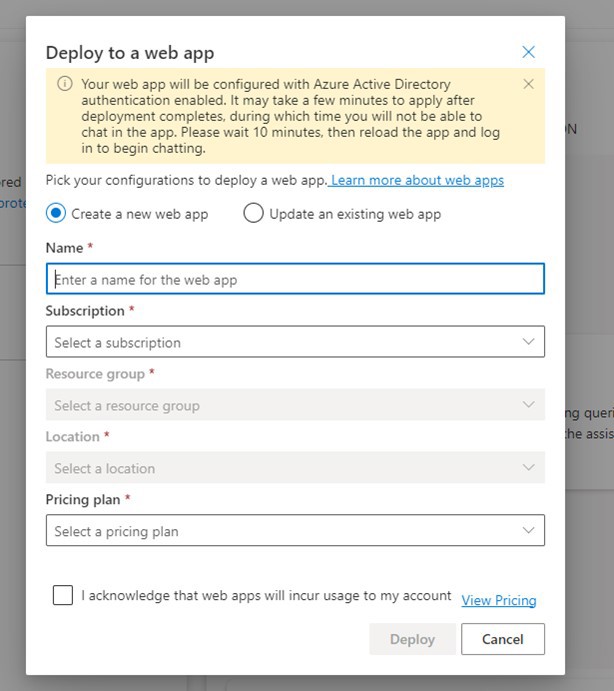
Unlike in Studio’s Chat playground, you don’t need to stick to the same Azure subscription with the web application. However, you need to have permissions to create new resources within the selected resource group. Pricing plans have various options, including a free tier. The free tier is great for testing, but since it is free it doesn’t have a lot of computing resources assigned to it (thus it is slow to start).
Once the application is deployed you can navigate to its URL, log in, approve usage and start testing it—and of course, sharing it with your colleagues so they can test it too.
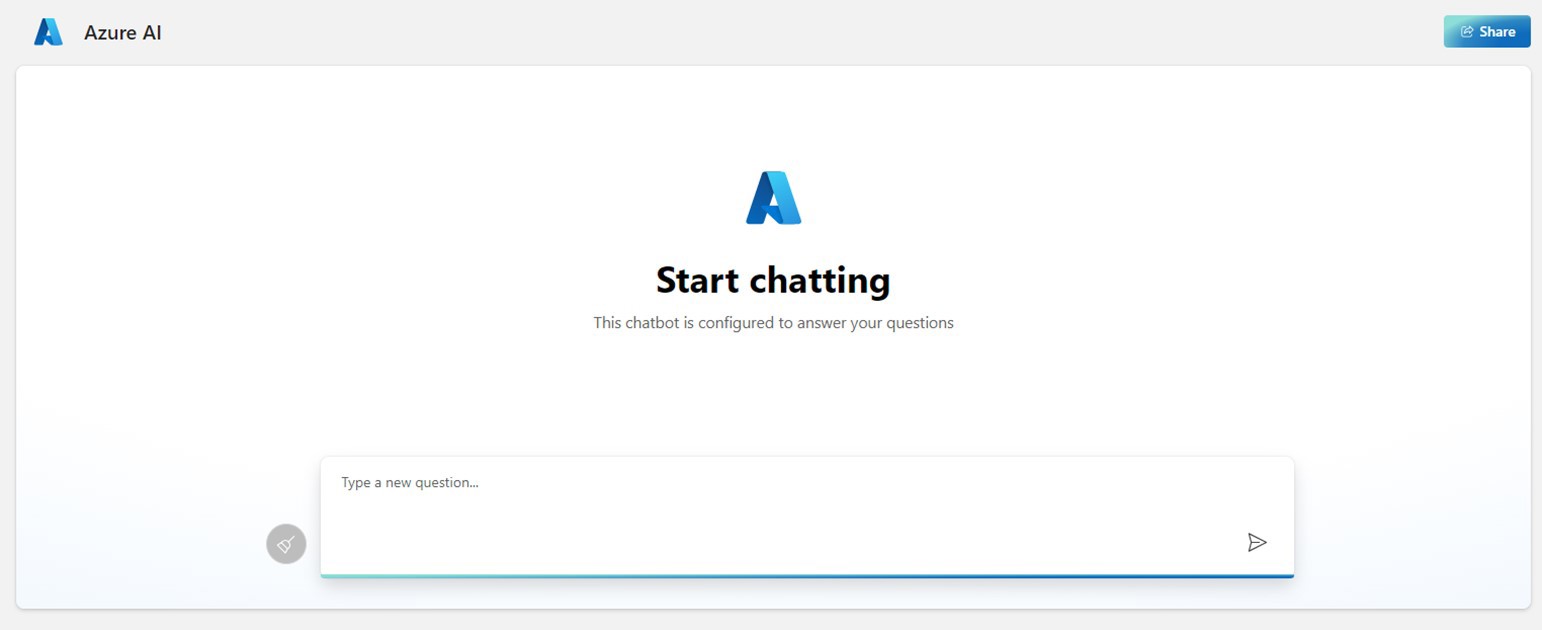
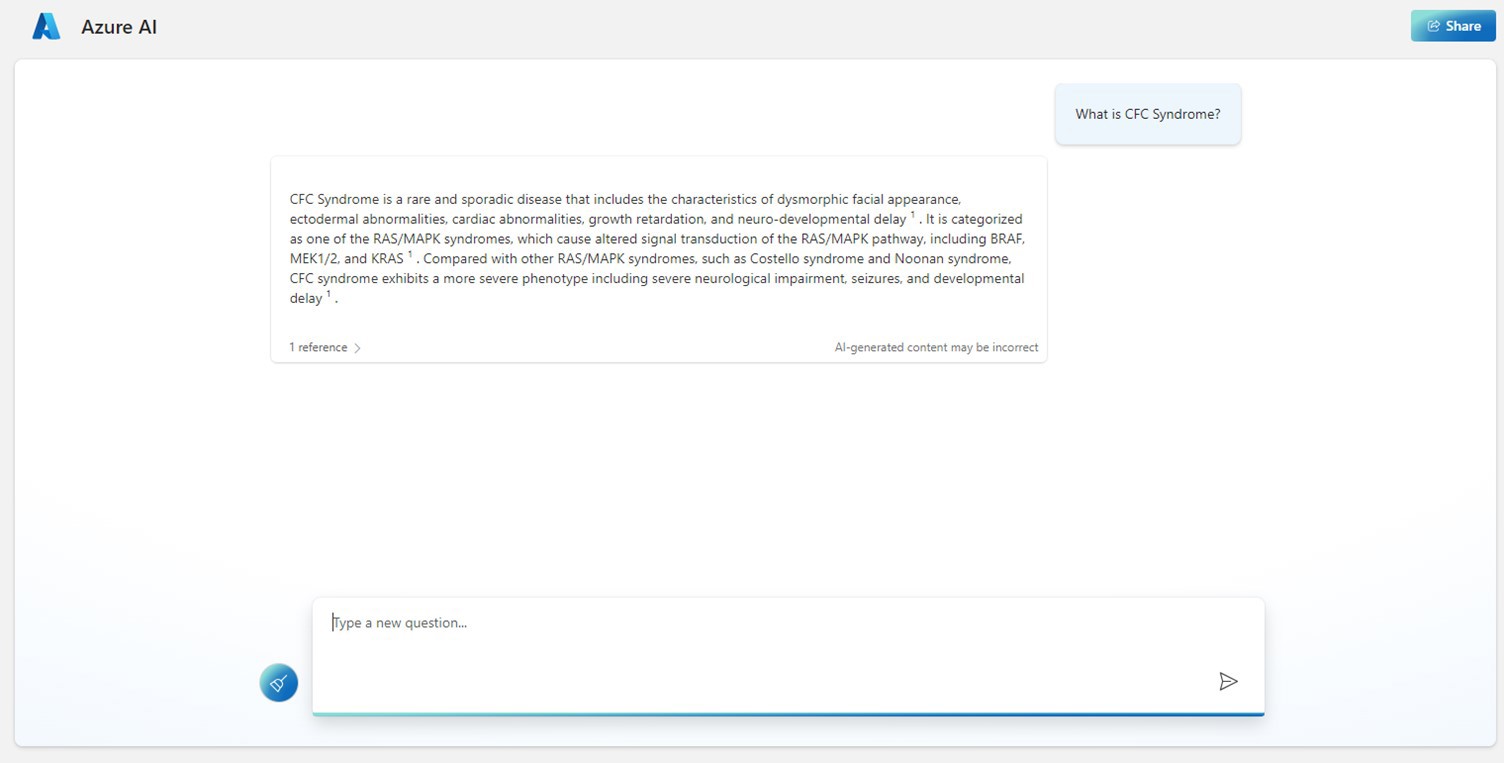
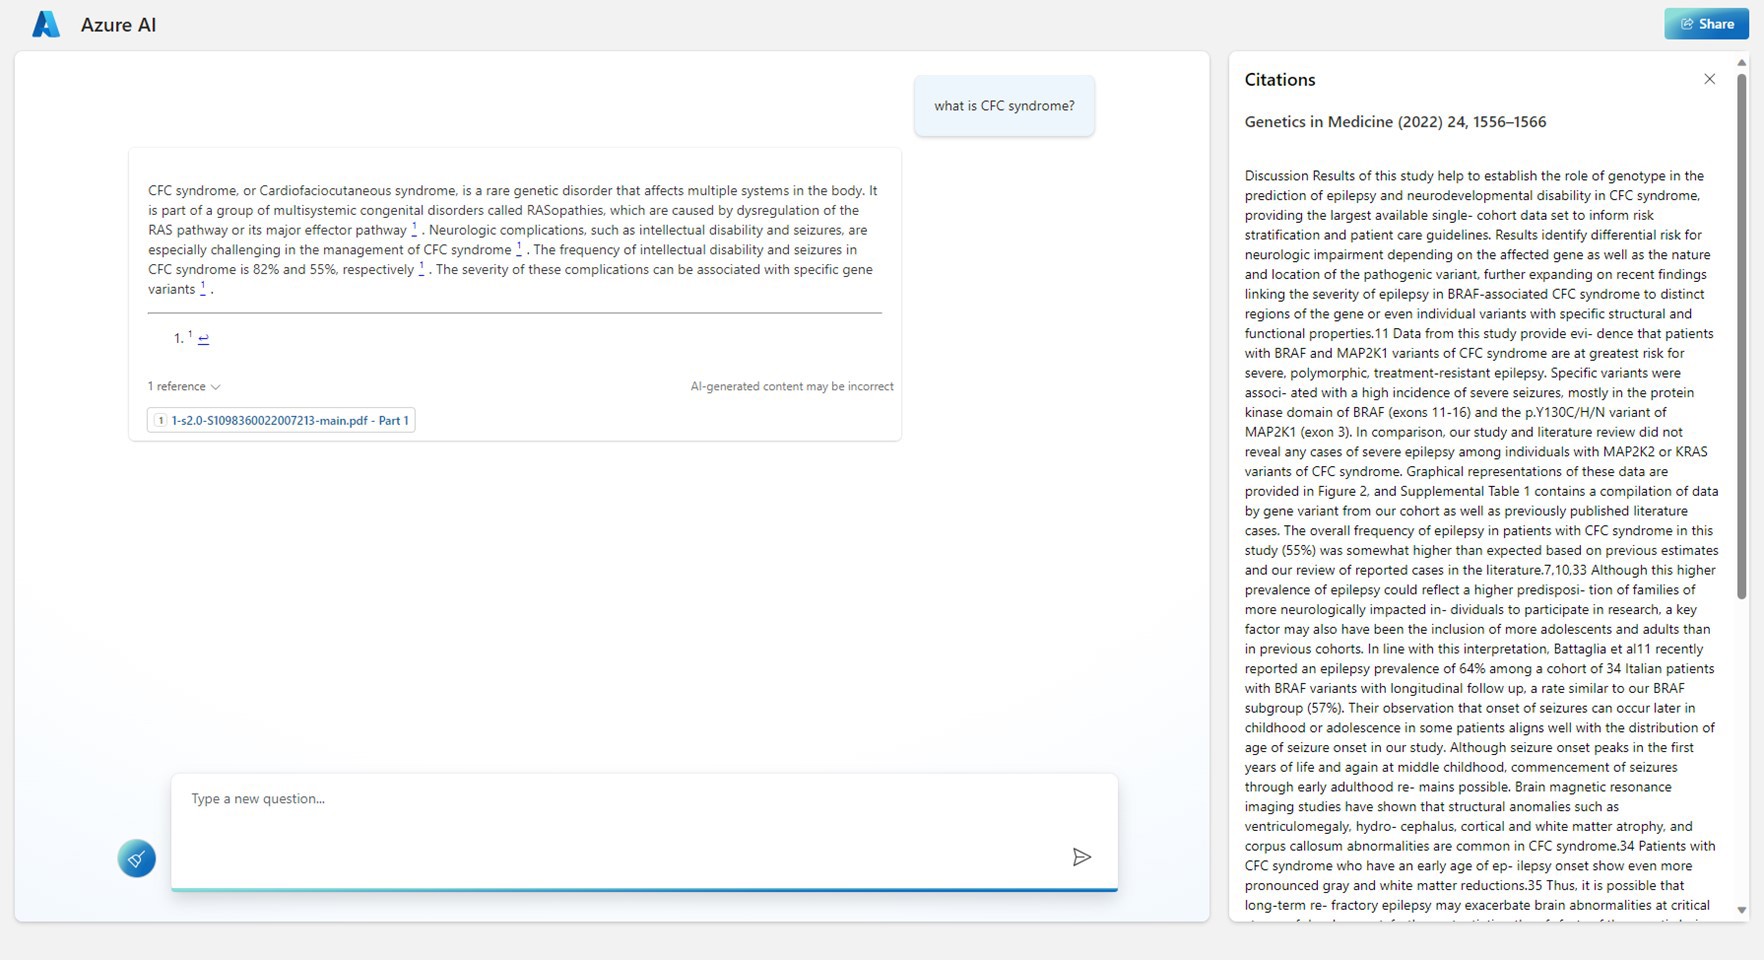
If we test it with the same prompt as in Chat playground, we get similar results.
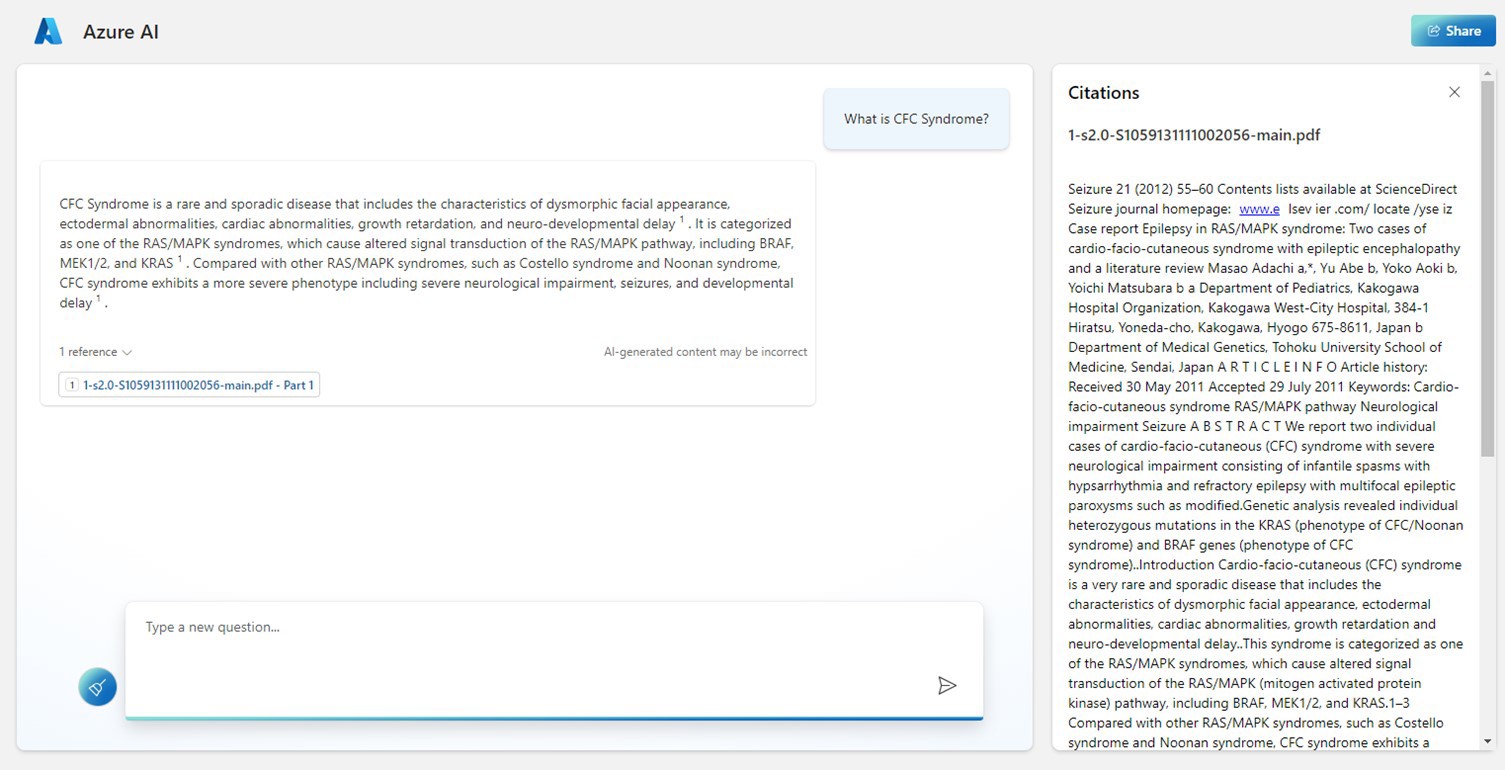
The app also includes file references and citations.

What the web chat app doesn’t include is the link to the file. But since the filename is there, in this example at least, it will be easy to find the reference using Microsoft search since it is in a SharePoint document library.
Adding an Azure Blob Storage Source
But not all files are in SharePoint. You may have some Cognitive Search configurations that are indexing data sources outside SharePoint. Sometimes you have just a bunch of documents you want to use with AI and you don’t want to add them to a SharePoint library first. Why can't you just upload your own files there for testing? The answer is: You can. During the setup process you can choose an existing Azure Blob Storage or create a new one. Blob Storage is part of an Azure Storage Account.
Let’s take a look at how I ended up with the configuration in figure 19. I started by adding a data source, as I did before.
This time I chose to Upload files. If you have existing Azure Blob Storage with files there, you can use that as well. It just needs to be in the same Azure subscription as the Azure OpenAI Service and you must have access to it.
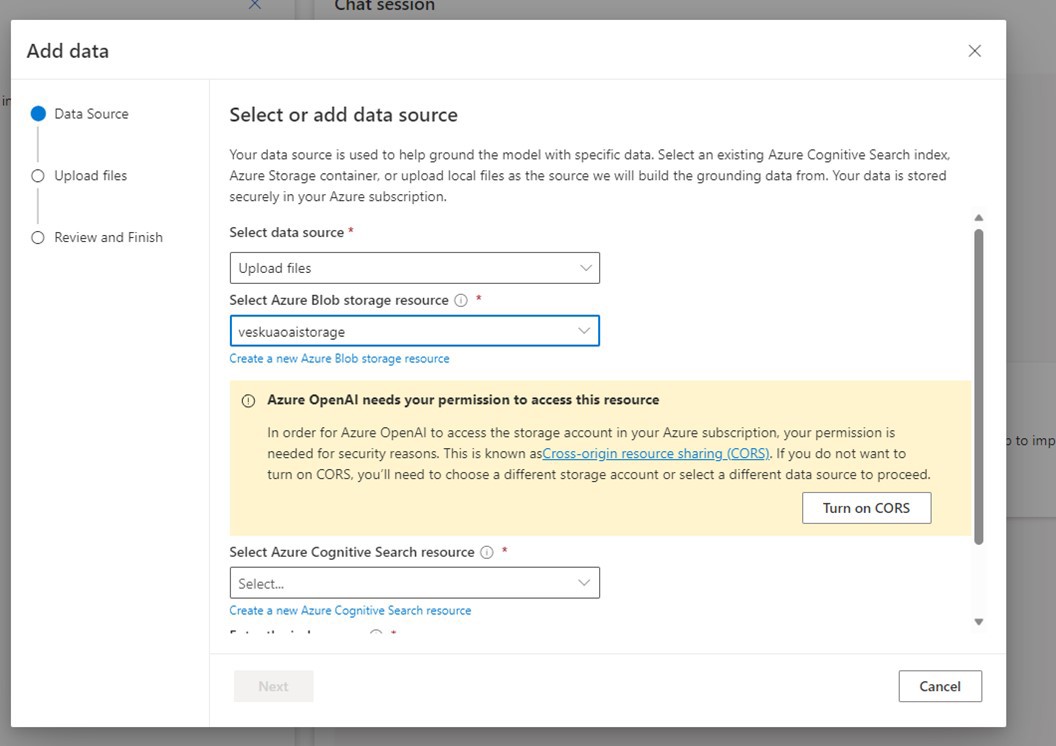
If you don’t have an existing one, you can create a new Azure Blob Storage resource. If you create a new one, you may need to close the wizard, refresh the AI Studio page and try selecting Blob Storage again. If your storage account doesn’t have CORS (Cross-Origin Resource Sharing) on, you need to turn it on before continuing further.

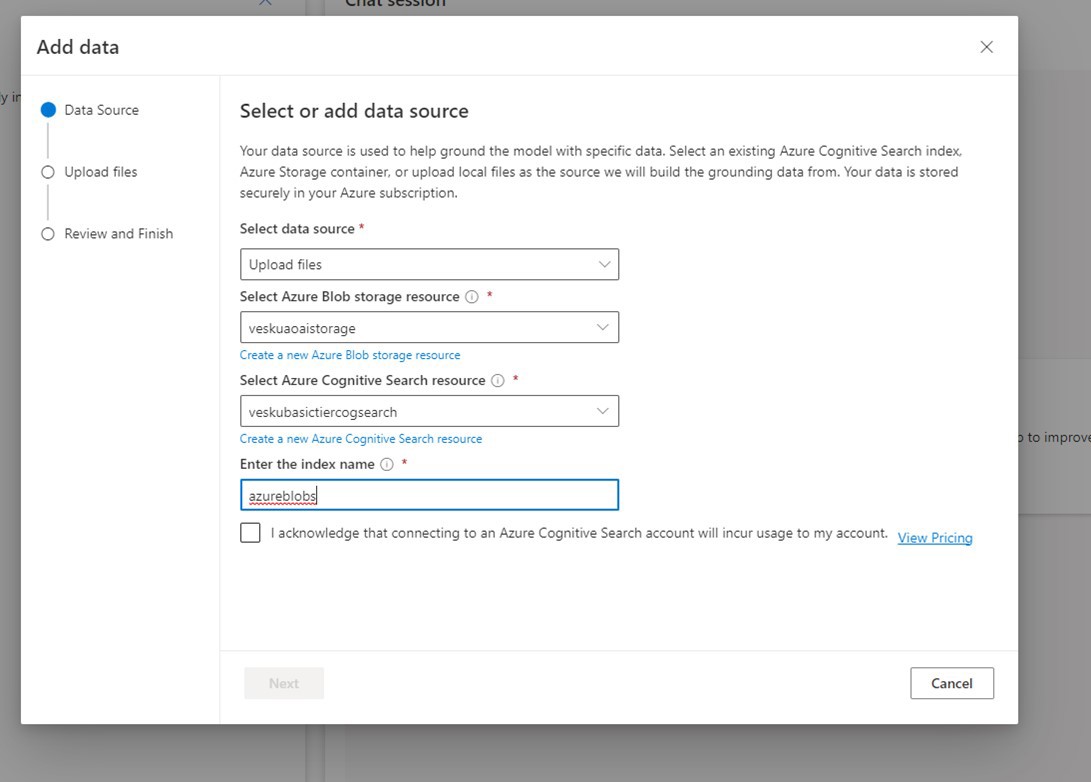
You also need to choose an Azure Cognitive Search resource before you can continue. If you create a new one during this wizard, you may need to refresh Azure AI Studio before you can select it here.
Finally, you need to give Cognitive Search index a name, and it will be created for you. Note that if you already have an existing configuration in place, you can select its resources and indexes. When using Add your data with Upload files, a new index is created during the process. The info panel for the Enter the index name field states, “Enter the index name that will be used to reference this data source. A new cognitive search index with the provided name will be generated after data ingestion is complete.”
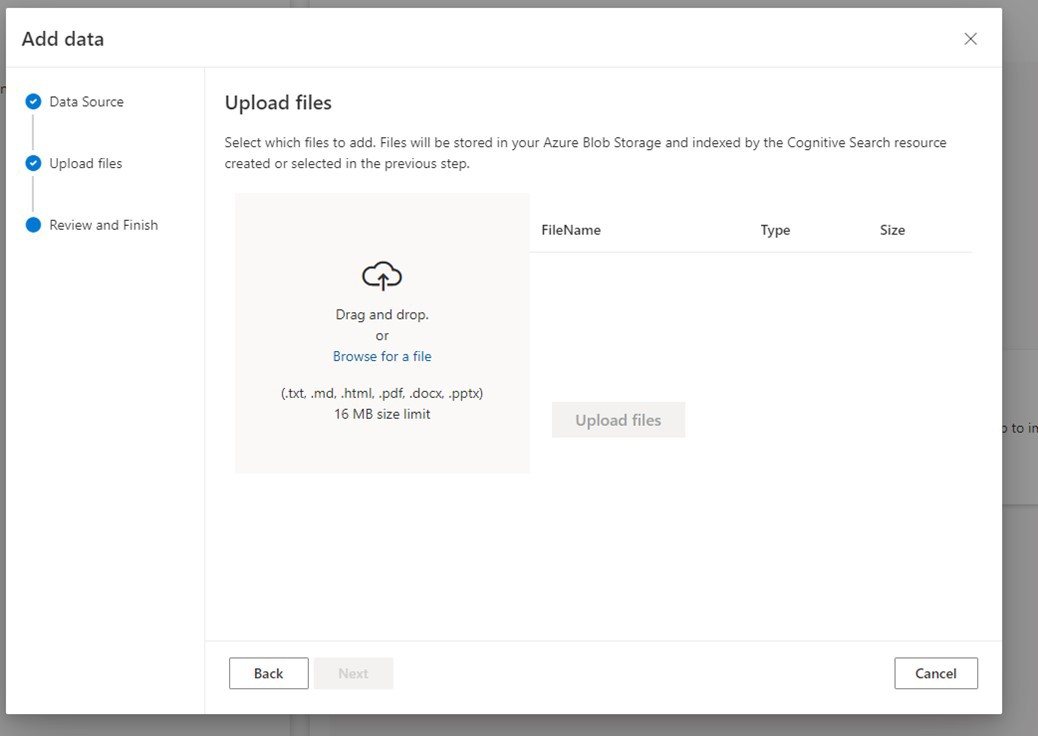
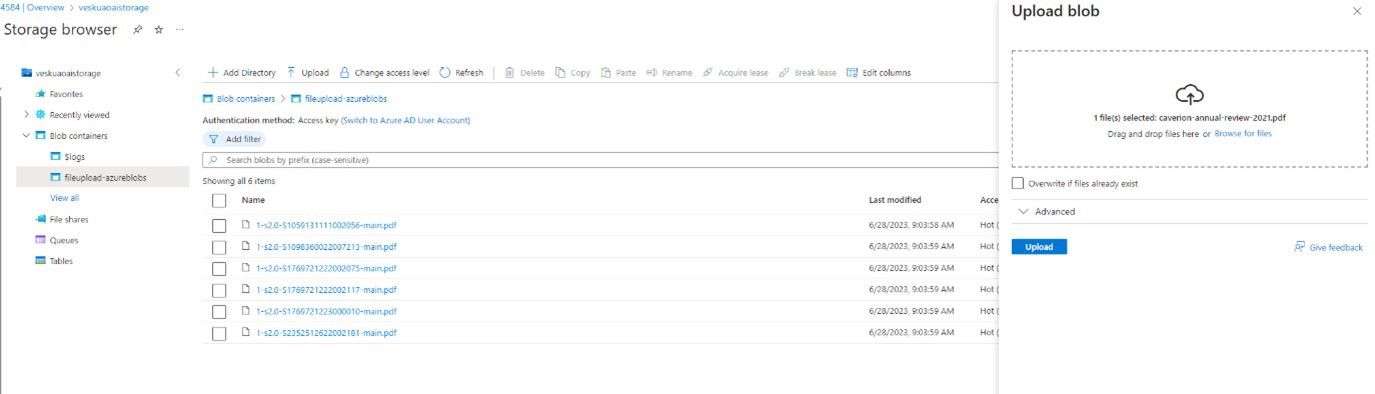
In this phase you can start uploading files. Once uploaded, you can see them in the corresponding Azure Blob Storage resource’s Storage browser. You can also add files to storage from the Storage browser.
In fact, there isn’t much difference when you are using existing Blob Storage or selecting Upload files. In both cases you end up with Azure Blob Storage that contains your files. Using the Upload files option gives you the ability to create a new Blob Storage and upload files, which is especially great for testing and POCs. Once these are set up and the files are there, you can try this out.

You can see the result with Blob Storage is very similar to when I selected Azure Cognitive Search. You can also play around with parameters and deployment in AI Studio before you deploy the web application. Or if you have already deployed it, you can launch it from the Studio without having to remember the exact URL to it.
Deployment is the same as before. Once the application is deployed, you can go ahead and try it.
The same citations are found here with Blob Storage. However, I found that there a small glitch in the response between text and reference that only appears when Blob Storage is used. But otherwise, the experience was just like before.
The JSON – Or “How Do I Use This in My Code?”
The final part of this article explains how to use Add your data beyond the test application. The web chat application deploys this Sample Chat App with Azure OpenAI and you can get its code from GitHub. This can give you ideas on how to get started with developing your own application.
But if you are like me, you want to jump to REST API calls and see what JSON is like. That lets you use this feature in Power Automate or Power Apps, if you like.
The first example—a SharePoint library that is connected to Cognitive Search index—is shown below, in figure 27.

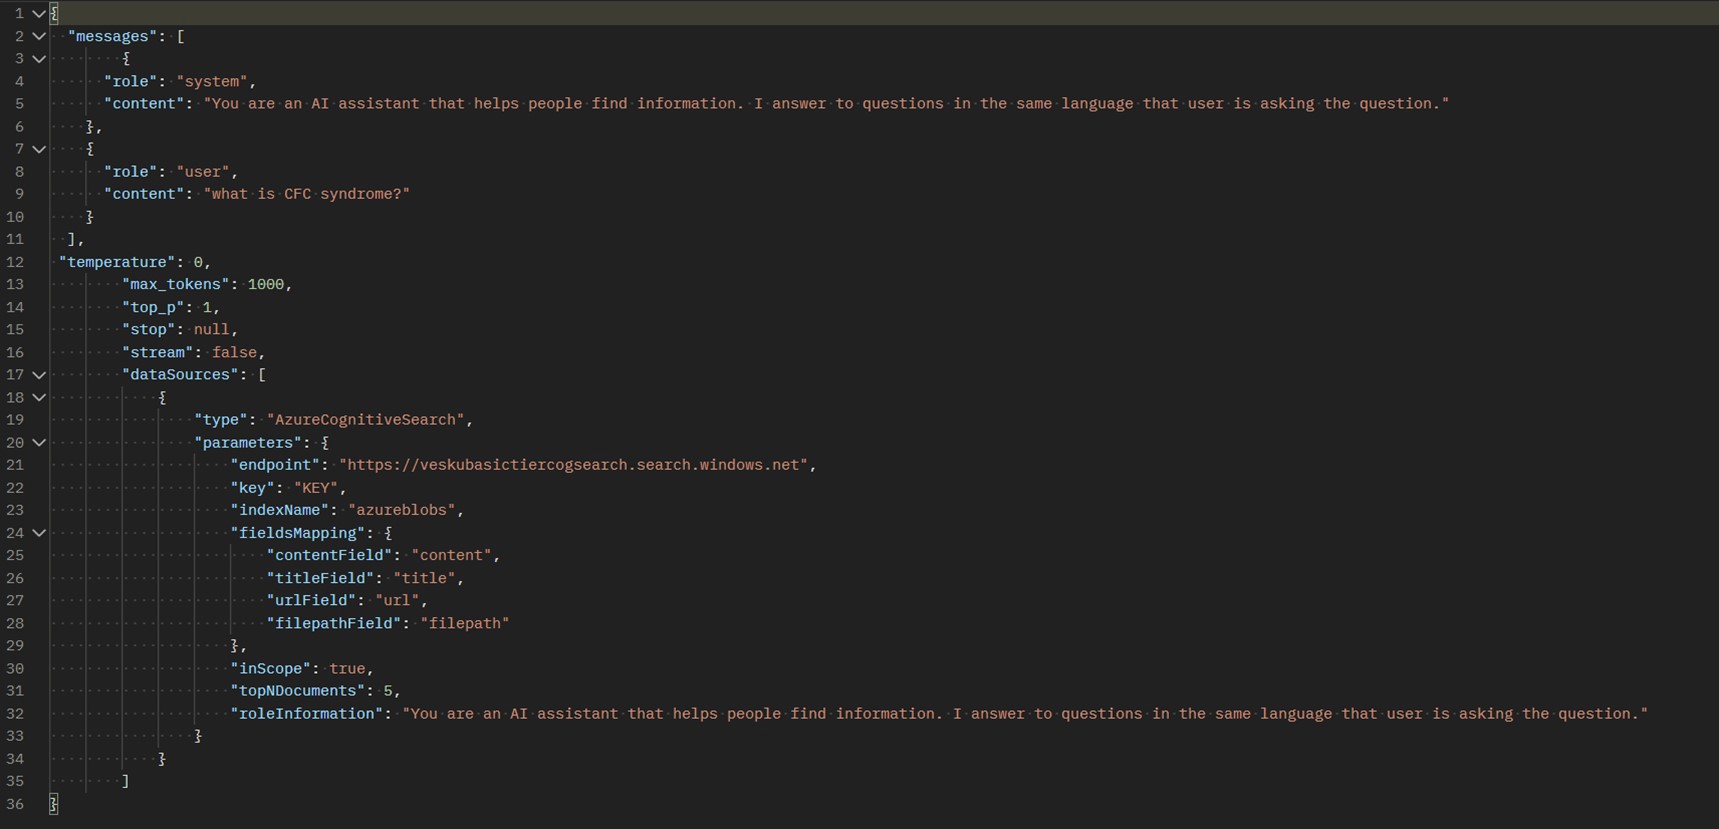
Here is the text version of the data source:
"dataSources": [
            {
                "type": "AzureCognitiveSearch",
                "parameters": {
                    "endpoint": "https://yourcognitivesearchservice.search.windows.net",
                    "key": "KEY",
                    "indexName": "yoursharepoint-index",
                    "fieldsMapping": {
                        "contentField": "content",
                        "titleField": "metadata_spo_item_name",
                        "urlField": "metadata_spo_item_path",
                        "filepathField": "metadata_spo_item_name"
                    },
                    "inScope": true,
                    "topNDocuments": 5,
                    "queryType": "simple",
                    "semanticConfiguration": "",
                    "roleInformation": "You are an AI assistant that helps people find information.  "
                }
            }
        ]
The Microsoft Learn page on Azure Open AI on your data doesn’t include all the details yet, but combining the information there with the sample application code, it was possible to parse the missing details to the REST API call body. What Add your data adds is a dataSources section to call.
In the dataSources section, you define the type of data source which, so far, can only be AzureCognitiveSearch. Parameters include Cognitive Search endpoint and key. Be careful when you are using your endpoint and key – these together are enough to give people access to your index. The key is the secret, and thus I have replaced the real key value with KEY text in JSON for this article. You also specify which index you are using for Cognitive Search and the fieldMapping section. After doing the configuration in Azure AI Studio earlier, this should look very familiar. There are also several other parameters: InScope (limit only to your data), topNDocument (how many top documents from the search are used), queryType (simple or semantic) and roleInformation, which is basically the system prompt (max 200 tokens, if longer it is truncated).
A good thing to know is that the max_tokens upper limit is 1500 and this only works with GPT-35-turbo or gpt-4 models. According to Microsoft, the model provides the best citation titles from markdown (.md) files, but in testing I stuck to pdfs and word documents, which are commonly used in organizations.
Using Azure Open AI with your data does have some other limitations, as it is clearly not as versatile as using GPT-4 or GPT-3.5 turbo standalone. Microsoft recommends and highlights on the Azure Open AI on your data page:
- Avoid asking long questions and break them down into multiple questions if possible
- Azure OpenAI on your data supports queries that are in the same language as the documents. For example, if your data is in Japanese, then queries need to be in Japanese too.
- Currently Azure OpenAI on your data supports semantic search for English data only. Don't enable semantic search if your data is in other languages. Note: in my testing semantic search increases accuracy for better with a good step.
- If you have documents in multiple languages, we recommend building a new index for each language and connecting them separately to Azure OpenAI.
If you are using Azure Blob Storage, then field mapping is slightly different:
Note: For demo purposes I needed to create Azure Blob Storage to another tenant, in case you are wondering about the different endpoints. Normally these would be in the same tenant, but nothing is preventing you from calling these from different tenants if you have the endpoint and the key.
JSON for dataSources definition when using Azure Blob Storage. As before you need to replace details to your resources, including endpoint and key:
"dataSources": [
{
"type": "AzureCognitiveSearch",
"parameters": {
"endpoint": "https://yourcogsearchservice.search.windows.net",
"key": "KEY",
"indexName": "azureblobs",
"fieldsMapping": {
"contentField": "content",
"titleField": "title",
"urlField": "url",
"filepathField": "filepath"
},
"inScope": true,
"topNDocuments": 5,
"roleInformation": "You are an AI assistant that helps people find information. "
}
}
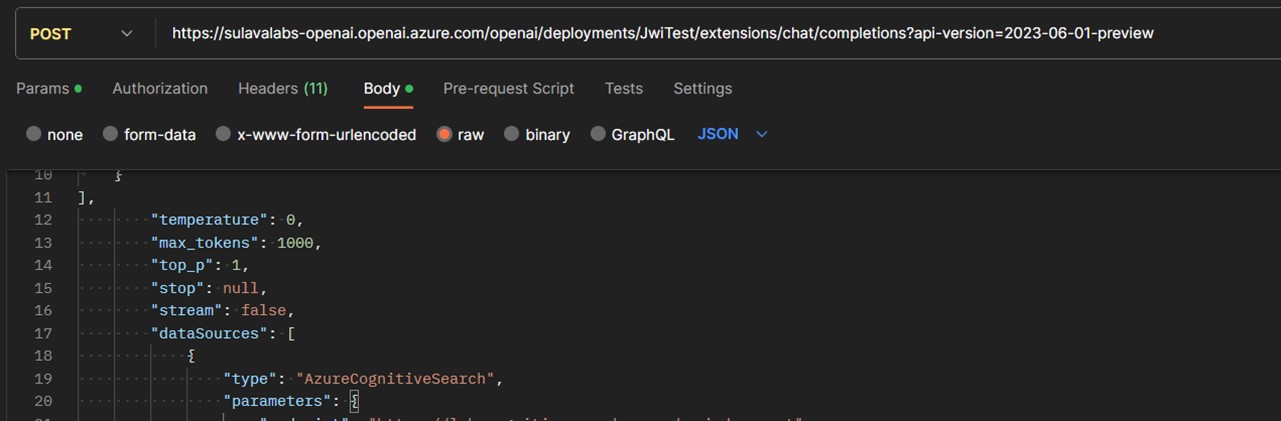
]There are two important changes, compared to standard Azure OpenAI HTTP calls, when using your data. The first is that the path is /openai/deployments/yourdeploymentname/extensions/chat/completions. The second is the API version, which needs to be 2023-06-01-preview or later. If you just add dataSource to existing API calls with an earlier version, you end up with an error message.

The result of the call is also a bit different than before. It now includes a tool section and assistant reply content, instead of just AI reply.
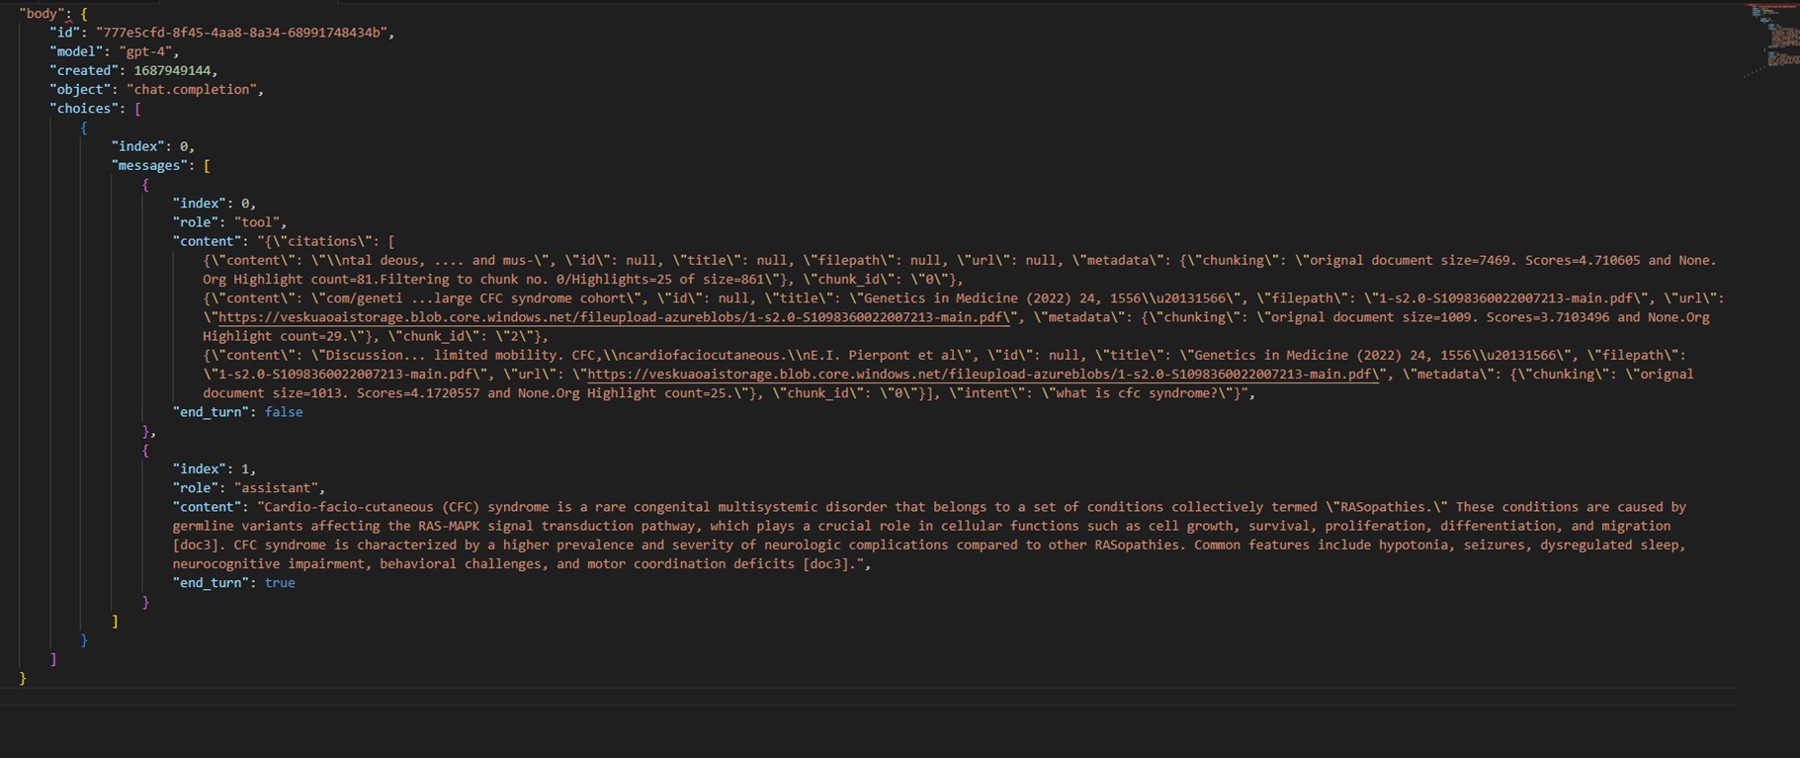
The tool section, which is always at index 0 (assistant reply is at index 1), includes all details for reference files and citations. These details come from Azure Cognitive Search, are linked to data field mappings, and are in a citations array within tool content. That requires a bit more JSON parsing to extract the details than before.
Note: In the figure below, most of the citation content was cut so it would fit the screen.

Sometimes I got a few NULL results for filename and URL—even when citations were correct—so that is something to watch out for. For example, I might get two citations (references) with NULL filename and URL, but the other three have correct data included.

Looking closely at the assistant reply, there are placeholders like [doc3] for correct citation locations, which you can match with citation results.
When you use an Azure Blob Storage data source, it includes links to files, but a SharePoint Data Source includes URLs a bit differently (see the figure below).

This is one way to reference a document in a SharePoint document library (drive), but it doesn’t allow you to open the file. For that, the easiest way is to make another REST API call to retrieve document information based on its drive path with
GET https://graph.microsoft.com/v1.0/{drivepath from the citation URL}
and parsing the webUrl from the result.
Closing and Insights
Using Azure OpenAI with your data is a welcome addition; personally, I have been waiting for this capability since I started working with Azure OpenAI. Previously, I had to generate a separate call for Azure Cognitive Search to retrieve document texts for the GPT model to process, but with token limits it was much more difficult to work with documents. With this new capability, you can ground your data directly to Azure OpenAI and get results with citation contents, including file references. Using this feature with SharePoint Document libraries allows using your organization’s data easily as a data source for FAQs, manuals, guides, practices and more, all while retaining the power of SharePoint and collaboration without any changes. It is certainly a limitation that all document libraries need to be added to Azure Cognitive Search separately, at least in this point. The ability to use Azure Blob Storage, on the other hand, allows more flexibility and custom solutions that can include more filetypes than what Cognitive Search can index from SharePoint—for example, markdown (.md) and html files.
Microsoft recommends that data sources and data sets with long text should be prepared, with data preparation script or otherwise, to reasonably-sized chunks. This will make responses more accurate. If this is an option, I recommend it. But if the data you work with is actively updated in a SharePoint document library, then I recommend you test it first to see how good the results are—and if they are unsatisfactory, then start planning how you could split documents to smaller ones and still maintain updatability and usability when editing them.
Limiting the GPT model to only work with your documents reduces its tendency to hallucinate facts since it is already noted inside this feature. On the other hand, it seems to limit the creativity we have come to experience with GPT models. But if your application supports a chat interface, you can do clever prompting to get over this limit, as you can first use chat to get to the right information and then, in a separate prompt, ask it to format it specifically to your needs.
AI is going to be everywhere, and it is changing the way we work. It is important to get started with proof-of-concepts and experiments to get experience and find out how AI is going to be helping your organization and where it makes sense to use it.

Vesa Nopanen
Vesa "Vesku" Nopanen, Principal Consultant and Microsoft MVP working on metaverse and Future Work at Sulava.
The metaverse is a Digital Fabric with AI, Digital Twins, metaverse of Things, Microsoft Mesh, and other services & platforms in the cloud connecting digital and physical worlds and people together.
The metaverse journey is on its early steps and Vesku is guiding you and your organization towards the future. He is extremely passionate about metaverse, mixed & virtual reality and how these technologies, with Microsoft Teams and cloud, enable to change how people work together.
Vesku has 25+ years of experience in IT business on multiple industries, domains, and roles. He is also a futurist, active speaker, blogger, evangelist, and technology community member.
Metaverse | Futurist | Speaker | Blogger | Mr. Metaverse