Using the SharePoint Migration Tool (SPMT) to Migrate SharePoint Sites to Microsoft 365

Microsoft provides a free and simple migration tool, the SharePoint Migration Tool (SPMT), to assist in the migration process from SharePoint sites to Microsoft 365. SPMT can perform SharePoint-related migrations to SharePoint Online, OneDrive, and Teams from the following:
- SharePoint Server 2010, 2013, 2016, and 2019
- SharePoint Foundation 2010 and 2013
- SharePoint Server 2010 out-of-box (OOB) workflows to Power Automate
- SharePoint Designer 2010 and 2013 workflows to Power Automate
Note: If you are proficient with Windows PowerShell, SPMT contains all the functionality available in PowerShell to complete your migration.
Understanding SPMT
It is important to prepare for and understand SPMT, including supported authentication methods, migrated content permission behavior, migration assessment, and prerequisites.
Supported SPMT Authentication Methods and Permissions
SPMT supports several authentication methods:
- NTLM
- Kerberos
- Forms
- ADFS
- MFA
- SAML-based claims
- Client certificates
Note: If your on-premises server is configured to support multiple authentication methods that include Windows authentication, the Windows authentication will not be supported. You’ll have to choose a different authentication method other than Windows.
Also, the permissions associated with the files being migrated can be affected during the migration process. The location of the on-premises content, along with whether you have synchronized your Active Directory accounts with Entra ID (formerly Azure AD), can affect the permissions on your files after a successful migration. If you want to maintain your existing on-premises file permissions, it is important to perform a synchronization between your on-premises Active Directory and Entra ID. This will create and associate a corresponding user in SharePoint Online, therefore maintaining their file permissions.
Use the Microsoft SharePoint Migration Assessment Tool (SMAT) to Help Plan the Migration
The planning process for a migration is not to be taken lightly and can take your team a considerable amount of time to plan for and document a successful migration. To help minimize any errors during the migration, assess your content prior to the migration. You can run the Microsoft SharePoint Migration Assessment Tool (SMAT) to assess your current deployment and identify any potential migration issues. I strongly recommend you step out of this article and take some time to read and understand my article on TekkiGurus about SMAT: Using SMAT to Assess Your SharePoint Server Migration to SharePoint Online.
After running SMAT and discovering any potential issues, you can continue your planning process by ensuring that you are prepared to run SPMT. This involves verifying three primary items:
- Access to migration destination: Global admin or SharePoint/OneDrive admin in Microsoft 365
- Access to the source: Read access to the content you want to migrate to Microsoft 365
- Meeting the SPMT prerequisites:
- Hardware and software requirements, as shown in Table 1
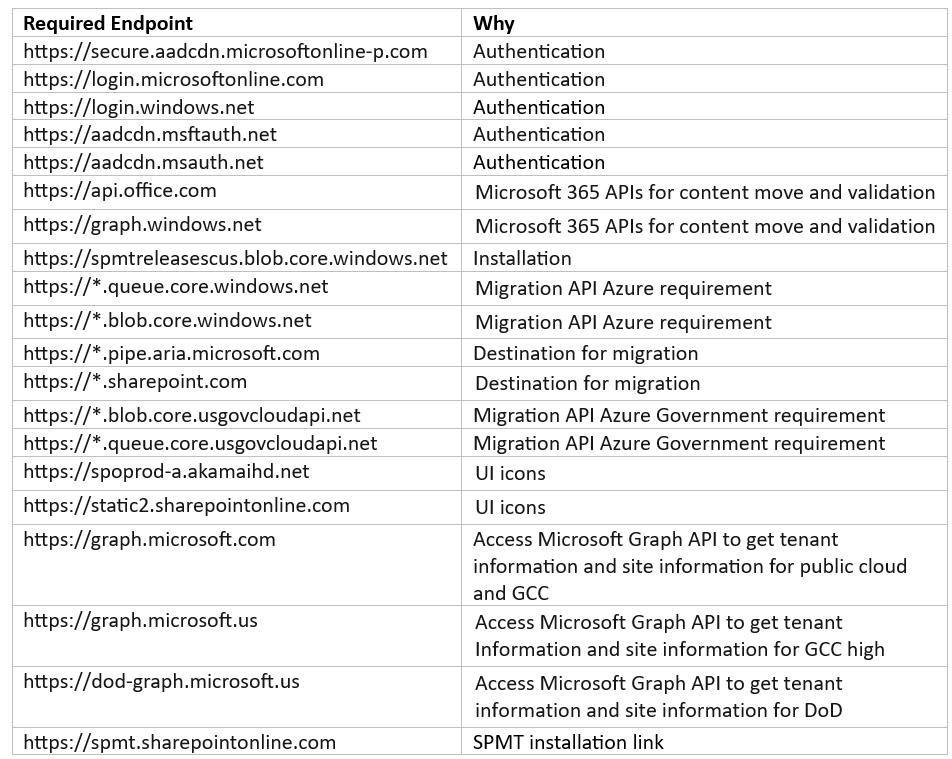
- Required endpoints, as shown in Table 2
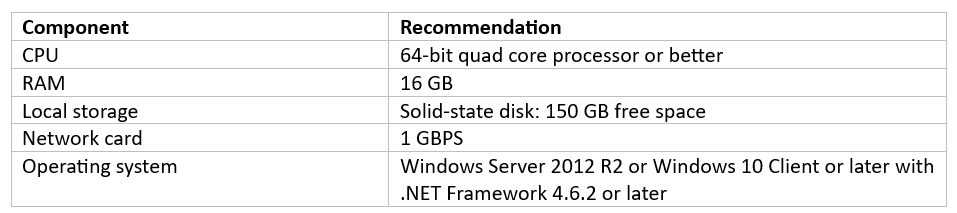
Important: There is a file size limit of 250 gigabytes (GB) when migrating files from both SharePoint Server and file shares to Microsoft 365.
Download, Install, and Run SPMT
After going through the planning process and documenting your migration strategy, you’ll need to download and install the latest SPMT. To locate and download the latest SPMT version, visit Install the SharePoint Migration Tool, which contains a link to a few flavors of SPMT:
- Public preview (test, use, and provide feedback to Microsoft about the product)
- First release (more reliable and tested version of the product, but not General Availability)
- General Availability (recommended for production environments)
Neither SharePoint nor file share migrations that are performed using SPMT will support proxy connections by default. However, you can use the following steps to configure the SPMT app config file to recognize your system proxy connections:
- Download and install the latest SPMT product.
- Start SPMT and connect to Microsoft 365.
- If SPMT doesn’t connect to Microsoft 365, navigate to %localappdata%\Apps\SharePointMigrationTool\SPMT.
- Open the Microsoft.sharepoint.migrationtool.advancedapp.exe.config file.
- Uncomment the following default proxy setting, also shown in Figure 1, and then restart SPMT.
<system.net>
  <defaultProxy useDefaultCredentials="true" enabled="true">
        <proxy usesystemdefault="True" />
  </defaultProxy>
</system.net>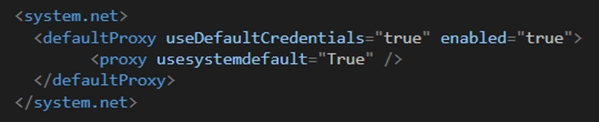
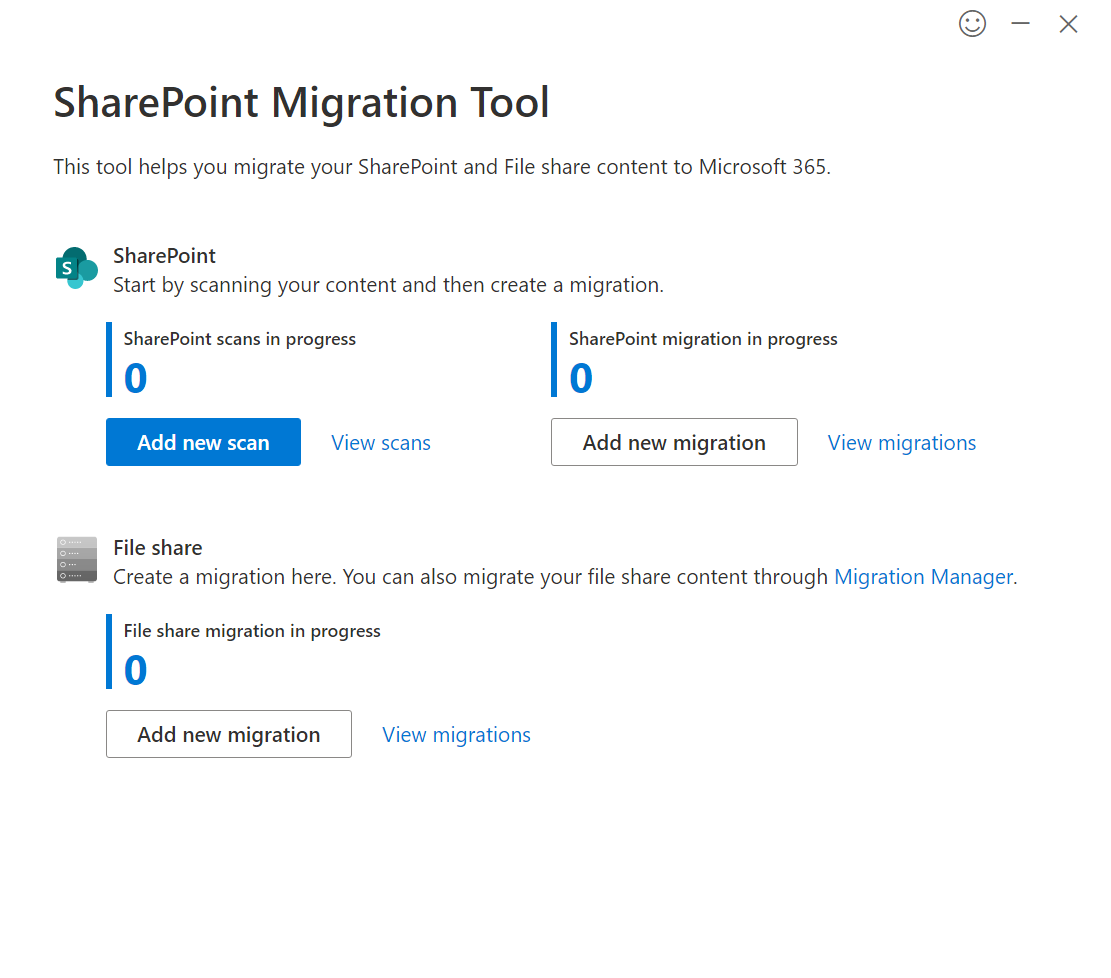
SPMT 4.0 and later contain the SharePoint Server assessment functionality, as shown in Figure 2, that allows you to scan your source sites right before the migration, review the results, and make any changes necessary to allow the migration to complete successfully.
Important: I strongly recommend that you still run SMAT as discussed earlier! By running SMAT early-on, it will give you an idea on the likelihood of a successful migration, and it can be used to identify most issues before you are ready to perform the actual migration.
Figure 2 shows the SPMT dashboard options available to you after you have run SPMT and signed in to Microsoft 365 using either a global admin account or a SharePoint administrator account.
| Used with permission from Microsoft.
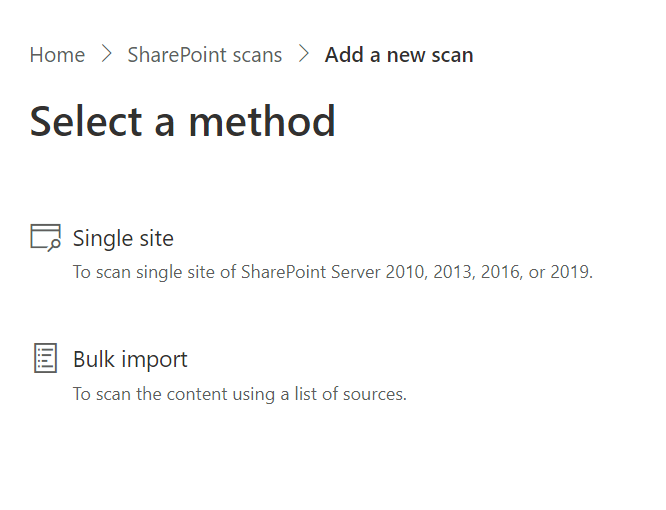
If you select the SharePoint Add new scan button, you’ll see the two methods of Single site, or Bulk import, as shown in Figure 3. After selecting Single site, enter in the Single site URL, and then select Start.
If you select Bulk import, supply the location of the .csv file or the .json file that contains the sites you want to scan.
| Used with permission from Microsoft.
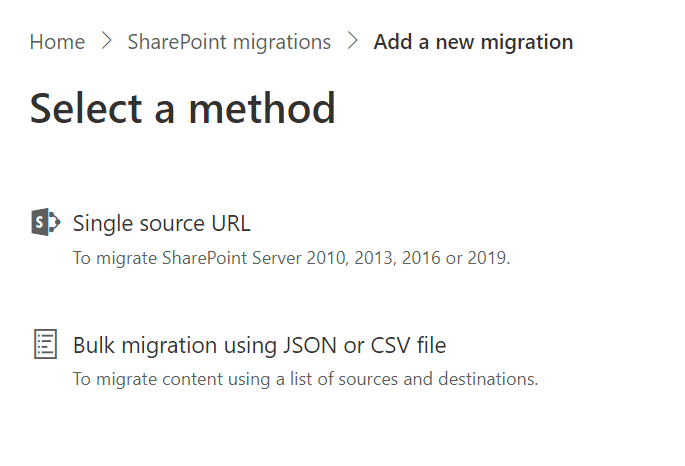
After successfully assessing your sites and determining that you can migrate SharePoint content to Microsoft 365, select the Add new migration button to display the two methods shown in Figure 4: Single source URL or Bulk migration using JSON or CSV file, which you select when you’re ready to complete the migration. Similar to the bulk scan operation, you would supply the location of the .csv file or the .json file that contains the sites you want to migrate.
| Used with permission from Microsoft.
If you select Single source URL, you are presented with another screen containing three migration types, as shown in Figure 5. This allows you to choose whether you want to perform a site migration and all its content, get more granular and migrate a list or library within a site, or migrate a workflow to Power Automate. If you choose to perform a site migration, you can also decide if you want the migration to maintain the classic site structure, or if you want to switch to the modern site structure, which can optionally be associated with a hub.

| Used with permission from Microsoft.
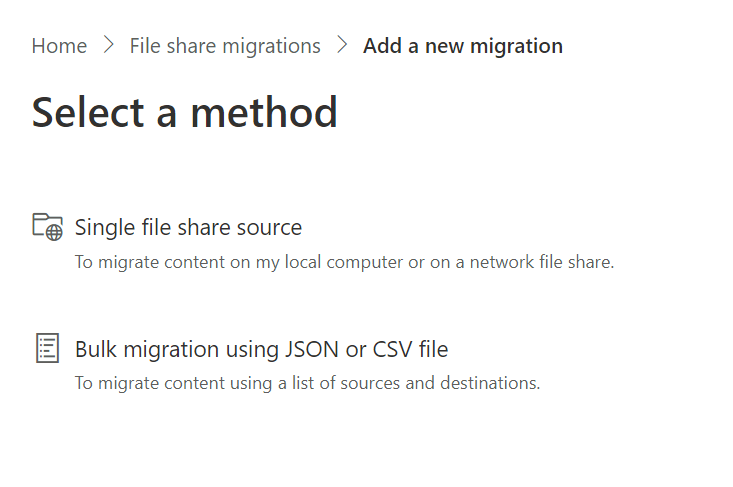
In addition to being able to migrate SharePoint content, you can also migrate files stored in file shares. If you want to perform a file share migration, select Add new migration under File share on the SPMT dashboard as shown earlier in Figure 2. There are two file share migration methods: Single file share source and (similar to the SharePoint migrations) Bulk migration using JSON or CSV file option, as shown in Figure 6.
| Used with permission from Microsoft.
Regardless of the type of migration you choose, there are ways to monitor your migration and there are reports generated about your migration. While the migration is being performed, you can monitor the progress of it through the SPMT dashboard and view both the amount of time elapsed and the amount of time remaining with the migration.
The migrations generate two types of reports: summary and task:
- SummaryReport.csv: This contains a single row of data providing you a big picture of the migration including total size, number of files migrated, and the duration of the migration.
- FailureSummary.csv: Hopefully, you won’t see this one because it is only generated if there are any failures or errors encountered during the migration process.
The seven task reports provide more detail when you are troubleshooting migration issues or when you are just verifying that everything was migrated successfully:
- ItemReport.csv: Contains a list of all attempted tasks during the migration process
- ItemSummary.csv: Similar to SummaryReport.csv but provides more detailed information for each task
- ItemFailureReport.csv: Contains only failures at the item level
- ScanSummary.csv: Provides a summary containing statistical totals
- StructureReport.csv: Contains a task level structure report
- StructureFailureReport.csv: Contains task-level failure information
- StructureFailureSummary.csv: Hopefully you won’t find this, as it will contain aggregated data of all structure-related task failure reports
If you do encounter errors during the migration process and need help troubleshooting what they are, visit Troubleshooting common SPMT issues and errors. This website is separated into five sections:
- Common error messages (about a dozen of them)
- SPMT error codes (about 35 of them and some with different resolutions)
- Navigation errors (about five of them)
- Taxonomy errors (about five of them)
- Web part errors (about ten of them)
Important: These are issues and errors associated with the migration process, not any issues that would be associated with the installation of SPMT. For help on troubleshooting the SPMT installation, visit Troubleshooting SPMT installation issues.
SPMT has come a long way, and Microsoft is still investing in it and updating it. Before you look at buying third-party applications to assist you with your migration, I suggest you conduct due diligence and check out both the free SMAT and SPMT to help you assess, plan, and perform your migration to Microsoft 365.

Brian Alderman
Brian Alderman is a former Microsoft MVP, and has his Master's in Computer Information Systems. Since 1995, he has held several Microsoft certifications that currently include; MCT, MCSE for SharePoint, MCSA for Office 365, MCITP for SQL Server(R), MCSA and MCSE for Windows Server(R), and also his PMP certification. As a Senior Technical Instructor and Consultant, he has 30 years of experience in networking, SQL Server databases, SharePoint technologies, and project management. Brian's publications include Windows 2000 Professional, SQL Server 2000 Administration, SharePoint 2010 Administrator's Companion, and Microsoft SharePoint 2013 Administration Inside Out. He is an active speaker at SharePoint Industry conferences including SharePoint Saturday's, SPLive, DevIntersection, SharePoint Fest, Microsoft Ignite, and several international SharePoint conferences including London, Milan, and Madrid.