Using OhMyPosh to Customize the Windows Terminal Prompt

Windows Terminal offers nearly infinite support for personalization and customization. This is dramatically visible using so-called “nerd fonts.” These have colorful graphical symbols for the characters that normally show up in the prompt part of the Windows PowerShell command line. Behind the scenes, PowerShell uses a built-in function named prompt to display specific information each time a new input line appears there. In this article, I’ll explore a specific Windows PowerShell prompt customization tool called OhMyPosh to show you what kinds of colorful and dramatic possibilities it enables.
Check Out the Other Windows Terminal Articles
This is the fourth article in a series on Windows Terminal (sometimes referred to as WT). Here’s a list of what this series covers (or plans to cover in future installments):
- Understanding and Using Windows Terminal: Gives a general description of what Windows Terminal is, how it works, and what it can do.
- Understanding and Using Windows Terminal Color Schemes: Explains the contents and behavior of Windows Terminal color schemes, with tools to display and inspect them.
- Using Text, Tabs, Panes, and Themes in Windows Terminal: Explains how to inspect, set and change text and background colors in Windows Terminal, how to split the display into horizontal and vertical panes, and more.
- Using OhMyPosh to Customize the Windows Terminal Prompt: This article.
- Creating and Sharing Windows Terminal Profiles Across PCs: Explains how to export and import complex Windows Terminal environments across multiple PC instances (a few or a fleet, as your needs may dictate).
Teasing Command Prompt Presentations
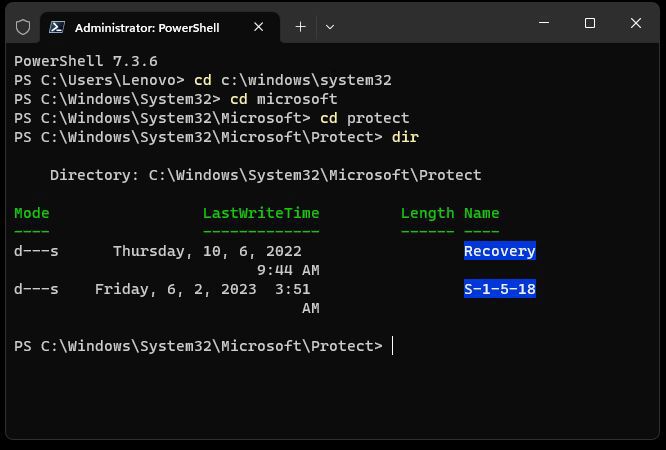
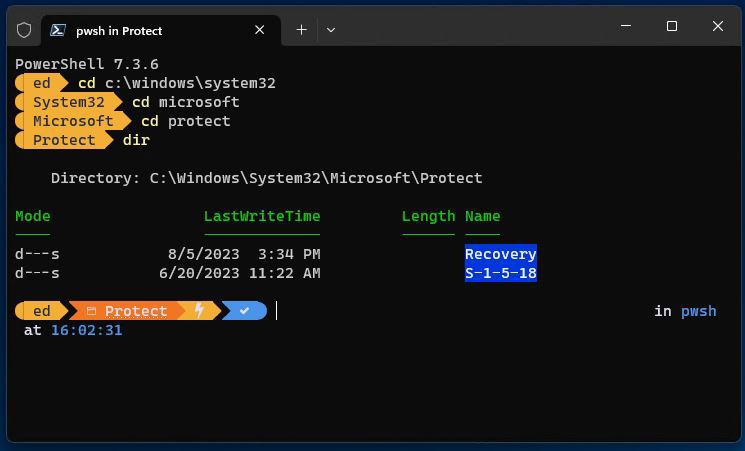
The best way to understand what customizing the prompt in Windows Terminal looks and acts like is to compare the default prompt in PowerShell to the same default after OhMyPosh is installed and properly configured (including installing and using a suitable nerd font). To get a good idea, compare the look and feel of Figures 1 and 2. Both show the same sequence of directory navigation in Windows—one with the default Windows Terminal prompt (Figure 1), and the other with the default OhMyPosh prompt (Figure 2).

| Used with permission from Microsoft. View Full Size
| Used with permission from Microsoft. View Full Size
From left to right, the final prompt elements in Figure 2 vary in color and meaning, as follows:
- “ed” (black text against mustard yellow): Shows the name of the logged-in account (missing in plain text default in Figure 1).
- “Protect” preceded by folder symbol (white text and symbols against orange): Shows the name of the current directory.
- “Lightning bolt” (white symbol against mustard yellow): Shows this is a remote, logged-in session.
- “Checkmark” (white checkmark against blue): Shows the preceding command completed successfully.
- Concluding text reads in pwsh at 16:02:31 where pwsh and the time are in light blue. Both are dynamically supplied and identify the shell (PowerShell) and the current time (16:02:31, in this case).
In short, there’s a lot of useful information you can lay into the prompt display, well beyond the simple current working directory approach that PowerShell and Command Prompt use by default. The biggest problem is to dig through all the options and choose (or customize) the one that works and looks best for you.
Downloading and Installing Nerd Fonts
A necessary prerequisite to get the symbols and colored backgrounds used in OhMyPosh prompts, nerd fonts supply the basic ingredients to display prompt elements with visual pizazz. You can get nerd fonts from many sources online. However, I’ll echo OhMyPosh developer Jan de Dobbeleer (pronounced “dough-bell-air” from the Dutch) in recommending the iconic Nerd Fonts website as a go-to source for such things. Select the Downloads button on that home page, and you’ll transition to the Downloads page, where you’ll find 56 different nerd fonts from which to choose (as I write this, anyway).
As downloaded, those fonts come in a ZIP file. Unzip its contents, then copy those files into the C:\Windows\Fonts folder. That’s all there is to it!
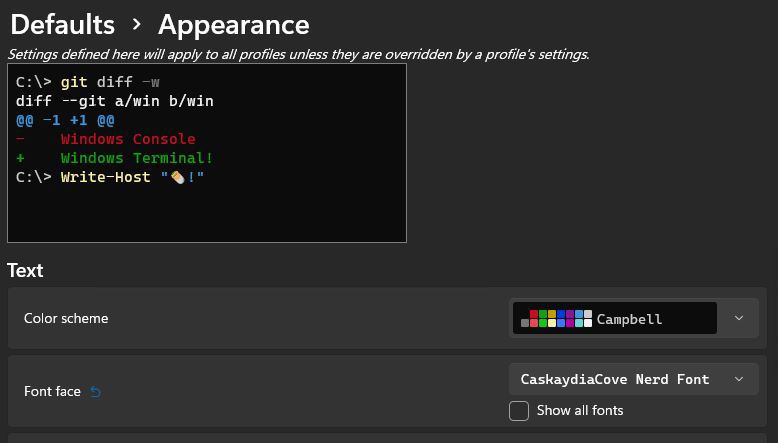
Figure 3 shows the Default Settings for PowerShell with a nerd font named “CaskaydiaCove Nerd Font” installed. It’s what you see in all the screenshots in this series, in fact (unless otherwise noted). To see what a specific nerd font looks like, grab it from the website (or another source of your choosing), unpack the ZIP, then copy the files over into C:\Windows\Fonts. Then, you can select that font in PowerShell Settings > Defaults > Appearance > Font face. For best results, you must choose a nerd font before installing OhMyPosh (next section).
Installing and Configuring OhMyPosh
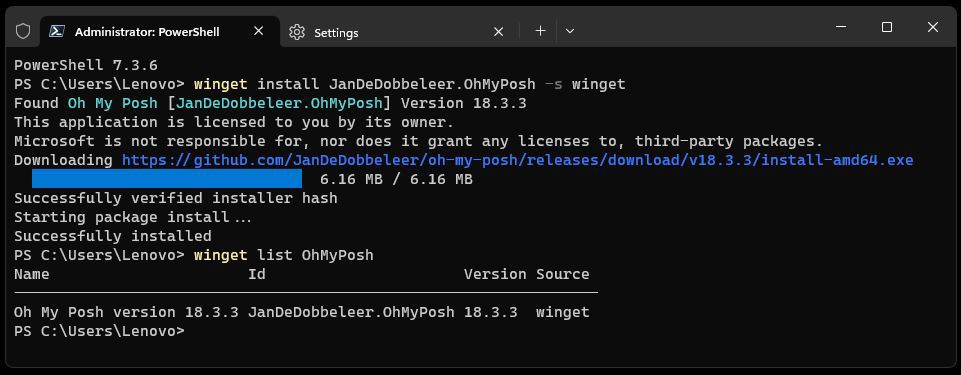
The built-in Windows package manager—namely, WinGet—is all you need to install OhMyPosh. As the developer himself explains in the surrounding documentation, a single PowerShell command does the trick:
winget install JanDeDobbeleer.OhMyPosh -s winget
In this statement, the complete ID is used to identify the package (JanDeDobbeleer.OhMyPosh), and the source for the package comes from the winget servers themselves (-s winget). This is depicted in Figure 4 on a test PC that previously lacked OhMyPosh in PowerShell. To show it is indeed installed, the winget list OhMyPosh command shows that version 18.3.3 is indeed now known to PowerShell. (For more complete coverage on winget capabilities, usage, and limitations, see my series of articles on this excellent tool, starting with the overview article: Understanding and Using Windows Terminal.)

Notice that the typical signs of OhMyPosh are still missing in Figure 4. It is now necessary to instruct PowerShell to call on OhMyPosh as it starts up, so that its characteristic and cheerful glyphs to appear in the prompt string. This requires editing (or perhaps even creating) a PowerShell profile to invoke OhMyPosh each time PowerShell starts up in Windows Terminal.
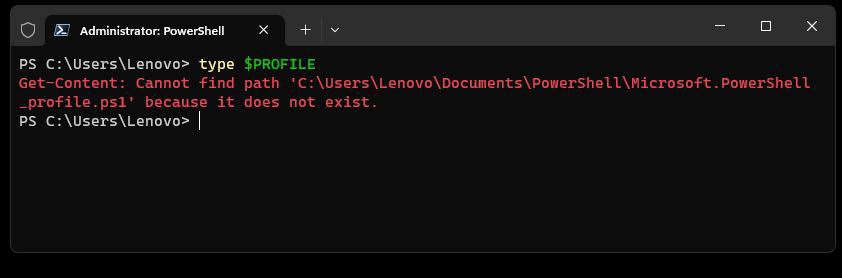
The PowerShell profile resides in a file tied to the $PROFILE variable inside its run-time environment. You can check (and possibly examine) the contents of that profile by entering type $PROFILE in PowerShell. If it exists, it will show up inside the active PowerShell pane; if non-existent, you’ll get an error message like the one shown in Figure 5. Incidentally, this also provides the complete path specification for that profile, which is typically the following: C:\Users\<acct>\Documents\PowerShell\Microsoft.PowerShell
_profile.ps1

This next step is optional and only applies when, as shown in Figure 5, your Windows PC has no PowerShell profile defined for the currently logged-in user account. In that case, a single PowerShell command causes an empty profile to be created:
New-Item -Path $PROFILE -Type File -Force
This creates the file named Microsoft.PowerShell_profile.ps1 with nothing in it. That’s OK: you’re about to change that (or for those with existing profiles, add to its contents). This is best accomplished by entering the following command in PowerShell; feel free to use a different editor, if you like:
Notepad $PROFILE
This tells Notepad to open the filename associated with the $PROFILE variable (…profile.ps1). At this point, you’ll enter a PowerShell instruction that tells it to open OhMyPosh with its default theme to obtain assignments for prompt glyphs and characters:
Oh-my-posh init pwsh | Invoke-Expression
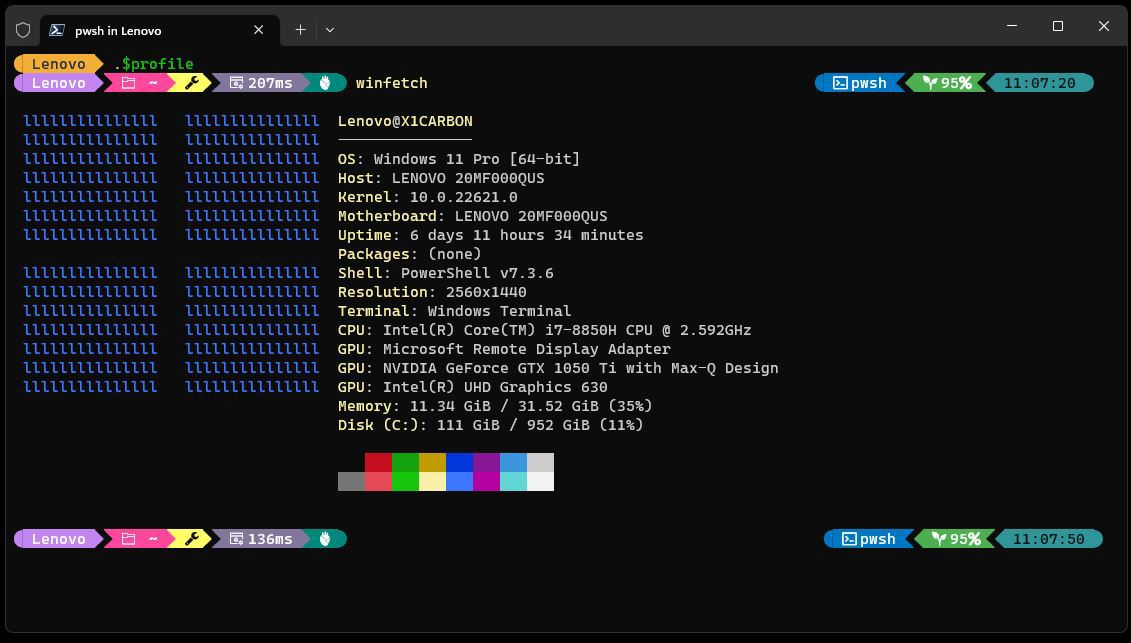
After you do this, enter .$PROFILE in PowerShell to reload the profile. That will invoke OhMyPosh and bring the glyphs to life. You’ll see something like what appears in Figure 6. (Note: I ran the winfetch command to give the screencap some extra visual appeal.) Now you’re cookin’!

Now that OhMyPosh is installed, you can use it as-is, or you can switch to any of the nearly five dozen themes that also get installed on your PC along with OhMyPosh.exe. That’s what’s covered in the next section. But before I get into that, let me observe that the default theme shown in Figure 6 is not defined as a theme file in OhMyPosh. Instead, it’s built into the code itself. Unless you use a trick, which I also explain in the next section, you can’t return to this default except by editing the ohmyposh invocation to remove the –config parameter and its associate theme file name (as shown earlier in this section: Oh-my-posh init pwsh | Invoke-Expression). And then, you must restart Windows Terminal before that default will once again kick in. Needless to say, I learned this the hard way.
Changing (and Viewing) OhMyPosh Themes
De Dobbeleer calls these collections of prompt settings by multiple names: “configuration,” “default theme,” and “configuration file.” You can switch to any named omp (which stands for OhMyPosh) theme file by invoking it in your PowerShell profile. Take, for example, the file eponymously named jandedobbeleer.omp.json. It’s part of the collection of such themes that get installed along with oh-my-posh.exe. Here’s how you edit $PROFILE except you also include a complete path-specification within double or single quotes (abbreviated path-spec) below (replace or add to the previous “bare invocation” as you see fit):
Oh-my-posh init pwsh --config path-spec| Invoke-Expression
Personally, I used Voidtools Everything to find this file on my test system by searching for that filename. When it popped up, I held down the left Shift key while right-clicking that filename, and then selected Copy as path from the resulting pop-up menu. This produced the following string (including enclosing double quote marks):
"C:\Users\Lenovo\AppData\Local\Programs\oh-my-posh\themes\jandedobbeleer.omp.json"
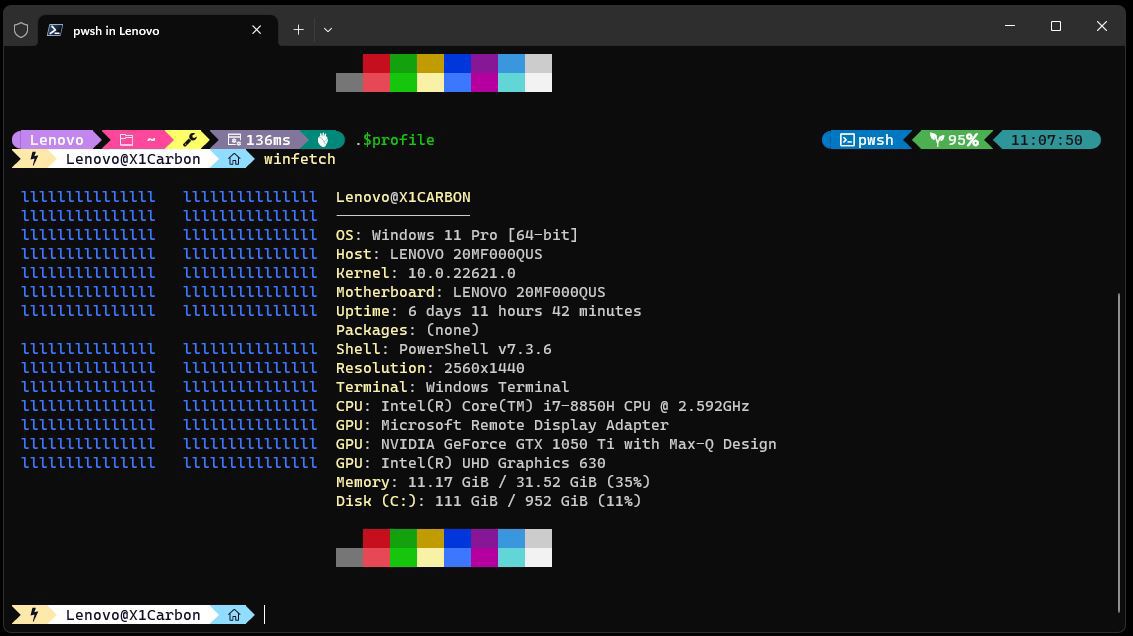
When you add the oh-my-posh invocation line to your PowerShell profile, be sure to drop this whole string in between the -config parameter to the left and the pipe symbol (“|”) to the right. Save the file in Notepad (or your chosen editor), and then reload the profile. Close, and then re-open Windows Terminal, or simply enter .$PROFILE at the command line. (Note the opening period at the start of the string.) When you do that, Figure 7 shows something like what you’ll see inside Windows Terminal/PowerShell. (Again, I called winfetch afterward to add some visual pop.)

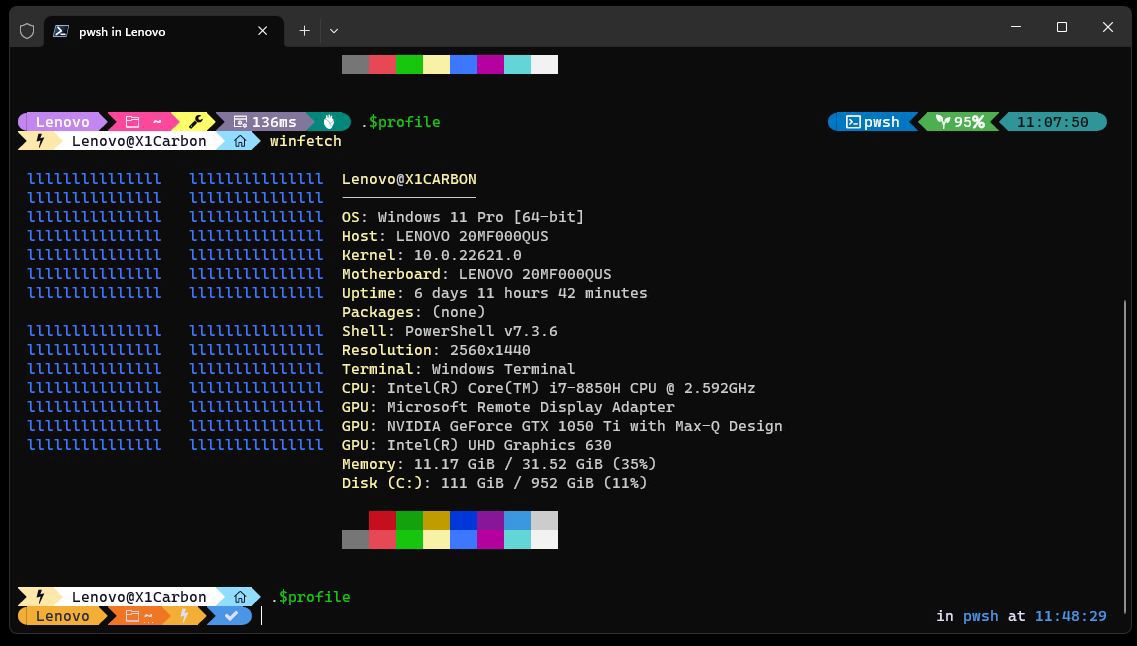
The DeDobbeleer theme is just one example of the 56 themes installed with oh-my-posh.exe. You can switch to any of them now by subbing in its filename in the $PROFILE file. (Leave the rest of the file specification alone: they’re all in the same folder.) Here’s what happened when I switched to a different theme named agnoster by replacing jandedobbeleer with that string (Figure 8, with another call to winfetch).
Notice the prompt at top differs significantly from the one below it (and at the bottom of the image). The latter shows a lightning bolt plus account name “@” machine name in black text on a white background, and a black home (directory) symbol on light blue background. The Agnoster theme is very different from the more information-laden and colorful JanDeDobbeleer theme. And there are at least 54 more to explore… I’ll cover a helpful shortcut to show you what’s there in the next section.
Now for the trick to let you restore the default theme without having to edit $PROFILE and restart Windows Terminal/PowerShell. As it turns out, OhMyPosh can save – or rather – export the currently running theme as well as import other themes. When I asked the developer about the default issue, he confirmed there’s no theme file for those settings. But then, he gave me precise syntax to create such a theme file – namely:
oh-my-posh config export --output "<path-spec>\mytheme.omp.json"
Here again, <path-spec> puts the newly created file in the same folder as all the other OhMyPosh theme files. And once built, you can use the same approach to restore the otherwise inaccessible default theme to PowerShell by replacing agnoster with mytheme. That’s what you see in Figure 9.
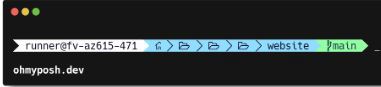
The OhMyPosh Schemes Gallery
It’s fun to switch themes inside PowerShell. However, editing and saving the profile in Notepad, and then reloading the profile inside PowerShell, can get tedious after the first few repetitions. In keeping with his exhaustive and informative supporting materials, De Dobbeleer provides a gallery of OhMyPosh Themes as part of the documentation at ohmyposh.dev. You’ll find sample prompts for all of them in alphabetical order there. Better yet, click on any given theme to see its underlying elements as defined in .json format. This actually tells you at least something about what you’re seeing. The Agnoster file is pretty illuminating, so I’ll show the prompt in Figure 10, and then walk through the blocks and segments defined in the supporting code.
| Used with permission from Microsoft. View Full Size
The segments in the .json file appear as follows (left to right):
- Empty segment (root: opening notch at left)
- Segment with text username@hostname (session)
- Segment with folder icon
- Segment with path symbols (one for each level of folder hierarchy, ends at leaf)
- Segment with status code/symbol
By looking at the .json files for the various themes, you can puzzle your way through what each one represents based on what it says and where it’s positioned. Great fun! Those really interested in the gory details (and in further customizing or creating their own themes) should dig into the Segments information in the OhMyPosh documentation (available from the left pane).
Make the Prompt Your Own Thing
It’s easy enough to work through the Themes gallery to find a prompt that tells you what you need to know. But if you’re a programmer, or an inveterate tinkerer, you can do ever so much more. I’ve found the time spent on OhMyPosh to be educational and fun. As an added bonus, the developer—Jan de Dobbeleer—is active and responsive on Twitter (X). I’ve not tried to bother him unnecessarily, but he’s always been quick to reply to thoughtful and legitimate questions.
To get a sense of the range of possible prompts, check out long-time Microsoft maven and development guru Scott Hanselman’s blog post A Nightscout Segment for OhMyPosh shows my realtime Blood Sugar readings in my Git Prompt. He shows how he customized the OMP Nightscout theme so that it would include blood sugar readings from his implanted monitor in his PowerShell prompt. Simply astounding! In the same vein (drum roll, please), if you give OhMyPosh a try, you may find that it takes you further than you ever thought to go. Cheers!

Ed Tittel
Ed Tittel is a long-time computing industry writer, consultant, and occasional expert witness. He’s the author of over 100 computer trade books, countless articles, and other stuff. For more info, please visit https://edtittel.com.