Power Platform Connector Customization and Extensibility

Part four of this series explored in detail the concepts of references, triggers, and policies. Each of these involves editing the underlying definition files and demands a certain level of technical acumen and comfort with JSON, YAML, command-line utilities, and testing tools. These are necessary skill areas for advanced connector creation, but mastery of them is not required—it is sufficient to just be familiar enough to use them when needed. This article discusses some additional advanced techniques related to optional configuration and constructing dynamic schemas, which involve the same level of technical knowledge. It also introduces the only true “professional developer” topic related to custom connectors—the Code step—with the caveat that actual coding is a task best left to programmers. It is important to understand, however, where it fits into the overall connector architecture and how it functions.
For reference, the series outline is as follows:
- Introduction and Overview
- Connector Fundamentals
- Basic Building Blocks: Security, Actions, Requests, and Responses
- Advanced Capabilities: Triggers, References, and Policies
- Finishing Touches: Customization and Extensibility (this article)
- Staying In Control: Versioning and Change Management
- The Big Picture: Performance, Hosting, and Scalability
- Making It Official: Publishing, Certification, and Deployment
- Going All In: Commercialization and Monetization
- Lessons Learned: Tips, Tricks, and Advanced Techniques
Optional Configuration
With the basics of connector creation already in place, and some advanced capabilities added, it is worthwhile to explore some of the optional settings that can enhance overall connector functionality. Some options, such as connecting to a remote system via an on-premises data gateway, may be dictated by security or networking requirements. Others, like deciding which inputs to show by default and which to conceal, are entirely up to the creator. The following sections detail a few of the more common optional elements and how they are used.
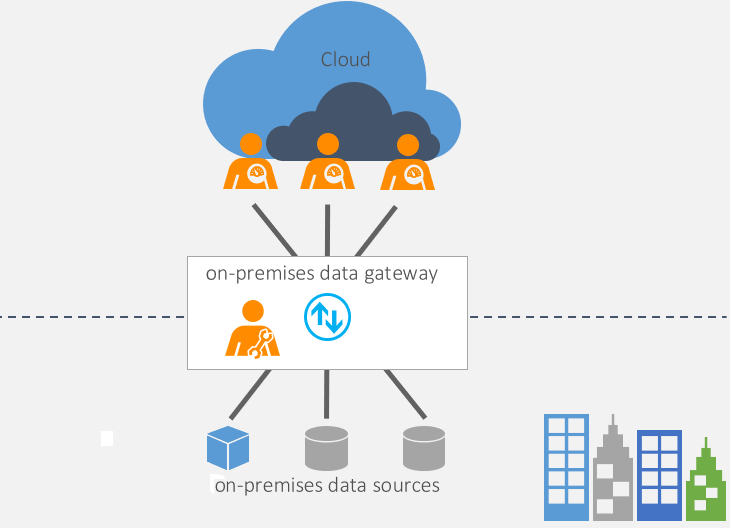
On-Premises Data Gateway
In some cases, the remote system hosting the APIs that a custom connector is calling is within the customer’s own data center or that of a partner, potentially even running in the cloud using Infrastructure as a Service (IaaS). In these instances, it may be necessary to configure a more secure connection between the Microsoft network and the target servers than what can be achieved by simply opening a firewall port to the Internet. The on-premises data gateway application from Microsoft can address this issue, running on a Windows machine inside the customer network and serving as a bridge between local resources and designated Microsoft services. For instructions on how to install and configure the gateway, including a list of considerations and prerequisites, visit https://learn.microsoft.com/en-us/data-integration/gateway/service-gateway-install.
| https://learn.microsoft.com/en-us/data-integration/gateway/service-gateway-install
Once installed and configured, accessing resources behind the gateway from within the connector creation wizard is done in the same manner as any other remote system. Supply the IP address (or fully qualified URL, if one exists) and port of the target machine that hosts the desired resource (not the gateway machine) in the host field, toggle the On-premises data gateway checkbox, and continue creating the connector as usual.
| https://powerautomate.microsoft.com/en-us/blog/on-premise-apis/
During flow creation, the designer will display a new connection prompt asking for the target gateway, as soon as an action from the connector is added to the flow.

| https://powerautomate.microsoft.com/en-us/blog/on-premise-apis/
Once connected, the data gateway acts as an intermediary, brokering requests and responses between Power Platform and the target systems. It is transparent to connector operations and, so long as the gateway remains online and accessible, should not require any additional management. Be aware of common activities that may cause periods of inaccessibility, like operating system patching and maintenance events, as these may cause actions in flows and apps to fail.
Action Visibility
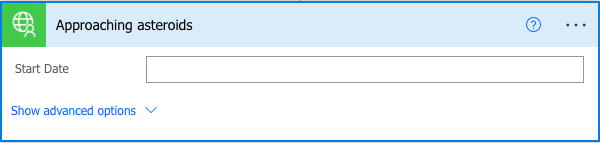
Some actions have more input fields to configure than others, which necessarily requires more screen real estate in the Power Automate flow designer. It might be easier and less intimidating to initially show makers only the required fields that they must fill in, allowing them to select an option to see more fields. There may also be cases where an action requires a specific field to be present but displaying it to the user may cause confusion or reveal more information than necessary. The x-ms-visibility property addresses these concerns, providing a selection of four values to control where and when a field should be shown or hidden:
- None: No action is taken and all fields are displayed.
- Important: These operations and parameters are shown to the user first.
- Advanced: Any action marked in this manner will be hidden under an additional menu.
- Internal: These elements are hidden from the user.
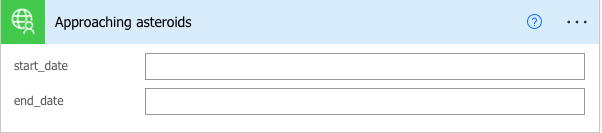
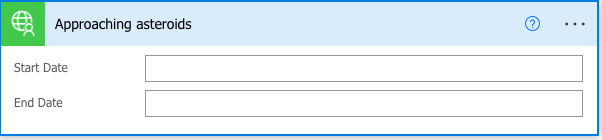
In the following code snippet, the start_date parameter is marked important so it will always be shown to the user, while the end_date parameter is marked advanced so the user must click the Show advanced options link to see it:
"parameters": [
          {
           "name": "start_date",
           "in": "query",
           "required": false,
           "type": "string",
           "x-ms-summary":"Start Date",
           "x-ms-visibility": "important"
          },
          {
           "name": "end_date",
           "in": "query",
           "required": false,
           "type": "string",
           "x-ms-summary": "End Date",
           "x-ms-visibility": "advanced"
          }
        ],
In the flow designer, the second parameter is hidden by default.
| Used with permission from Microsoft.
Action Summary
It is common for input parameter names to be supplied in a developer-oriented variable naming convention such as PascalCase, camelCase, kebab-case, or snake_case, or even some other pattern, depending on how the API provider crafted their specification. These are great for programmers but not very user friendly for the average business user (or anyone else, for that matter). While it is necessary to pass in the exact parameter names that the remote system expects, they do not have to be presented that way in the user interface. Microsoft provides a custom x-ms-summary property that can used to override specification names with a different value of the creator’s choosing.
The following image shows how the action parameters in snake_case are presented in the Power Automate user interface without using alternate x-ms-summary values.
| Used with permission from Microsoft.
Altering the definition file by adding x-ms-summary to each parameter will change what the user sees but not what Power Platform sends to the operation target:
"parameters": [
          {
           "name": "start_date",
           "in": "query",
           "required": false,
           "type": "string",
            "x-ms-summary":"Start Date"
          },
          {
           "name": "end_date",
           "in": "query",
           "required": false,
           "type": "string",
            "x-ms-summary": "End Date"
          }
        ],
After modifying the definition file as shown earlier, the UI presentation is much more user friendly.
| Used with permission from Microsoft.
Connector and Action Capabilities
The x-ms-capabilities property describes a specific set of features that are supported in a connector at either a global or action-specific level. The former currently supports two feature descriptions, file-picker and testConnection (note the mixed casing used in the naming conventions), whereas the latter supports only a single chunkTransfer description:
- file-picker: Defines the behavior of the file picker dialog when an input data type is a file or blob object.
- testConnection: Identifies the default action to use for testing connections to the remote system.
- chunkTransfer: A Boolean value (true or false) that specifies whether the destination endpoint accepts data in chunks across multiple requests or only a single request comprised of one large stream.
For more information on how to use these declarations, refer to the custom extensions documentation at https://learn.microsoft.com/en-us/connectors/custom-connectors/openapi-extensions#x-ms-capabilities or the official Power Platform Connectors GitHub repo at https://github.com/microsoft/PowerPlatformConnectors/blob/dev/schemas/apiDefinition.swagger.schema.json.
Dynamic Schemas, Properties, and Lists
It would be ideal if all actions contained a predefined set of inputs that could be fully described within a connector and rarely, if ever, altered, but that is not a realistic expectation. It may be that a remote endpoint expects different object structures based on a selection that the user makes or will only provide a sample object in response to a specific query. In either case, the input parameters are not known beforehand and, therefore, cannot be declared in the definition. Whatever the case, such situations necessitate the use of dynamic schemas and properties that change based on various factors.
As an example, consider the scenario used in a previous article of this series of querying an automobile database for information about certain makes and models of automobiles. Assuming the data source is large and contains information on all kinds of vehicles—personal, commercial, and recreational—it would be nearly impossible to construct a functional definition that considers every possible input parameter. It is far more effective to make the inputs to the automobile data service dynamic, so that a user who selects “motorcycle” will not be offered a choice of two or four doors and a “motorhome” will not have inputs for coupe or sedan.
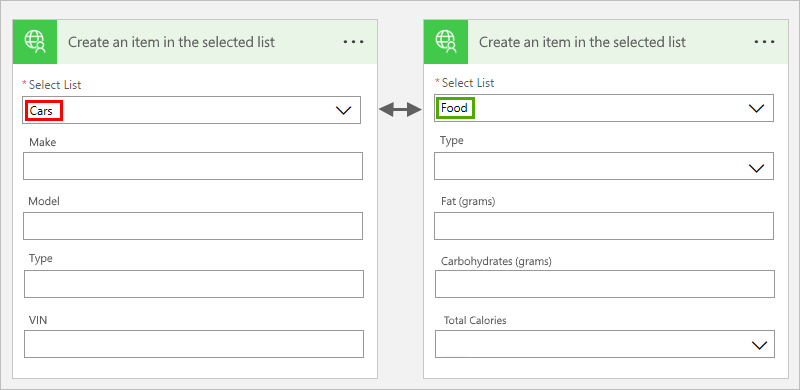
This is a fairly common occurrence for any connector that interfaces with a list in SharePoint. As each list can be customized with numerous columns of various data types, such a connector needs the ability to describe fields on-the-fly after the list is selected. One site may have a list with fields appropriate to cars, while another may have a completely different set of fields for food items. The following image depicts how such a connector would function, with inputs changing dynamically based on user input.
| https://learn.microsoft.com/en-us/connectors/custom-connectors/openapi-extensions#use-dynamic-schema
The same logic applies to outputs from an operation. Based on a set of inputs, the structure of the response object may change accordingly. It would be strange indeed to get a response that includes calories and fat when submitting inputs for make, model, and vehicle identification number (VIN). Dynamic inputs and outputs can be used together for a completely generic two-way exchange, with neither the inputs nor the outputs being fully described in advance.
To see how dynamic lists and schemas work in practice, we will extend our sample Asteroids NeoWS connector with the ability to query for events by individual asteroid; however, the start_date and end_date parameters explicitly described in previous actions will instead be generated dynamically based on a design-time query to the remote system. In addition, the list of asteroids to choose from will also be generated dynamically to populate the selection of choices.
The first step is to define the operations to retrieve a list of all observed asteroids. A new endpoint /v1/asteroids will be added to the paths section of the definition:
"/v1/asteroids": {
     "get": {
       "description": "All available asteroid names.",
       "summary": "Asteroid Names",
       "operationId": "GetAsteroids",
       "parameters": [],
       "responses": {
         "200": {
           "description": "OK",
           "schema": {
             "$ref": "#/definitions/GetAsteroidsResponse"
            }
          }
        },
       "x-ms-visibility": "internal"
      }
    },
The result of the preceding get operation is defined in the GetAsteroidsResponse reference, which declares an output object with id and name fields:
"GetAsteroidsResponse": {
     "type": "array",
     "items": {
       "type": "object",
       "properties": {
         "id": {
           "type": "number"
          },
         "name": {
           "type": "string"
          }
        },
       "required": [
         "id",
         "name"
        ]
      }
    }
When a maker adds the connector action to a flow, Power Automate will automatically execute the operation, binding the response to an HTML select control (the type of UI element used for rendering a dynamic list). This completes the first step—getting a list of all available asteroids.
The next step is to generate the input fields for start_date and end_date needed for the final operation of retrieving events for the selected asteroid. This requires another action that is concealed from the user, the purpose of which is to execute a get operation to the endpoint that contains the input schema:
"/v1/schema/{type}": {
     "get": {
       "description": "Event details fields.",
       "summary": "Event fields",
       "operationId": "GetEventSchema",
       "parameters": [
          {
           "name": "type",
           "type": "string",
           "in": "path",
           "description": "Type of NEO.",
           "required": true,
           "x-ms-url-encoding": "single",
           "x-ms-summary": "Event details"
          }
        ],
       "responses": {
         "200": {
           "description": "OK",
           "schema": {
             "type": "object"
            }
          }
        },
       "x-ms-visibility": "internal"
      }
    },
The /v1/schema/{type} path retrieves the actual schema. It takes the type parameter from execution of the dynamic schema parameter in the AsteroidEvents operation and calls the remote system to get another generic response, this time comprised of a JSON object that defines the fields start_date and end_date. Each time the Asteroids drop-down selection changes, the schema endpoint will be called to fetch the field definitions and parsed anew by the form renderer. Since this can result in a good deal of traffic (depending upon how many times the selection changes), it is advisable for the schema endpoint to implement a caching mechanism; however, this is solely at the discretion of the API provider and not something that the connector designer can control. Note that this operation is also marked internal because the user will not see it or be able to add it as an action. Instead, it is called behind the scenes by the third endpoint, which is the only one that will be exposed in the user interface (the other two simply support the dynamic schema generation mechanism):
"/v1/events/{id}": {
     "post": {
       "description": "This operation will retrieve events for a specific asteroid.",
       "summary": "Get asteroid events",
       "operationId": "AsteroidEvents",
       "parameters": [
          {
           "name": "id",
           "type": "number",
           "in": "path",
           "description": "Select an asteroid.",
           "required": true,
           "x-ms-url-encoding": "single",
           "x-ms-summary": "Select Asteroid",
           "x-ms-dynamic-values": {
             "operationId": "GetAsteroids",
             "value-path": "id",
             "value-title": "name"
            }
          },
          {
           "name": "dynamicEventSchema",
           "in": "body",
           "description": "Details for the selected asteroid.",
           "schema": {
             "type": "object",
             "x-ms-dynamic-schema": {
               "operationId": "GetEventSchema",
               "parameters": {
                 "type": {
                   "value": "asteroid"
                  }
                },
               "value-path": "items"
              }
            }
          }
        ],
       "responses": {
         "200": {
           "description": "OK",
           "schema": {
             "$ref": "#/definitions/AsteroidInfo"
            }
          }
        }
      }
    }
The path expects a single id argument, which is the same id bound to the select control from the GetAsteroidsResponse of the /v1/asteroids action get operation. The first object in the parameters section is what initiates the call to this endpoint, signaling to the form renderer via the x-ms-dynamic-values property that it will display a list of choices based upon the results of the GetAsteroids operation. The outputs it will bind are then declared using the value-path and value-title properties.
Once this parameter operation is complete, the form renderer moves on to the next parameter, which contains the x-ms-dynamic-schema property. This object includes a single parameter of type with a static value of asteroid; however, it could also use the id or name properties of the previous parameter selection (or any other combination of values) as inputs for the GetEventSchema operation. In the schema response, it expects an object named items, as defined by the value-path property, which the form renderer will parse to display the various fields based on their declared data types. (Note that complex objects in the schema response can be tricky to render, so the most effective schema is a flat collection of simple objects.) The final output of executing this action is the same array of AsteroidInfo objects as the original /v1/feed action, only they will be filtered to just the ones that match the id value from the selected asteroid.
One additional descriptor that often results in confusion is x-ms-dynamic-properties. This can be specified in place of or alongside x-ms-dynamic-schema. The purpose of an additional descriptor in this context is to allow for parsing of complex objects at design-time into a flatter structure. As mentioned earlier, the form renderer has trouble parsing complex nested objects. Exactly how should it display a number field, inside of a text field, inside of an array? The x-ms-dynamic-properties parameter delivers an all-or-nothing result—the entire object is parsed as a cohesive unit. If a nested field cannot be rendered, then the entire object is invalid. The challenge with this approach is that nested objects inside of nested objects represent a perfectly valid JSON data structure.
Using x-ms-dynamic-properties, the connector creator can cherry-pick which fields they want from the dynamic response using JSON pointers. These are essentially nested path indicators, much like a web URL or XML XPath query, that describe the parent-child relationship between data entities. Assuming that the object hierarchy is something like vehicleType > purpose > manufacturer, retrieving the trim property would require the following pointer: vehicleType/purpose/manufacturer. This syntax is employed in the dynamic properties object as the value of a parameterReference, itemValuePath, or even the name of a parameter. It simply tells the parser “do not get the whole object, just get this field at the following location in the object”. In this manner, a flat schema object can be produced from any complex JSON object that the API provider returns in their schema response.
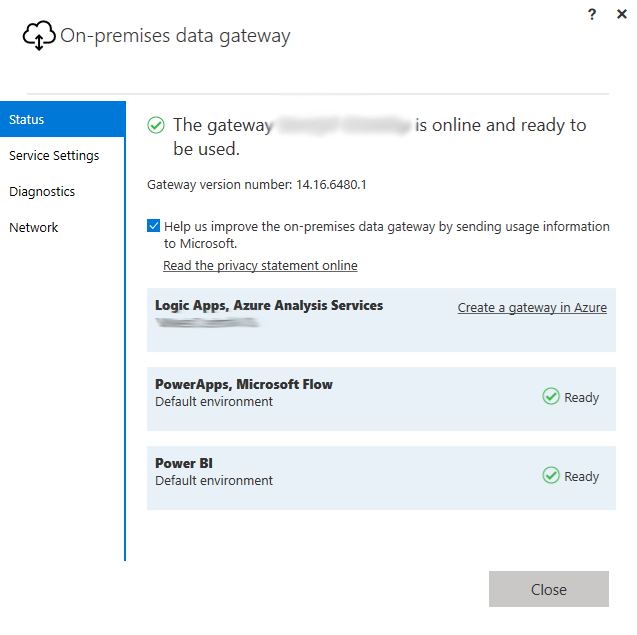
Code
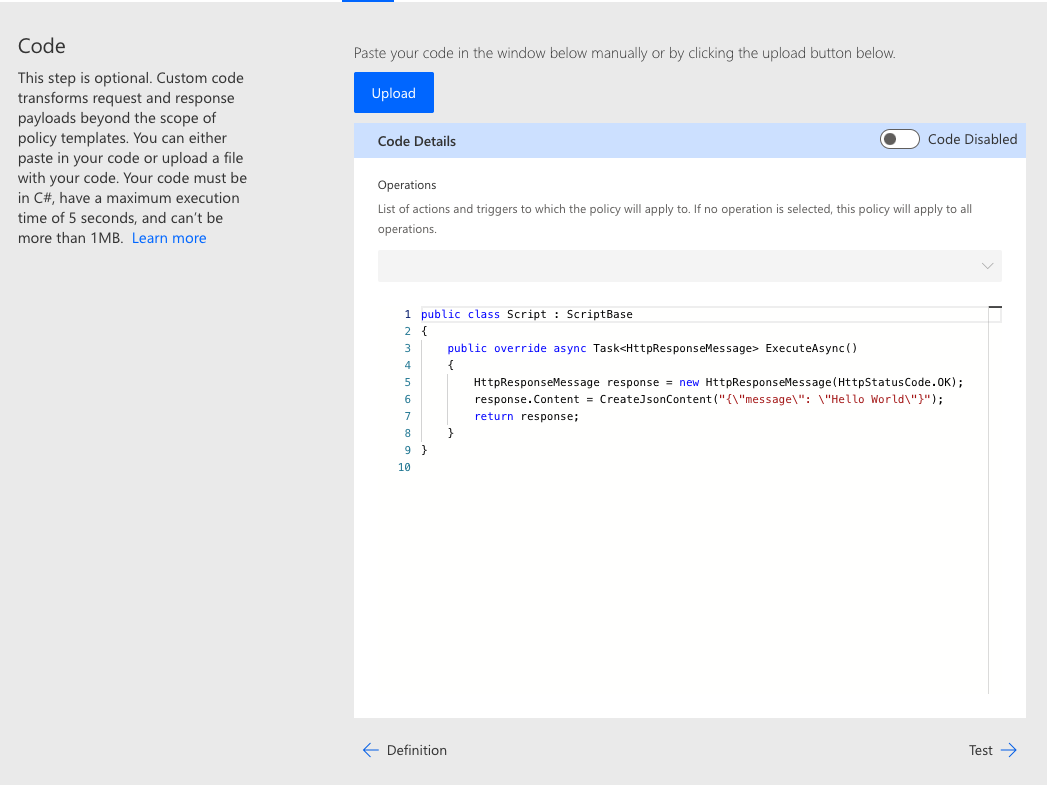
There may be circumstances in which the request to, or the response received from, a remote API cannot be processed correctly using any of the previously discussed methods. In such cases, the only remaining option is to run custom code against the request/response to achieve the desired result. Custom code is disabled by default in the Code step of the connector creation wizard. Enabling it and pasting in a script class with properly constructed methods will cause the resulting code to run on each selected request or response, taking precedence over any of the other non-programmatic transformation methods (such as a policy template).
The following image shows the default state of the Code step and includes a sample asynchronous ExecuteAsync method for replacing the response body with a simple JSON object.
| Used with permission from Microsoft.
Developers interested in writing code for a connector should be aware that the wizard does not offer a functional IDE for script creation; it is just a simple text editor lacking any kind of tooling, validation, or auto-complete (IntelliSense) capabilities. Each connector can have only one script file, the contents of which are placed into a script.csx file in the connector package (which can be viewed by downloading the connector package using the paconn command-line utility). There are some additional limitations that should also be taken into consideration:
- Code syntax is C#.
- Class name must be Script and it must implement ScriptBase.
- The base override method ExecuteAsync() is required with a return type of Task<HttpResponseMessage>. All other methods are optional.
- There is a limited number of supported namespaces.
- The maximum file size is 1 MB.
- All execution must complete within 5 seconds.
- Incompatible with the on-premises data gateway (code scripts do not run when a gateway has been specified).
For more information on limitations, classes, interfaces, methods, and to view code samples, visit https://learn.microsoft.com/en-us/connectors/custom-connectors/write-code.
A simple use case for custom code would be to alter the response object when the API provider changes the structure. This can be a challenging situation because a deployed action that is already being used in flows cannot have its input or output structure modified or the operation may fail; however, continuing to issue requests with improper object definitions will also result in errors. To mitigate this situation, the response can be transformed in-flight via code. The following code snippet converts the nested response from the NeoWS API into a flat object that is compatible with our connector definition:
public override async Task <HttpResponseMessage> ExecuteAsync()
{
   HttpResponseMessage response = await this.Context.SendAsync(
       this.Context.Request,
       this.CancellationToken
   ).ConfigureAwait(continueOnCapturedContext: false);

    if (response.IsSuccessStatusCode)
    {
        var responseString = await response.Content.ReadAsStringAsync().ConfigureAwait(
       continueOnCapturedContext: false
        );

        var result = JObject.Parse(responseString);

        var newResult = new JObject
        {
           ["id"]: result["near_earth_objects"]["id"],
           ["neo_reference_id"]: result["near_earth_objects"]["neo_reference_id"],
           ["name"]: result["near_earth_objects"]["name"],
           ["nasa_jpl_url"]: result["near_earth_objects"]["nasa_jpl_url"],
           ["absolute_magnitude_h"]: result["near_earth_objects"]["absolute_magnitude_h"],
           ["is_potentially_hazardous_asteroid"]: result["near_earth_objects"]["is_potentially_hazardous_asteroid"],
           ["is_sentry_object"]: result["near_earth_objects"]["is_sentry_object"],
           ["orbiting_body"]: result["near_earth_objects"]["close_approach_data"]["orbiting_body"]
        };

       response.Content = CreateJsonContent(newResult.ToString());
    }
     return response;
}
The Code step can be useful not only in transforming requests and responses, but also for testing connector operations. If the connector is being created prior to the target endpoint becoming available, a bit of custom code could be implemented to return a mock response object so the definition can be validated before live data is available. The following code snippet returns a simple JSON object for testing purposes:
public override async Task<HttpResponseMessage> ExecuteAsync()
{
    var response = new HttpResponseMessage();
    response.Content = CreateJsonContent(new JObject
    {
        ["result"] = "Here is the information you requested.",
    }.ToString());
    return response;
}
There are many situations for which custom code injected into the request and response process can be beneficial; however, it should be used only when necessary. Due to the 5-second execution limitation, only a relatively small number of lightweight operations is feasible. Any operations that instantiate an HTTP Client or invoke the Context.SendAsync method should be used with extreme caution, since there is no guarantee that the remote operation target will respond within the supported timeframe. It can also be difficult to debug custom code operations, since the script executes in a sandboxed environment with trace or logging output. In essence, the capability is there and can provide value under the right conditions, but creators should proceed with caution.
Conclusion
There are several useful configuration options that creators can use to enhance the functionality of custom connectors, including connecting to protected data via the on-premises data gateway, conditionally displaying only portions of action input by default, adding summaries to assist flow makers with supplying the proper inputs, and setting the capabilities of individual actions. Connector creators can also use dynamic values to display input options based on data from a remote API, and even render form schemas based on those choices without needing to define in advance how the response object is structured. If these methods, combined with other advanced techniques like policy templates, prove insufficient, connector creators can engage professional developers to create custom code to transform requests and responses as necessary.
This concludes our exploration of the basic building blocks and advanced capabilities of custom connectors. Creators should have sufficient knowledge at this point to construct feature-rich connector definitions for use in Power Apps, Power Automate, and Azure Logic Apps. In part six, our focus will move from creation to deployment and maintenance of production connectors, including solutions, versioning, action deprecation, updates, and ongoing modifications.

Eric Shupps
Eric Shupps is the founder and CTO of Apptigent, a leading provider of cloud-based software solutions for Microsoft, Salesforce, and more. Eric has worked in the industry for more than 30 years, primarily focused on Microsoft software and services, as a consultant, administrator, architect, developer and trainer. He co-hosts the Community CloudCast, has authored numerous technology articles, and speaks at user group meetings and conferences around the world.