Organize Your Digital Classroom With Microsoft Teams for Education

Since 2020, not only has the world of work changed dramatically, but so has the world of education, with the advent of hybrid work/teaching and all the questions it raises about best practices and appropriate technical governance. Microsoft Teams for education is a flexible classroom tool that, with appropriate setup and customization, can match most educational organizations' digital participation needs.
However, in order to make the most of Teams for education, you need to know your way around not just Teams in General, but also the particular differences found in Teams for education. Few Microsoft partners are aware of this, but unlike the business version, the education version of Microsoft Teams offers four different types of team. Each type has a different purpose, but also a different technical operation, and it's important to understand the differences before taking any (irreversible) action.
In this first of a three-part series, I will give you an overview of Teams for Education, then take you on a deep dive into the Class team type. In doing so, I will answer the most frequently asked questions from all stakeholders (principals, teachers) about how Teams for education’s team types differ (from each other, and from Teams for businesses), the functional and technical aspects to consider when deploying Teams for education, and the best practices for organizing a Microsoft Teams class.
Team Types
Let's start by taking a closer look at the differences between the main three team types in Teams for education. You may be wondering why I am only covering three types when I mentioned above that there are four. Simply put, I don’t think the Other team type is appropriate for education. Microsoft presents it as a space for clubs, for example. But in this case, it would be more appropriate to create a Viva Engage community.
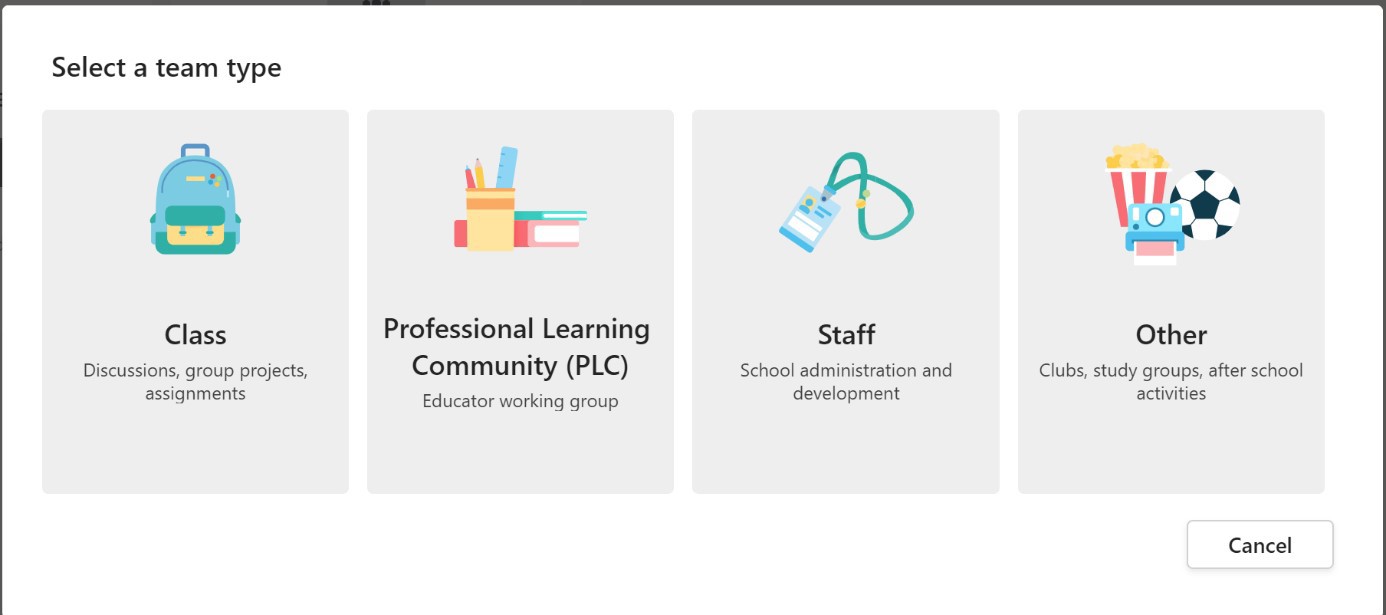
Type 1: Class
This team type allows teachers and students to collaborate on learning resources, curricula, group projects, assignments, etc.
Class teams have unique permissions and features for teachers and students.
Roles by default: Teachers are team owners and students are team members.
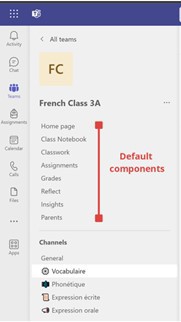
Components by default (see figure 3 below): Home page, OneNote Class Notebook, Classwork, Assignments, Grades (visible to teachers only), Reflect, Insights, Parents, (visible to teachers only), General Channel
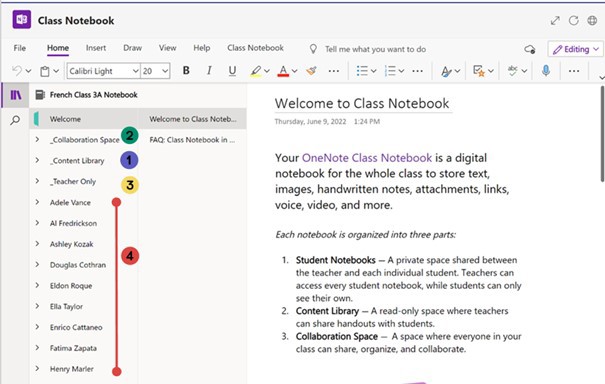
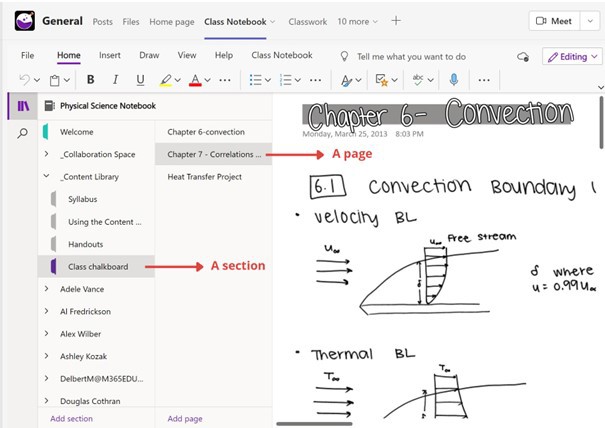
OneNote version (see figure 2 below): OneNote Class Notebook with four spaces created by default: Content Library (editable by teachers, visible only to students), Collaboration Space (editable by all team members), Teacher Only (visible only to teachers), Student Notebooks (editable by the teacher and individual students)
Type 2: Professional Learning Community
This is a space for educators to collaborate.
Roles by default: owners and members, like a traditional Microsoft Teams for business team.
Features by default: OneNote.
OneNote version: the same version as for business, with no permissions created by default.
Type 3: Staff
With Staff teams, school administrators and staff (teachers and non-teaching staff) work together to manage and develop the school.
Roles by default: Principals are team owners and staff are team members.
Features by default: OneNote Staff Notebook.
OneNote version: OneNote Staff Notebook with three spaces created by default: Content Library (editable by owner, viewable only by members), Collaboration Space (editable by everyone in the team), Personal Workspace
A Closer Look at Class Teams
A class team includes a set of default components that are activated at the time of creation.
Each has a specific function, and it's up to the teacher committee and principal to decide which components to activate or not. Once they decide, the IT admin can configure which components are active in the Teams admin center.
Let’s go through each of these components.
The Home page is a central landing destination for communication in a class team to check the latest information, class resources, upcoming assignments, recent files, the teacher profile, and anything else a teacher wants to personalize through web parts (this is actually a SharePoint page).
Only teachers can edit the Home page; students are given view-only access.
The Home page is set up by default, but an IT admin can control this feature (I will cover this in a forthcoming article).

Class Notebook is the teacher's essential tool for structuring and creating teaching resources. Students can access three areas within this space: Content Library, Collaboration Space, and their individual notebook. It has OneNote’s familiar structure of sections, pages, and sub-pages. Everything can be configured by the teacher to best structure teaching resources.
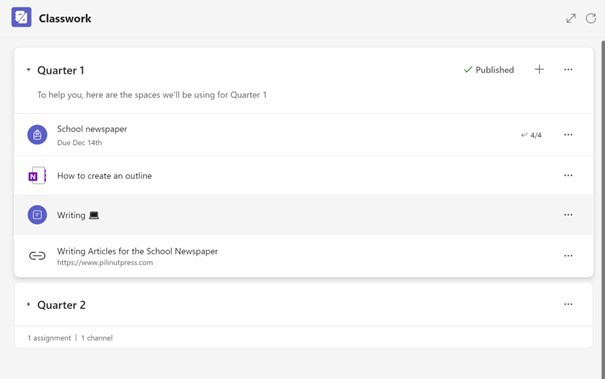
Classwork is an aggregator for all learning spaces. It is made up of modules within which teachers can organize their course, for example, by topic or week, as well as
resources they have already created, such as assignments, OneNote class notebooks, web links, files, and Teams channels.
Assignments allows teachers to assign papers, quizzes, or other work to their students. It includes several options for customizing assignment timelines, instructions, and various new and existing resources.
Grades is where educators track student progress and access grades. It includes status columns (viewed, submitted, returned) and grades assigned to the student.
Reflect allows educators to set up regular check-ins for student reflections.
Insights provides data views to help teachers track their students' activity in Teams, from assignments to classroom conversations.
Parents allows educators to communicate directly with parents by Teams chat, phone call, or email.
So, as you can see, there's a lot a teacher can do to communicate and organize their teaching resources. Now let's take a closer look at how you might configure these components.
Structuring the Channels in a Class Team
A Class team’s channel setup depends on a few factors. First, there are some technical limitations to keep in mind:
- Maximum number of members using a OneNote Class Notebook in a Class team: 300
- Maximum number of private channels per team: 30
- Shared channels—where people outside the team can participate—are not supported in Class teams
There are two scenarios that allow different degrees of flexibility with channel setup: a solo team (one subject, one teacher and their students) or a supra team (several subjects, several teachers and their students).
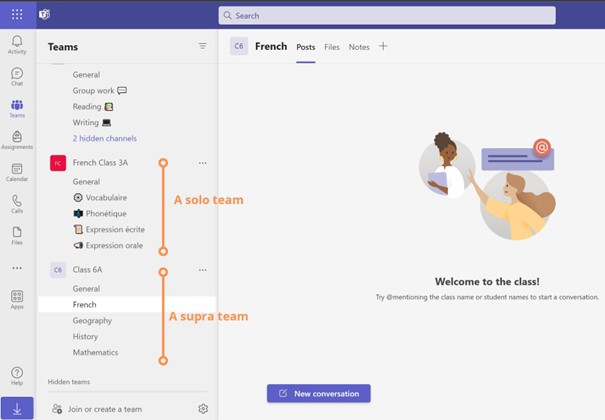
With a solo team, since the teacher is the sole team owner, they will have total freedom to organize the channels as they see fit. For example, the channels could be organized by topic, by skill, or by semester. With a supra team, the choice of channel structure will be more limited because the class teams will be shared by several teachers, so the channels will have to be linked to each teacher’s subject.
Keep in mind that it's possible to link a section of the Class Notebook to a specific channel, which will make it easier to keep interest in using the Class Notebook.
It's important to create channels in addition to the general channel to help students understand where to communicate and where to collaborate. The general channel, as its name implies, should only be used for general, non-specific information.
Finally, the creation of private channels should be limited to either the tenant level (IT Admin action) or teacher level (team owner). Creating a private channel can lead to complications in managing private channel owners and access to documents stored in the accompanying SharePoint. If the teacher wants to create group work, they can either propose a group conversation in Teams or give separate permissions to groups of students in the Collaboration Space.
Organizing and Distributing Educational Content
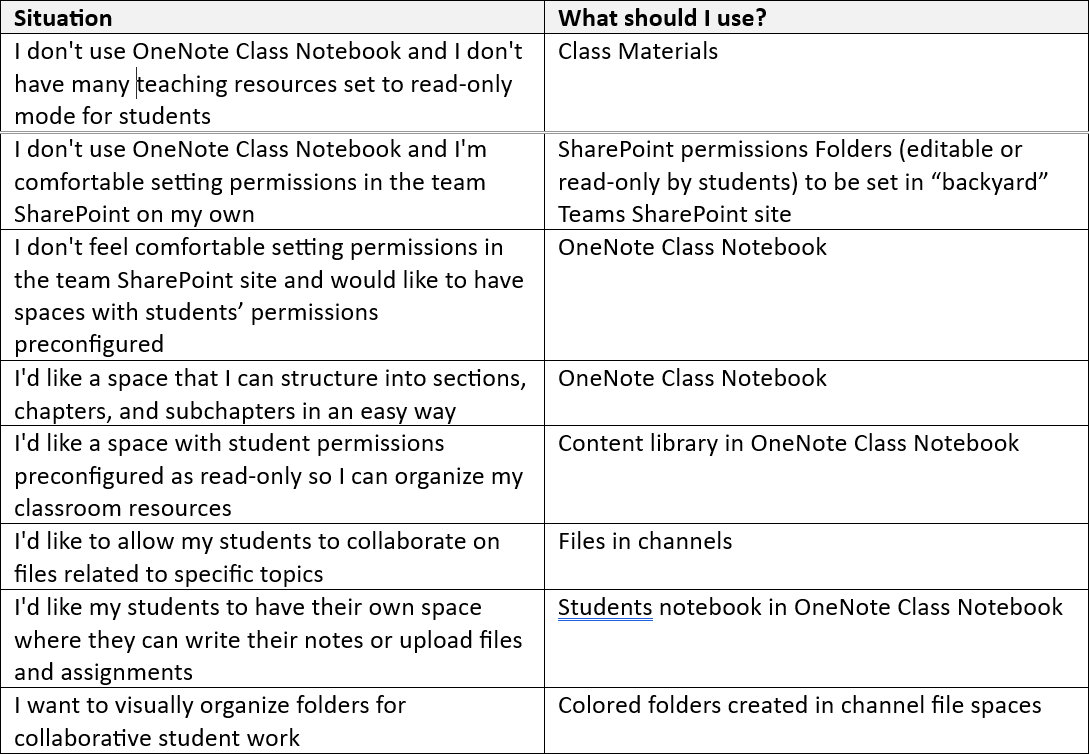
There are lots of ways to organize content within a Class team. I’ll describe four methods below: the Class Materials folder; folders or files in the team Files space; the Class Notebook content library in OneDrive; and the Classwork component.
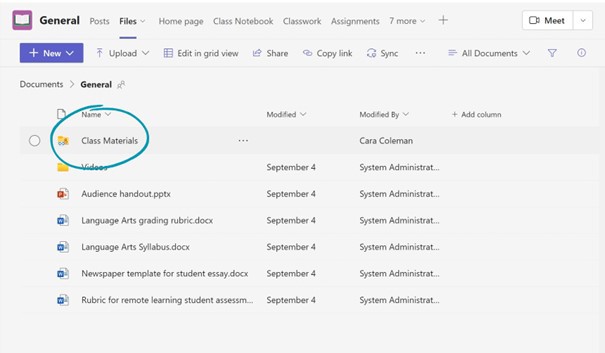
The Class Materials Folder
This folder is created by default in the General channel. It is set to read-only for students by default, and any files that the teacher places in this folder will inherit this default permission.
This may sound like a good idea, but the downside is that it's only in the General channel and not in the other channels that the teacher creates. What's more, organizing resources into multiple topics can prove complex to set up, with the mandatory creation of subfolders and perhaps even sub-sub-folders.
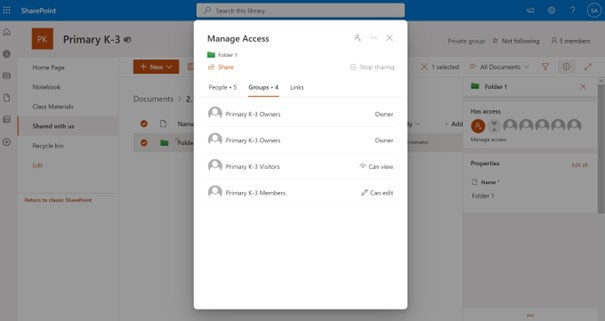
Folders or Files in Channel Files Spaces
With this method, you'll need to set permissions on all resources, case by case (editable or read-only by students), by accessing the Teams SharePoint site. This can be a complicated process depending on the teacher’s digital literacy level.
It's also relatively complex for students, who have to make multiple selections to access the resource they're looking for, especially if the teacher intends to create an architecture based on folders, subfolders, and sub-sub-folders.
The Class Notebook Content Library
This is the ideal solution because the permissions for students are set by default to read only or write only, depending on where they are. It's also the ideal solution for teachers who have a structure of sections, pages and sub-pages, because they can integrate any type of content, such as documents, videos, audio clips, or third-party content by inserting, pasting, or linking to such content right in their notes.
The Classwork Component
This is the last component that appears by default in a Class team. It's made up of modules that contain resources such as Files, Assignments, OneNote Class Notebook, Links, or Teams Channels.
It's particularly interesting for teachers who want to create a broader macro for structuring instructional content, combining modules by topic or skill, grouping together access to course resources, external links, or dedicated communication areas (Teams Channels).
Setting Up Class Teams to Start a New School Year
Your approach to starting a new year with Class teams will depend on what your IT system has in place. The ideal solution is to automate the processes of creating a new Class team and archiving the old one with the Microsoft School Data Sync (SDS) tool.
SDS is a free service for education that automates the process of synchronizing user data and rosters from student information systems with Microsoft 365.
It helps you manage your educational organizations, users, classes, and roles by creating new teams for the new school year and archiving old classes.
The process is relatively simple and saves a lot of time for IT staff and teachers (stay tuned for my next Teams for education article, which will cover this in more detail).
If your organization is not using SDS, you must manually create new teams and archive those from the prior year. When doing so,
there are a few things to keep in mind.
For Class teams, you'll need to make sure that you name them by starting with the school year, followed by the class name. This is important so that you can easily identify the teams that need to be purged at the end of the year.
You can create a Class team from an existing template, but only the channels, tabs, team settings, and applications will be inherited. No messages, files, or other content will be copied.
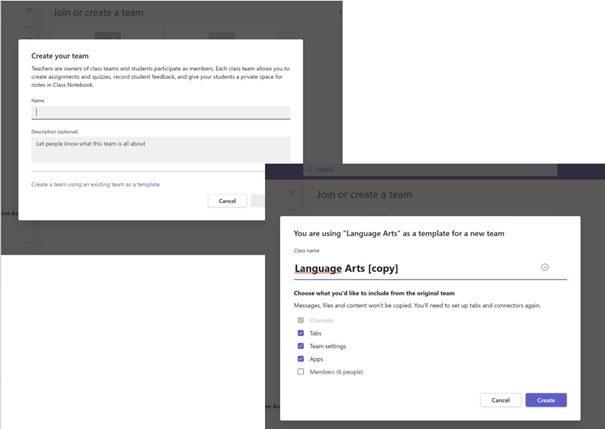
You can copy all or part of a Class Notebook. When creating a Class Notebook in the new Class team, select the From existing notebook content option, which allows you to import content from the Collaboration Space, Content Library, Teacher-Only section, and a private space for each student in your class.
Deciding What Tools to Use
As you have read above, there are several ways to communicate and collaborate in a Class team, each with pros and cons, so it may not be easy to decide which tool to use. With that in mind, I'd like to suggest two decision schemes for teachers that I regularly use with my education clients to help them decide which tool to use.
Communication decision chart

Files decision chart
Finally, the teacher must draw up a charter of good communication and collaboration practices with the students. This charter must be read and signed by the students so that they all agree on the correct etiquette when writing posts, as well as the correct procedures for accessing, creating or collaborating on files.
This can be done with a post pinned to the general channel reminding everyone of the basics.
And voilà! That's it for now.
I hope you found this article useful. Please don't hesitate to contact me if you have questions about anything I’ve touched on in this article.
In part 2, I’ll look at best practices for IT admins deploying Microsoft Teams for education.
Description
The education version of Teams differs from the business version in important ways. The channel structures, organisation of learning resources, and access paths for students are all important considerations for smoothly running the class throughout the year. This article is a deep dive into those considerations, as well as some best practices to help you build your classroom teams with confidence, whether you're teaching alone or with a group of teachers.

Laurent Carlier
Laurent is an experienced Microsoft 365 consultant and has a unique combination of technical and functional expertise.
He works daily with worldwide clients in business and education sectors, helping them building, designing and implementing modern workplace & modern teaching with Microsoft Teams and many other Microsoft 365 tools, such as Microsoft Viva.
Covering all aspects from strategies to change management & IT governance, he is always advocating about the importance of human-first approach and the necessary but always forgotten bridges between IT staff, end users & stakeholders.
He loves sharing as a Microsoft MVP his dual expertise in adoption change management & technical governance and can be found presenting in many languages (french, english, japanese) at international conferences and user groups.