Managing Microsoft Teams Using PowerShell

The Microsoft Teams potential of having tens of thousands of users, thousands of teams, and thousands of channels, and the ability to automate and bulk manage these teams, channels, and team members means that it’s imperative to have an on-the-ball administrator. It’s helpful to understand how nicely PowerShell integrates with Microsoft Teams and how you can use PowerShell to interact with Teams and generate scripts to perform some of the more common – and possibly tedious – tasks associated with Teams.
Microsoft Teams PowerShell provides several cmdlets for managing all aspects of Microsoft Teams, and the Teams PowerShell module offers three great features:
- Support for authentication options, like credentials and access tokens
- The ability to manage all aspects of Teams, including teams, users, policies, and configuration
- The automation of common repetitive tasks, streamlining their completion
Before you can begin using these PowerShell Teams cmdlets, you have to install them. There are a few ways to complete this installation:
- Install the Microsoft Teams PowerShell module via PowerShell Gallery (preferred method).
- Install the Microsoft Teams PowerShell module manually by downloading the .nupkg.
- Deploy to Azure Automation.
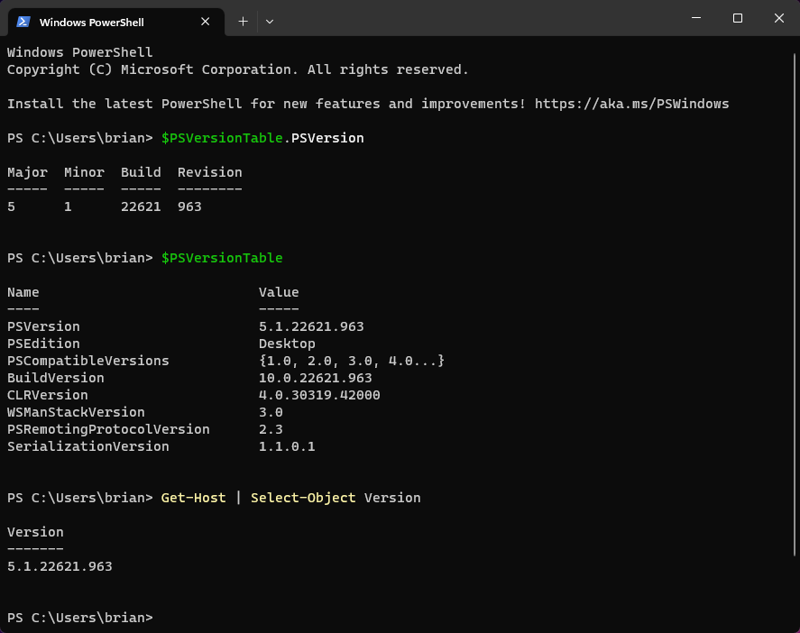
The preferred method of installation is the most thorough and requires only minimal steps. Before you begin the installation, you need to meet the minimum PowerShell requirement of 5.1. There are a few easy ways to determine which version of PowerShell you’re running, excluding digging into the operating system registry. You do so by opening a PowerShell window and then entering one of the following commands:
- $PSVersionTable.PSVersion (provides the PowerShell Major, Minor, and build information)
- $PSVersionTable (provides the PowerShell version and other extraneous information)
- Get-Host > Select-Object Version (provides just the PowerShell version)
Figure 1 shows the results from these commands.

If you discover that you aren’t running PowerShell 5.1, you can upgrade to it by downloading Windows Management Framework 5.1, which includes Windows PowerShell 5.1. This can be downloaded from the Microsoft Download Center.
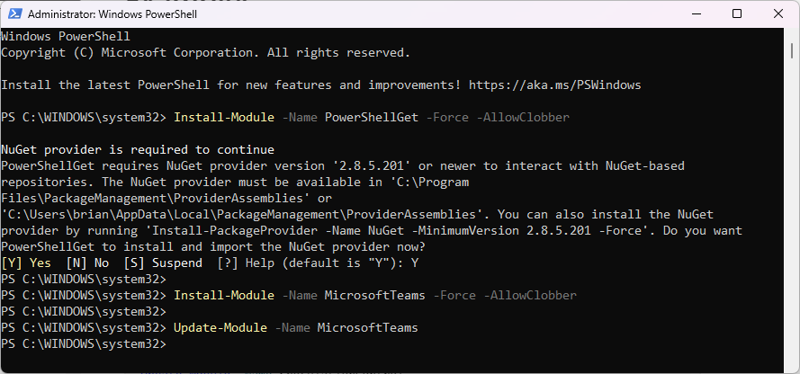
After verifying that you have the correct version of PowerShell, you can continue with the installation of the Teams PowerShell Module by using the following two commands from within a Windows PowerShell Window that was opened with Admin rights:
- Install-Module -Name PowerShellGet -Force -AllowClobber: Ensures that the PowerShell Gallery (PSGallery) is configured as a trusted repository
- Install-Module -Name MicrosoftTeams -Force -AllowClobber: Installs the Teams PowerShell Module
Note: To ensure that you have the latest Teams PowerShell module, you can use the following cmdlet:
Update-Module -Name MicrosoftTeamsFigure 2 demonstrates the commands used to install and update the Teams PowerShell module.

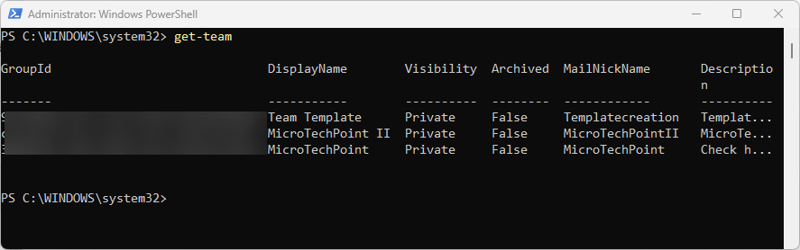
To verify that the Teams PowerShell cmdlets were installed properly, you can issue the following Microsoft Teams command that’s used to connect to Microsoft Teams using PowerShell:
Connect-MicrosoftTeamsImportant: If you receive an error indicating that the MicrosoftTeams module was found but the module could not be loaded, it’s because of the ExecutionPolicy setting. To resolve this error, enter in the following cmdlet and execute the Connect-MicrosoftTeams cmdlet again:
Set-ExecutionPolicy -ExecutionPolicy RemoteSignedAfter establishing a connection to Microsoft Teams, run the following cmdlet to verify the connection (displays a list of teams in your M365 tenant), as shown in Figure 3.
Get-Team 
There’s a plethora of Microsoft Teams PowerShell cmdlets, so I’m not going to discuss all of them, but I will explore an overview of the most common cmdlets used to manage your teams, channels, and team members. The general cmdlets for managing your teams, channels, and users involves using five primary commands using a verb-noun pattern:
- Add-xxx: Adds a Teams user to a Teams component.
- Get-xxx: Retrieve and display information about a Teams component.
- New-xxx: Create a new Teams component.
- Set-xxx: Modify or change settings on a Teams component.
- Remove-xxx: Delete a Teams component.
Obtaining Help with Available Microsoft Teams PowerShell cmdlets
There are way too many Microsoft Teams PowerShell cmdlets for anyone to remember all of them, but you can get help on all the Microsoft Teams PowerShell cmdlets by using the following command:
Get-Command -Module Microsoft.TeamsUse the following command to display a list of Microsoft Teams PowerShell cmdlets that begin with an action, like New:
Get-Command -Module Microsoft.Teams NewUse the following command to display the details of a specific Microsoft Teams PowerShell cmdlet:
Get-Help New-Team -DetailUse the following command to see examples of a specific Microsoft Teams PowerShell cmdlet:
Get-Help New-Team -ExamplesManaging Microsoft Teams Components in Bulk
If you have the need to create site collections or add Teams users in bulk, you can create a .csv file containing the necessary fields, separated by commas, for the Teams object and then use PowerShell to perform a bulk import. For instance, if you want to create several Microsoft Teams, you can create a .csv file called NewMSTeams.csv, perhaps, using a format similar to this:
TeamName,TeamDescription,Visibility,OwnerIn subsequent lines, you provide the values for each team you want to create:
MTPMarketing,”MTP Marketing Team”,Public,Brian@Microtechpoint.comTo create new Microsoft teams, open Windows PowerShell in Administrator mode, connect to Microsoft Teams using the Connect-MicrosoftTeams cmdlet, and then execute the following command:
Import-Csv C:\users\Brian\Desktop\NewMSTeams.csv | ForEach-Object
{New-Team -DisplayName $_.TeamName -TeamDescription
$_.TeamDescription -Visibiliity $_.Visibility -Owner $_.Owner}
To add users to the new Microsoft teams, create another .csv file. Call this file TeamMembers.csv. It will store each user’s email address and which role they will become a member of within the team, using a format similar to this:
EmailAddress,RoleIn subsequent lines, provide the values for each user, including their email address and the desired role that you want them to be a member of within the team:
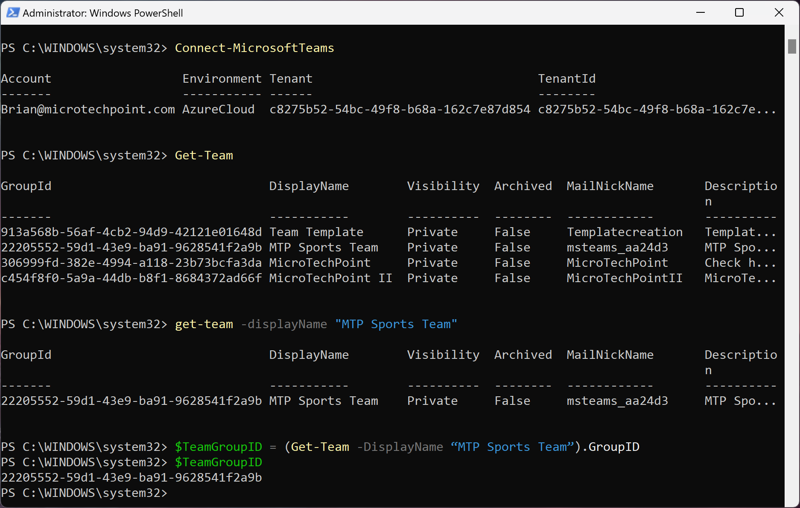
Linda@Microtechpoint.com,OwnerIn order to add the users to the correct team, you need to obtain the GroupId of your teams and use the correct GroupID when adding the users to teams. To obtain the group ID for your teams, open Windows PowerShell in Administrator mode and connect to Microsoft Teams using the Connect-MicrosoftTeams command. After doing so, you can display Microsoft Teams and their GroupIDs using:
- Get-Team: Displays all available teams and their GroupID
- Get-Team -DisplayName “MTP Sports”: Displays the GroupId of the team specified
Tip: Create a variable to store the GroupID. This allows you to use it multiple times while in the current PowerShell window.
$TeamGroupID = (Get-Team -DisplayName “MTP Sports Team”).GroupIDFigure 4 displays the steps used to connect to Microsoft Teams from a Windows PowerShell opened in Administrator mode. It displays all teams and the associated information, specifically the GroupID that you need to perform the bulk import. As you can see in Figure 4, you then display a specific team’s information, called “MTP Sports Teams,” followed by executing the command to store the GroupId in a variable and showing the value of the variable that contains the GroupID for the Microsoft Team called MTP Sports Teams.
After gathering this information, you’re ready to add users to the appropriate team and specify what role they will become a member of in that team. To complete this, open Windows PowerShell in Administrator mode and connect to Microsoft Teams using the Connect-MicrosoftTeams command. Then execute the following command:
Import-Csv C:\users\brian\desktop\TeamMembers.csv | ForEach-Object
{Add-TeamUser -GroupID $TeamGroupID -User $_.EmailAddress
-Role $_.Role }
Alternatively, you can create a PowerShell script to create the TeamsGroupID variable and then execute the Import-CSV command from within the script file. You do so by creating a file, which you can call TeamsUsers.ps1, and then copying and pasting the two commands into the file on separate lines, in the same order that you ran them manually.
You can execute the script file by opening Windows PowerShell in Administrator mode and executing the following command:
Set-ExecutionPolicy Bypass
C:\users\Brian\desktop\TeamsUsers.ps1
Common Microsoft Team cmdlets
The following is a list of cmdlets that you’ll use all the time:
- Get-Team, New-Team, Set-Team, Remove-Team
- Get-TeamUser, Add-TeamUser, Remove-TeamUser
- Get-TeamChannel, New-TeamChannel, Set-TeamChannel, Remove-TeamChannel
- Get-TeamChannelUser, Add-TeamChannelUser, Remove-TeamChannelUser
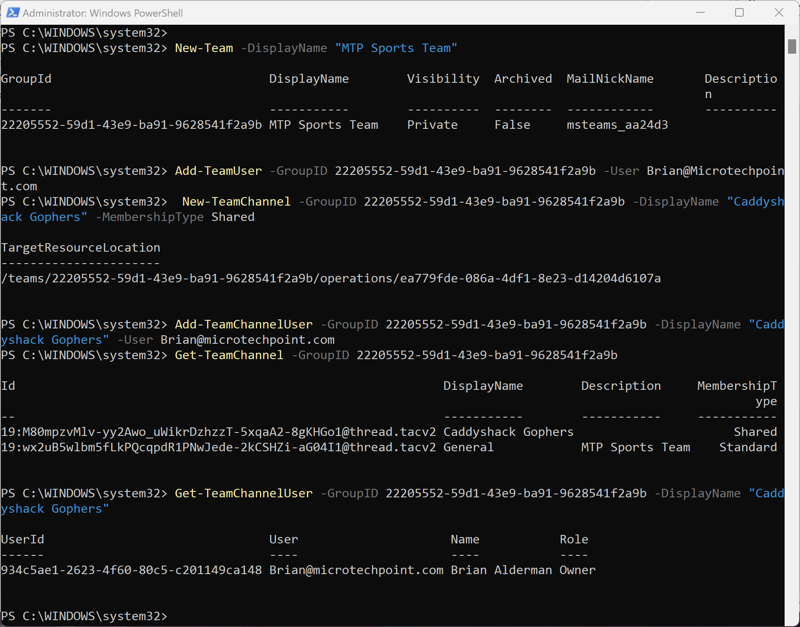
Figure 5 contains the New-Team command used to create a new team with DisplayName “MTP Sports Team.” Follow these steps to create a new user and a new channel, and then add that new user to the new channel.
- Use Add-TeamUser to add Brian as a User to the team.
- Use New-TeamChannel to create a new channel with DisplayName “Caddyshack Gophers”.
- Use Add-TeamChannelUser to Brian as a User to the new channel.
- Use Get-TeamChannelUser to display Owner of the new Caddyshack Gophers channel.

As I mentioned previously, there are too many Teams PowerShell cmdlets to discuss but you can review and learn about all of these cmdlets by accessing this MicrosoftTeamsPowerShell website. Microsoft Teams PowerShell is constantly changing, and you can monitor these changes by following these Microsoft Teams PowerShell Release Notes.

Brian Alderman
Brian Alderman is a former Microsoft MVP, and has his Master's in Computer Information Systems. Since 1995, he has held several Microsoft certifications that currently include; MCT, MCSE for SharePoint, MCSA for Office 365, MCITP for SQL Server(R), MCSA and MCSE for Windows Server(R), and also his PMP certification. As a Senior Technical Instructor and Consultant, he has 30 years of experience in networking, SQL Server databases, SharePoint technologies, and project management. Brian's publications include Windows 2000 Professional, SQL Server 2000 Administration, SharePoint 2010 Administrator's Companion, and Microsoft SharePoint 2013 Administration Inside Out. He is an active speaker at SharePoint Industry conferences including SharePoint Saturday's, SPLive, DevIntersection, SharePoint Fest, Microsoft Ignite, and several international SharePoint conferences including London, Milan, and Madrid.