How to Assign a Microsoft 365 User License

This article discusses two ways of assigning a Microsoft 365 user license. You can either:
- Assign a license using the Microsoft 365 admin center.
- Assign a license using Windows PowerShell.
Note: The Microsoft 365 admin center might seem like the easier option of the two. However, when it comes to handling hundreds of user accounts, PowerShell scripting proves more beneficial because you can search for unlicensed users, assign licenses to hundreds of users at once, among other things.
For those who like to watch and learn, check out the 10-minute video at the end of this article, which is a video version of this content.
Assign a License Using the Microsoft 365 Admin Center
To access the Microsoft 365 admin center, do the following:
- Sign in to your Microsoft 365 tenant.
- Click the Admin Center icon. You will be directed to the Microsoft 365 admin center.
- Select Users, and then select Active users. The Active users page opens.
You can assign licenses to an individual user or to multiple users in bulk.
Assign a License for a Single User
To assign a license for a single user, follow these instructions. You can assign the license in two ways:
- Click the username directly: This opens the user details pane to your right. Select the Licenses and apps tab. Under Licenses, select the license, and then save the changes as shown in the following video demo.
Video 1: Assigning a license by clicking the username. | Demo: Thilak Kumar Singh.
- Select the user checkbox: After enabling the checkbox, click the three dots icon at the top of the user list, and then select the Manage product licenses option as shown in the video demo. You get directed to the Licenses and apps tab of the user details section. Select the license for the user from License, and then save the changes.
Video 2: Assigning a license by selecting the user checkbox. | Demo: Thilak Kumar Singh.
Assign a License for Multiple Users
To assign a license for multiple users, follow these instructions.
- Select multiple users by enabling the respective user checkboxes.
- Click the three dots icon at the top of the user list, and then select the Manage product licenses option as shown in the following video demo. You are presented with three options. To assign the license, either use Replace or Assign more, and then save the changes:
- Replace (Unassign existing licenses and assign new ones).
- Assign more (Keep the existing licenses and assign more).
- Unassign all.
Video 3: Assigning a license for multiple users. | Demo: Thilak Kumar Singh.
Assign a License Using Windows PowerShell
If your organization is big, searching for unlicensed users can become a humungous task. This is where PowerShell comes to your rescue. With PowerShell, you can easily search for unlicensed users and assign them licenses by running a simple script. And just like with the Microsoft 365 admin center, you can either choose to assign user licenses individually or in bulk.
Note: If you are not sure how to connect your Microsoft 365 tenant with PowerShell, see How to Connect to Your Microsoft 365 Tenant Using PowerShell.
Before You Start Using PowerShell for Assigning User Licenses
The following are prerequisites for using PowerShell to assign user licenses:
- You should have Global, License, or User Administrator rights to assign user licenses. If not, PowerShell will throw an error indicating the same.
- You should have assigned usage location for your users. Without assigning the
-UsageLocation property for your users, you cannot assign licenses to them. To set the location using PowerShell, run the Set-MsolUser -UserPrincipalName <userprincipalname> -UsageLocation <usagelocation> command as shown in the video demo.
Video 4: Setting usage location for a user. | Demo: Thilak Kumar Singh.
- You should know the AccountSkuId of your license. AccountSkuId is a unique string ID associated with your license. You need this when adding or assigning user licenses. If you are not sure what your AccountSkuId for your license is, run the Get-MsolAccountSku command, as shown in the following video demo.
Video 5: Finding out the AccountSkuId of your license. | Demo: Thilak Kumar Singh.
- You can check for unlicensed users in your Microsoft 365 tenant using this command:
Get-MsolUser -All - UnlicensedUsersOnly as shown here.
Video 6: Fetching all your unlicensed users. | Demo: Thilak Kumar Singh.
Assign a License for a Single User
To assign a license for a single user, run Set-MsolUser -UserPrincipalName <userprincipalname> -AddLicenses <licensename> command as shown in the video demo.
Video 7: Assigning a license for a single user. | Demo: Thilak Kumar Singh.
This is how the preceding script works:
- The Set-MsolUserLicense cmdlet is used for assigning the license.
- <UserPrincipalName> of the unlicensed user is passed to the -UserPrincipalName parameter.
- AccountSkuID (license info) is passed to the -AddLicenses parameter.
Assign Licenses for Multiple Users
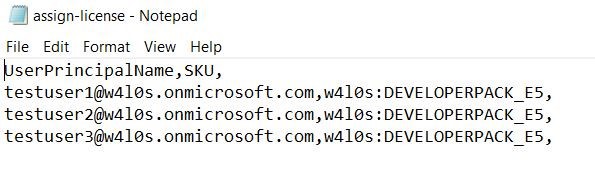
Ensure that your CSV file that has all the unlicensed users contains the headers as shown in Figure 1.
Running the forEach($user in $users){Set-MsolUserLicense -UserPrincipalName $user.UserPrincipalName -UsageLocation $user.UsageLocation -AddLicenses $user.SKU} command for all your unlicensed users stored in a CSV file ensures that they get assigned with the license as shown in the video demo.
Video 8: Bulk assigning user licenses. | Demo: Thilak Kumar Singh.
This is how the preceding script works:
- The unlicensed user list is imported from the CSV file by using the Import-CSV cmdlet.
- The imported user collection is looped through using a forEach loop.
- UserPrincipalName and SKU details of every user are passed to -UserPrincipalName and -AddLicenses parameter.
Possible Errors You Might Face
Here are examples of errors you might come across:
- Assigning a license without setting usage location for user profile: Microsoft decides what rules apply to the user license based on the region the user is located in. So, if you try to assign a license without setting the usage location for the user profile, PowerShell throws an error. To set the usage location and then assign the license, use Set-MsolUser -UserPrincipalName <userprincipalname> -UsageLocation <usagelocation> command.
- Providing the wrong license ID: Make sure you provide the right license ID to the Set-MsolUser command. If you don’t have the license ID, use Get-MsolAccountSku to find it, and then pass that license ID to Set-MsolUser -UserPrincipalName <user principal name> -AddLicenses <license ID>
- Providing wrong CSV headers: Having a predefined CSV template that you can use every time you have to bulk assign user licenses prevents you from running into CSV header-related issues.
Conclusion
Although it is easy to assign licenses using the Microsoft 365 admin center, the situation can get out of control when you handle hundreds or thousands of user accounts – which is probably the case for most administrators. So, it’s best to use PowerShell scripting for assigning user licenses. This option offers the ability to search for unlicensed users, assign licenses to hundreds of users in one go, and much more.
For Those Who Like to Watch and Learn
The following video is a 10-minute visual version of this article. It explains two ways that you can assign licenses to a single user or to multiple users:
- Assign a license using the Microsoft 365 admin center
- Assign a license using Windows PowerShell

Thilak Kumar Singh
Thilak Kumar Singh is a trainer who believes in teaching about IT in the simplest possible way with more emphasis on visual mode of learning. He firmly believes in democratizing IT knowledge, especially of Microsoft solutions, in which he specializes as a trainer and consultant.
He observes that in this era dominated by cloud computing and collaboration, where IT has reached users unimaginable hitherto, IT knowledge must not be an obscure science, but rather be available to anyone who wishes to engage with IT.