Creating and Sharing Windows Terminal Profiles Across PCs

In personalizing Windows Terminal, many options are available. Windows Terminal offers access to a plethora of options for defaults, startup behavior, user interactions, appearance, color schemes and keyboard shortcuts. This extends to font faces, sizes and weights, line height, text contrast adjustments, cursor controls, a background image, text formatting and much more. Indeed, a curious and persistent user can spend hours getting their Windows Terminal environment “just right” (not to mention related settings for Windows PowerShell, Command Prompt, and other shells, along with tools and extensions). Simply put, there’s a lot going on behind the scenes in Windows Terminal, much of it amenable to user control or direction.
Check Out the Other Windows Terminal Articles
This is the fifth and final article in a series on Windows Terminal (sometimes referred to as WT). Here’s a list of what this series covers:
- Understanding and Using Windows Terminal: Gives a general description of what Windows Terminal is, how it works, and what it can do.
- Understanding and Using Windows Terminal Color Schemes: Explains the contents and behavior of Windows Terminal color schemes, with tools to display and inspect them.
- Using Text, Tabs, Panes, and Themes in Windows Terminal: Explains how to inspect, set, and change text and background colors in Windows Terminal, how to split the display into horizontal and vertical panes, and more.
- Using OhMyPosh to Customize the Windows Terminal Prompt: Explains how to download, install, and use Jan de Dobbeleer’s fascinating GitHub project to choose among glyph-driven, nerd font–based custom prompts for Windows Terminal (or build one’s own).
- Creating and Sharing Windows Terminal Profiles Across PCs: This article, which explains how to export and import complex Windows Terminal environments across multiple PC instances (a few or a fleet, as your needs may dictate).
What Works for the Goose…
Any environment that’s subject to intense and detailed customization and personalization—such as Windows Terminal—raises issues related to migrating or replicating the same look and feel from one Windows desktop to another. I wish I could find a tool that auto-magically picks everything up from any single Windows Terminal setup, with all its settings, preferences, adds-on, and tweaks to move it over to another, different Windows PC in one go. Alas, if there is such a tool, I couldn’t find it.
However, there is a way to get from a reference or canonical Windows Terminal setup to re-create or replicate that same setup on one or more other Windows PCs. In this article, I’ll explain what’s involved in making this happen for a specific, example Windows Terminal setup, and then explain the general principles involved in doing so for the general run of Windows Terminal setups and configurations. Let’s get started.
Settings.json: The Easy Part
For the most part, those settings, defaults, and other values about which Windows Terminal itself keeps track all reside in one or perhaps a few places—namely, in its settings.json files. Within Windows Terminal, individual shells also have their own settings.json files, too. Thus, you must find and save the right one to move it to another PC. As it turns out, that’s quite easy. Inside Windows Terminal, open its settings.json file in a text editor of your choosing by holding down the Shift key and choosing the Settings entry in the down-caret menu, as in Figure 1.
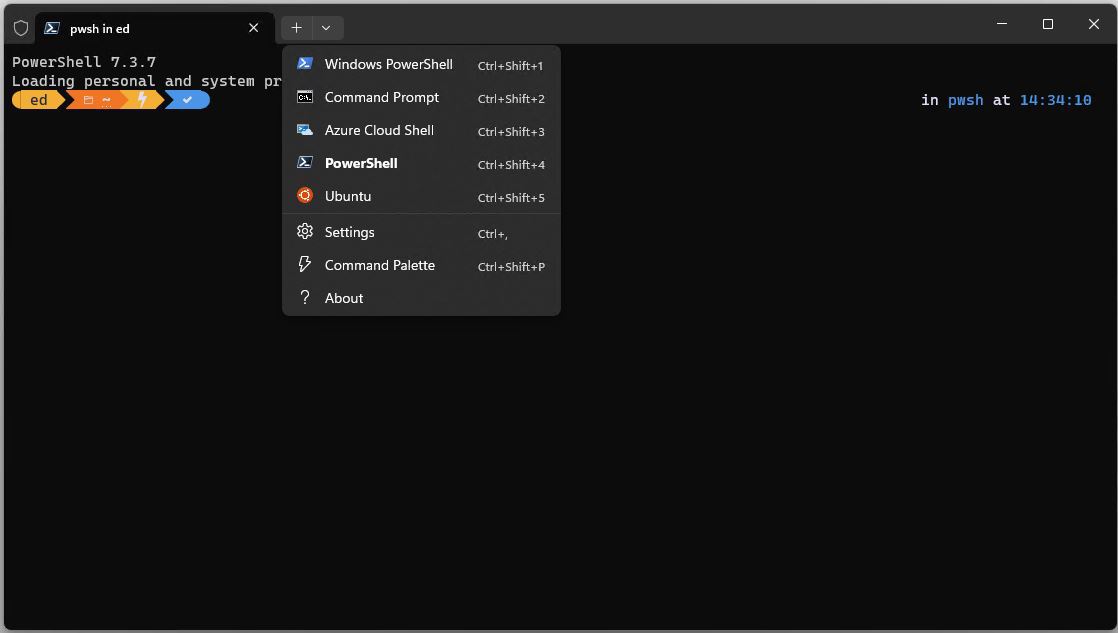
| Used with permission from Microsoft.
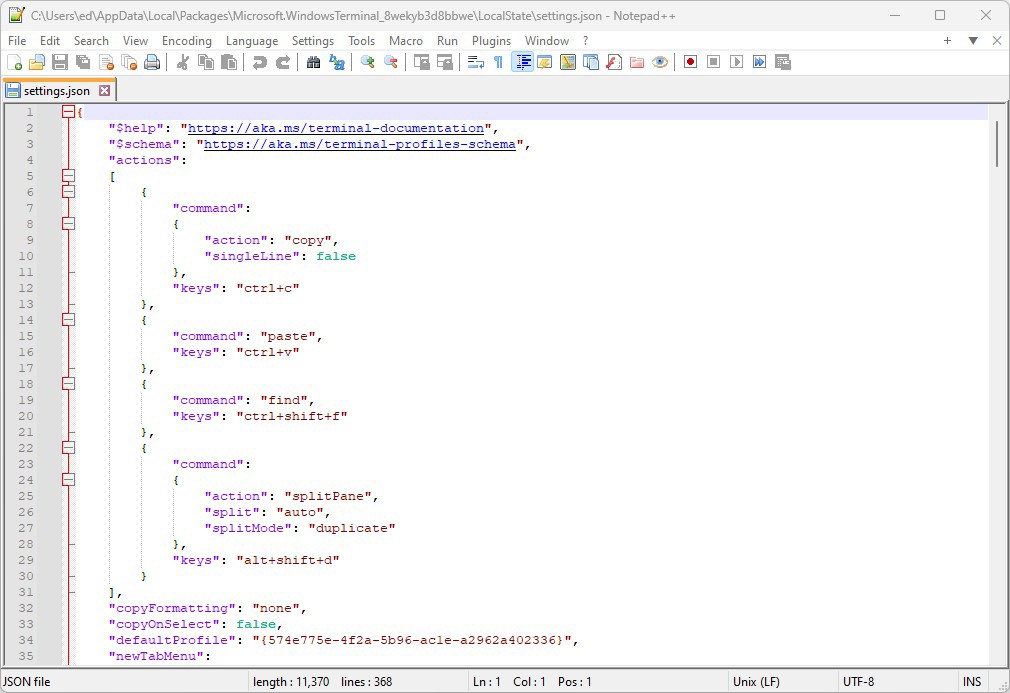
The first time you do this, you’ll have to indicate to Windows Terminal which editor to use. I chose the excellent freeware text editor Notepad++, as shown in Figure 2.

| Used with permission from Microsoft. View Full Size
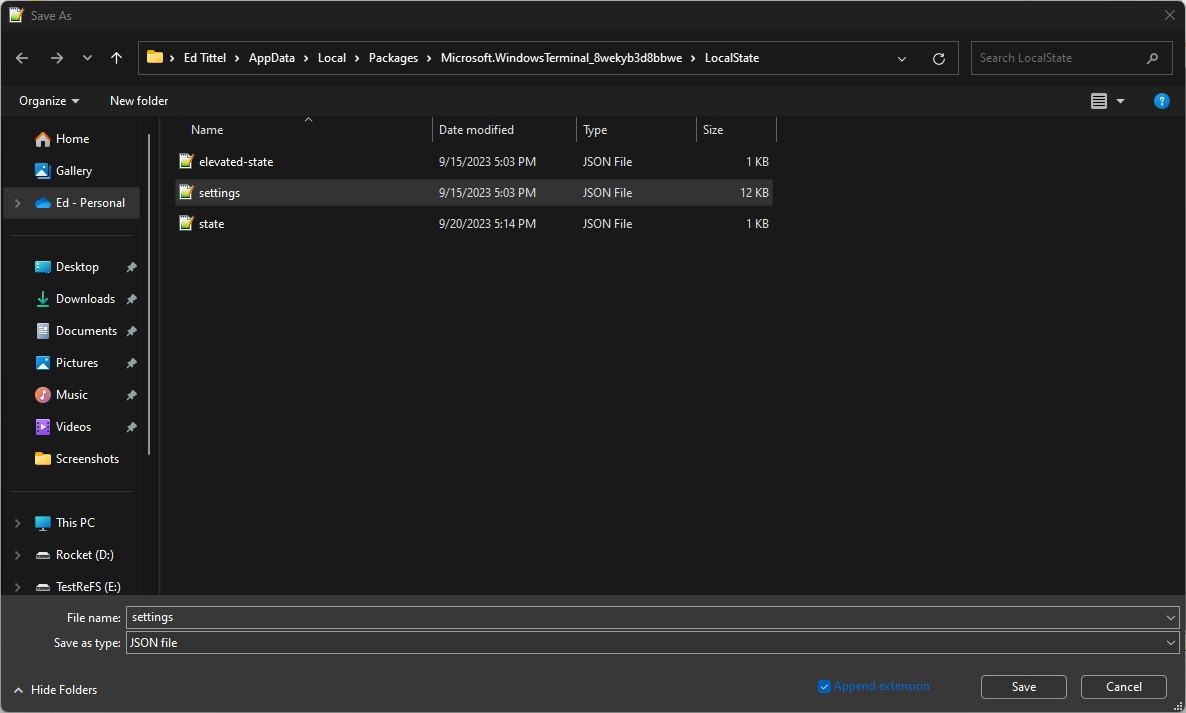
This access provides you with two useful things. First, you can use the Save as function under the File menu in Notepad++ to save a copy of this file for transport to another PC. Second, when you do that, the program shows you where the master copy of this file resides—namely:
C:\Users\<acct>\AppData\Local\Packages\Microsoft.WindowsTerminal_
8wekyb3d8bbwe\LocalState\settings.json
Your actual user account folder name appears where <acct> sits in the preceding path specification. Also, the full path specification is broken artificially across two lines for readability, but it still shows generally where this file lives. Figure 3 shows the Save As pane with the trailing end of that default path in the File Explorer address bar by way of illustration. The missing part is C:\Users.
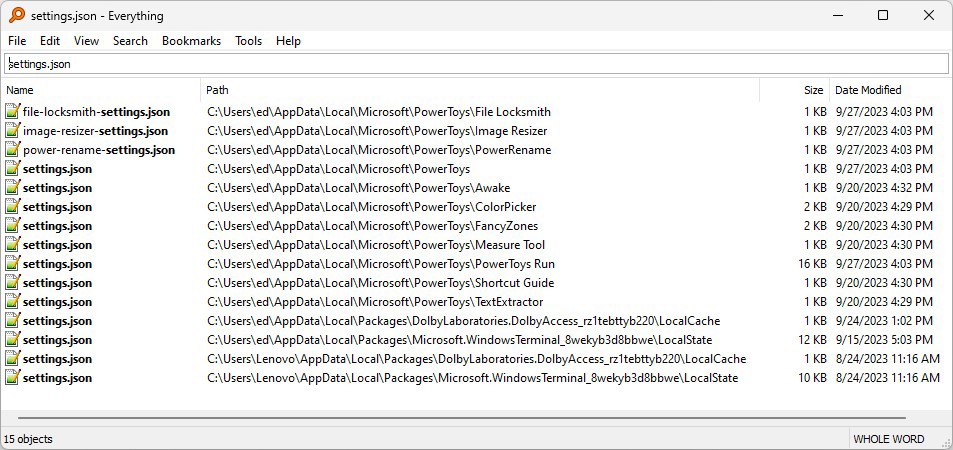
When I save this file for transport to another PC, I usually rename it mastersettings.json. This helps me distinguish it from all the other many settings.json files you’re likely to find on a typical Windows 10 or Windows 11 PC. As you can see in Figure 4, file search tool Voidtools Everything finds 15 files on my source PC, all named settings.json. (Many of them come from PowerToys, a Microsoft tools project.)
Long story short: By replacing the current settings.json file in the Windows Terminal directory as shown in and around Figure 3, you can move your chosen Windows Terminal settings, preferences, and so forth from the source to the target machine. That’s the easy part. What’s missing?
There’s More to a Windows Terminal Runtime Than Settings
Here’s where I’ll use my own customized setup to explain why replacing one copy of settings.json with another gets you only part of the way to re-creating a specific Windows Terminal environment. There are invariably other things needed to replicate a complex Windows Terminal configuration from one machine on another. In addition to the capabilities covered in settings.json, I run various tools and programs as part of my Windows Terminal environment and as a standard toolbox inside Windows Terminal. These include the following:
- Jan De Dobbeleer’s excellent OhMyPosh tool runs inside Windows Terminal, and provides a wide range of predefined customizations for the PowerShell prompt. In turn, OhMyPosh requires users to download and install so-called Nerd Fonts into Windows. Next, the user must select one within the Windows Terminal default appearance settings so they may be used to create classy custom prompts. I wrote a whole item for this series about this terrific tool: Using OhMyPosh to Customize the Windows Terminal Prompt. In this current article, I’ll cover what’s involved in a PowerShell script under the later heading “Testing the Combined Script.” The short version, however, is: download and install Oh-My-Posh, download and install a NerdFont and set it as default, create a PowerShell profile and invoke Oh-My-Posh from inside that profile. That way, it always runs when PowerShell runs.
- I’m a big fan of the GitHub winfetch tool. This handy little program shows system information, the Windows version, and the current Windows Terminal/PowerShell color scheme in use. But one must download and install this file also, using a special PowerShell facility. Again, I’ll provide a detailed script in the “Testing the Combined Script” section of this article. For more information about winfetch, see my companion story Understanding and Using Windows Terminal Color Schemes.
- I also use the Windows Terminal ColorTool program, which shows prevailing text treatments in Windows Terminal. (It’s also covered in the Color Schemes story linked in the preceding list element.). Once downloaded, its executable runs so long as Windows Terminal can find it on an accessible Windows path. Once more, I’ll offer a detailed script below as well. (Again, see “Testing the Combined Script”).
In putting this information together, I made truly great use of the new Copilot capabilities in Windows 11 22H2/22H3. Simply put, I asked it to show me how to script the preceding activities in PowerShell. It gave me a running start to put all that PowerShell code together. The result is a script I already use to re-create my Windows Terminal environment on other (mostly new) PCs and VMs. Very helpful!
Handling OhMyPosh
There are five steps to make OhMyPosh useful:
- Download and install a Nerd font (I’ll go with CaskaydiaCove Nerd Font).
- Install OhMyPosh itself.
- Create a PowerShell Profile to invoke OhMyPosh.
- Add an invocation string for OhMyPosh to the PowerShell profile.
- Select CaskaydiaCover Nerd Font as the default font in Windows Terminal Settings/Defaults/Appearance.
I was able to use Copilot (Bing Chat) to create a sequence of PowerShell commands to handle these tasks, as follows:
# Download, unzip and copy nerd fonts into proper folder
# Set the URL of the ZIP archive
$url = "https://github.com/ryanoasis/nerd-fonts/releases/download/v2.1.0/CascadiaCode.zip"
# Set the destination folder
#Change $destf target value to match intended temporary zip file name
$destf = "M:\WTstuff\CascadiaCode.zip"
#Change $tempf to match intended temporary zip file drive & folder
$tempf = "M:\WTstuff"
#This is the actual Windows Fonts location, no need to change
$dest = "C:\Windows\Fonts"
Invoke-WebRequest -Uri $url -OutFile $destf
# Extract the ZIP archive to the temporary folder
Expand-Archive -Path "$tempf\CascadiaCode.zip" -DestinationPath $tempf
# Copy the font files (extension .ttf) to the destination folder
Get-ChildItem -Path $tempf -Filter "*.ttf" | Copy-Item -Destination $dest
# Remove the temporary folder and its contents
Remove-Item -Path $tempf -Recurse -Force
#Install OhMyPosh using winget
winget install JanDeDobbeleer.OhMyPosh -s winget
#create profile if not already present
$profilePath = "C:\Users\Ed\Documents\PowerShell\Microsoft.PowerShell_profile.ps1"
#Add string to profile
Add-Content -Path $profilePath -Value 'oh-my-posh init pwsh | Invoke-Expression'
# Set the Windows Terminal default font to CaskaydiaCove Nerd Font
# Set the font face name (should match what's listed in a Windows folder)
$fontFace = "CaskaydiaCove Nerd Font"
# Get the settings.json file path
$settingsPath = Join-Path $env:LOCALAPPDATA "Packages\Microsoft.WindowsTerminal_8wekyb3d8bbwe\LocalState\settings.json"
# Convert the JSON file to a PowerShell object
$settings = Get-Content $settingsPath | ConvertFrom-Json
# Set the font face for the default profile
$settings.profiles.defaults.font.face = $fontFace
# Convert the PowerShell object back to JSON
$settings | ConvertTo-Json -Depth 100 | Set-Content $settingsPath
As you can see, there are many PowerShell commands involved in handling OhMyPosh. However, it involves installing fonts and software, creating and populating a PowerShell profile, and changing the default font to support prompt customization inside Windows Terminal. After Copilot built the code in a couple of minutes, this took me more than a day to work my way through completely. At one point, I made an appeal to the PowerShell team for help. As I would slowly figure out, my problems came from minor syntax, plus object name and reference errors in the Copilot code. These caused an “interesting” issue with saving the settings.json file. Indeed, it wouldn’t save at all, and it trashed the original file, too. That took some time to understand and fix. You can do likewise (but skip the errors), at your own speed. Hopefully, I’ve done most of the heavy lifting already—and I now KNOW it works on both Windows 10 and Windows 11 PCs (mine, at least).
Handling ColorTool
ColorTool is a GitHub project that runs from a simple executable. You only need to download, unzip, and add its folder location to the Windows PATH environment variable for it to work in PowerShell or Command Prompt. Here’s the debugged PowerShell that Copilot created for me to handle these tasks:
# Set the URL of the ZIP archive
$url = "https://github.com/microsoft/terminal/releases/download/1904.29002/ColorTool.zip"
# Set the destination folder
$dest = "c:\WinTerm"
# Create the destination folder if it does not exist
if (-not (Test-Path $dest)) {
New-Item -ItemType Directory -Path $dest -Force}
# Download the ZIP archive to the destination folder
Invoke-WebRequest -Uri $url -OutFile "$dest\ColorTool.zip"
# Extract the ZIP archive to the destination folder
Expand-Archive -Path "$dest\ColorTool.zip" -DestinationPath $dest
# Add the destination folder to the Windows path
$env:Path += ";$dest"
# Save the path change permanently
[Environment]::SetEnvironmentVariable("Path", $env:Path, "User")
This worked more or less “out of the box” (as delivered from Copilot). As such things go, this effort is straightforward. (Notice how it shares common tasks involved in downloading, unzipping, and working with destination folders; that made this much easier as a “second time around.”)
Handing Winfetch
Because it only needs to be called once it’s installed (the installer handles downloading, unpacking and so forth), this is a one-liner script (two, including the comment to explain what’s up). Please note that the –F directive forces Install-Script to run silently without requiring user confirmation or interaction.
# Install winfetch from PowerShell Gallery
Install-Script winfetch -F
That’s all there is to it! As you go through this installation (see my companion article Understanding and Using Windows Terminal Color Schemes for a complete discussion of downloading and working with winfetch), you should find the tool useful to show what settings are currently active in PowerShell and Command Prompt.
Testing the Combined Script
To check my work, I set up a clean Windows 11 22H2 installation on a laptop PC and a clean Windows 10 virtual machine on that same machine. I then opened an administrative PowerShell session in each operating system. I pasted all the PowerShell together from the three preceding sections into a file named WTaddons.ps1 (OneDrive download link, read-only: after downloading, unblock the file and reset its properties to allow local changes for your own environment, please). You can either change the context in PowerShell to the folder where that file resides, or deposit it in a folder on your Windows path. Next, in an administrative session, type .\WTaddons.ps1 at the command line. You may have to change your execution policy to allow running local scripts. That will run the update file. I also checked the script to make sure it would work in Windows 10 (22H2, Build 19045.3448) as well: it does.
Working with the script goes best if you tackle it one line at a time, and see if it works. If it does work, you can type the name of any variables referenced in a PowerShell command to see what’s become of it and what values it holds. If you enter a variable name and get no text in reply, that indicates the variable is undefined (or contains the null string). One more thing: not all PowerShell or Windows Terminal messages tell you what is wrong, or why things didn’t work. My most difficult debugging came from learning how to properly reference Windows Terminal object attributes. Hint: Check settings.json for guidance: look at how attributes descend in your local object hierarchy.
I also ran into naming issues. For example, Copilot indicated that “CaskaydiaCove NF” was a valid name for that font: alas, that worked in Windows 10, but not in Windows 11. If you look in the unzipped files for the nerd fonts, it’s actually named “CaskaydiaCove Nerd Font.” As soon as I used that name for setting my default font for OhMyPosh’s benefit, my save problem with settings.json was solved. It had been reported as a “bad formatting” error, though. I knew that wasn’t right because the excellent JSON formatter website’s format/validation tool parsed my settings.json file and pronounced it “Valid JSON.” I knew something was wrong (it threw an error) but the error message itself didn’t guide me to the solution. So be careful when working your way through things.
I’ve prepared this script for download with some additional comments, so it tells you what it’s doing. It also shows values that you should set for your own local configurations. As you work through it for your machines and your own customizations, it should show you how to manipulate Windows Terminal and PowerShell settings via scripts. I constantly checked my work by entering variable names (for example, $dest) to see what values they stored. As you work through the script commands, you’ll get a good understanding of how such things work. Indeed, with a little planning and research (and maybe some recourse to Copilot) you can add to the capabilities of the command line through additional tools and facilities (like winfetch and ColorTool, both described in preceding sections of this article). Then you can re-create your work on multiple PCs, as I’ve shown here in this article. Have fun!

Ed Tittel
Ed Tittel is a long-time computing industry writer, consultant, and occasional expert witness. He’s the author of over 100 computer trade books, countless articles, and other stuff. For more info, please visit https://edtittel.com.