3 Ways to Get Advantage Using Microsoft Copilot in Whiteboard

Learn How to Leverage the Power of AI to Generate and Refine Your Ideas in Microsoft Whiteboard
Microsoft Whiteboard is a digital canvas that lets you brainstorm, sketch, and collaborate with others in real time. Whether you are working on a project, planning a meeting, or teaching a class, you can use Microsoft Whiteboard to capture and share your ideas visually. But what if you need some inspiration or guidance to get started? That's where Microsoft Copilot comes in.
Copilot is an AI-powered assistant that helps you generate and improve your ideas in Microsoft Whiteboard. Copilot can suggest relevant topics, keywords, images, and icons based on your input. You can also ask Copilot to expand, refine, or rephrase your ideas, or to generate new ones. Copilot can help you with different scenarios such as brainstorming, preparing for training, and ordering your ideas. Here are some examples of how you can use Copilot in Microsoft Whiteboard.
You can use Microsoft Copilot in Microsoft Whiteboard, a collaborative digital canvas that lets you brainstorm, sketch, and present your ideas. With Microsoft Copilot in Microsoft Whiteboard, you can create interactive prototypes, visualize data, and explore new possibilities for your projects. All you need is a Microsoft 365 license and M365 Copilot license.
Brainstorming in Microsoft Whiteboard with Copilot
Brainstorming is a creative process that involves generating and exploring many ideas without judging or filtering them. Brainstorming can help you find new solutions, perspectives, and opportunities for your challenges. However, sometimes you may feel stuck or run out of ideas. That's when Copilot can help you.
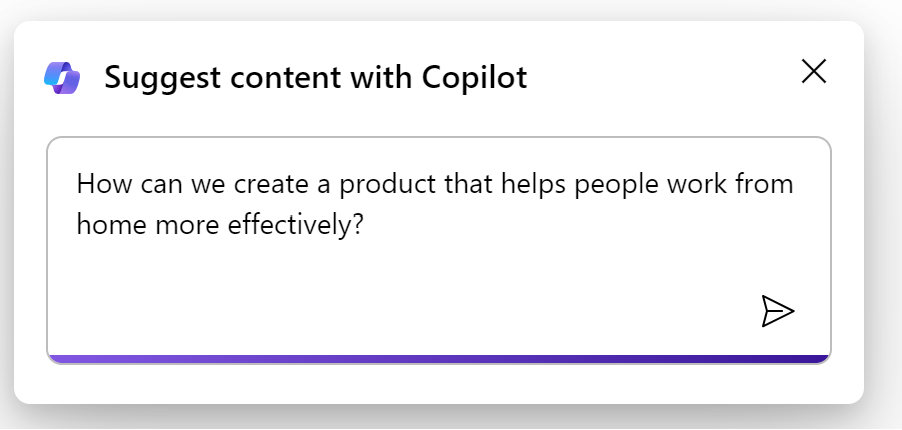
To use Copilot for brainstorming, you need to start with a question or a problem statement. For example, let's say you want to brainstorm ideas for a new product. You can write or type your question in Copilot for Microsoft Whiteboard, such as "How can we create a product that helps people work from home more effectively?" Copilot will give you six ideas by default, but you can include more ideas. And even add your own.
When you start a new Whiteboard, you have the option to suggest a new topic with Copilot. In Figure 1 I’ll suggest one and will then click the send button to send the suggestion to Copilot.
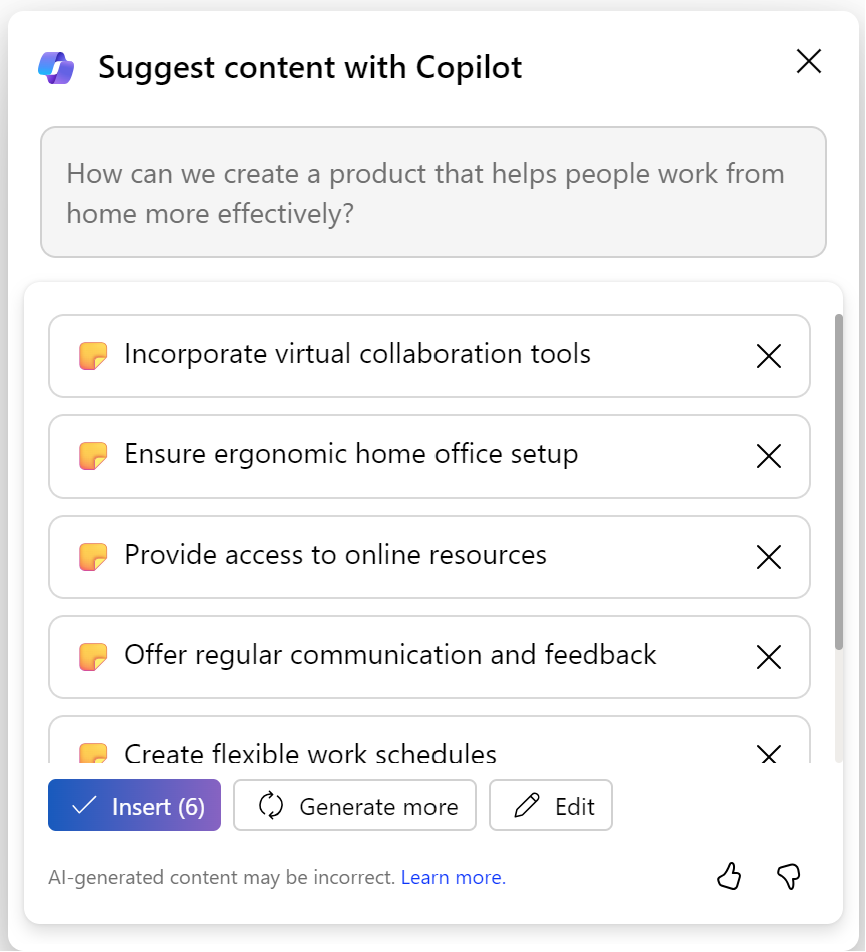
After you send the suggestion, Copilot gives you some of suggestions. In Figure 2 you see some of the suggestions Copilot has for your request.
As you add more ideas to your whiteboard, Copilot will update its suggestions accordingly. You can also ask Copilot to expand, refine, or rephrase your ideas by selecting them and clicking on the Copilot button again. For example, if you have an idea like a “video conferencing app," you can ask Copilot to expand it by adding more details, such as "with background blur, transcription, and emoji reactions." You can also ask Copilot to refine it by making it more specific, such as "video conferencing app for freelancers and small businesses." Or you can ask Copilot to rephrase it by using different words, such as "online meeting platform."
In Figure 3 Where ask for more suggestions for one of the items in the whiteboard.

By using Copilot for brainstorming, you can generate more and better ideas in less time. Here are some good examples:
- Use Copilot to find relevant images and icons to make your whiteboard more visual and engaging.
- Resize, rotate, and arrange your ideas on the whiteboard as you like.
- Use the lasso tool to group your ideas into categories or themes.
- Invite other people to join your whiteboard and collaborate with you in real time. You can see their cursors, comments, and edits as they happen.
- Chat with your invited collaborators using the built-in chat feature or use the voice and video call option to communicate with them.
Preparing for Training in Microsoft Whiteboard with Copilot
Training is a process that involves teaching or instructing someone on a specific topic or skill. Training can help you share your knowledge, improve your performance, or develop new competencies. However, preparing for training can be challenging and time-consuming. You need to define your learning objectives, design your content, and deliver your presentation. That's where Copilot can help you.
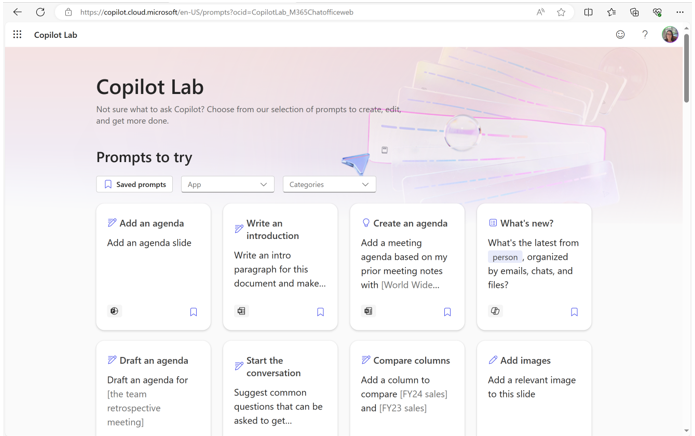
If you need some ideas about writing your prompts to ask in Whiteboard you can go to https://copilot.cloud.microsoft/en-US/prompts?ocid=CopilotLab_M365Chatofficeweb. This website (shown in Figure 4) is a good starting point for getting more information about writing prompts.
To use Copilot for preparing for training, you need to start with a topic or a goal. For example, let's say you want to prepare a training session on how to use Microsoft Whiteboard. You can write or type your topic in Microsoft Whiteboard, such as "Microsoft Whiteboard Training." Then, you can select your topic and click on the Copilot button on the toolbar. Copilot will open a sidebar with suggestions for learning objectives, subtopics, images, and icons related to your topic. You can drag and drop any of these suggestions to your whiteboard or click on the plus icon to add more. You can also type your own objectives or subtopics or use the ink tool to draw them.
In this video I show how you can use Microsoft Copilot to prepare a new training. It’s started with the prompt, categories update, and it’s summarized with a Loop component.
As you add more objectives and subtopics to your whiteboard, Copilot will update its suggestions accordingly. You can also ask Copilot to expand, refine, or rephrase your objectives and subtopics by selecting them and clicking on the Copilot button again. For example, if you have an objective like "Learn how to use the ink tool," you can ask Copilot to expand it by adding more details, such as "Learn how to use the ink tool to draw, erase, highlight, and change color." You can also ask Copilot to refine it by making it more measurable, such as "Learn how to use the ink tool to draw at least three shapes, erase any mistakes, highlight important points, and change color as needed." Or you can ask Copilot to rephrase it by using different words, such as "Master the ink tool to sketch, correct, emphasize, and customize."
By using Copilot for preparing for training, you can create a clear and structured outline for your session in less time. (This list is similar to the brainstorming list above.)
- Find relevant images and icons to make your whiteboard more visual and engaging.
- Resize, rotate, and arrange your objectives and subtopics on the whiteboard as you like.
- Use the lasso tool to group them into sections or modules.
- Invite other people to join your whiteboard and collaborate with you in real-time.
- You can see their cursors, comments, and edits as they happen.
Ordering Your Ideas in Microsoft Whiteboard with Copilot
Ordering your ideas is a process that involves arranging your ideas in a logical and coherent way to help you organize your thoughts, communicate your message, and persuade your audience. However, ordering your ideas can be difficult and tedious. You need to consider your purpose, audience, and context. You also need to use transitions, connectors, and signposts to link your ideas. That's where Copilot can help you.
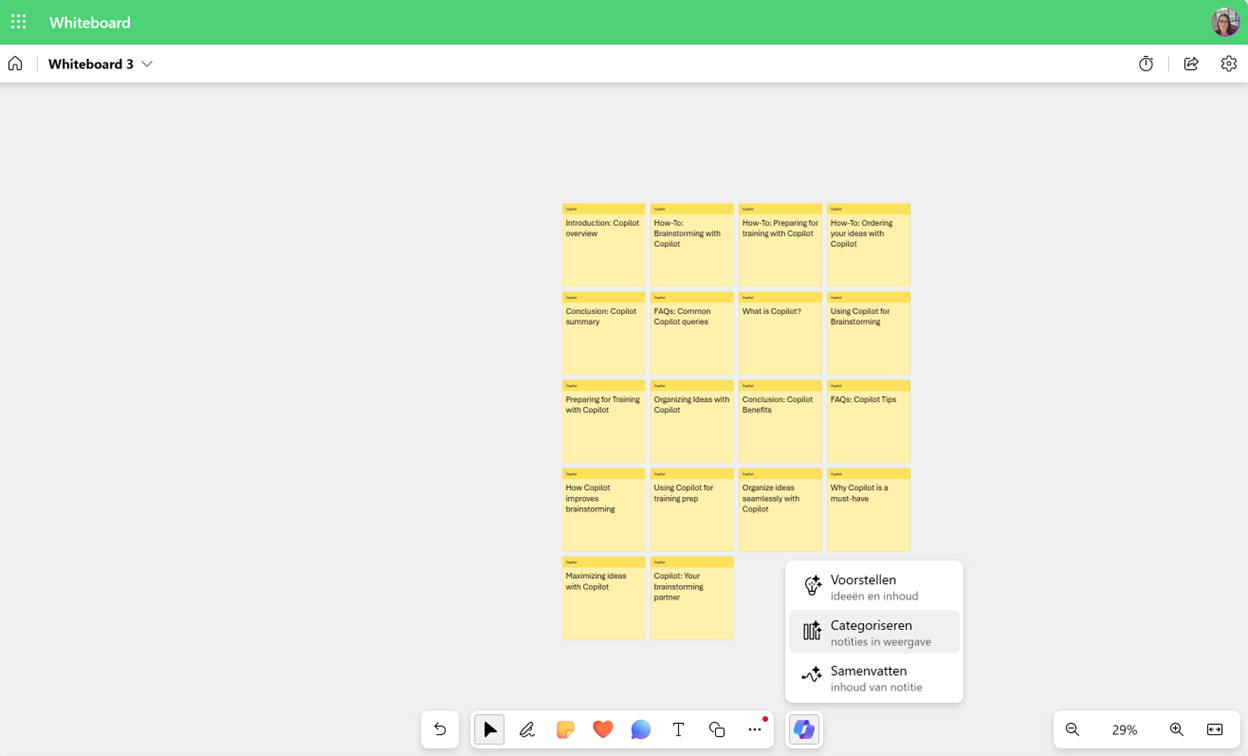
To use Copilot for ordering your ideas, you need to start with a list of ideas. For example, let's say you have a list of ideas for a blog post about how to use Copilot in Microsoft Whiteboard. You can write or type your ideas in Microsoft Whiteboard, such as "introduction, what is Copilot, how to use Copilot for brainstorming, how to use Copilot for preparing for training, how to use Copilot for ordering your ideas, conclusion". Then, you can select your list and click on the Copilot button on the toolbar and choose Categorize. Figure 5 shows the result.
By using Copilot for ordering your ideas, you can create a clear and coherent structure for your document in less time. You can also use Copilot to find relevant transitions, connectors, and signposts to link your ideas and guide your readers. Plus, the same bullet list of features already described above.

Anouck Fierens
Anouck works as a modern workplace consultant by Wortell. Her focus is on SharePoint, Microsoft Viva, and Power Platform. Inside SharePoint, Anouck’s focus is on building an intranet and document management. When working with Power Platform, Anouck specializes in Power Apps, mostly canvas apps and Power Automate flows.
Anouck is PL-100 Certified and is a Microsoft Certified Trainer (MCT).
Anouck has a bachelor in applied computer science and started working in IT in 2011, beginning as a SharePoint developer consultant. Her projects included SharePoint administration and development in SharePoint on-premises environments.