Winget Deployment With PSAppDeployToolkit

Windows Package Manager, commonly known as winget, has emerged as a powerful tool for managing applications on Windows 11 (and Windows 10). It simplifies the process of installing, updating, and removing applications, offering a centralized repository for packages and a consistent command-line interface. In Microsoft Intune, you can deploy all winget apps that were formerly published in the Microsoft Store with just a few clicks. For all other applications, however, you have to create your own Win32 packages.
In enterprise environments, deploying applications can be a complex task. To streamline this process and add flexibility, PowerShell App Deployment Toolkit (PSAppDeployToolkit) is a powerful and commonly used framework. It provides a comprehensive set of well-defined functions for handling common deployment tasks, including installation, uninstallation, and updating applications. PSAppDeployToolkit also offers user interface elements for seamless end-user interactions during the deployment process.
Obtaining Winget IDs
Each winget package has a unique identifier called a package ID. You can use this ID to easily install or manage the application. There are two types of winget IDs:
- Winget apps from the public repository: Here, the ID is something similar to “vendor.application”.
- Winget apps from the Microsoft Store: Here, the ID is a unique string like “”. If you have a package like this and you want to deploy it via Intune, I recommend selecting the app type Microsoft Store app (new) in the Intune admin center. (See Add an app from the Microsoft Store.) This way, you don’t have to create a package yourself.
Search Winget ID With Windows PowerShell
To search for a winget package using PowerShell, follow these steps:
Open PowerShell terminal. (You don’t need to be an admin.) Enter the following command, replacing <application name> with the name of the application you're looking for:
winget search "<application name>"
For instance, to search for the winget package for Notepad++, enter:
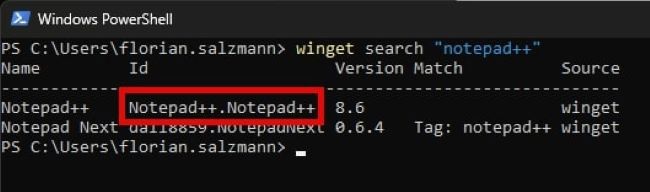
winget search "notepad++"
The output will display a list of matching packages, including their package IDs. For the Notepad++ package, the package ID is Notepad++.Notepad++.
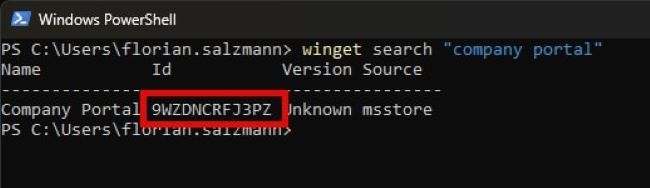
If you are searching for an application that is published in the Microsoft Store, you’ll notice the source as "msstore" instead of "winget" and a special ID. This is the case, for example, for the "company portal":
winget search "company portal"
Obtain Winget IDs Via the Winget Catalog
In addition to using PowerShell, you can obtain winget package IDs by searching the winget catalog. The catalog is a publicly accessible repository of packages that provides detailed information about each package, including its name, publisher, description, package ID, and system requirements.
To search for a winget package in the catalog:
- Open your web browser, and go to the winget catalog website: https://winget.run/
- In the search bar, enter the name of the application you’re looking for. The search results will display a list of matching packages, including their package IDs.
- Once you’ve found the package you’re looking for, note down its package ID.
Benefits of Using the Winget Catalog
Using the catalog to obtain winget package IDs offers several benefits:
- Centralized: The winget catalog provides a centralized repository for finding and managing winget packages.
- Community-driven: The winget catalog is maintained by a community of developers and users, ensuring that it’s up to date with the latest winget packages.
- Secure: The winget catalog only lists packages from trusted sources, minimizing the risk of installing malware or other security vulnerabilities. (For more details, check out the “Changes and Risks of Using Winget” section at the end of this article.)
Overall, the winget catalog is a valuable resource for anyone who wants to manage winget packages on their Windows devices. It provides a convenient way to find, install, and uninstall applications, as well as to access detailed information about each package.
Installing Winget Apps
Winget makes it straightforward to install applications both as a regular user and in system context.
Install Winget Apps as a User
To install an application using winget, follow these steps.
Open a PowerShell terminal. Enter the following command (replacing <package ID> with the ID of the application you want to install):
winget install <package ID>
For example, to install Notepad++ (where we’ve obtained the ID a step earlier), enter:
winget install “Notepad++.Notepad++”
The winget package for Notepad++ will be downloaded and installed, and a shortcut will be created on your desktop for easy access.
If this is the first package you’re installing, you will get prompted to accept the source agreement.
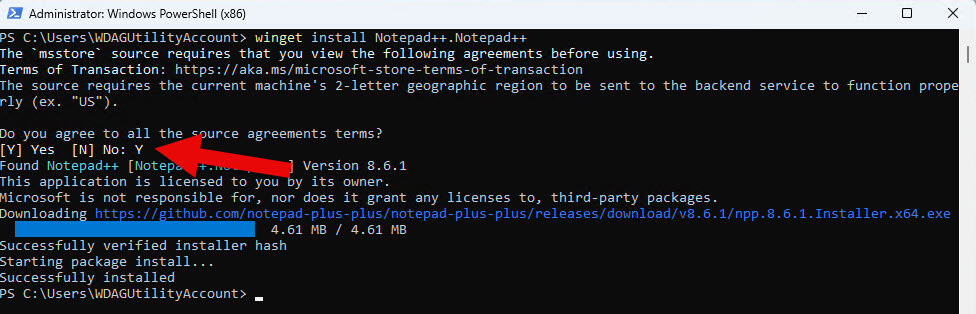
When using Intune or another software deployment solution, you can’t have prompts during an installation. To work around that, you can add the parameter --accept-source-agreements to the winget installation command:
winget install notepad++ --accept-source-agreements
Install Winget Apps in System Context
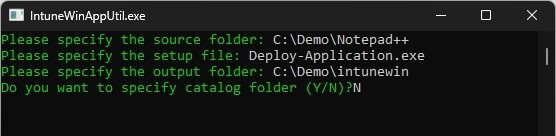
As within the user context, you use PowerShell, but there is a small problem. When entering "winget" as system user (or when deploying via Intune), you get a command-not-found error.
To solve this, resolve the full path of the winget.exe and call it directly instead of the alias.
To do so, use the following PowerShell lines to get the correct path and store it in the variable $winget_exe. This way, you can call it several times during your script without entering the whole path.
$winget_exe = Resolve-Path "C:\Program Files\WindowsApps\Microsoft.DesktopAppInstaller_*_*__8wekyb3d8bbwe\winget.exe"
if ($winget_exe.count -gt 1){
        $winget_exe = $winget_exe[-1].Path
}
if (!$winget_exe){Write-Error "Winget not installed"}
If the winget exe is present on the system, you can call winget as stated in the following code block; otherwise, you will get an error:
& $winget_exe install <package name>
Parameters Required for a Silent Installation
To perform a silent installation using winget, you can use specific parameters to instruct the installer not to display any user interface elements. This allows for automated installation without interrupting the user's workflow.
General Parameters
The --silent flag is the primary parameter for initiating a silent installation. It instructs the installer to suppress all user interface elements, including prompts, progress bars, and dialog boxes.
Additional Parameters
In addition to the --silent flag, you can use other parameters to further customize the installation process and provide specific instructions to the installer, as shown in the following table.
| Parameter | Description | |
| --accept-package-agreements | Accepts the license agreement and avoids the prompt. This agreement belongs to the application package. | |
| --accept-source-agreements | Accepts the source license agreement and avoids the prompt. This agreement belongs to the repository and needs to be accepted once per machine to use winget. | |
| --exact | Uses the exact string in the query, including checking for case-sensitivity. It will not use the default behavior of a substring. | |
| --version | Enables you to specify an exact version to install. If not specified, the highest versioned application will be installed. |
Example of Silent Installation Command
Here's an example of a command that performs a silent installation of Notepad++, which accepts the source and license agreement and disables the progress bar:
winget install "Notepad++.Notepad++" --silent --accept-source-agreements --accept-package-agreements
Deploying Winget Apps with PSAppDeployToolkit
As mentioned, PSAppDeployToolkit streamlines and adds flexibility to common deployment tasks, including installation, uninstallation, and updating applications.
To further enhance customization and flexibility, PSAppDeployToolkit provides a robust wrapper architecture. This wrapper can be tailored to accommodate specific requirements, such as branding, custom user interface elements, and integration with third-party tools.
Download and Customize PSAppDeployToolkit
If you haven’t already have downloaded and customized PSAppDeployToolkit, you can do so at https://github.com/PSAppDeployToolkit/PSAppDeployToolkit/releases/.
In theory, you don’t have to change anything in the template that is provided. It is ready to use. However, I recommend changing at least the Log path to the one that Intune uses. This way, you can collect the logs via the Intune console. For more information, see "Collect diagnostics" for custom logs with Intune | scloud.
Add Your Winget Installation Routine
First, you need your winget id and the installation context (user/system). Most installations are intended to be done in the system context, so I will focus on that in this example. If you need to deploy a package in user context, you won’t need the whole part with the “$winget_exe” parameter.
As an example, I will make a Win32 app for Notepad++.
Open the PowerShell file Deploy-Application.ps1 in your PSAppDeployToolkit (here referred to as PSADT) folder. Define the package details. As you can see in the screenshot, you don’t have to declare every variable.
A bit further below, you’ll find the comment ## <Perform Installation tasks here>
Below that, insert the installation command:
# Resolve winget.exe
$winget_exe = Resolve-Path "C:\Program Files\WindowsApps\Microsoft.DesktopAppInstaller_*_*__8wekyb3d8bbwe\winget.exe"
if ($winget_exe.count -gt 1){
        $winget_exe = $winget_exe[-1].Path
}
if (!$winget_exe){Write-Error "Winget not installed"}
# Installation via winget
& $winget_exe install "Notepad++.Notepad++" --silent --accept-source-agreements --accept-package-agreements
If you go even further, there is the ## <Perform Uninstallation tasks here>
Below that, paste the uninstallation command:
# Resolve winget.exe
$winget_exe = Resolve-Path "C:\Program Files\WindowsApps\Microsoft.DesktopAppInstaller_*_*__8wekyb3d8bbwe\winget.exe"
if ($winget_exe.count -gt 1){
        $winget_exe = $winget_exe[-1].Path
}
if (!$winget_exe){Write-Error "Winget not installed"}
# Installation via WinGet
& $winget_exe uninstall "Notepad++.Notepad++" --silent
Thats it. Your package is now ready to run.
Right? Kind of; that depends on the detection rule you choose. I’ll dive deeper into that in the next section.
Choose a Detection Rule Method
Intune provides a mechanism for creating detection rules to automatically identify the presence of winget packages on managed devices. This enables you to ensure that applications are installed and up to date without requiring manual intervention. There are three approaches.
Approach 1: Identifying Executable (EXE) or MSI Code
The first approach involves identifying the presence of the winget package's executable (EXE) or MSI file. This method is suitable for applications that are distributed through MSI or EXE installers. For that, you have to check for every installation manually where the EXE lies or what the MSI code is. This is why I prefer the two alternatives I show you next.
Approach 2: Using a Script
Another method is using a script to check for the existence of the winget package on the local system.
The script I used in several environments looks like the following:
$wingetID = "Notepad++.Notepad++"
# Resolve winget_exe
$winget_exe = Resolve-Path "C:\Program Files\WindowsApps\Microsoft.DesktopAppInstaller_*_*__8wekyb3d8bbwe\winget.exe"
if ($winget_exe.count -gt 1){
        $winget_exe = $winget_exe[-1].Path
}
if (!$winget_exe){
    Write-Error "Winget not installed"
}else{
   $wingetPrg_Existing = & $winget_exe list --id $wingetID --exact --accept-source-agreements
        if ($wingetPrg_Existing -like "*$wingetID*"){
        Write-Host "Found it!"
    }
}
The only thing you need to change per package is the parameter $wingetID at the beginning.
Approach 3: Set Your Own Custom Registry Keys
If you would rather use the Intune functionalities for detection rather than using a script, you can set your own registry key on the system. This brings the added benefit of customization in your installation routine. For example, if you decide to create an additional shortcut in the future and renew the existing Intune Win32 app with that, the shortcut won’t be added for existing installations. With your own registry key, however, you can just increase the number, and the new package will work like an update.
To add a custom registry key, I use the following script block below ## <Perform Post-Installation tasks here> in the Deploy-Application.ps1:
Set-RegistryKey `
            -Key "HKEY_LOCAL_MACHINE\SOFTWARE\PSADT\Packages\$appName" `
            -Name 'Version' `
            -Value "$appVersion $appRevision" `
            -Type String
In addition, you must remove this key in case of uninstallation. You can do this by adding the following line in the Uninstallation section in your PSADT wrapper:
Remove-RegistryKey -Key "HKEY_LOCAL_MACHINE\SOFTWARE\PSADT\$appName" -Name 'Version'
Note: You can find the correct section by searching for: ##* UNINSTALLATION
Upload Your App to Intune
After you have created a package and have chosen a detection method, you’re ready to upload the application to Intune.
First, create the intunewin file to upload to Intune:
- Download the latest Microsoft Win32 Content Prep Tool.
- Open the downloaded "IntuneWinAppUtil.exe"
- Provide the path to your package.
- Enter the installation file: Deploy-Application.exe
- Enter the path to save the intunewin file.
- For the catalog folder question, choose N (No).
You have now created the Win32 App / "intunewin".
Now you can create the package in Intune.
Open the Intune admin center. Navigate to Apps > Windows. Choose +Add. Under Select app type, select Windows app (Win32).
Now upload the previously created intunewin file and, in the App information section, define the Name, Description, and Publisher. In addition, you can add a Logo, which will be visible in the company portal.
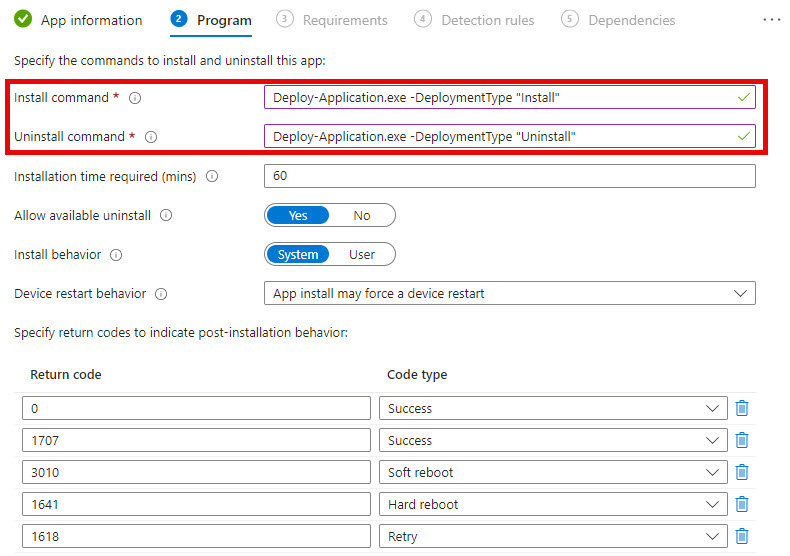
In the Program section, define the commands to install and uninstall, which are:
Deploy-Application.exe -DeploymentType "Install"
Deploy-Application.exe -DeploymentType “Uninstall”
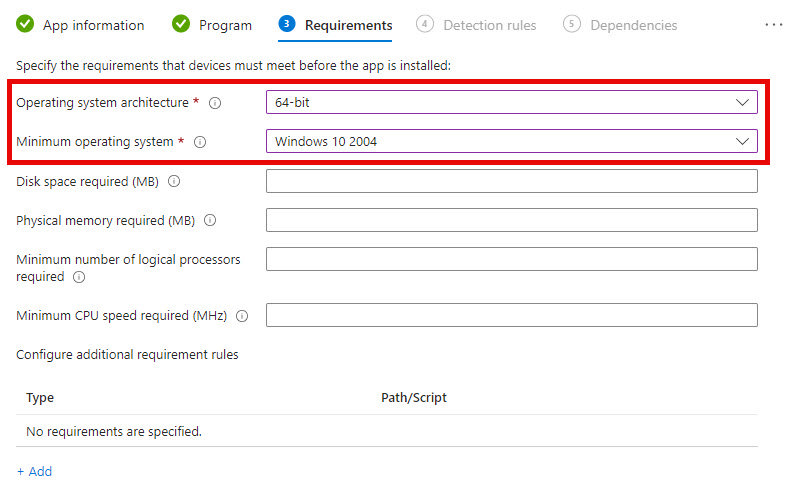
In the Requirements section, I recommend using the following for the required fields:
- Operating system architecture: 64-bit
- Minimum operating system: Windows 10 2004
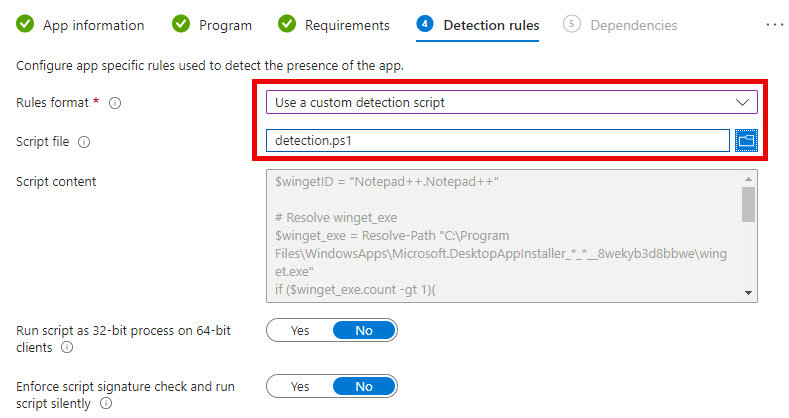
Now you come to the Detection rules section. Here the configuration depends on your choice:
- EXE/MSI
- PowerShell script
- Custom registry
EXE/MSI
Choose Manually configure detection rules and add the rule you found for your installation.

PowerShell Script
Upload the script provided earlier with your winget ID.
Custom Registry
Choose Manually configure detection rules and Registry and add the key as follows:
- Key path: HKEY_LOCAL_MACHINE\SOFTWARE\PSADT\Packages\Notepad++
- Value name: Version
- Detection method: String comparison
- Operator: Equals
- Value: winget auto 01

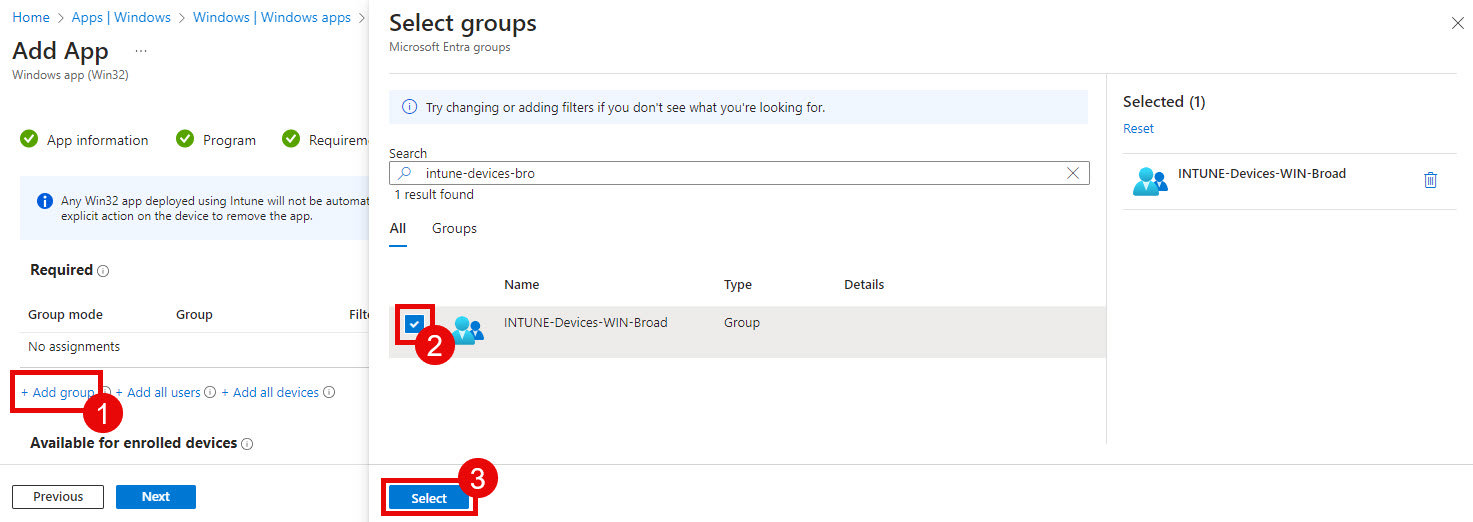
You can skip the next steps. In Assignments, add your app to the desired groups.
That’s it. You now have deployed a winget application with PSAppDeployToolkit as a wrapper through Intune.
Changes and Risks of Using Winget
The introduction of winget brings about several changes to the way applications are managed on Windows. For instance, it eliminates the need for scouring the web for individual installation files or navigating through the Microsoft Store.
However, there are certain risks associated with using winget. Since it's a relatively new tool, the package ecosystem is still evolving. It's crucial to exercise caution when installing applications from untrusted sources, as they may contain malware or other security vulnerabilities. Check every package before deploying because most of them don’t come directly from the vendor.
Conclusion
Winget has emerged as a powerful tool for managing applications on Windows devices. It simplifies the process of installing, updating, and removing applications, offering a centralized repository for packages and a consistent command-line interface.
In this article, I explored the benefits of using winget and PSAppDeployToolkit for deploying winget applications in Intune. I covered key topics such as obtaining winget IDs, installing winget apps, using PSAppDeployToolkit for silent installations, creating detection rules, and uploading applications to Intune.
I also highlighted the potential risks associated with using winget, emphasizing the importance of verifying the authenticity of packages from untrusted sources.

Florian Salzmann
Florian Salzmann is a passionate Microsoft MVP and consultant based in Switzerland. His primary expertise lies in Microsoft Cloud Platforms, with a particular focus on endpoint management (Intune). With a background of several years in the IT industry since 2012, Florian revels in the art of Windows PowerShell scripting and leveraging the cloud to its full potential.