Use Azure DevOps to Create an End-to-End Cloud Deployment Pipeline

Learning how to use continuous integration/continuous delivery (CI/CD) pipelines is important for a systems administrator for several reasons:
- Automating deployment: CI/CD pipelines automate the deployment process, making it faster and less prone to errors. This means that a systems administrator can spend less time manually deploying updates and patches and more time on other important tasks.
- Consistency: With a CI/CD pipeline, deployments are done in a consistent manner. This reduces the likelihood of inconsistencies that can cause problems down the line. Consistency in the deployment process also means that other team members can easily understand the process and troubleshoot any issues that arise.
- Faster feedback: CI/CD pipelines provide faster feedback on changes made to code or infrastructure. This helps a systems administrator identify issues early and address them before they become bigger problems.
- Better collaboration: CI/CD pipelines encourage collaboration between development and operations teams. By using a shared pipeline, teams can work together to deliver changes more quickly and with fewer errors.
- Scalability: As systems grow, it becomes increasingly important to automate processes like deployment. CI/CD pipelines can be scaled up as needed to handle larger workloads, making it easier for a systems administrator to manage the infrastructure.
In this article, we’ll deploy a pre-created CI/CD pipeline into Azure DevOps so you can see how the process works from end to end. Before we go any further, here are the prerequisites:
- Azure DevOps organization: You can use the free tier for this exercise.
- Microsoft Azure subscription: You can use the free account if you haven’t already redeemed this offer.
- Azure Developer CLI: This is the command-line interface (CLI) we’ll use to create our CI/CD environment for us automatically.
- Node.js with npm: The sample ToDo app we use in this tutorial is a Node application, so we need to have the build tools locally on our workstation.
When we work with public cloud services, we need to keep cost top of mind. Thus, I have the following two suggestions for you. Once you’re finished testing, don’t forget to:
- Delete all the deployed Azure infrastructure
- Delete the personal access token (PAT) you created for the project
Alrighty then! I think we’re ready. Let’s proceed.
About CI/CD and the Sample Application
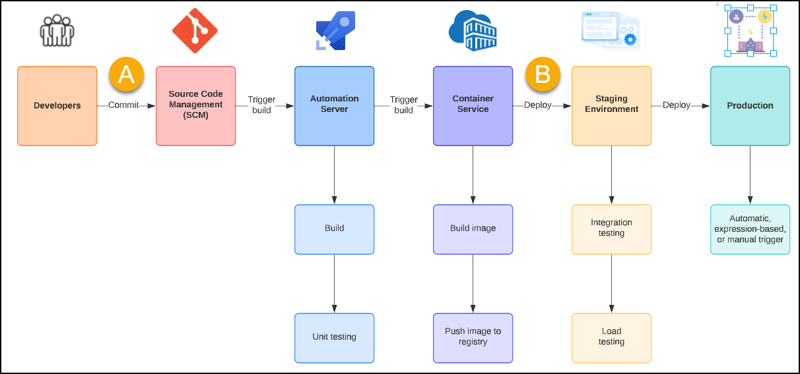
Take a look at the following conceptual diagram which shows a generic continuous integration/continuous delivery (CI/CD) pipeline:
Essentially, a CI/CD pipeline is nothing more than a series of scripts that perform tasks such as:
- Installing dependencies
- Compiling the application
- Running unit and integration tests
- Performing security scanning
- Testing against best coding practices
- Deploying infrastructure
- Publishing code to the deployed infrastructure
I want to draw your attention to the two annotations in the aforementioned diagram (Figure 1) because they are particularly crucial to understand:
- Your CI pipeline is normally automatically triggered by a code commit. The developer submits their code change via a pull request (PR) process. The PR normally involves both automatic and manual approval gates to ensure the new or changed code won’t break anything. When the commit is integrated into the target branch, the CI pipeline starts.
- Your CD pipeline is normally broken into phases like Dev, QA, and Release. Normally the most recent build to emerge from your CI pipeline is what automatically triggers the CD pipeline. Again, you have automated and manual gates before and/or after each phase to ensure code and application quality and stability.
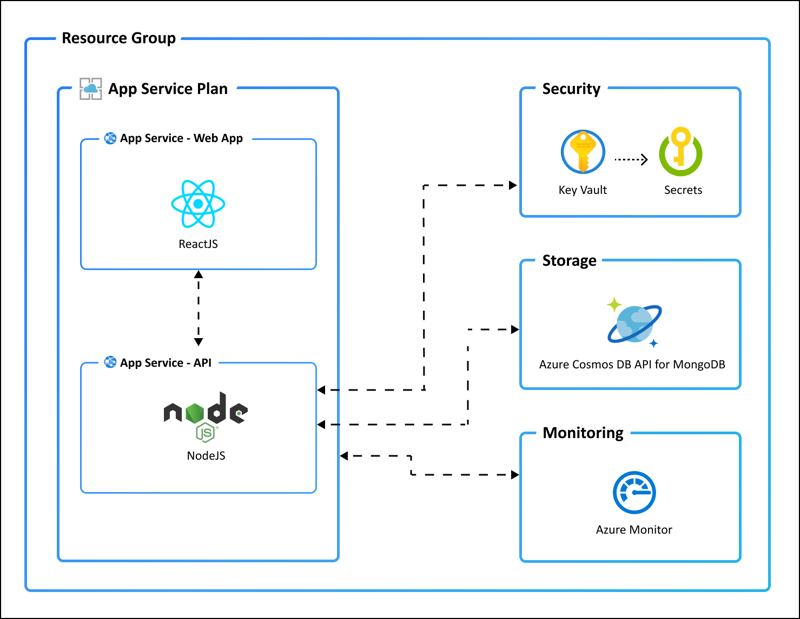
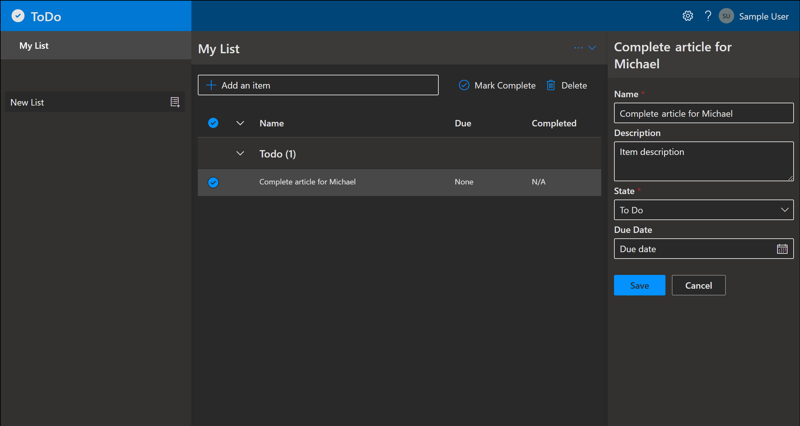
As I mentioned previously, we’ll use the Azure Developer CLI to build an Azure DevOps CI/CD process that deploys a Node-based ToDo app that runs on Azure. Here’s a conceptual diagram, borrowed from the Microsoft docs:
Building Out the Environment
First, you need to create a personal access token (PAT) to give the Azure Developer CLI permission to create a new Azure DevOps project in your organization. To keep this lesson concise, I encourage you to use the many Microsoft Learn links I peppered throughout to get the step-by-step procedures if you need them. Because you’ll delete the PAT after testing, you can grant the PAT full access to your Azure DevOps organization.
Second, open an elevated PowerShell console and run the following Azure Developer CLI command to kick off the process:
azd pipeline config –provider AzDo
You’ll be prompted for the following information:
- Azure DevOps PAT: Paste in the plaintext value
- Azure DevOps organization name: Just the friendly name here, not your full organization URL
- Create a new Azure DevOps project
- Give the project a name
And that’s it! The Azure Developer CLI is essentially an automation toolkit to accelerate different types of Azure cloud development tasks. And just like that, we have a new:
- Azure DevOps project
- Application code base
- CI/CD pipelines
Inspecting the CI/CD Pipeline Environment
Now open a browser and open your new project in the Azure DevOps web portal. Navigate to Repos > Files and verify the application codebase. Another great feature of the Azure Developer CLI is the application, and all its artifacts are pre-integrated with Microsoft proven security practices.
NOTE: You may want to disable branch protection in this project if you don’t want to go through the pull request process in your testing.
This project’s codebase uses a technique called GitOps, in which the Git repository contains not only the application’s source code and testing modules, but also:
- Infrastructure as code (IaC): Specifically, Bicep modules to automate the deployment of the underlying Azure architecture.
- Pipeline as code (PaC): The YAML pipeline definition is itself version-controlled in the same codebase as the IaC and app source code for great convenience.
Next, navigate to Pipelines > Pipelines and edit the Azure Dev Deploy pipeline. Please overwrite the YAML in your copy of the pipeline with what I give you here:
trigger:

- main

- master

pool:

vmImage: ubuntu-latest

container: mcr.microsoft.com/azure-dev-cli-apps:latest

variables:

AZURE_SUBSCRIPTION_ID: fc8d795a-57cf-4416-acb5-c4de5461a4bc

AZURE_ENV_NAME: 4sysops

AZURE_LOCATION: eastus

steps:

- pwsh: |

azd config set auth.useAzCliAuth "true"

displayName: Configure AZD to Use AZ CLI Authentication.

- task: AzureCLI@2

displayName: Azure Dev Provision

inputs:

azureSubscription: azconnection

scriptType: bash

scriptLocation: inlineScript

inlineScript: |

azd provision --no-prompt

env:

AZURE_SUBSCRIPTION_ID: $(AZURE_SUBSCRIPTION_ID)

AZURE_ENV_NAME: $(AZURE_ENV_NAME)

AZURE_LOCATION: $(AZURE_LOCATION)


- task: AzureCLI@2

displayName: Azure Dev Deploy

inputs:

azureSubscription: azconnection

scriptType: bash

scriptLocation: inlineScript

inlineScript: |

azd deploy --no-prompt

env:

AZURE_SUBSCRIPTION_ID: $(AZURE_SUBSCRIPTION_ID)

AZURE_ENV_NAME: $(AZURE_ENV_NAME)

AZURE_LOCATION: $(AZURE_LOCATION)NOTE: In contrast to JSON, which ignores white space, YAML is extremely picky about white space. Therefore, ensure you use consistent spacing in your pipeline data.
Although Azure DevOps does offer a graphical pipeline editor, I strongly suggest you ignore it in favor of YAML. As we’ve just seen, it’s greatly convenient to track all pipeline changes in source code control.
Let me briefly explain each component of this very simple CI/CD pipeline:
- trigger: Any code commit, to either the main or master branches, will run the pipeline automatically.
- pool: Use an Azure-hosted build server pool running Ubuntu Linux.
- container: Ensure the build server container has the Azure CLI dev apps environment preinstalled.
- variables: Key-value pairs we can reference elsewhere in the pipeline definition.
- steps: The smallest building block of a pipeline.
- tasks: Specific scripts that are invoked on the build servers to accomplish specific goals.
Ours is an example of a single-phase pipeline that does both CI/CD as one continuous sequence. More realistic to most businesses nowadays is the multi-phase pipeline that separates the CI and CD pipelines. You can learn more about Azure DevOps multi-stage YAML pipelines, as usual, at Microsoft Learn. Use the stage keyword to break a single Azure DevOps YAML pipeline into stages.
Run the Pipeline and Verify Application Deployment
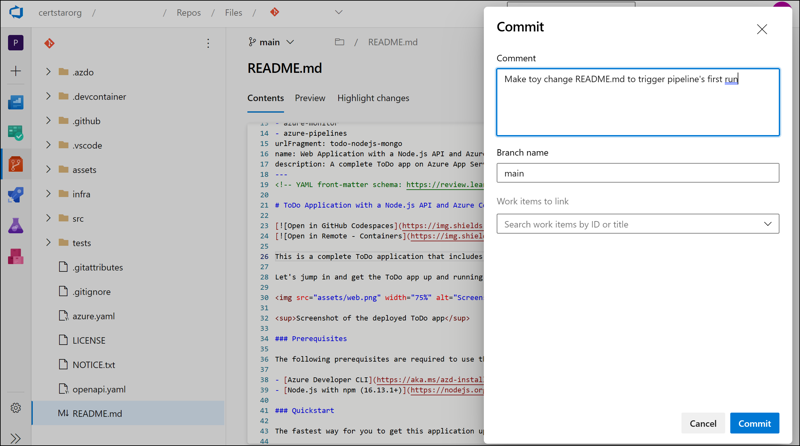
Trigger your pipeline to run by committing a change to your codebase. You can do so directly in the Azure DevOps portal by opening a file in-browser from Repos > Files. If you turned off branch protection, your commit should happen, and the pipeline will begin.
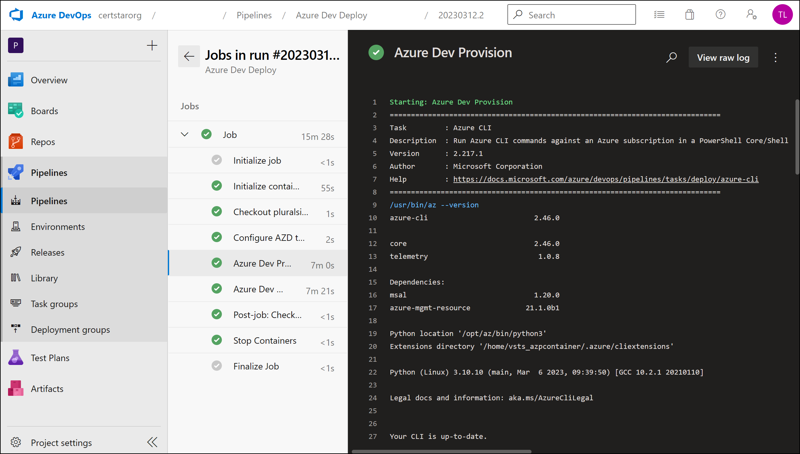
Follow your pipeline’s progress by selecting it from Pipelines > Pipelines. Recall that end-to-end traceability is a key component of DevOps.
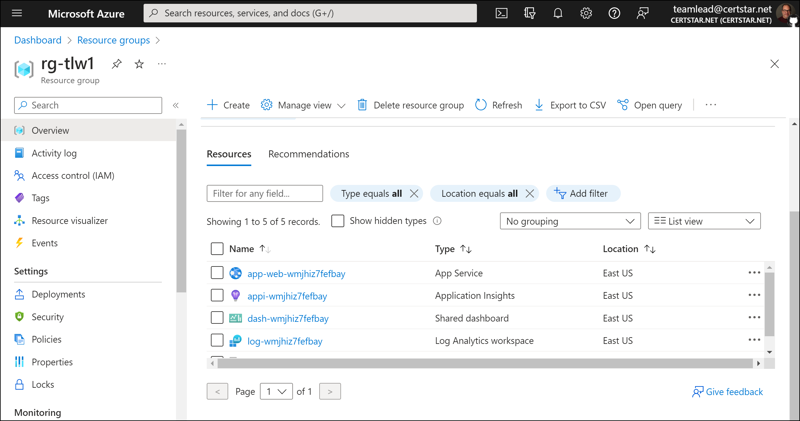
Lastly, visit the Azure portal and make sure the underlying infrastructure was successfully deployed. Note that we could have modified the Bicep templates in the repo to change the name of these resources. If you didn’t do so, then the resources have the default names given to them by the Azure Developer CLI.

This solution runs as an Azure App Service, so we can click Browse on the App Service’s Overview blade to preview the app.
Wrap-up
My goal for you is you now have a clearer understanding how CI/CD pipelines work in Azure DevOps. I also hope you are inspired to learn more about them. Even though you may not be an application developer, other job roles, particularly infrastructure and security engineers, most definitely have a place at the table in terms of contributing to a shared Git repository and associated automation pipelines.
Please note also you can apply everything you’ve learned here to other CI/CD platforms like GitHub and GitLab. Please let me know what you think in the comments – thanks for reading!

Tim Warner
Tim Warner is a senior content developer with Microsoft, specializing in Azure Governance. A former Microsoft MVP, in his spare time Tim teaches thousands of people worldwide how to get certified and build meaningful careers using Microsoft products. Reach Tim at his website, TechTrainerTim.com.