Process Mining: How to Record and Edit Task Mining Features in Power Automate

Process mining merges process analysis with data-centric techniques. It uses events from an organization’s systems and based on that, process mining produces meaningful information about the process. You can find details in my previous article, Overview of Power Automate Process Mining.
Tasks mining is a technology that records users’ tasks (e.g., sending an e-mail or modifying a record in an ERP system) and generates logs based on those data. The information is used by the process mining module to understand how processes work, find bottlenecks, and optimize them.
But why is that so important?
In reality, many processes are not covered by IT systems – they exist as procedures or guides. For example:
- I need a few large monitors for an upcoming conference.
- I sent an e-mail to my manager with suggested models.
- My manager replied “I agree.”
- I have forwarded this e-mail to IT.
- IT department have bought the monitors so I can use them during the upcoming conference.
In this example, I only use e-mail to buy something and use it in my job. The only system that stores information about whether my manager agreed or not is an e-mail service. No one is able to track it or improve such a process. This is a very common scenario even in large companies.
Even if you have dedicated processes and you use IT systems to track them, people tend to create shortcuts and use them. For example, instead of going through the system and an approval process, employees might do ask for approval via chat and paste additional information into the approval process. It’s faster and more convenient, but companies lose the ability to track what’s going on and to improve existing processes/systems. You can’t fix a broken system without feedback.
Task mining tools help you gather information about how employees work, and it then uses the information to build better processes and improve existing ones.
Steps You Take to Start Task Mining for a Process
Before you start recording and analyzing your data you must create a process and install all required modules.
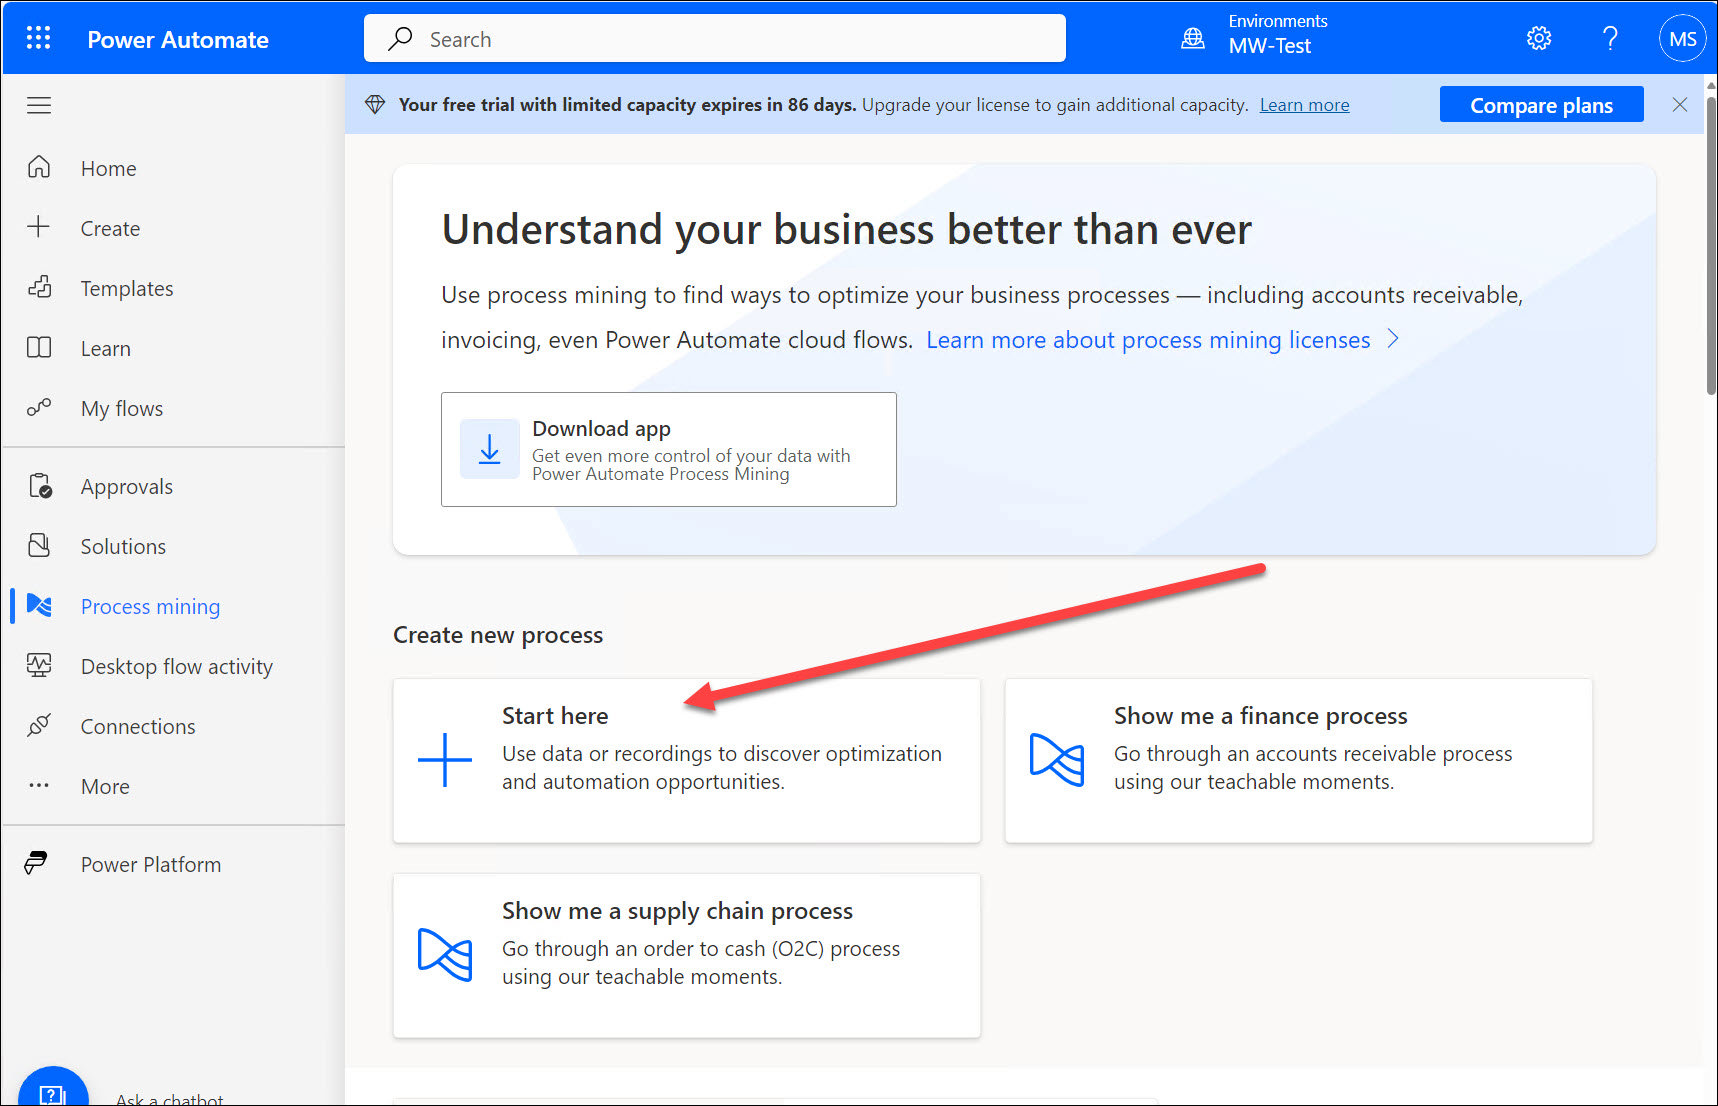
1. Navigate to the Power Automate portal https://make.powerautomate.com/, select Process mining in the left-hand pane, and then click Start here in the main pane, as shown in Figure 1.
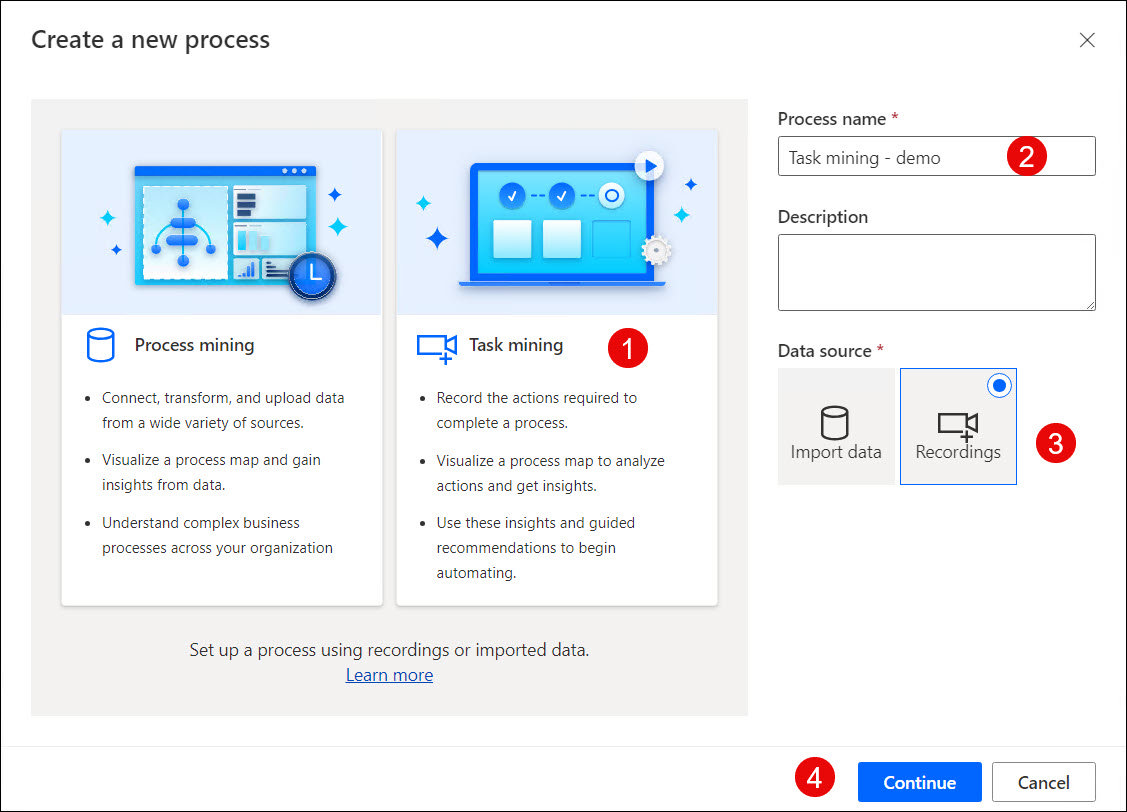
2. On the first step where you create a new process, shown in Figure 2, select Task mining (1), enter a name for your process (2), and select Recordings (3). To confirm, select the Continue button (4). The system will create a new process ready to collect data from a users’ actions.
3. On the next step (Figure 3), select Add recording to start working with recordings. There are three options:
- Get the app – this option downloads the Power Automate Desktop applications. It’s not only an app for Robotic Process Automation (RPA) processes but it’s also an agent which records a user’s actions and sends them to the Power Automate Task mining.
- Open again – click this if you have the recorder in Power Automate application installed and you want to open it to start recording.
- View recording – redirects you to the page with all recordings associated with the selected process.

4. If you don’t have the app, choose the Get the app option to download it. Next, select all required options (Figure 4) and choose Install. Check the app page here for information about installation details and requirements: https://learn.microsoft.com/en-us/power-automate/desktop-flows/install. When you install the app, you are ready to record actions and then analyze them.

Record Actions in Your Process and Prepare the Data You Recorded
To analyze data, you need to record users’ actions and then prepare recorded actions (remove unimportant actions, group them, hide personal information, etc.) in the task mining module. You first want to record actions that need to be analyzed (you don’t need to record everything that employees do – preparing such data would be a waste of time and you won’t get valuable outcomes).
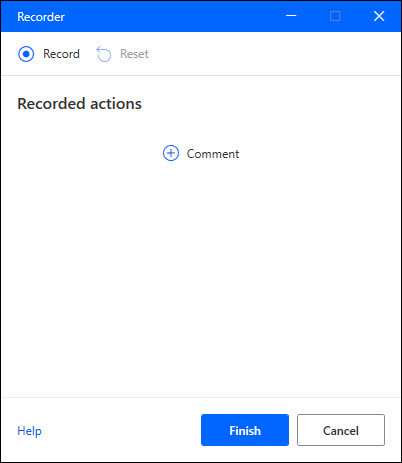
1. Open the recording app and then select the Record button (Figure 5). The app will start recording everything that is selected on the screen. Every single action will be saved and uploaded to the task mining process.

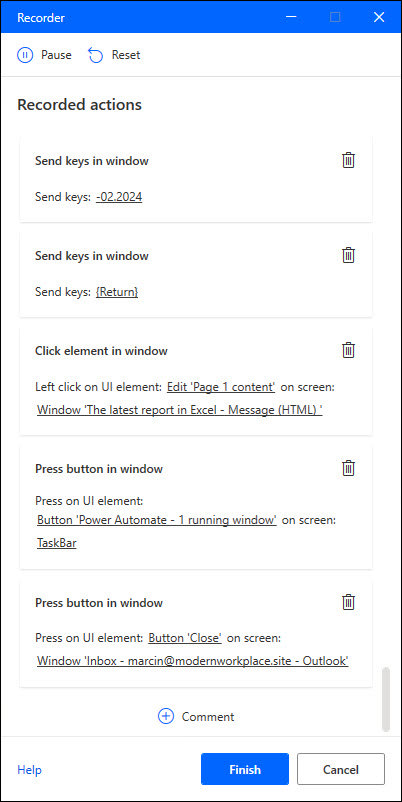
2. When you finish your task, click the Finish button (Figure 6) to close the recording and upload the data. You can also pause the recording process (also Figure 6) at any time (to do some other tasks that are not needed in the analyzing process).
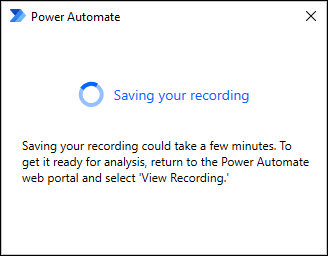
3. The uploading process could take a few minutes (it depends on the number of actions recorded, see Figure 7).
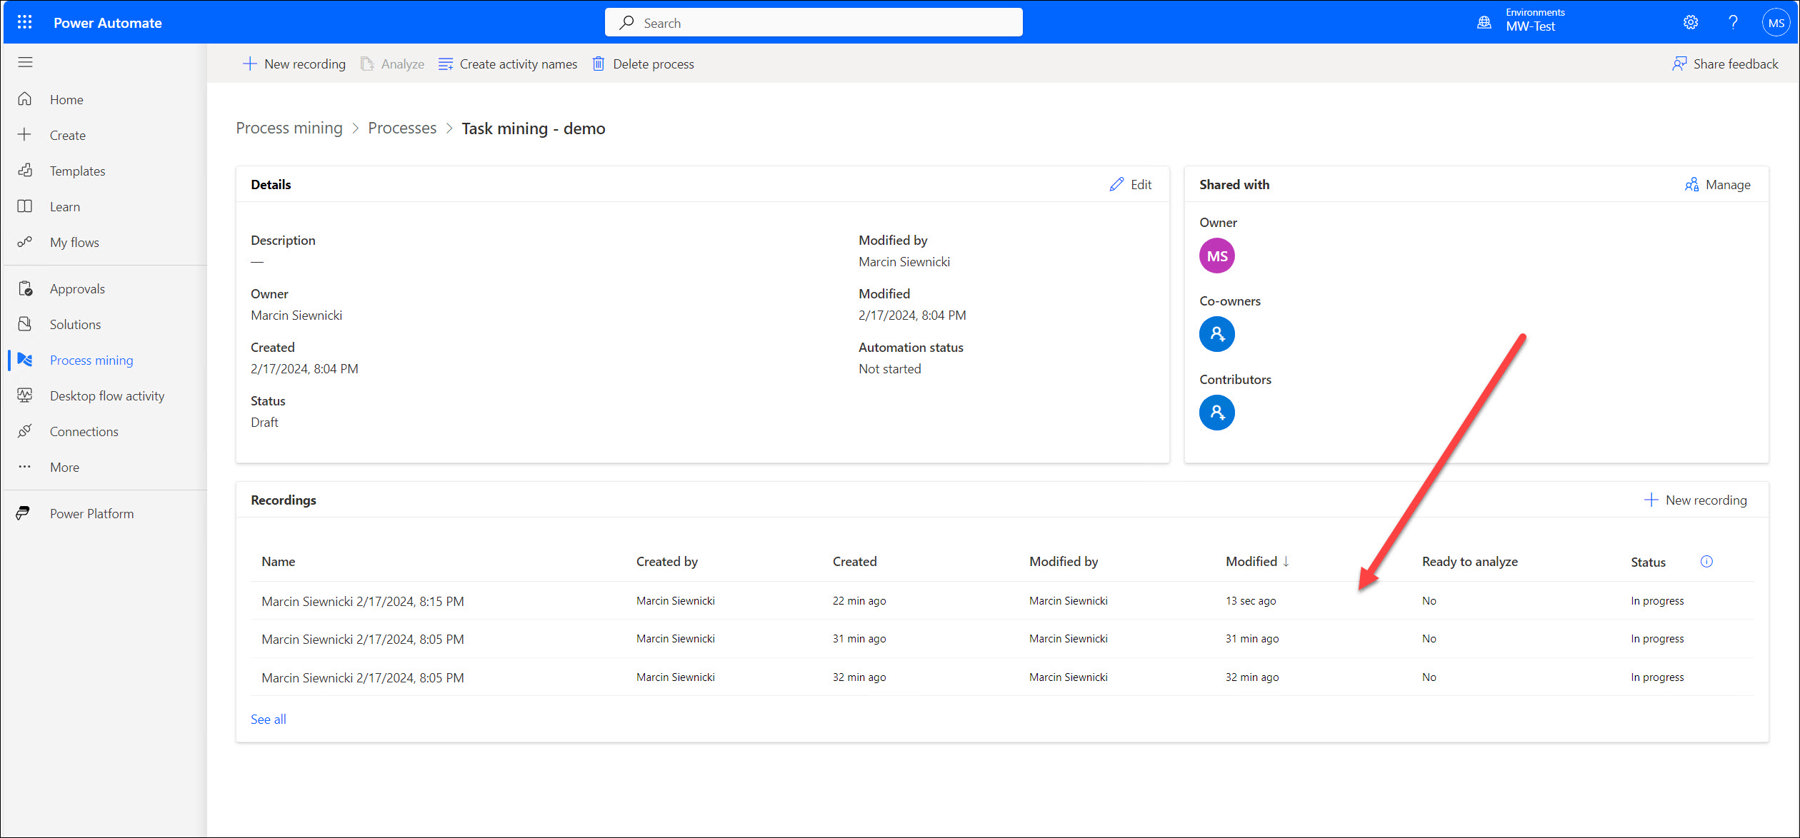
4. To check the recorded data, navigate to your process in the Process mining section (Figure 8) and then select the latest recording. You can see the status in the last column.
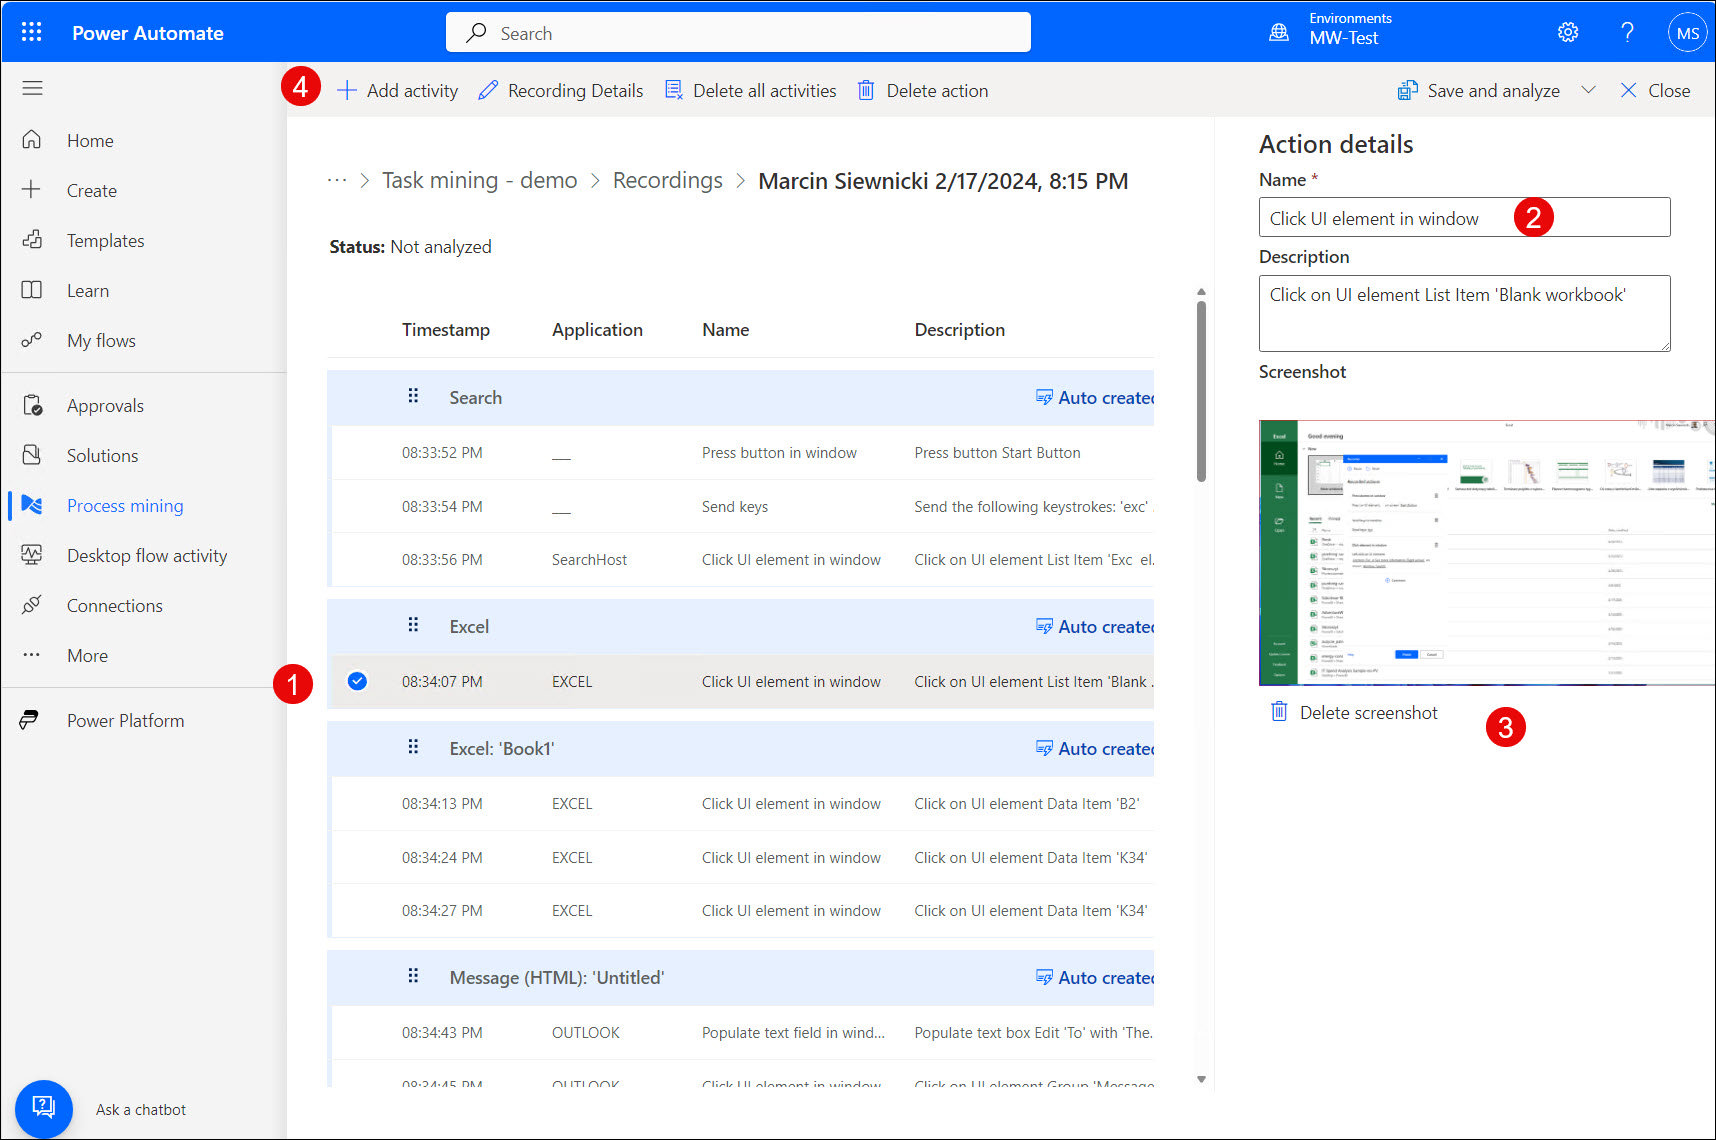
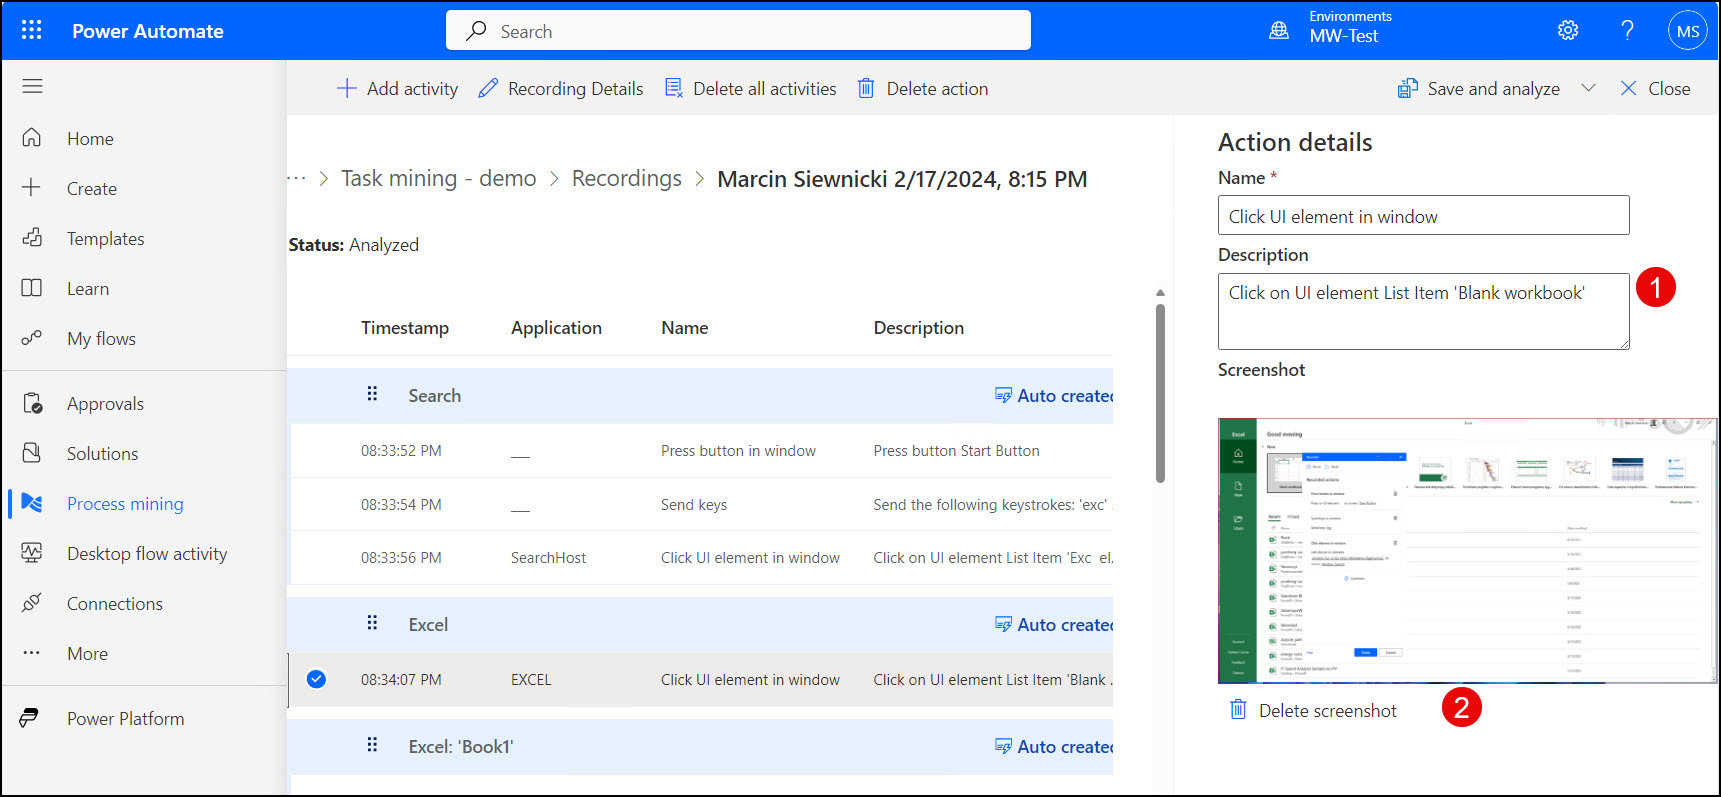
5. Figure 9 shows all the actions recorded during the selected session on a list. You can find here details about the user’s actions, information about applications used, and even screenshots from a user’s desktop. The available actions include:
- Select an action (1) and view the details.
- Rename the action (2) – actions are named by the application and those names are generic (e.g., Click the UI element). To make the names of these actions more informative and easier to analyze, you should change the most important names.
- Delete screenshot (3) – if a screenshot contains sensitive information you should delete it and do not analyze it.
- Add activity (4) – you can also add a missing activity or an action that should be mentioned and analyzed during the process (e.g., gathering information during a phone call).
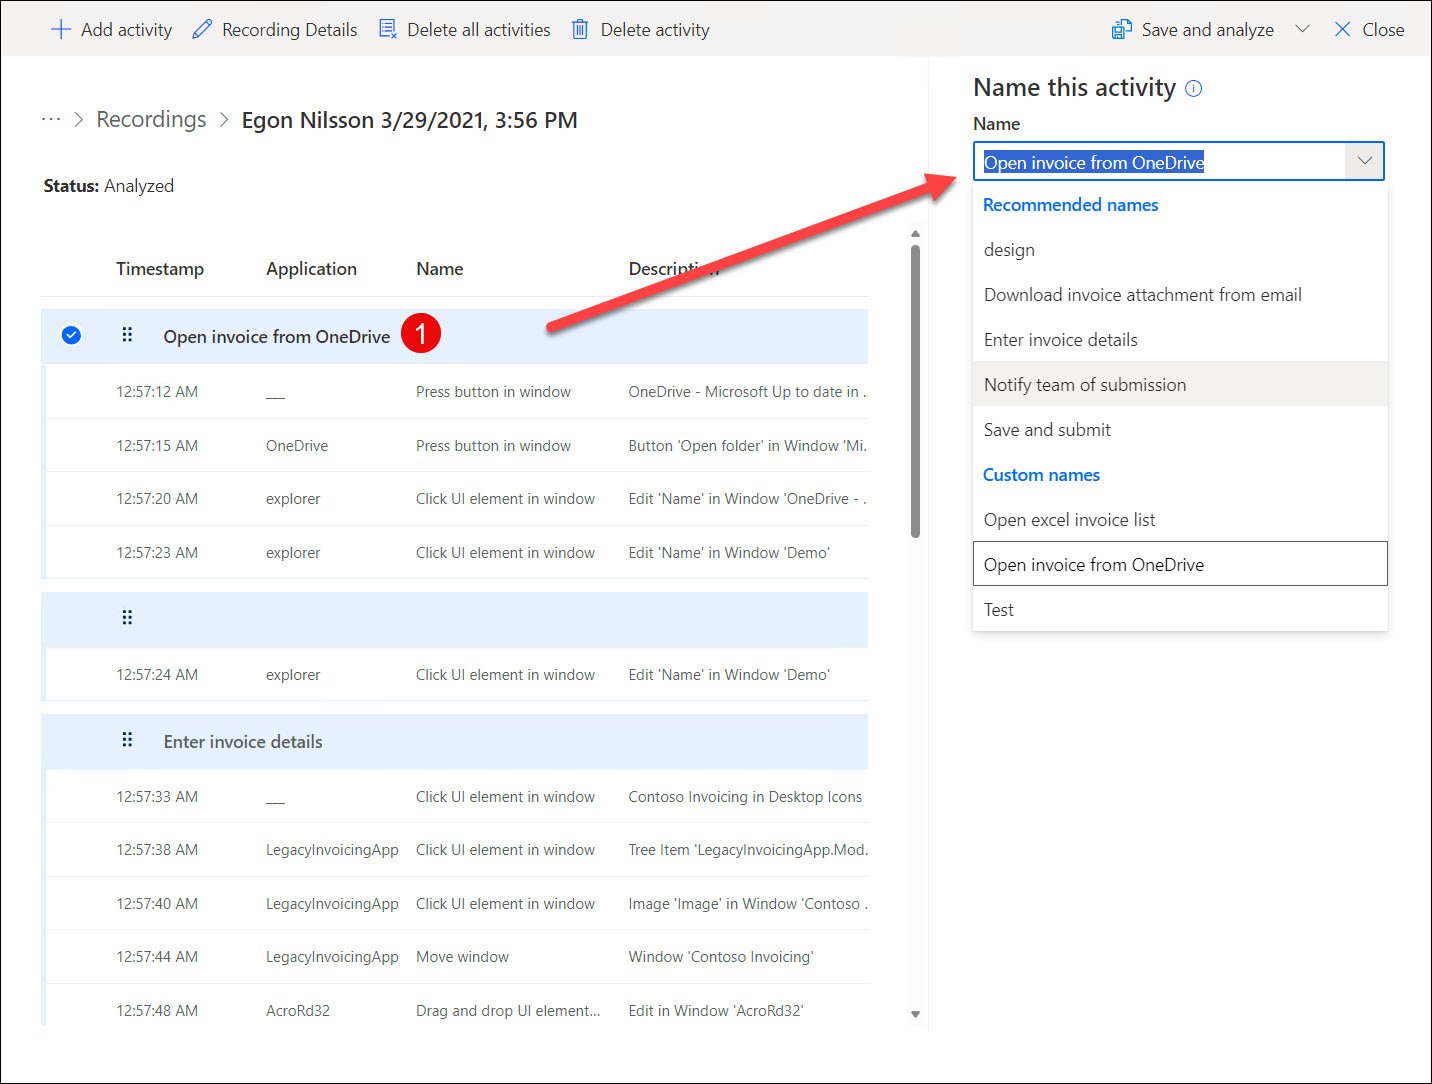
6. You can also modify activity names (they are also generated by the app). To do that select the category (1) as shown in Figure 10 and enter a more meaningful name that matches the actions inside.
7. The last step is to run the analyzing process. Go to the process page and select the Analyze button (Figure 11). It will take some time (the processing time depends on the number of recordings and their complexity).

Analyze the Process You Recorded in Power Automate
When process mining finishes analyzing your data select Analytics on the process page. You will get a 2-page report. On the first page (Figure 12), you’ll see basic details such as a task diagram, statistics, and variants charts.

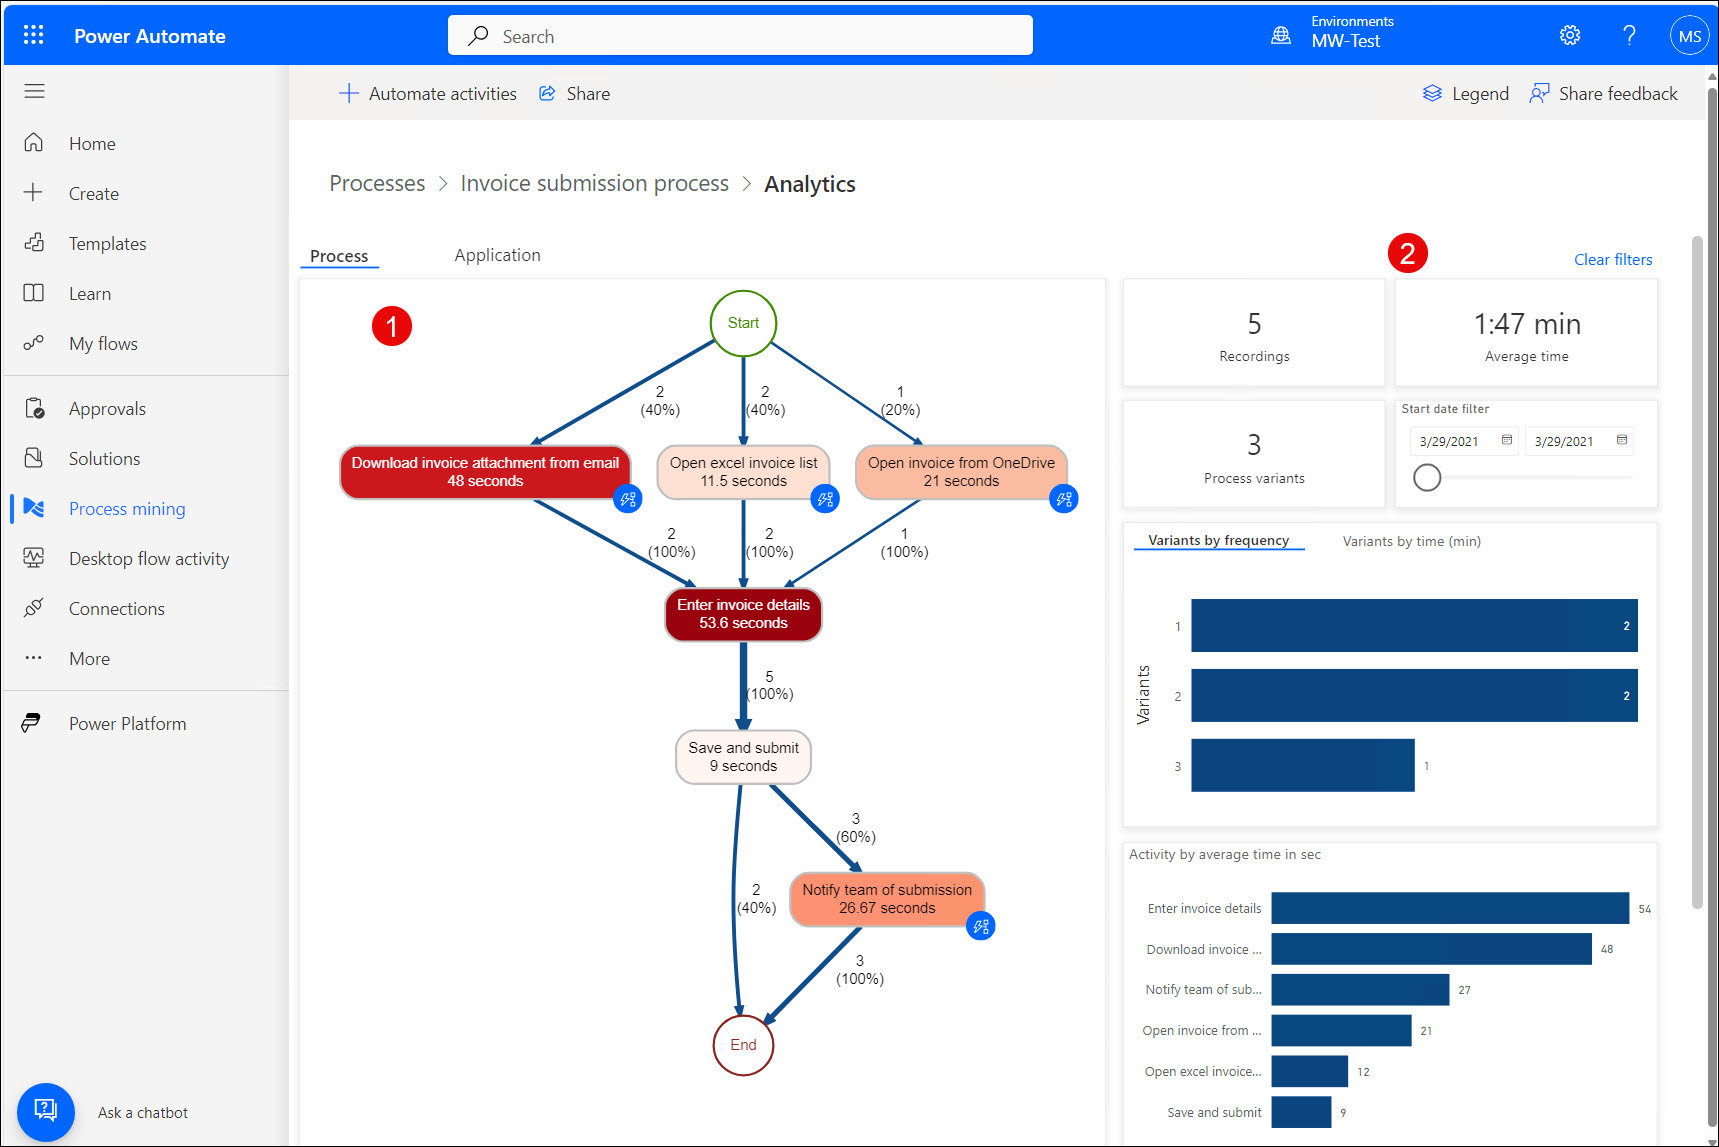
The Application page (Figure 13) of the report displays more data (presented as a dashboard) about the process you recorded. You can find here details about applications used by users, how much time they spend on each application, and statistical info about apps.
Those two screens give you info on how users interact with applications and identify potential bottlenecks and areas for improvement.
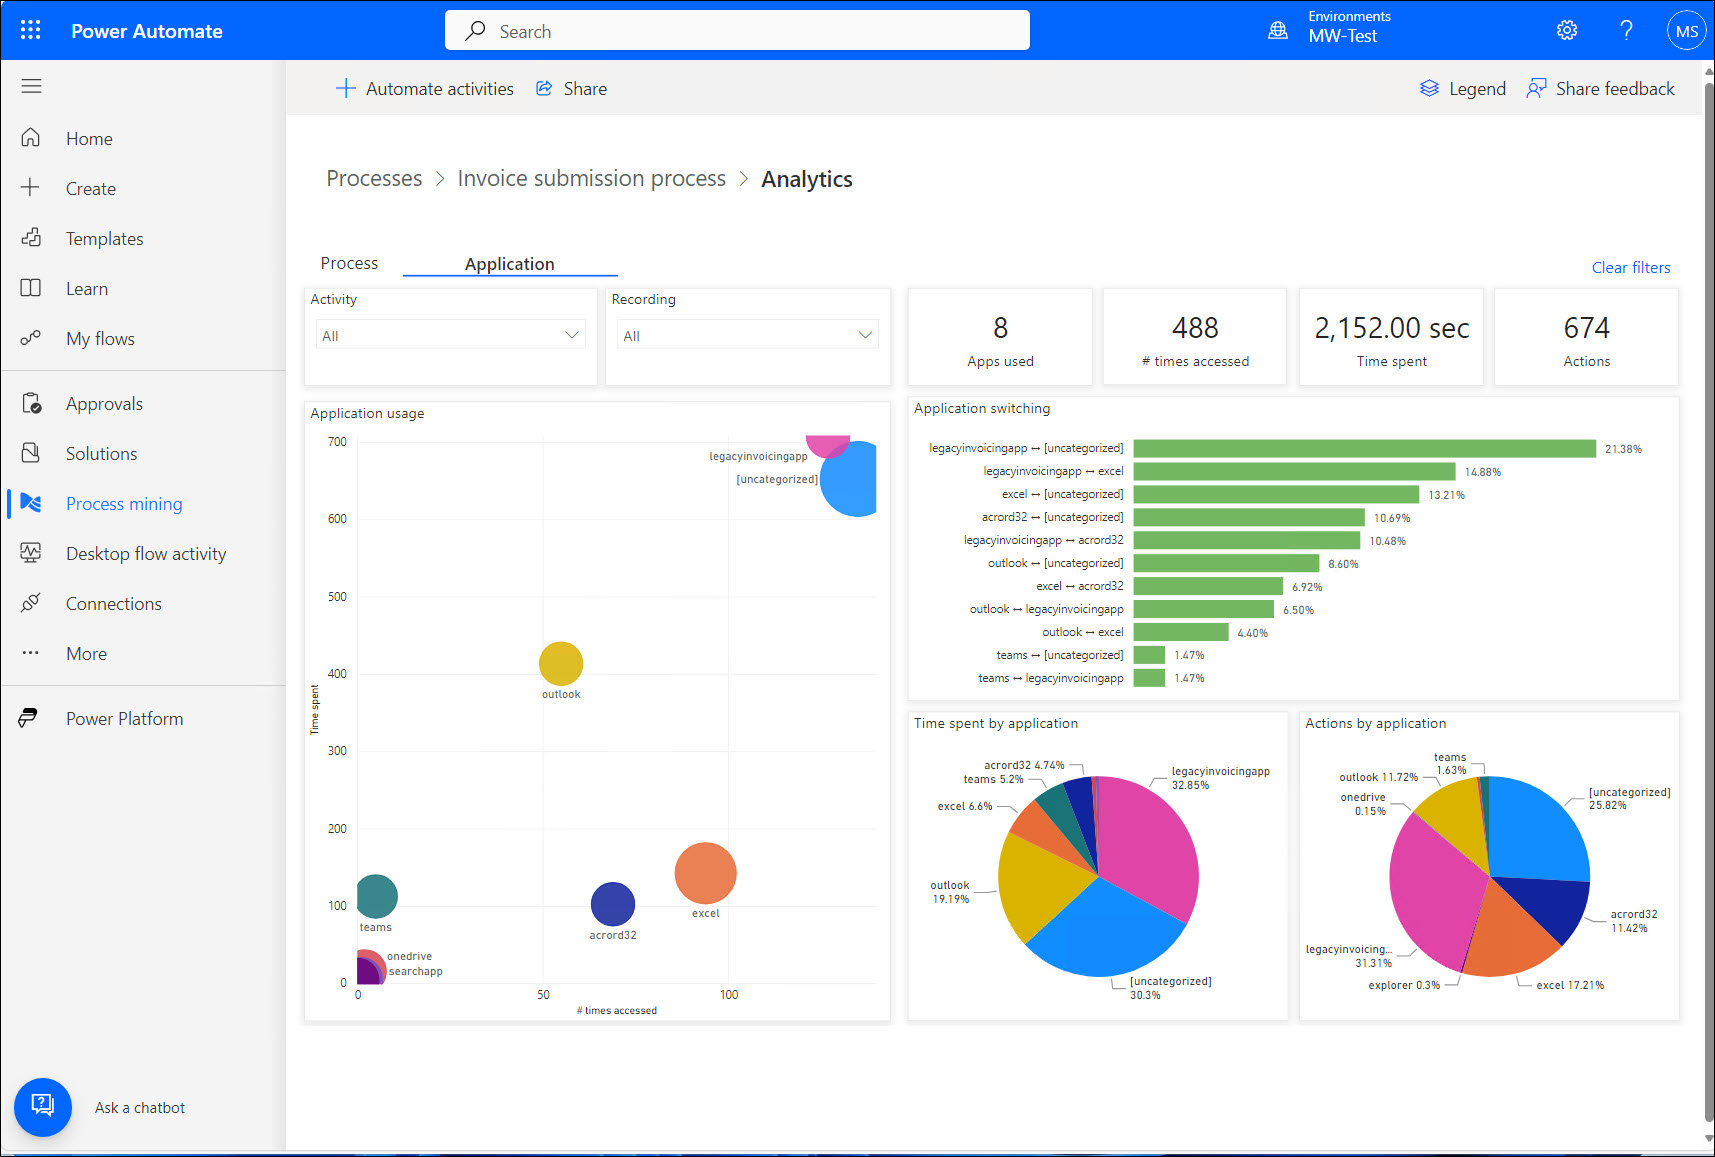
Security and Privacy of Actions You Recorded
The task mining app records users’ actions – this means that all information from their desktops is recorded, saved, and uploaded to the process mining portal in Power Automate. During the recording review, you can modify the description of the user’s tasks and remove any sensitive information (1). You can also delete a screenshot recorded by the app (Figure 14).
The whole process requires manual interactions, but it is critical if you want to keep any sensitive or private information secure.
Summary
The task mining module fills the gap in business process data. While logs from IT systems give you well-structured insights into how users interact with designed processes and workflows, the task mining reports give you info about how users work outside of your systems or applications.
Task mining requires more work in gathering data and data preparation stages. You must record all information from selected users and make sure that they gather what is required. The easiest method is to record everything, but you will spend a lot of time cleaning such information. The data preparation stage requires a lot of effort to make raw data meaningful, but it is a critical step, otherwise reports will contain useless statistics that could potentially blur important information.
Reports from your users’ tasks could be valuable when you want to analyze existing processes and improve them or build a new one. If you analyze an existing process using a process mining module, you should use the task mining module as an additional component to map anything that is not covered by logs from existing systems.

Marcin Siewnicki
Marcin Siewnicki is a Microsoft 365 consultant and architect. His IT adventure started in 2005. Since then he’s been creating and implementing business applications based on SharePoint and Microsoft 365 platforms. He is a big fan of tasks and process automation (Power Automate) and Modern Workplace platforms (Microsoft Teams).
Privately Marcin is a husband and father of two sons. He is a fan of science fiction and cyberpunk and is a futurist. Marcin is co-organizer of the CollabDays Poland conference and speaker at Microsoft’s community events.