Power Platform Connectors Publishing, Certification, and Deployment

This eighth installment of the “Power Platform Custom Connectors” A to Z series focuses on the activities related to making a connector publicly available via the Power Platform Connector Gallery. This process involves the creation of a publication package, certification of the package contents, and deployment of the package throughout the Power Platform global regions. Connector creators should familiarize themselves with all the steps involved with publication before beginning the process. There are some crucial factors to consider before deciding that publishing a custom connector to the official connector gallery at https://learn.microsoft.com/en-us/connectors/connector-reference/ is the best option for making it available to a wider audience.
For reference, the series outline is as follows:
- Introduction and Overview
- Connector Fundamentals
- Basic Building Blocks: Security, Actions, Requests, and Responses
- Advanced Capabilities: Triggers, References, and Policies
- Finishing Touches: Customization and Extensibility
- Staying In Control: Versioning and Change Management
- The Big Picture: Performance, Hosting, and Scalability
- Making It Official: Publishing, Certification, and Deployment (this article)
- Going All In: Commercialization and Monetization
- Lessons Learned: Tips, Tricks, and Advanced Techniques
Overview
Custom connectors are restricted to use within the environments where they were created or by those with whom a solution package has been explicitly shared. While effective for collaborative scenarios, these restrictions limit the scope of distribution for a connector that may have broad appeal within the Power Platform community. They also limit the ability for connector creators to monetize their work and partners to integrate their own solutions at scale.
To address this issue, Microsoft has defined a structured process for connector publication. This process is comprised of several individual steps that lead from connector packaging by the creator, to certification by the connectors team, and finally to worldwide distribution and exposure in the official connector gallery. It also involves the installation of specific software utilities, use of a dedicated web portal for publishers, and documentation in public source-code repositories.
The following conceptual diagram illustrates the publication, certification, and deployment process.
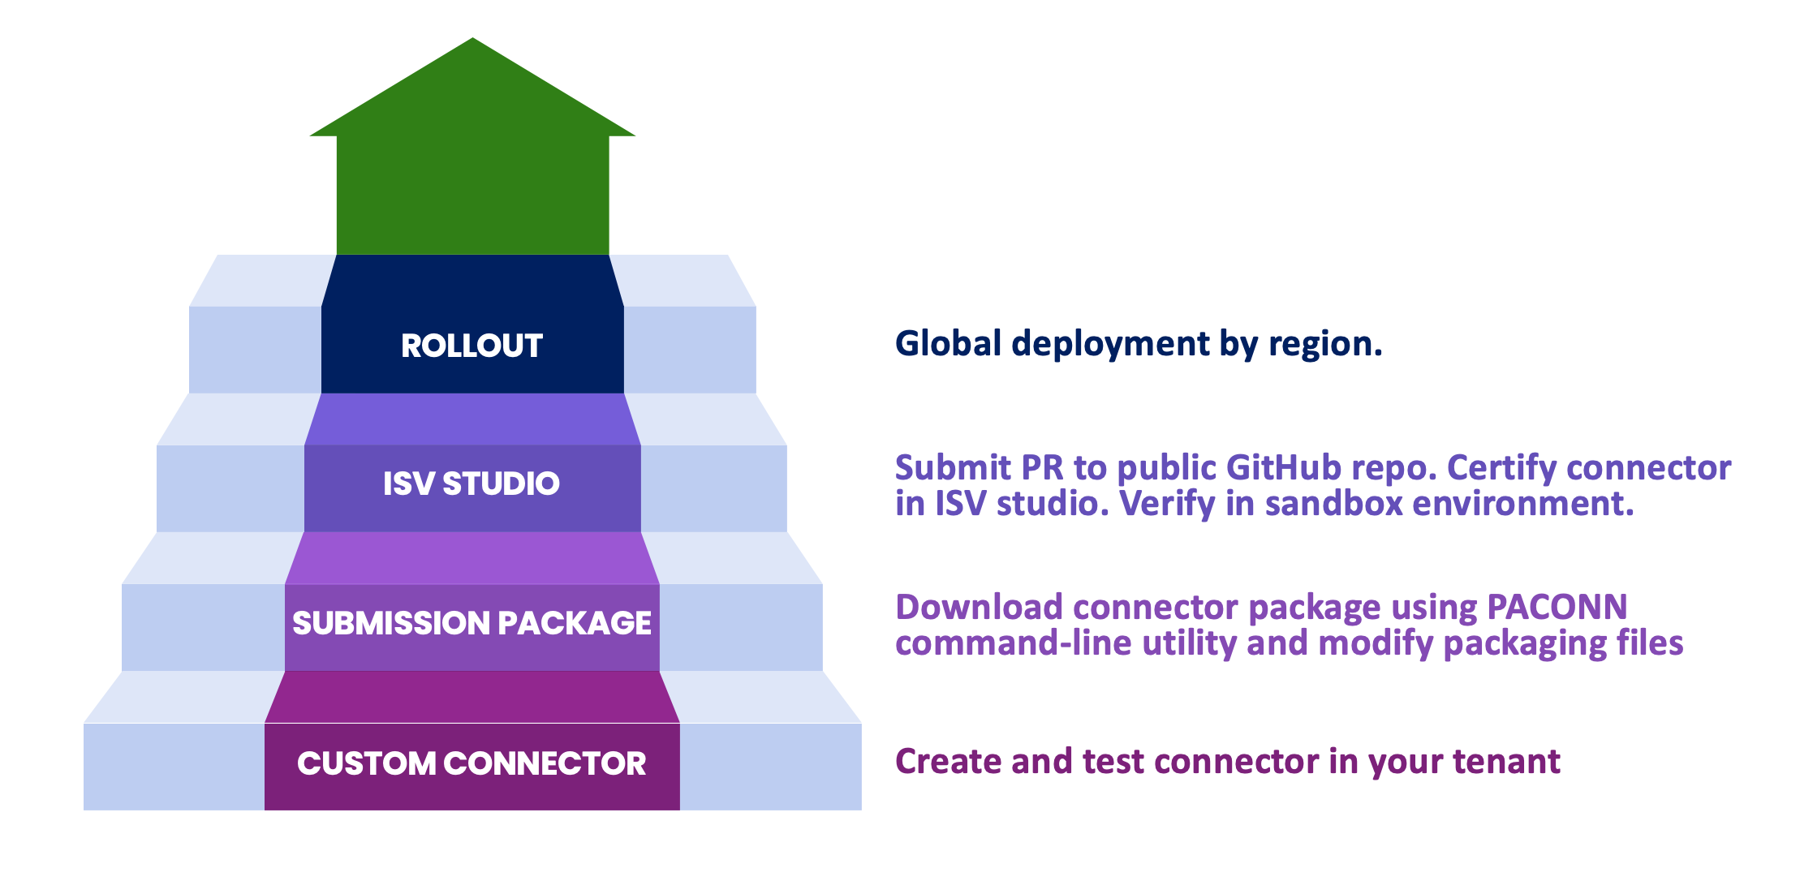
As the figure illustrates from bottom to top, the high-level steps are:
- Custom connector: Create and test the connector in your tenant.
- Submission package: Download the connector package using the PACONN command-line utility and modify packaging files.
- ISV Studio: Submit pull request (PR) to public GitHub repo, certify the connector in ISV Studio, and verify in a sandbox environment.
- Rollout: Deploy globally by region.
Before initiating the publication process, it is important to determine what kind of publisher will be releasing the connector. Microsoft defines two types of connector publishers:
- Verified publisher: An independent software vendor, typically a business or legal entity, who owns the underlying API and has a commercial interest in connector publication.
- Independent publisher: An individual, group, or other non-legal entity releasing a connector into the public domain without any commercial interest.
From a publication process perspective, there is no difference in the steps required to complete connector packaging, certification, and deployment. There are, however, important distinctions between the two types of publishers. To begin with, a verified publisher may be required to demonstrate that they have ownership or control of the endpoints provided in the connector or have obtained legally binding permission to use them. There may be legal ramifications for creators who release connectors that contain endpoints they are not expressly authorized to distribute. Even APIs released into the public domain may have provisions that restrict for-profit or commercial use. It is the publisher’s responsibility to conform to all legal requirements and restrictions. Independent publishers, on the other hand, who have no commercial interest in the related APIs, may be exempt from such restrictions provided they conform to the published terms of use.
All connectors, regardless of publisher type, are listed in the connector gallery at https://learn.microsoft.com/en-us/connectors/connector-reference/. They are differentiated only by the text “(Independent Publisher)” after the connector name. There is no difference in the way they are accessed by makers, their discoverability as part of search results in the actions panel, or in how they are used as part of an app or flow. As with verified publishers, independent publishers are expected to maintain and support their published connectors throughout their lifecycle.
Preparation
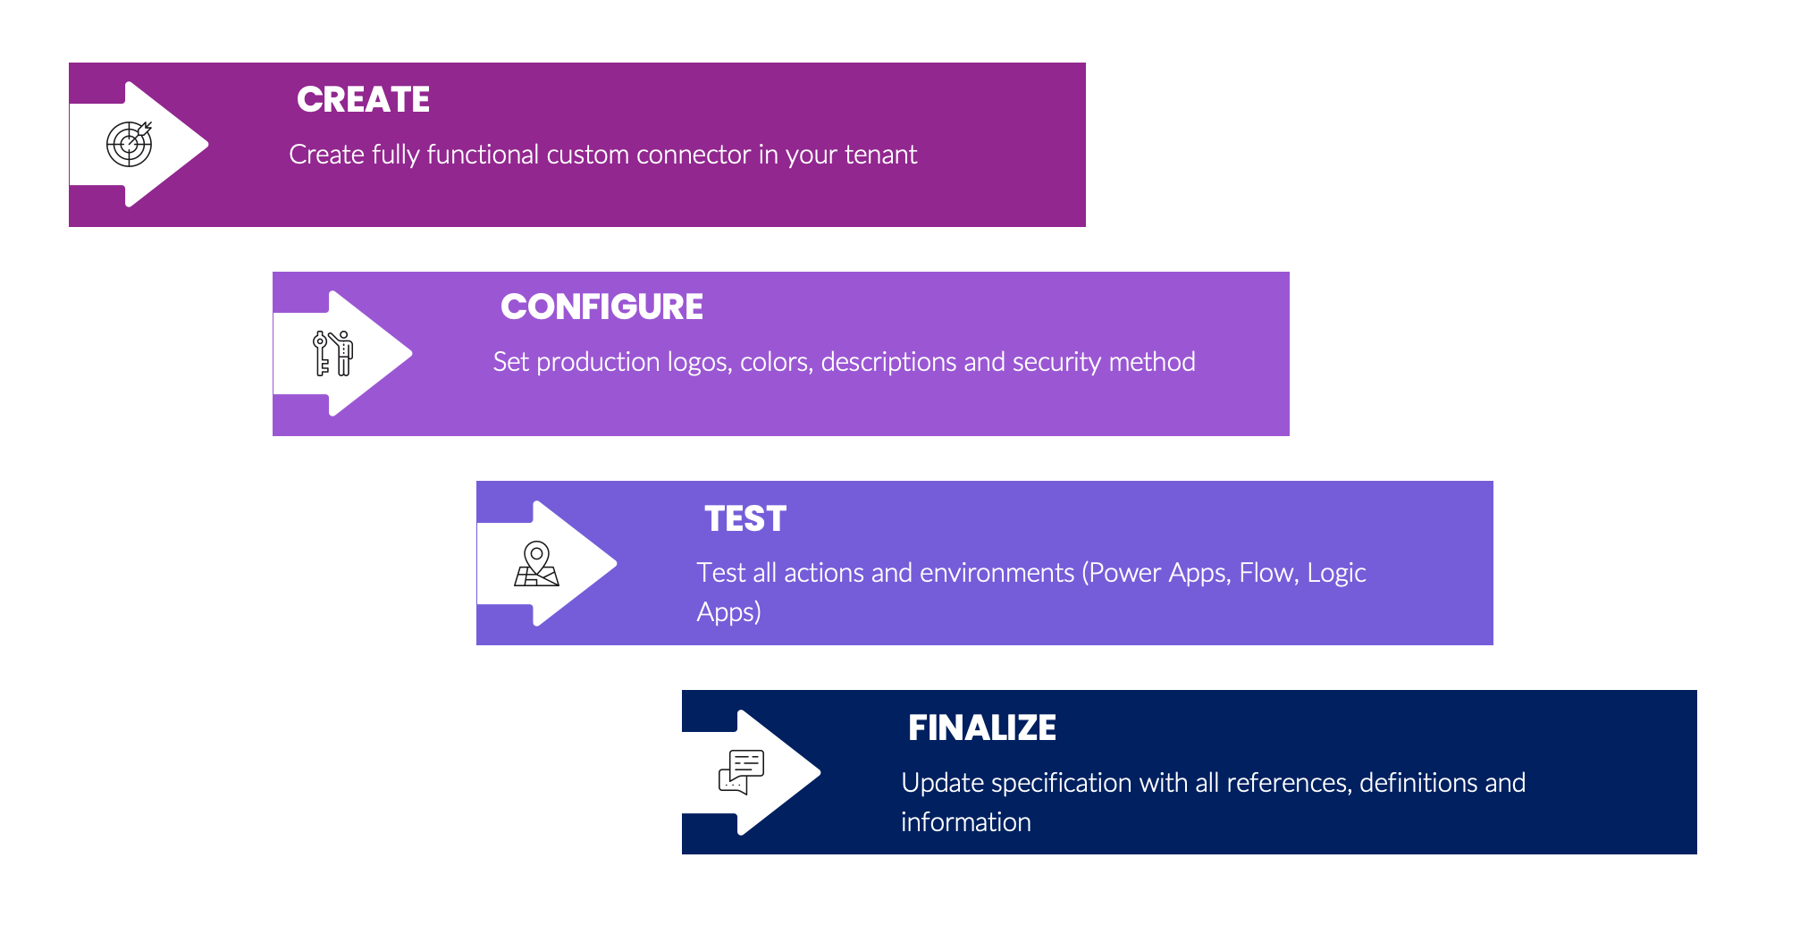
Before a package can be created and submitted for certification, there are several tasks that must be performed. The first, and most obvious, step is the creation of a custom connector comprised of all the elements discussed in previous articles in this series. Next, some of the optional steps within the creation process must be addressed, like uploading a logo, setting a logo background color, specifying HTTPS endpoints, and defining secure authorization methods. The connector then must be thoroughly tested to ensure that all endpoints are functional, policies work as expected, and custom code runs without errors. Finally, the specification should be audited for the use of production URLs, properly structed inputs and outputs, functional dynamic endpoints, releasable non-debug code scripts, and any optional descriptors like x-ms-summary, x-ms-capabilities, and the like. These steps are vital since the certification process can take some time to complete. Fixing problems after a package is submitted requires resubmission and potentially long delays in deployment.
The following diagram illustrates the tasks involved in the preparation stage: Create, Configure, Test, and Finalize.
Publication
Prior to submitting a connector for certification, Microsoft requests that all potential first-time publishers fill out a registration form with background information about their connector. This form is available at https://go.microsoft.com/fwlink/?linkid=2242828. It is not required that connector development be complete before this form is filled out. It's only necessary that some level of progress has been made and that the publisher is prepared to provide information about their organization (or themselves, for independent publishers), what the connector does, how it functions, the readiness timeline, and what, if any, assistance may be required by the publisher.
After the registration form has been completed, the connector files must be prepared properly for submission. There is no need to wait for a response from the connector publishing team regarding the registration form; publishers can proceed with the preparation phase immediately. Note that all submissions are manually reviewed and verified by the connector publication team at Microsoft. Publishers should allow sufficient time in their publication schedule for this review to take place (at least a few days, but be prepared to wait longer in case the review team is working through a lengthy backlog).
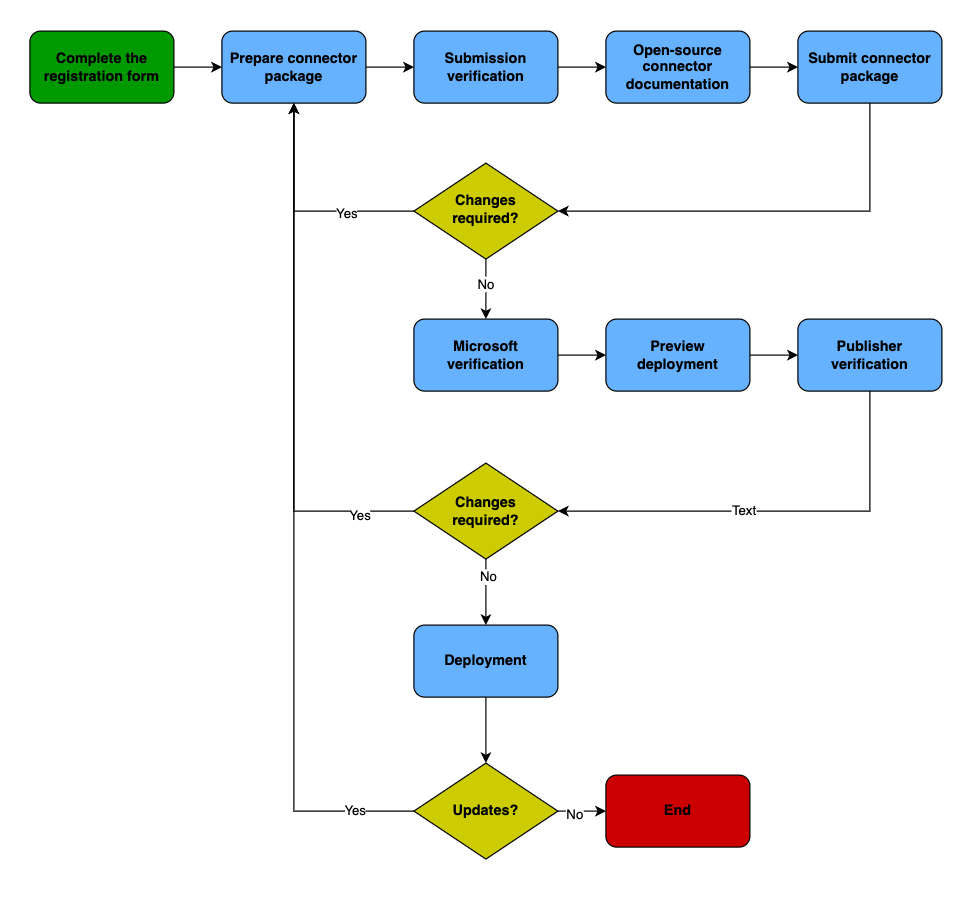
Once the initial review is complete, the connector will be deployed to an internal release ring and the publisher will receive a request within ISV Studio to create a test environment along with instructions. All actions within the connector must be tested in this environment and notification of test completion provided to the review team. Assuming that all tests pass, the deployment process will begin, with the connector rolling out to production release rings by geography region. If the testing stage reveals any issues that require correction, the process starts again once a new version of the package is resubmitted. Future updates to a connector follow the same overall process.
The following diagram provides a high-level overview of the publisher experience lifecycle.
Before a connector can be submitted for certification, it must meet certain basic guidelines. The following table defines the publication expectations for connector certification. *
| Capability | Details | Required | ||
| Software as a service (SaaS) app | You must either own the underlying service, or present explicit rights to use the API and provide a user scenario that fits well with our products. (Doesn't apply to independent publishers.) | Yes | ||
| Authentication type | Your API must support one of: OAuth2, anonymous authentication, API key, or basic authentication. | Yes | ||
| Support | You must provide a support contact so that customers can get help. | Yes | ||
| Availability and uptime | Your app has a minimum of least 99.9% uptime. | No |
* Extracted from the official documentation at https://learn.microsoft.com/en-us/connectors/custom-connectors/submit-certification
Prerequisites
The first step in connector certification is to create a deployable package that can be submitted via the ISV Studio portal and documented in the public GitHub repository. To do this, the publisher must configure their computer to run the PACONN command-line utility. The utility itself can be downloaded from https://learn.microsoft.com/en-us/connectors/custom-connectors/paconn-cli but it has some prerequisites that publishers need to be aware of before getting started. The installation and configuration process is documented at https://learn.microsoft.com/en-us/connectors/custom-connectors/paconn-cli.
There is a hard dependency on several libraries and components that are part of the Python programming language and platform. These must be in place before the PACONN utility can be run. This is a professional developer task, and it is important to understand that organizational IT policies, machine configuration, operating system features, user permissions, and other restrictions may prevent a potential publisher from completing the prerequisite steps. It may be necessary to get assistance from your IT department or a developer before moving forward.
- Install Python 3.5+ from https://www.python.org/downloads. For platform-specific version information, refer to the Information about specific ports, and developer info section on the downloads page.
- During the installation process, a prompt should appear asking if Python should be added to the system PATH variable. This is an essential step and must be completed for PACONN to function properly. If the prompt does not appear, or a different installation method is used that does not provide such a prompt, ensure that the system PATH is updated with the proper Python references. It may be necessary to consult the Python documentation at https://docs.python.org/3/using/windows.html for Windows users or https://docs.python.org/3/using/mac.html for Mac OS users.
- From a command-line shell utility, such as Windows Terminal, PowerShell, Bash, or Mac OS Terminal, run the following command to verify that the proper version of Python has been installed and that the system PATH variables have been updated: Python --version
If the wrong version is returned, the PATH cannot be found, or an error occurs, address these issues before attempting to move on. The PACONN utility will not install or run correctly until a valid Python installation has been completed. Mac OS users should note that the default installation of Python that ships with the operating system is likely to be a version prior to 3.x, which will need to be upgraded or replaced before continuing. - After Python is successfully installed and verified, install PACONN from the command shell with the following command: pip install paconn
When the preceding steps have been completed, and the tool runs without errors, the following command initiates the PACONN authentication sequence: paconn login
The authentication process requires that a separate browser session be initiated to https://microsoft.com/devicelogin, which will ask for the code displayed in the command line interface (CLI). Follow the prompts to complete the login sequence. Once authenticated, the CLI will display a Login successful message.
Once successfully authenticated, custom connector package files can be downloaded using the following command: paconn download
A choice of environments will be displayed, followed by a list of custom connectors within the selected environment after a selection is entered:
Please select an environment:
 [1] My Power Platform Environment (default)
Please enter a choice [Default choice(1)]: 1

Environment selected: My Power Platform Environment (default)
Please select a connector:
 [1] NASA Asteroids NeoWS OAuth
 [2] NASA Asteroids NeoWs
Please enter a choice [Default choice(1)]: 2
Selecting a connector will initiate the download process for the connector package files. There are no specific requirements regarding where the connector files are stored. Depending on the machine configuration, it may be necessary to place them in a location where the Python assemblies and PACONN utility are accessible, since additional commands will be run against the package files later in the process.
Packaging
It is tempting to think of an entire connector in terms of the API definition file that describes its security, operations, and paths, but that is only one piece of the puzzle. A complete connector is actually comprised of definition, configuration, and asset files that are bundled together into a single deployable unit. When a custom connector is downloaded using the PACONN utility, the following core components are extracted.
| File Name | Description | |
| apidefintion.swagger.json | The core API definition file generated from the connector creation wizard or uploaded from an OpenAPI specification. | |
| apiproperties.json | Additional metadata that describes the security authorization method, publisher, icon background color, and capabilities. | |
| settings.json | Base configuration data including the names of relevant JSON files, Power Apps API version, environment ID, and custom connector ID. | |
| icon.png | The image used to identify the connector in the Power Automate actions panel and individual action blocks. | |
| script.csx | If custom code is associated with the connector, this file contains the complete script. |
Each core file serves a particular purpose.
apidefinition.swagger.json
This file is the primary specification artifact that has been discussed at length in this series. It describes the connector and is the focus of the open-source GitHub repository, which serves as a documentation resource for all connector consumers. Along with this file, there are four additional elements that deserve further discussion.
apiproperties.json
This file contains information that Power Platform needs to properly represent a connector in the user interface. The inputs for the security settings exposed in the Connections dialog are contained within the connectionParameters section. The security object specified in this file must match the name property of the securityDefinitions object or objects in the apidefinition.swagger.json file.
The icon background color is provided in hex code. The capabilities property contains an array of strings that must conform to the recognized values from the schema definition published at https://github.com/microsoft/PowerPlatformConnectors/blob/dev/schemas/paconn-apiProperties.schema.json. The publisher and stack owner values identify the connector publisher and must be unique. Publishers who do not actually own or operate the API endpoints in the connector should provide their own unique values for these settings to avoid any legal liability or copyright issues that may stem from using protected names or trademarks.
The following is an example of a properties file:
{
  "properties": {
    "connectionParameters": {
      "api_key": {
        "type": "securestring",
        "uiDefinition": {
          "displayName": "API Key",
          "description": "Asteroid NeoWS API Key",
          "tooltip": "Provide your Asteroid NeoWS API key",
          "constraints": {
            "tabIndex": 2,
            "clearText": false,
            "required": "true"
          }
        }
      }
    },
    "iconBrandColor": "#ffffff",
    "capabilities": ["actions","triggers"],
    "publisher": "Contoso Corporation",
    "stackOwner": "Contoso"
  }
}
settings.json
The settings file is an artifact that Power Platform uses internally and rarely needs to be modified in any way. It contains backend details regarding the original environment in which the connector was created, names of packaging elements, and API version information.
The following is an example of a settings file:
{
  "connectorId": "asteroid-20neows-00000000000000-0000000000000",
  "environment": "Default-00000000-0000-0000-0000-000000000000",
  "apiProperties": "apiProperties.json",
  "apiDefinition": "apiDefinition.swagger.json",
  "icon": "icon.png",
  "powerAppsUrl": "https://api.powerapps.com",
  "powerAppsApiVersion": "2016-11-01"
}
icon.png
Icon files are used for branding purposes and to differentiate connector actions in the gallery. They should be easily recognizable, contain minimal text, and avoid infringing on any protected trademarks or other intellectual property. Ideally, the icon image allows makers to instantly identify a connector and its related actions within the lengthy list of search results that appears when a new action is added to a flow or app. Icons should be square, with dimensions between 100 x 100 and 230 x 230 pixels, and in PNG (.png) format. The icon background color should be something other than white (#ffffff) but cannot match the system default color of #007ee5. Ensure that the icon image and text are unique and cannot easily be confused with another connector.
script.csx
As discussed in Power Platform Connector Customization and Extensibility earlier in this series, makers can include custom code with each connector. Such code takes the form of a script file that uses C# programming syntax. If such code has been included with a connector, it is extracted into a separate file that defines the class and methods of the script. The contents of such a file resemble the following:
public class Script : ScriptBase
{

    public override async Task<HttpResponseMessage> ExecuteAsync()
    {
        var domain = this.Context.Request.Headers.GetValues("Instance").First();

        var uriBuilder = new UriBuilder(this.Context.Request.RequestUri);
        uriBuilder.Host = domain;
        this.Context.Request.RequestUri = uriBuilder.Uri;

        HttpResponseMessage response = await this.Context.SendAsync(this.Context.Request, this.CancellationToken).ConfigureAwait(continueOnCapturedContext: false);
        return response;
    }

    private static HttpResponseMessage createErrorResponse(String msg, HttpStatusCode code)
    {
        JObject output = new JObject
        {
            ["Message"] = msg
        };
        var response = new HttpResponseMessage(code);
        response.Content = CreateJsonContent(output.ToString());
        return response;
    }

}
Professional developers might expect a more robust code structure that includes dependency packages, project definition files, build artifacts, and other components typically seen in code that will be compiled into an assembly or library. Power Platform handles all of this dynamically when a script file is identified within a package. Strict limitations on the objects, classes, interfaces, and dependencies available to script developers eliminates the need for package references on a per-connector basis, which explains the necessity for only a single code file within a connector package. More information about custom code capabilities and limitations is available at https://learn.microsoft.com/en-us/connectors/custom-connectors/write-code.
Along with the core files, there are two additional files that must be created to generate a complete package.
| File Name | Description | |
| readme.md | A Markdown file describing the connector that is published in the open-source GitHub repository for all Power Platform connectors. | |
| intro.md | A Markdown file similar to the intro.md file that is published to the Power Platform connectors gallery. |
These additional files, written in Markdown syntax, provide an overall description of the connector, along with instructions for how to get started. This may include guidance on configuring authorization, any necessary prerequisites, known issues or limitations, and anything else the publishers wish to communicate to consumers of the connector. They are essentially two versions of the same file, with a slight difference in formatting related to the introductory paragraph heading, which is omitted in the GitHub repo (readme.md) but necessary for the gallery listing (intro.md). It is common, but by no means required, for the readme.md file to contain a user-friendly list of connector operations, since the JSON-based raw definition file in the GitHub repo isn’t really designed for casual consumption. (A list of operations is included automatically in the intro.md file when it is published to the connector gallery.)
Note: It is important to bear in mind that, as of this writing, no formal store or marketplace exists for Power Platform connectors as there is for Office add-ins, Azure solutions, Teams apps, and other types of plugins. As such, the readme.md and intro.md files are the only mechanism by which publishers can provide high-level information via official channels to anyone interested in using their connector. Publishers may include links within these files to their websites, source code repositories, or any other resources that might be of use to connector consumers.
A suitable readme.md file resembles the following:
Get information about asteroids and other celestial bodies in near earth orbit using this freely available set of resources (NOTE: consumption limitations may apply).
## Prerequisites
Create an account and subscribe to the Asteroid NEO WS service to get an API key for use in your flows and apps.
## How to get credentials
Generate a license (API) key by following these simple steps:
1. Open https://api.nasa.gov in your browser, click "Web Services" and select "Asteroid NEO WS".
2. Select a plan and click "Subscribe".
3. Create an account to retrieve your API key.
## Known issues and limitations
Consumers are limited to 1,000 API calls per 24-hour period.
Note: If you are unfamiliar with the structure and formatting rules of a Markdown document, visit https://www.markdownguide.org/getting-started/ for more information.
Validation
The core apidefinition.swagger.json file must be provided in a valid OpenAPI version 2.0 (Swagger) format. At this time, Power Platform does not accept specification files in the version 3.0 format for connectors and the PACONN utility only works with version 2.0 files. Due to some quirks in the validation rules embedded in this tool, it is entirely possible to have a functional Swagger document that does not pass PACONN validation.
Before attempting to run the CLI validator, first verify that the apidefinition.swagger.json file conforms to the OpenAPI formatting rules. There are several free validators available from various resources on the internet. SmartBear provides a free website at https://editor.swagger.io that will parse a JSON or YAML document and identify any errors that need to be corrected. APIDevTools offers a similar free validator at https://apitools.dev/swagger-parser/online/. The Azure API Management service also has an embedded Swagger validator that can be invoked when creating a new API from an existing definition (it is free to try on the consumption tier).
Once the definition file passes Swagger validation, makers should check the file for initial conformance to the Microsoft validation ruleset to avoid any errors when the validation command is executed. A complete set of potential validation errors and what they mean is available at https://learn.microsoft.com/en-us/connectors/custom-connectors/certification-swagger-validator-rules. Professional developers who are interested in how the utility functions and want more information regarding the validation rulesets can view the source code on the Power Platform Connectors GitHub repository at https://github.com/microsoft/PowerPlatformConnectors/tree/dev/tools/paconn-cli/paconn.
Run the validator by navigating to the download directory for the custom connector package files and issuing the following command:
paconn validate --api-def apiDefinition.swagger.json
If any errors or warnings are encountered during the validation process, the CLI will return a JSON object with specific information in the message property, much like the following:
{
  "error": {
   "code": "SwaggerCertificationFailedWithErrors",
   "message": "Swagger certification failed with errors. Please validate again after fixing following errors: Error : paths/~1v1~1feed/get/parameters/0 : The 'x-ms-summary' property is required.\r\nError : paths/~1v1~1feed/get/parameters/0 : The 'description' property is required.\r\nError : paths/~1v1~1feed/get/parameters/1 : The 'x-ms-summary' property is required.\r\nError : paths/~1v1~1feed/get/parameters/1 : The 'description' property is required.\r\nError : info : The 'contact' property is required.\r\nError : The 'x-ms-connector-metadata' property is required.\r\nWarning : paths/~1v1~1feed/get/parameters/2/format : The type/format 'integer/password' is not recognized."
  }
}
The preceding message indicates that the underlying specification file is missing some key elements in the parameter definitions and in the info section. Errors and warnings are lumped together in the output message. Therefore, it may be worthwhile to manually separate them in a text editor that can parse the formatting indicators (like “\r\n”, which indicates a new line) to determine what must be addressed to pass validation versus what is optional. Most error messages produced by the validator are well-defined and easily correctible, but some may be a bit vague and require additional investigation. Refer to the validation rules documentation linked earlier for assistance tracking down and eliminating obscure errors and warnings.
It is worth noting that something described as a warning in the output message may, in fact, be an error, as the sample output demonstrates. Note the last entry:
Warning : paths/~1v1~1feed/get/parameters/2/format :
The type/format 'integer/password' is not recognized.
Despite being categorized as a Warning, this is actually an error in the underlying Swagger specification. A parameter with a type of “integer” cannot have a format of “password”. The two values are incompatible. Even after correcting all the results marked with an Error label, this package would not pass the rules in the certified connector GitHub repository for new PRs. Using one of the free Swagger validators, as indicated earlier, would highlight such errors in the definition file so they can be corrected before running the CLI validator.
Since the list of potential validation errors is quite long and the descriptions sometimes a bit vague, here are some tips to ensure at least a basic level of conformance:
- Any element, such as a parameter, that may be displayed in the user interface in Power Automate or Azure Logic Apps should have an x-ms-summary property and value. This will be parsed by the UI and displayed as the label next to the input field when adding an action. Strictly speaking, like many of the PACONN validation rules, enforcing validation for an optional setting such as a vendor-specific property is in violation of the OpenAPI specification rules. It is important to remember that the validator is designed to ensure that a custom connector deploys correctly within the overall Power Platform infrastructure, not that it is structured properly with regards to the open-source specification upon which it is based. While seemingly arbitrary, the connector submission will fail if it does not pass these validation rules, so creators must modify their specifications accordingly if they want to publish their connectors in the official gallery.
- As with the first tip, each parameter must have a description property, although the validator seems to apply this rule inconsistently, throwing errors for some actions but not for others with the same deficiency.
- Ensure that the info section is complete and contains title, description, version, and contact properties. Here, Microsoft deviates not only from the OpenAPI specification rules but also from their own toolset. The connector creation wizard UI does not provide a contact field in the General step, ensuring that every connector created using this mechanism will fail validation unless manually modified by the creator. There are many such inconsistencies throughout the connector ecosystem, making for a frustrating first-time experience for new creators.
- The OpenAPI specification allows for user-specified data types, such as “decimal”, “uuid”, “image”, and so on, assuming that the receiving system will know how to parse the indicated data type. The PACONN utility does not permit custom data type values, so use of these (even though the core specification allows them) will cause validation to fail. The valid types accepted by the validator are integer, number, string, boolean, and file. If desired, a corresponding format property can also be applied (such as int32, int64, float, double, byte, binary, date, date-time, or password) but care should be taken to ensure that the proper format value is used with the type value or validation will fail. For example, the format value of “int32” can be used with a type value of “integer” but not with a type value of “string”. For more information on the structure and rules of an OpenAPI 2.0 document, refer to https://swagger.io/docs/specification/2-0/basic-structure/.
Documentation
The Power Platform Connectors GitHub repository at https://github.com/microsoft/PowerPlatformConnectors serves as the official resource for all connector documentation. Unfortunately, this is a very developer-centric mechanism that can be quite intimidating for creators who are not familiar with source management tools and the highly technical requirements of Git version control. The readme file of the repo provides some instructions on how to get started but assumes the reader already knows how to use Git command-line tools.
For those unfamiliar with Git, a concise set of instructions for installing the base components can be found at https://learn.microsoft.com/en-us/devops/develop/git/install-and-set-up-git. Once installed, the commands referenced in the repo instructions will become available in PowerShell and other command-line applications (such as the Terminal window within Visual Studio Code, the Terminal application in Mac OS, or Bash in Linux). It will also be necessary to set up an account at https://github.com to copy, modify, and submit changes to the official repo. Beginners would be well served by going through the introductory material at https://github.com/skills/introduction-to-github before jumping into the connector documentation process as their first introduction to GitHub.
Once the concepts of repositories, branches, commits, PRs, and other Git-centric terms have been demystified, the instructions in the certified connectors repo will make a lot more sense. Even then, they only cover how to clone and fetch the latest version, while leaving out how to actually make changes and submit a new PR for a connector. Below are some general steps covering the rest of the process. Please note that these are simply guidelines; there is often more than one way to achieve the desired outcome in Git, and a wrong turn can often lead down a very long and circuitous path to get back to the beginning. Access to a professional developer with Git experience can prove quite valuable throughout the process.
Follow the readme instructions from the official repo to clone the official repo into a new personal repo. Next, set the proper branching structure, navigate to the local directory where the repo files have been downloaded, and do the following:
- Open a command or terminal window and create a new local branch. This tells the Git system that new code is being introduced separate from the main branch that will be merged in later. It may help to think of the primary version of the code as a published document. Rather than make changes directly in the main document, a copy is first made (clone), given a unique name (branch), edits and new contributions applied with unique version numbers (commits), then those changes are integrated back into the main document (pull request). A simple way to create a new branch is with the switch command, which combines the create operation with a command to move focus to the newly created branch, like so: git switch -c MyNewBranch
- Once focus has moved to the new branch, create a subfolder under certified-connectors using the connector name as the name of the subfolder. Copy the connector package files into this new directory. (Be sure to copy only the readme.md file and not the intro.md file, which is applicable only to the connector gallery listing.)
- Switch to the new subfolder in the terminal window and add these files to the new branch with the following command (which tells the system to add all files in the currently directory; alternatively, individual commands can be issued with full path and file names): git add .
- Create a new commit along with a description of what has changed. This action stages the changes locally and applies a unique operation ID. Descriptions should be concise and in the present tense; for example, “Add MyNewConnector package files” as opposed to “Added MyNewConnector package”.
git commit -m Add package files for MyNewConnector - Push the committed changes to the parent repository specifying the new branch name (which will be the cloned copy not the original repo): git push MyNewBranch
- Locate the personal repo created on https://github.com and navigate to the Repositories tab. Select the PowerPlatformConnectors repo, and then select the Compare and Pull Request button. This will initiate the PR process, submitting the new changes to the main repo for review by the connectors team. A link will be sent by email to the PR thread containing status updates and feedback from the team.
- If the PR is rejected, an explanation will be provided as to why and what should be done to fix the issues. Make any necessary changes on the existing local branch, create a new commit, then push again and submit a new PR. Repeat the process until the PR is accepted. Any questions about the rejection can be posted to the comment thread for the PR.
Additional Documentation
There is no provision in the connector package, the public GitHub repository, or the Power Platform Gallery listing to include user instructions for a connector. At best, the readme.md file can be used to provide details on how to get started, but it is not designed for tutorials, walkthroughs, screenshots, or lengthy descriptions. If a connector requires additional documentation, creators should consider authoring it separately and creating a web-based resource to distribute it to users of their connector. Links to such documentation can be included in the readme.md or info.md files for easy consumption.
Multiple Language Support
The verified publisher certification process documentation at https://learn.microsoft.com/en-us/connectors/custom-connectors/certification-submission contains a section regarding English-language strings within the connector package. This part of the process is easily overlooked when focusing on the more technical aspects of connector certification, but failing to follow the guidelines may result in the package being rejected from the documentation GitHub repository. Because connectors are localized within Power Platform based on the region of the user’s environment, including quality English strings that are machine translatable is an important consideration. Failing to pay adequate attention to this portion of the process can cause lengthy delays in the certification timeline.
Certification
After all preparation steps have been completed, the connector package is ready for submission, verification, and deployment. Unlike the previous steps, this is a straightforward, uncomplicated procedure that requires no developer tooling or technical knowledge. It does, however, take some time. Creators should be prepared for it to take several weeks (if not several months) for a new submission to make its way through to final deployment.
Submission
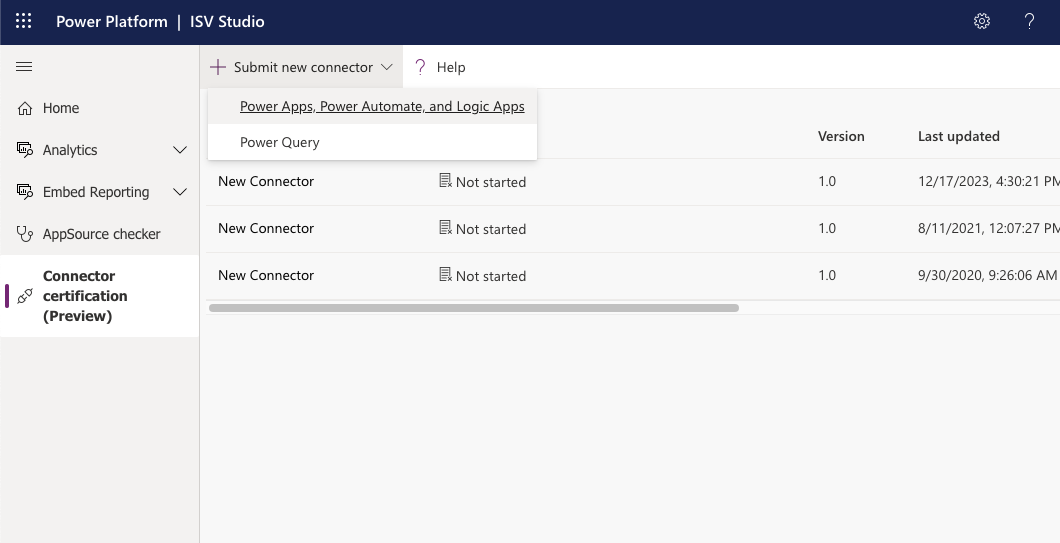
The submission process begins with ensuring that the connector owner has access to the ISV Studio portal located at https://isvstudio.powerapps.com. The account that is used to access the portal and manage connectors should have environment administrator rights in Power Platform to perform all of the certification steps. ISV Studio is the primary workspace for all connector publishing activities once the package has been submitted for review.
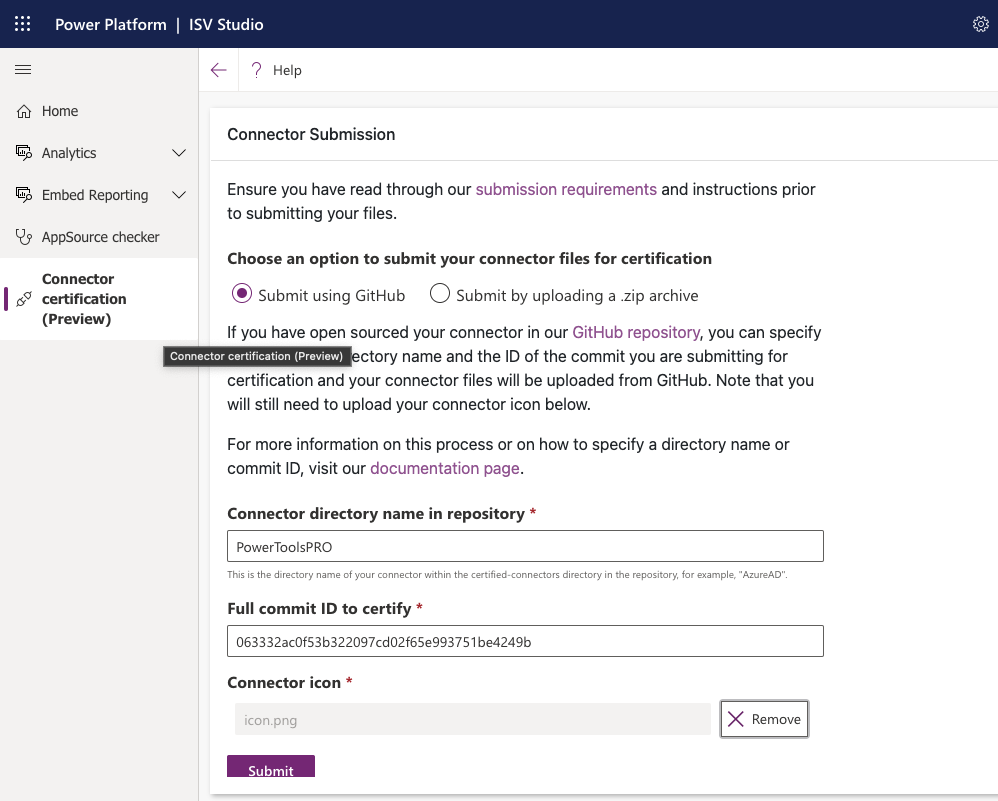
To submit or update a connector, locate the Submit new connector button and choose PowerApps, Power Automate, and Logic Apps, as shown in the following image.
A form will be displayed requesting information about the connector. The first option allows the creator to choose whether a GitHub submission will be used as the package source or a zip file archive. Assuming the instructions in the “Documentation" section of this article were followed, a GitHub submission is the most efficient way forward. Since open-sourcing each connector on GitHub is a required step anyway, it makes the most sense to do it in advance before reaching this stage. If the zip file archive option is chosen, the package files will need to be placed into an archive, uploaded, and attached to the form.
Assuming the GitHub option is selected, the form requests the name of the connector directory and the commit ID. The first parameter is the name of the subfolder created in the certified-connectors directory of the official repo. The commit ID can be found using the following command in the terminal window from the PowerPlatformConnectors directory of the local branch: git log
The long string of alphanumeric characters after the word commit is the commit ID. (If updating an existing connector, be sure to use the ID of the latest commit.) The connector icon must also be selected before the form can be submitted.
The following image shows a sample connector submission form using the GitHub option.
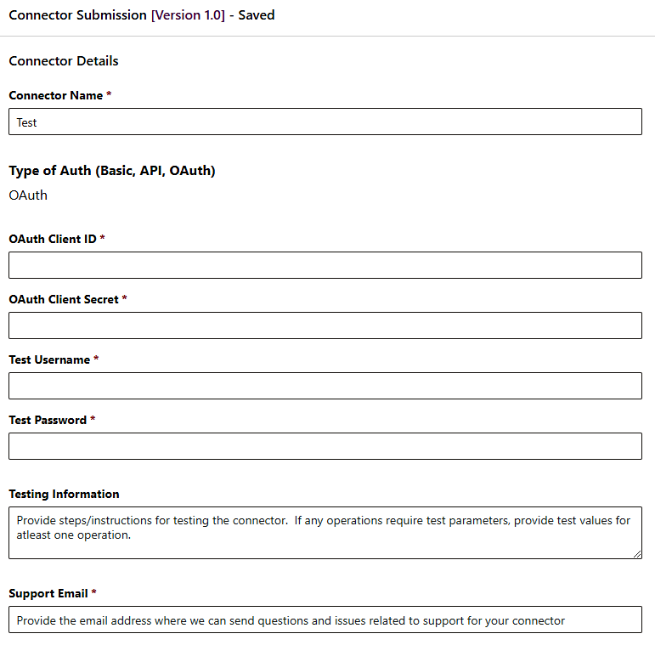
The next step requests additional information about the connector, including name, authorization credentials such as an API Key or OAuth configuration, instructions to the connector team for testing the connector, and an email address for support requests. Be concise yet thorough in the testing instructions, providing the team with any information required to run verification tests, such as how to invoke actions within the connector, any prerequisites (such as needing an account in an external system), and so on. If the connector only works properly with valid data, set up a test instance in the external system for the connector team and provide them with login instructions.
Note that OAuth security requires valid Client ID and Client Secret values that cannot be changed after submission, along with specific redirect URLs in the remote system. For more information, refer to the certification submission instructions at https://learn.microsoft.com/en-us/connectors/custom-connectors/submit-for-certification.
The following image shows the requested information fields for a connector that includes OAuth security.
| https://learn.microsoft.com/en-us/connectors/custom-connectors/submit-for-certification
Verification
Once a connector has been submitted, the team at Microsoft will review it and provide feedback. All communications occur through the Activity Control communication center panel in ISV Studio, which is displayed to the right of the connector details. Should any errors occur during verification or other issues arise, notifications will be posted to this panel. Questions may be posed by sending a message to the verification team using the chat interface. After any issues have been addressed, the process will proceed to the testing phase. A message similar to the following will be posted in the control panel when initial verification has succeeded.
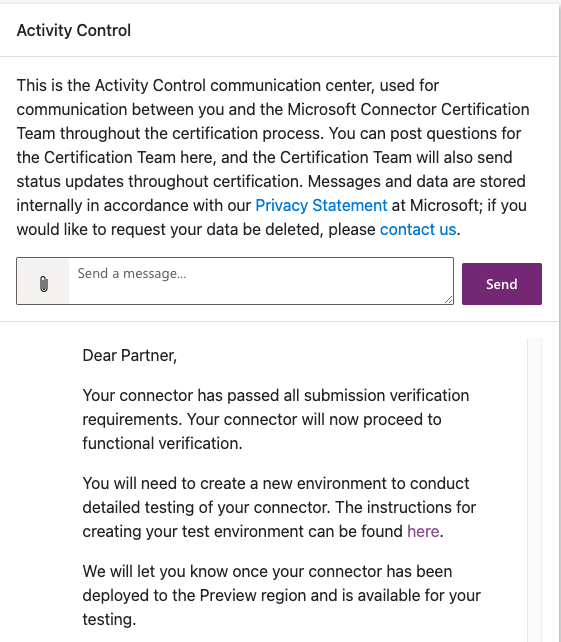
| Used with permission from Microsoft.
This message is a bit misleading as there isn’t any action to take upon receipt. The testing being referred to must take place in a special Preview region separate from the creator’s production or development environments. A second message like the one in the following figure is usually received within a few days, at which point the instructions linked to in the first message can be followed to set up a new environment. However, there is always a possibility for delay, so be prepared to wait at least week or two between messages.
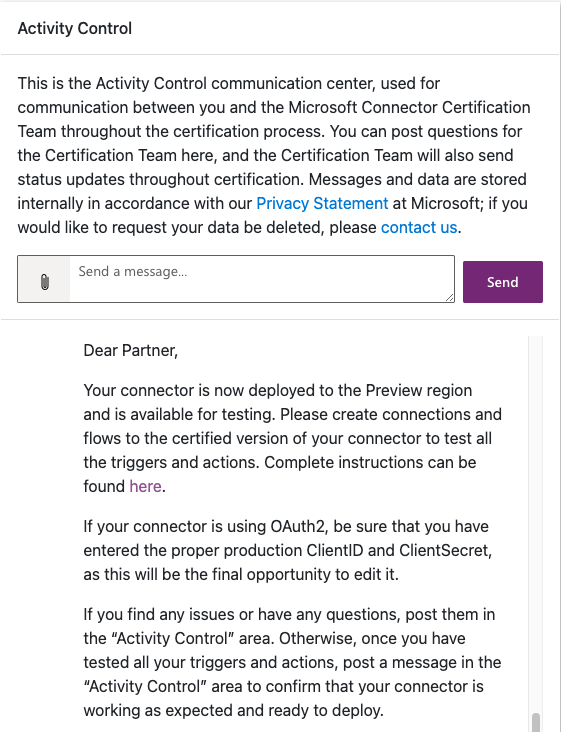
| Used with permission from Microsoft.
The instructions linked to in the message are straightforward and can be referenced in the official documentation at https://learn.microsoft.com/en-us/connectors/custom-connectors/certification-testing#testing-your-connector. Create a new environment following the directions and run through a complete test cycle to verify connector functionality. It is critical to perform a thorough battery of tests as they may reveal issues not exposed in the production and early release rings where the custom connector was initially created and tested. On more than one occasion, testing at this stage has exposed problems related to platform changes that Microsoft needed to address or changes in the connector infrastructure that had yet to be fully documented or communicated. It is far better to identify any such issues in the Preview stage than allow them to proceed unmitigated into deployment.
Report any test errors that are not directly related to the connector itself back to Microsoft through the control panel. There may be significant lag time between reporting an issue and getting a response as feedback makes its way through official channels. If any errors are identified that require connector modifications, the process of open-sourcing and submitting a new connector version must begin anew, with fresh commit IDs supplied in the submission form. This can cause a significant amount of delay so be certain that thorough testing is performing prior to submitting the GitHub PR for a new or updated connector. Assuming that all tests pass and no errors are discovered, send a message via the control panel to the Microsoft team indicating that everything looks good, so they can proceed with deployment.
Deployment
The deployment process occurs by region. Once the team provides notification that the connector has been onboarded to the deployment schedule, messages should arrive every few days indicating that regional deployment has succeeded in approximately the following order (which may vary and is subject to change at any time):
- Asia
- Europe (minus United Kingdom)
- Brazil, Canada, Japan, and India
- Australia and United Kingdom
- United States
The entire process may take anywhere from a few days to a couple of weeks. Once deployment is complete, a message will be posted to the control panel to that effect.
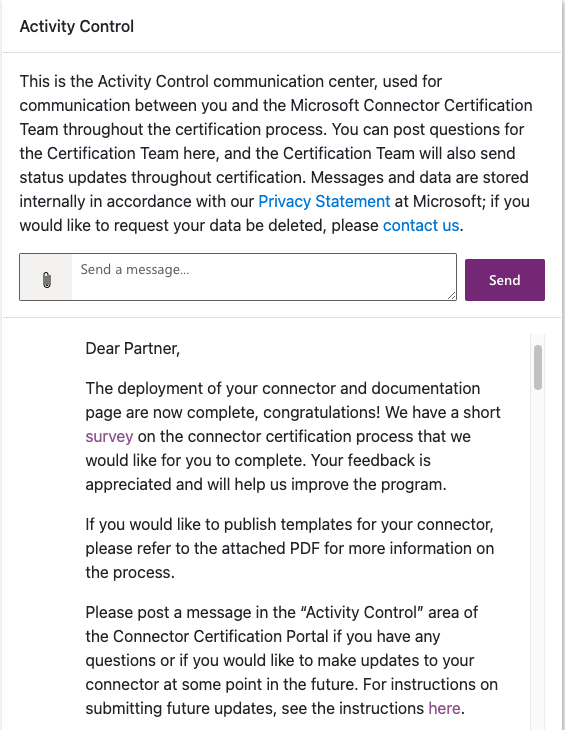
| Used with permission from Microsoft.
The connector deployment process is now complete and users around the world will have access to the published connector. Any future changes follow the same steps, with version information displayed in ISV Studio. A reasonable expectation for the total length of time required for each submission is four to seven weeks but it may take much longer, so plan accordingly when setting release schedules. If no activity is observed between stages for more than two or three weeks, post a message in the control panel requesting updated status information. With dozens of new connectors submitted each week, plus updates to existing connectors, the team may have a lengthy backlog to clear at any given time.
Conclusion
The connector certification process allows creators, whether independent publishers or independent software vendors, to publish their connectors to a global audience. Before publication can occur, a connector package must be created and validated to ensure it conforms to the Microsoft guidelines. This involves the use of command-line utilities that are designed for professional developers. However, with a bit of patience and practice, non-developers can quickly become proficient enough to install and use such tools themselves to access, download, validate, and package their custom connectors.
Once a connector package has been validated, it must be documented in the official open-source connector repository, a process that, once again, employs programmer-oriented tools and a learning curve for the uninitiated. Fortunately, once the packaging and documentation steps are complete, the actual submission process is not complicated. It does take some time, and thorough testing is vital to ensuring the procedure can be completed in a reasonable amount of time. However, at the end, a global audience will have access to the connector in Power Automate, Power Apps, and Azure Logic Apps.

Eric Shupps
Eric Shupps is the founder and CTO of Apptigent, a leading provider of cloud-based software solutions for Microsoft, Salesforce, and more. Eric has worked in the industry for more than 30 years, primarily focused on Microsoft software and services, as a consultant, administrator, architect, developer and trainer. He co-hosts the Community CloudCast, has authored numerous technology articles, and speaks at user group meetings and conferences around the world.