Exploring Microsoft Quizzes

If you want to gather real-time information, design a quiz in Microsoft Teams using Forms. You can use quizzes to assess learning, get feedback, and research your team’s concerns. When creating quizzes, you can choose that they be Web-based, inside OneNote notebook, or as a tab in a channel in Microsoft Teams. This article provides the basic steps necessary to create a web-based quiz, which, as you’ll see, is pretty similar to creating a form but with a few important differences.
- Log into Microsoft 365 and click the Forms option located on the waffle in the top left-hand corner of M365.
- Click on the drop-down arrow on +New Form and choose New Quiz.
- Type the title of the quiz, an optional description, and an image representing the topic of the quiz.
- Type in a quiz question you want to ask the participants.
- Choose the type of responses associated with the question. The main options are Choice, Text, Rating, or Date. Other options include Ranking, Likert, Upload File, or Net Promoter Score.
Note: You can format your text using keyboard shortcuts such as bold, italic, underline, and font settings, and you can add an image to each possible response to the question if you’re using Choice.
- You can specify whether the question is required and if you want to allow multiple answers for the question while controlling how many choices can be selected. Unlike on a form, you can’t allow participants to add their own option, but in a quiz, you can assign a point value to each question and add up the number of points based on correctly answered questions.
- If needed, you can add more questions to this form using steps 4 – 6.
Note: If you’re going to include more than a handful of questions, you can categorize them using sections.
- You can customize the look and feel of the quiz using the Style option, which includes background themes, colors, and even a selection of background music.
- Click Preview to view how your survey will look on a computer and then click Mobile to view how it will be displayed on a mobile device.
- Use the Collect responses button to specify the following configuration settings:
- Specify who can respond, whether you want to document their names, and if you want to limit each participant to one response.
- Create a short URL and/or copy the link to the survey.
- Send an invitation to the survey to participants using Outlook or Microsoft Teams.
- Download the QR code so participants can scan the code to access the survey.
- Copy the code that was generated so it can be pasted on a webpage.
By clicking the ellipsis (top right-hand side of page), you can complete the following steps:
- Collaborate or Duplicate: Add collaborators or share as a template)
- Settings: Control when to show the results of the quiz, add the participants who can access the quiz, configure response options including the start/end date of quiz, shuffle the questions of quiz, create a custom thank you message, and configure response receipts.
- Print Form: Allows the creator to print the quiz they created before or after it is completed.
- Feedback: Send feedback to Microsoft regarding what you like or dislike, or you can make a suggestion to Microsoft for a potential improvement to Forms.
To view the survey results, you can click the Responses option on the top-left of page for:
- Responses (overview)
- Average time to complete quiz
- Status of quiz
- Review quiz answers
- Post scores (you can assign a value to each question)
- Open responses in Excel to view points from each participant for each quiz question
Figure 1 is an example of a two-question quiz that I created in about seven minutes using Quiz within Forms. This question requires an answer to the first question and allows you to select multiple choices (up to three in this first question). The Other option is not available in quizzes, so I added a second question that allows participants to add a sport that’s not listed in the first question.
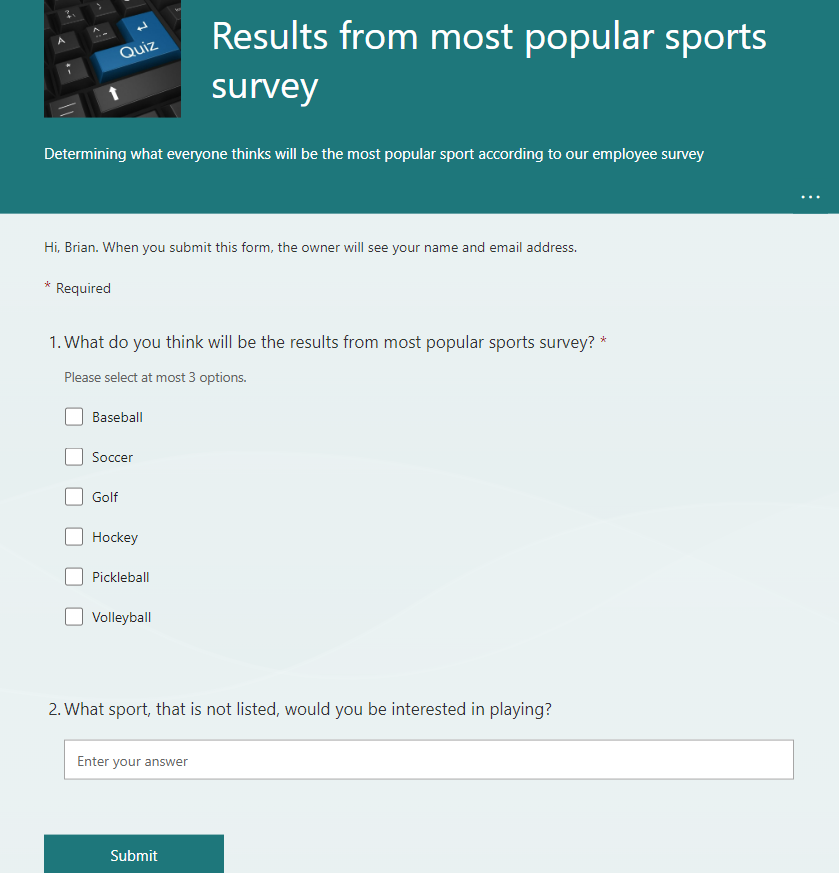
Tip: When viewing multiple forms and quizzes in your Microsoft 365 account, it may be challenging to differentiate between forms and quizzes. When creating them, you may want to use a prefix to help you identify the type of form that was created. For instance: Quiz-FavoriteSportResults, or Survey-FavoriteSport.
The integration of quizzes with Microsoft Teams is very powerful and provides an efficient way to easily test the knowledge of the participants. You can quickly view, export, and print real-time results to determine users’ knowledge or collect their opinions.

Brian Alderman
Brian Alderman is a former Microsoft MVP, and has his Master's in Computer Information Systems. Since 1995, he has held several Microsoft certifications that currently include; MCT, MCSE for SharePoint, MCSA for Office 365, MCITP for SQL Server(R), MCSA and MCSE for Windows Server(R), and also his PMP certification. As a Senior Technical Instructor and Consultant, he has 30 years of experience in networking, SQL Server databases, SharePoint technologies, and project management. Brian's publications include Windows 2000 Professional, SQL Server 2000 Administration, SharePoint 2010 Administrator's Companion, and Microsoft SharePoint 2013 Administration Inside Out. He is an active speaker at SharePoint Industry conferences including SharePoint Saturday's, SPLive, DevIntersection, SharePoint Fest, Microsoft Ignite, and several international SharePoint conferences including London, Milan, and Madrid.