Using Microsoft Migration Manager to Migrate Content to SharePoint Online and OneDrive

Microsoft SharePoint Online includes a free and simple migration GUI, Migration Manager, to assist you in your migration from SharePoint on-premises sites, file shares, and cloud-based document storage centers to Microsoft 365. The Migration Manager, which is located in the SharePoint Online Admin Center, can perform migrations to SharePoint Online, OneDrive, and Teams from:
- File shares
- Cloud-based document centers and Microsoft Stream
- Box
- Dropbox
- Google Workspace
- Egnyte
- Stream (Classic) content to Stream (on SharePoint)
- SharePoint Server on-premises using SPMT (can be downloaded from Migration Manager)
- 2010 OOB (Out-Of-Box) workflows to Power Automate
- SharePoint Designer 2010 and 2013 workflows to Power Automate
- SharePoint Server 2010, 2013, 2016, and 2019
- SharePoint Foundation 2010 and 2013
Note: For additional information on how to use SPMT to migrate on-premises content to SharePoint Online, please visit my TekkiGurus article: Using the SharePoint Migration Tool (SPMT) to Migrate SharePoint Sites to Microsoft 365.
Migration Manager Requirements
The Migration Manager hardware and software prerequisites necessary for a successful deployment and migration are shown in Table 1.
| Component | Recommended | Minimum – Slow performance |
| CPU | 64-bit quad core processor or better | 64-bit 1.4 GHz 2-core processor or better |
| RAM | 16 GB | 8 GB |
| .NET version | 4.6.2 or higher | 4.6.2 or higher |
| Local storage | 150 GB solid-state disk | 150 GB solid-state disk |
| Network card | 1 GBPS | High-speed internet connection |
| Operating system | Windows Server 2012 R2 or higher Windows 10 agent | Windows Server 2012 R2 or higher Windows 10 agent |
| Anti-virus software | Evaluate and determine risk of disabling during migration to expedite migration | |
| SMB 2.0 | File Share migrations require source server running SMB 2.0 or higher |
Table 1: Migration Manager prerequisites
In addition to the hardware and software prerequisites, there are also several endpoints required for the Migration Manager agents to send and receive data as shown in Table 2.
| Required endpoint | For |
| https://secure.aadcdn.microsoftonline-p.com | Authentication |
| https://*.login.microsoftonline.com | Sign into the MMA agent for SPO access |
| https://*.login.windows.net | Sign into the MMA agent for SPO access |
| https://graph.windows.net | Microsoft 365 APIs for content move and validation |
| https://msauth.net | Sign into the MMA agent for SPO access |
| https://api.mover.io | Scan feature for Migration Manager requirement |
| https://spmtreleasescus.blob.core.windows.net | Installation |
| https://*.queue.core.windows.net | Migration API Azure requirement |
| https://*.blob.core.windows.net | Migration API Azure requirement |
| https://*.pipe.aria.microsoft.com | Telemetry/update |
| https://*.sharepoint.com | Destination for migration |
| https://*.blob.core.usgovcloudapi.net | Migration API Azure Government requirement |
| https://*.queue.core.usgovcloudapi.net | Migration API Azure Government requirement |
| https://spmt.sharepointonline.com | SPMT Installation link |
| https://production.odyssey.ops.mover.io | Scan feature for Migration Manager requirement |
| https://api.prod.migrations.microsoft.com | Migration Manager Web UI requirement |
| https://odyssey.prod.migrations.microsoft.com | Scan feature for Migration Manager requirement |
| https://production-wus2-signalr.service.signalr.net | Migration Manager scan feature requirement, used to communicate with server |
| https://odyssey-production-weu-1.service.signalr.net | Migration Manager scan feature requirement |
| https://odyssey-production-weu-2.service.signalr.net | Migration Manager scan feature requirement |
| https://odyssey-production-neu-1.service.signaler.net | Migration Manager scan feature requirement |
| https://odyssey-production-eus2-1.service.signalr.net | Migration Manager scan feature requirement |
| https://odyssey-production-wus2-2.service.signalr.net | Migration Manager scan feature requirement |
Table 2: Migration Manager required endpoints.
Migration Manager doesn’t support the migration of all file types. However, if a migration is in progress, these file types will be “skipped” and the migration will continue on with the migration of the supported file types. Any unsupported file types encountered during the scan or migration will generate a failure error at the item level.
The following list contains the general file types that are not supported by Migration Manager:
- Files marked as restricted.
- Shortcut files.
- 0-byte files – limitation on the OneDrive destination.
- Single large files that exceed the maximum file size.
- Destination path URL that exceeds file path limit specified by SharePoint and OneDrive (400 characters).
File Share Migrations
Migration Manager provides the ability to set up multiple servers as "agents," allowing you to scale your migration project as much as you need. It guides you through the setup of your agents and the creation of tasks necessary to perform the migration.
Within the File share section of the Migration Manager, you are able to configure the following file share migration options:
- Specify global or task-level settings.
- View all-up task progress.
- Download aggregated summary and task-level reports.
- Perform advanced tasks.
- Group agents to optimize performance.
- Conduct pre-scans.
- Implement file exclusion metrics.
Note: The Microsoft 365 file share migration only supports file sizes up to 250 GB.
You perform a file share migration by completing the following three steps:
- Set up migration agents.
- Create tasks and complete migration.
- Monitor and report the progress of migrations.
Before beginning your file share migration, you can use the following checklist to verify you are ready to begin the file share migration:
- Determine how many agents you need to install.
- Be sure you have correct permissions to the source and destination (see requirements below).
- Determine the number of computers involved in the migration.
- Verify the computers meet the prerequisites discussed above.
- Verify you have the required checkpoints configured.
- If a multi-geo tenant, determine where the agents will be installed.
- If migrating to OneDrive, pre-provision the OneDrive accounts by ensuring you have site collection administrator rights on each OneDrive site.
- If in a government cloud, check to see if extra steps are required.
Set Up Migration Manager Agents
The first step to performing a file share migration is to configure one or more migration agents, which is achieved by running a setup file on each source computer you are migrating file shares from. When running the setup file, you will need to have the following credentials:
- Source: Windows credentials that have read access to the source file share.
- Destination: Global or SharePoint Administrator credentials for the SPO destination site.
You can use the following steps to set up an agent on a computer or VM that you want to migrate file shares from into Microsoft 365:
- Login to SharePoint Online Admin Center.
- Choose Migration from the left panel.
- Under the File shares section, click Get started.
- Select the Agents tab and click Add.
- Select Download the Agent setup file.
- On the Agent Welcome page, click Next.
- Provide SharePoint credentials for destination of migrated files.
- Provide Windows credentials for source of migrated files.
- Optionally, you can then test the agent, or you can click Close.
Note: For each agent, a working folder called %appdata%\Microsoft\SPMigration is created and used to store logs, reports, and temporary folders. This folder must have 150 GB of minimum free space.
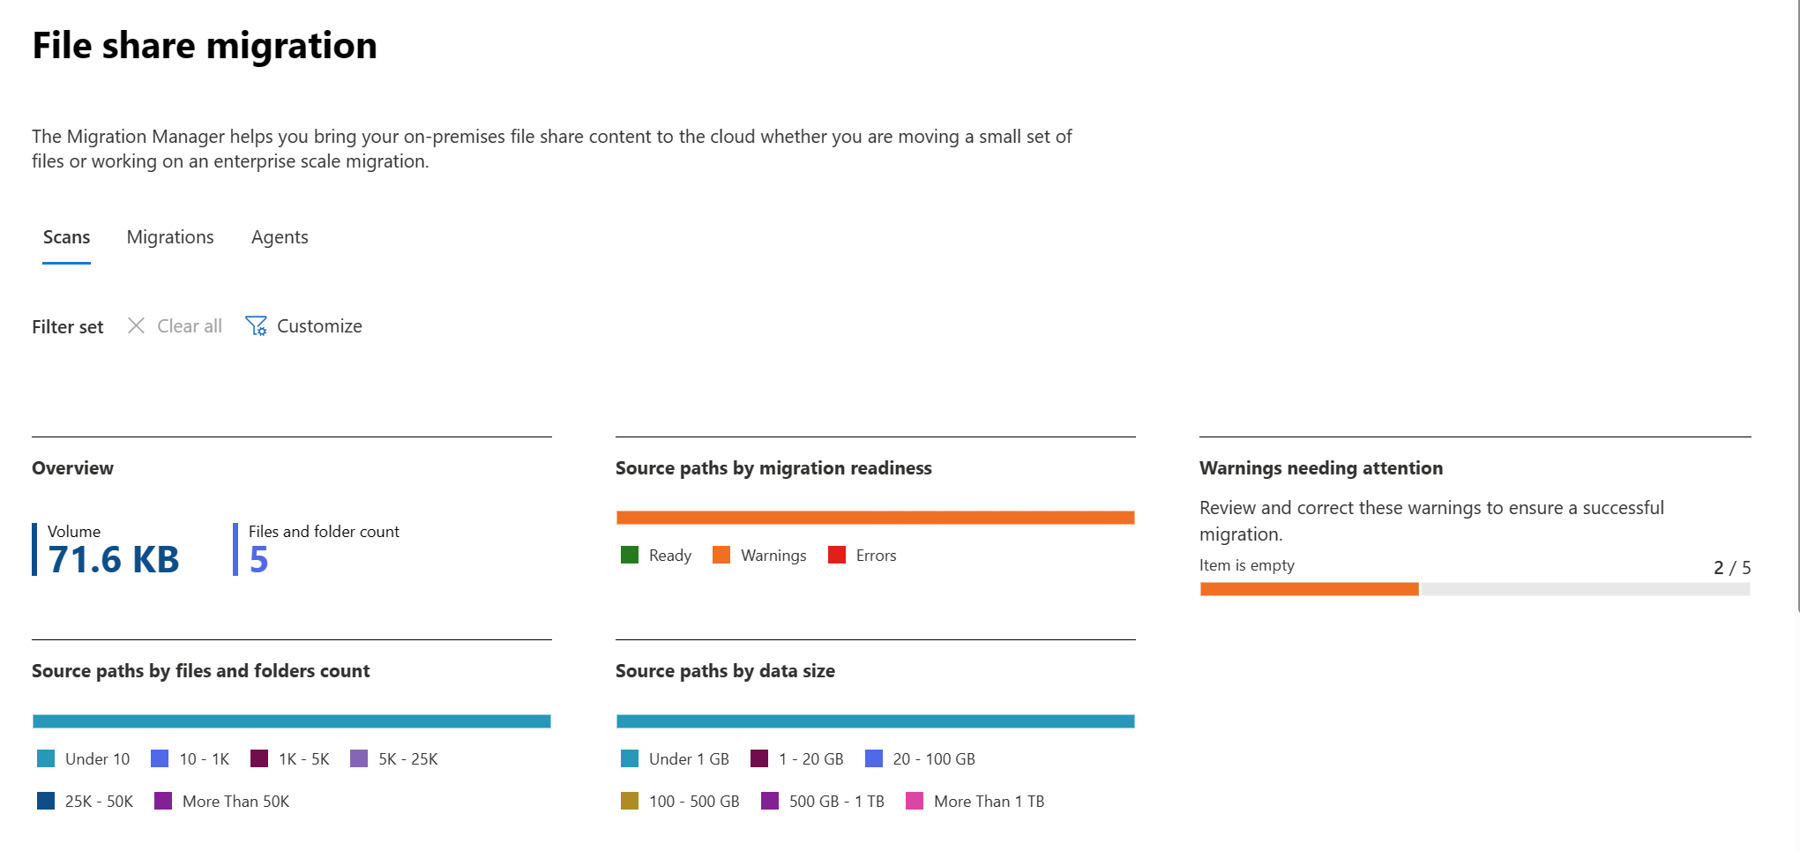
After creating an agent, the source file shares are automatically scanned. After the scan has completed, you can download the reports and logs generated and review them for any possible migration issues. Figure 1 is an example of what you would see in the Migration Manager file share under the Scans tab:

Our next step is to create a task which is where you specify the source and destination of the file share migration. The next several screen shots are the steps taken to create a file share migration task.
Create Tasks and Complete Migration
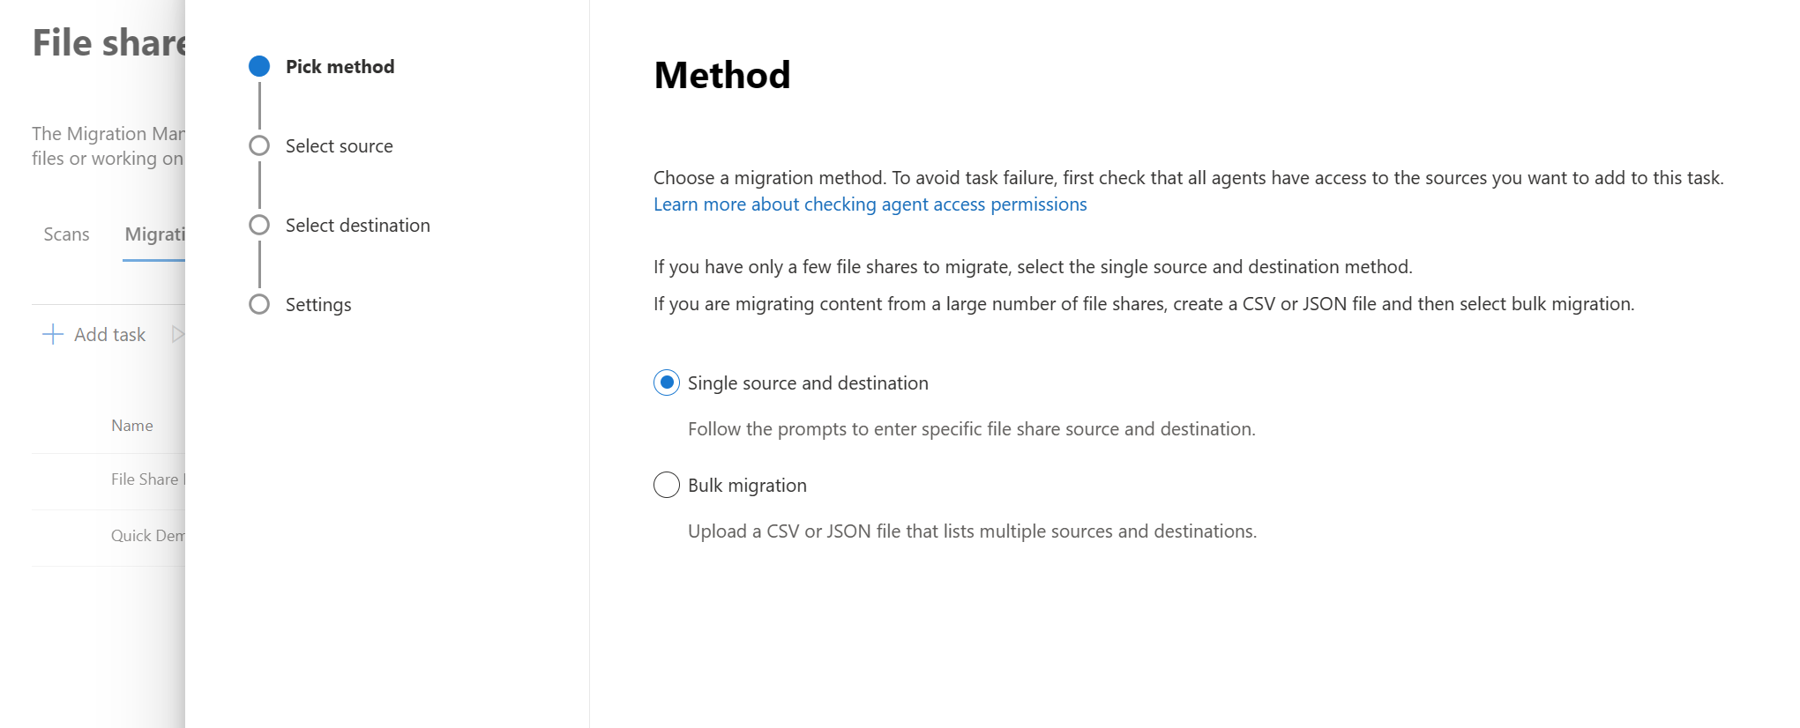
In step one you will be sure you are on the Migration tab, and you will click Add task to display the screen that allows you to specify the method of migration you are performing. You can perform a Single source and destination migration or bulk file share migrations with the source and destination addresses stored in a CSV file or using JSON file as shown in Figure 2.
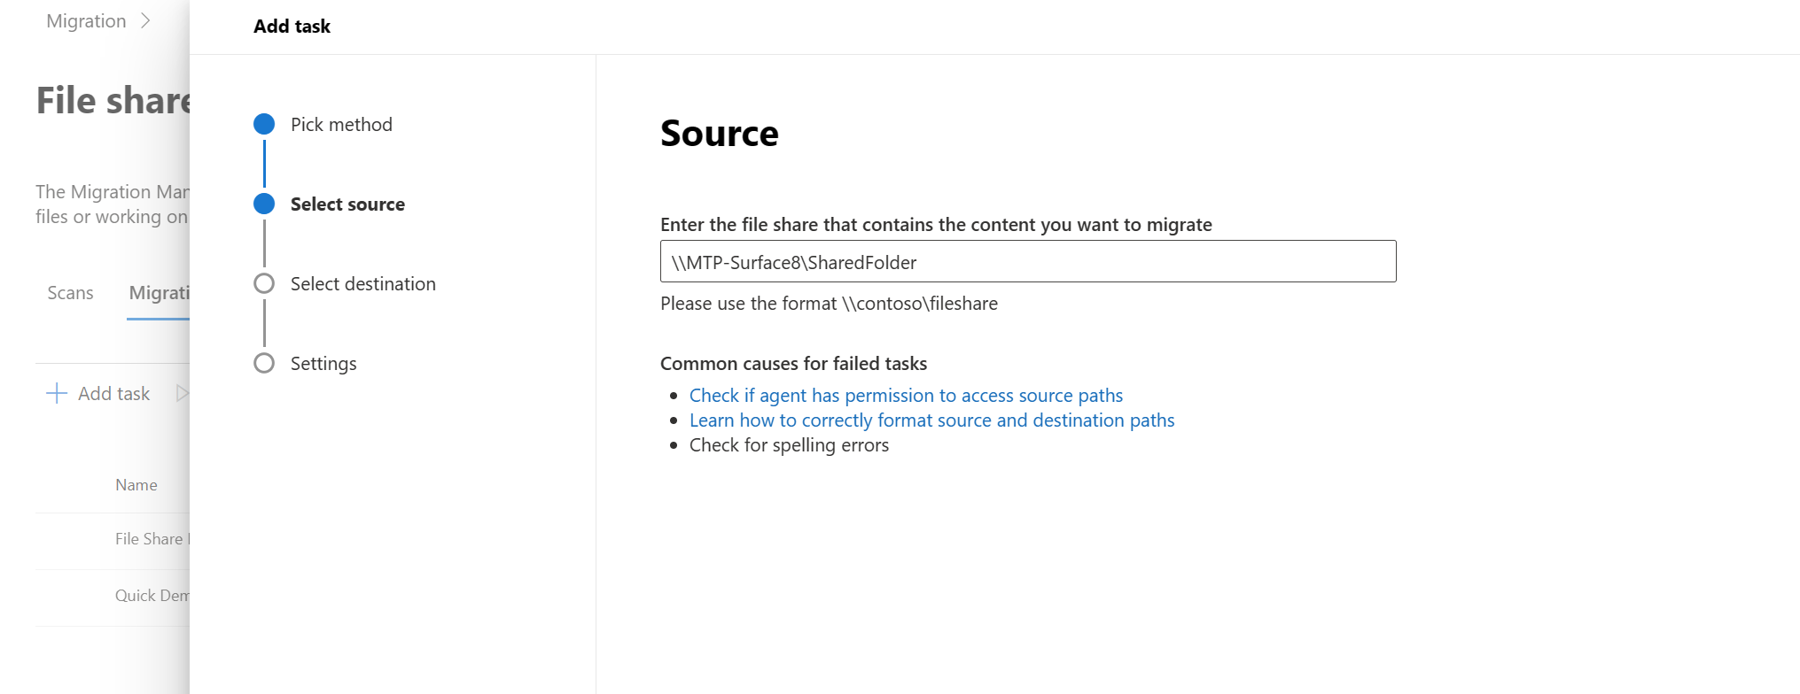
On the next screen you will specify the source file share that is to be migrated to Microsoft 365, by entering the file share path as shown in Figure 3.

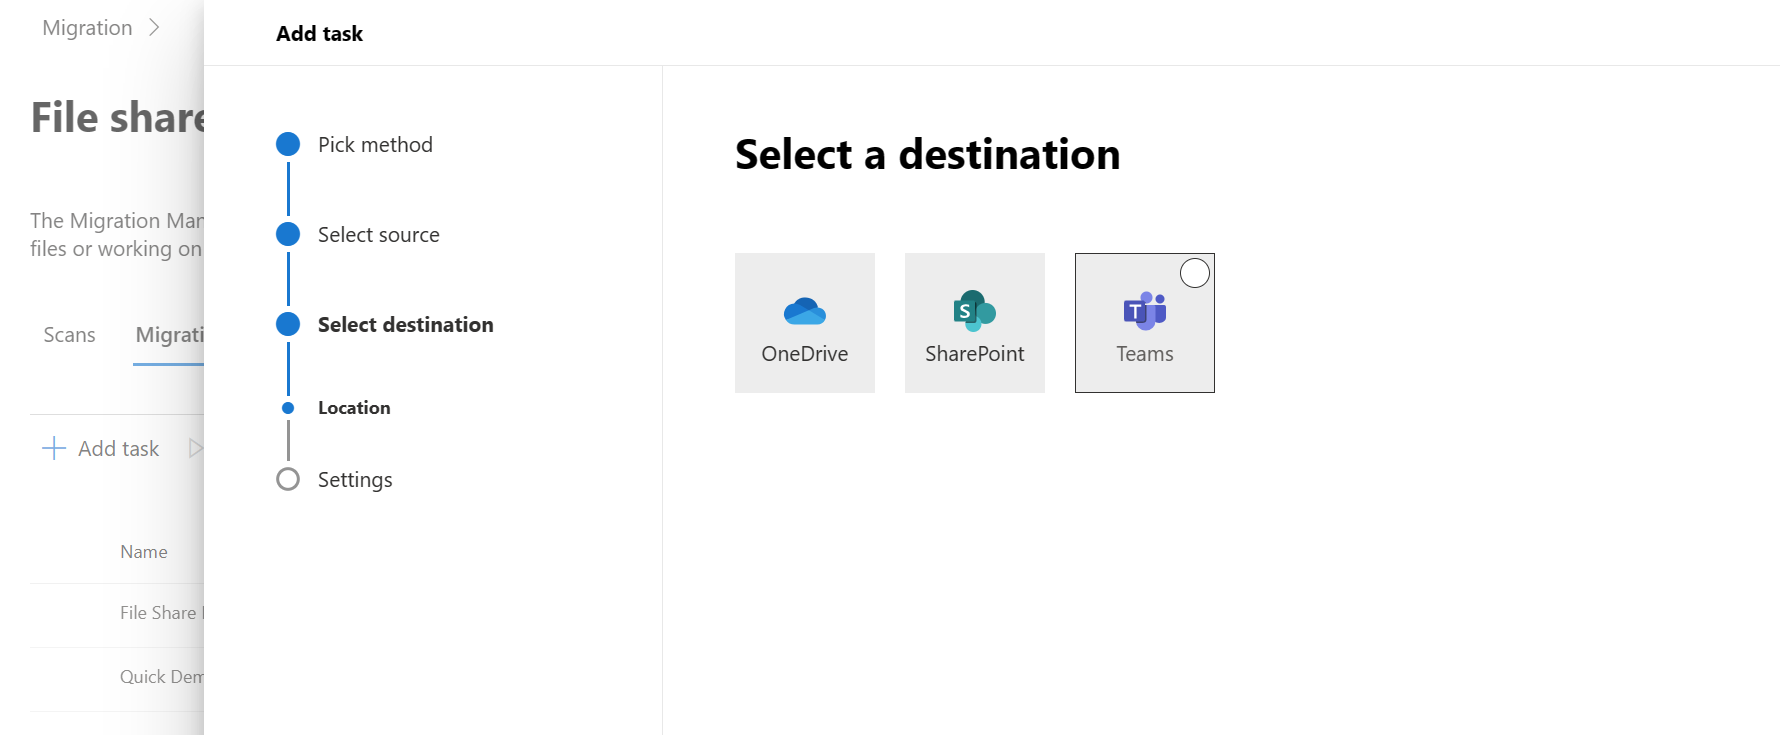
The Select a destination screen is where you specify where in Microsoft 365 you want to migrate the source files to, with your options being OneDrive, SharePoint, or Microsoft Teams, as shown in Figure 4.
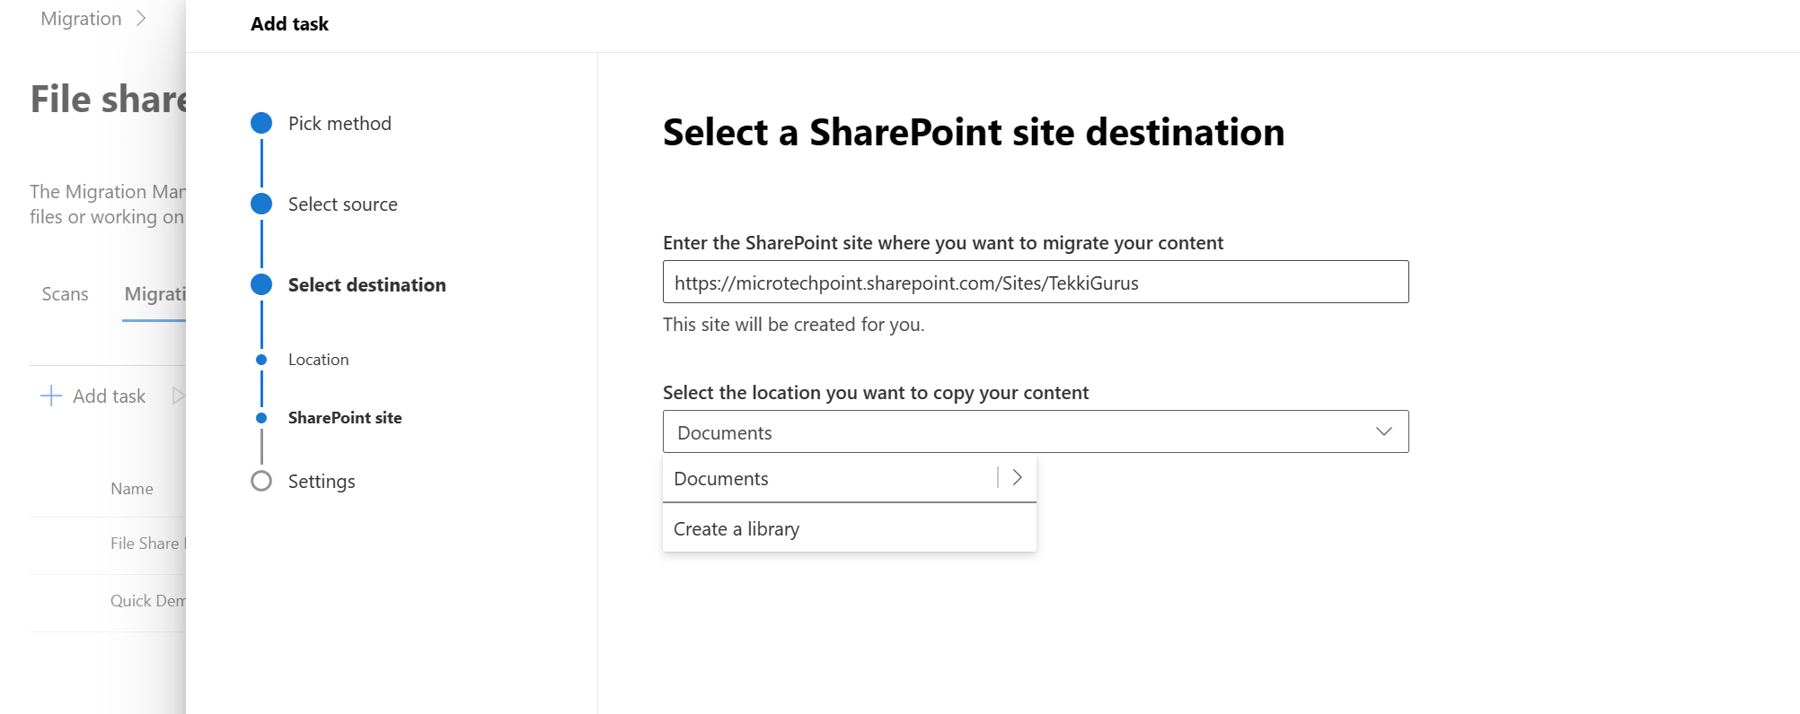
You will choose SharePoint, and then you are shown a screen asking which SharePoint site you want to migrate your content to in Microsoft 365. You can also choose to store the content in the default library location, called Documents, or supply a name for a new library to be created in SharePoint Online as shown in Figure 5.

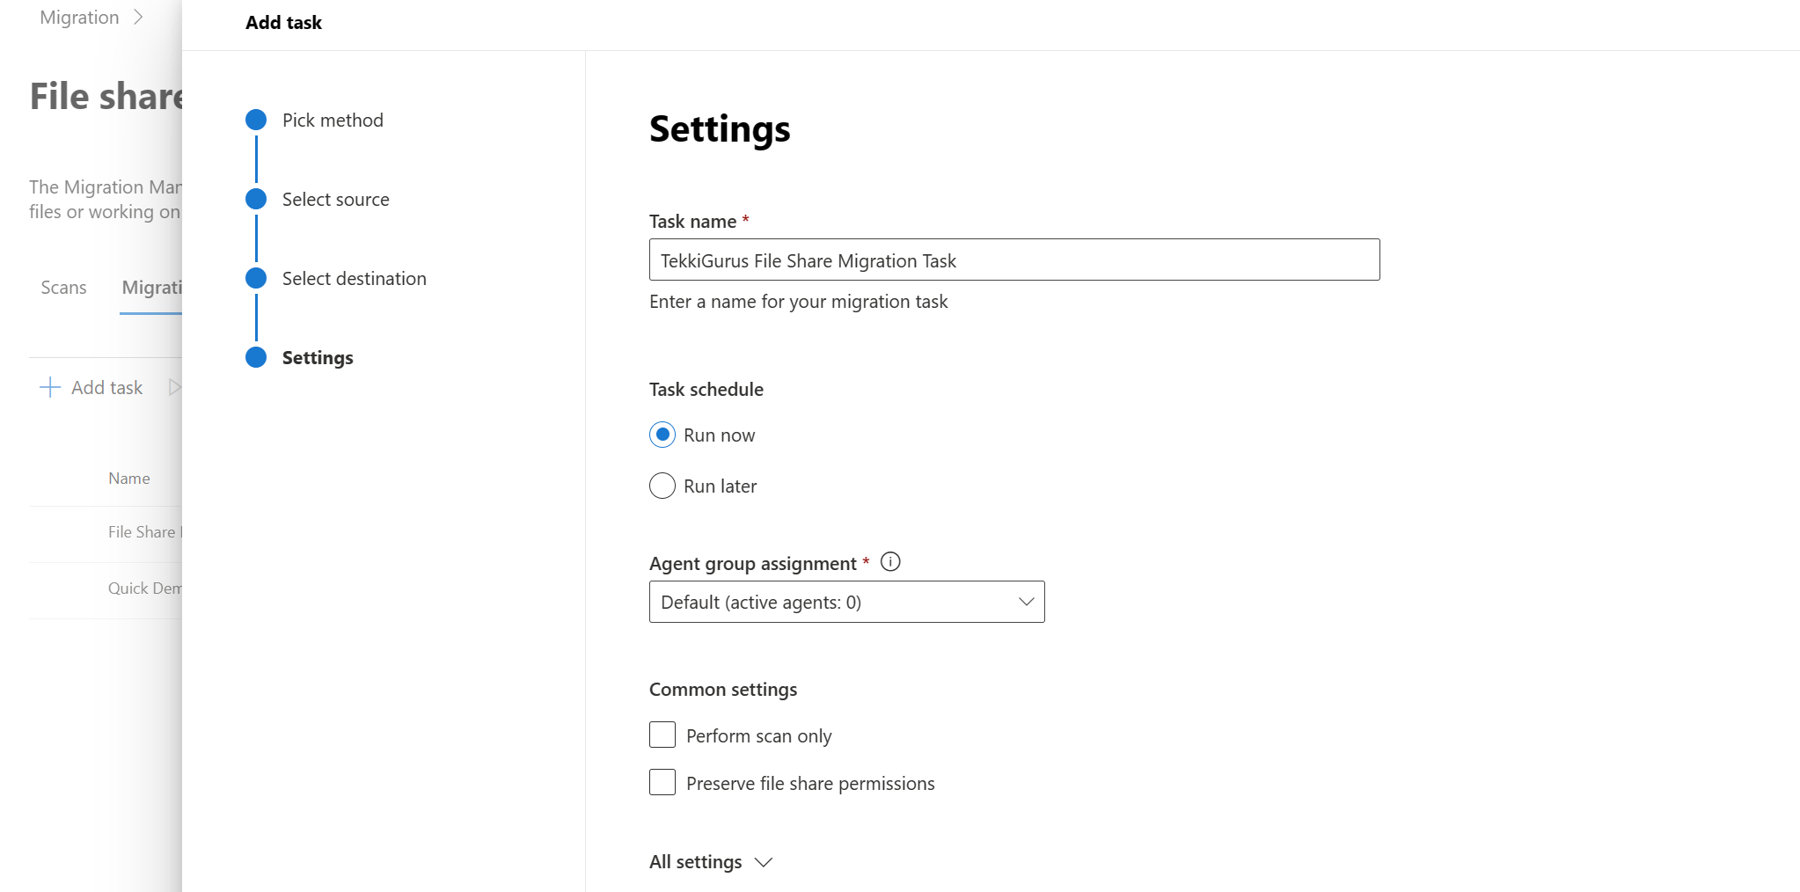
Next, the Settings screen (Figure 6) has several options to specify. By default, those include:
- Task name.
- Run task now or run later (specify date, and time it runs).
- What agent group you want to use if there are groups other than the default.
- Run a scan instead of performing the actual migration.
- Preserve file share permissions.

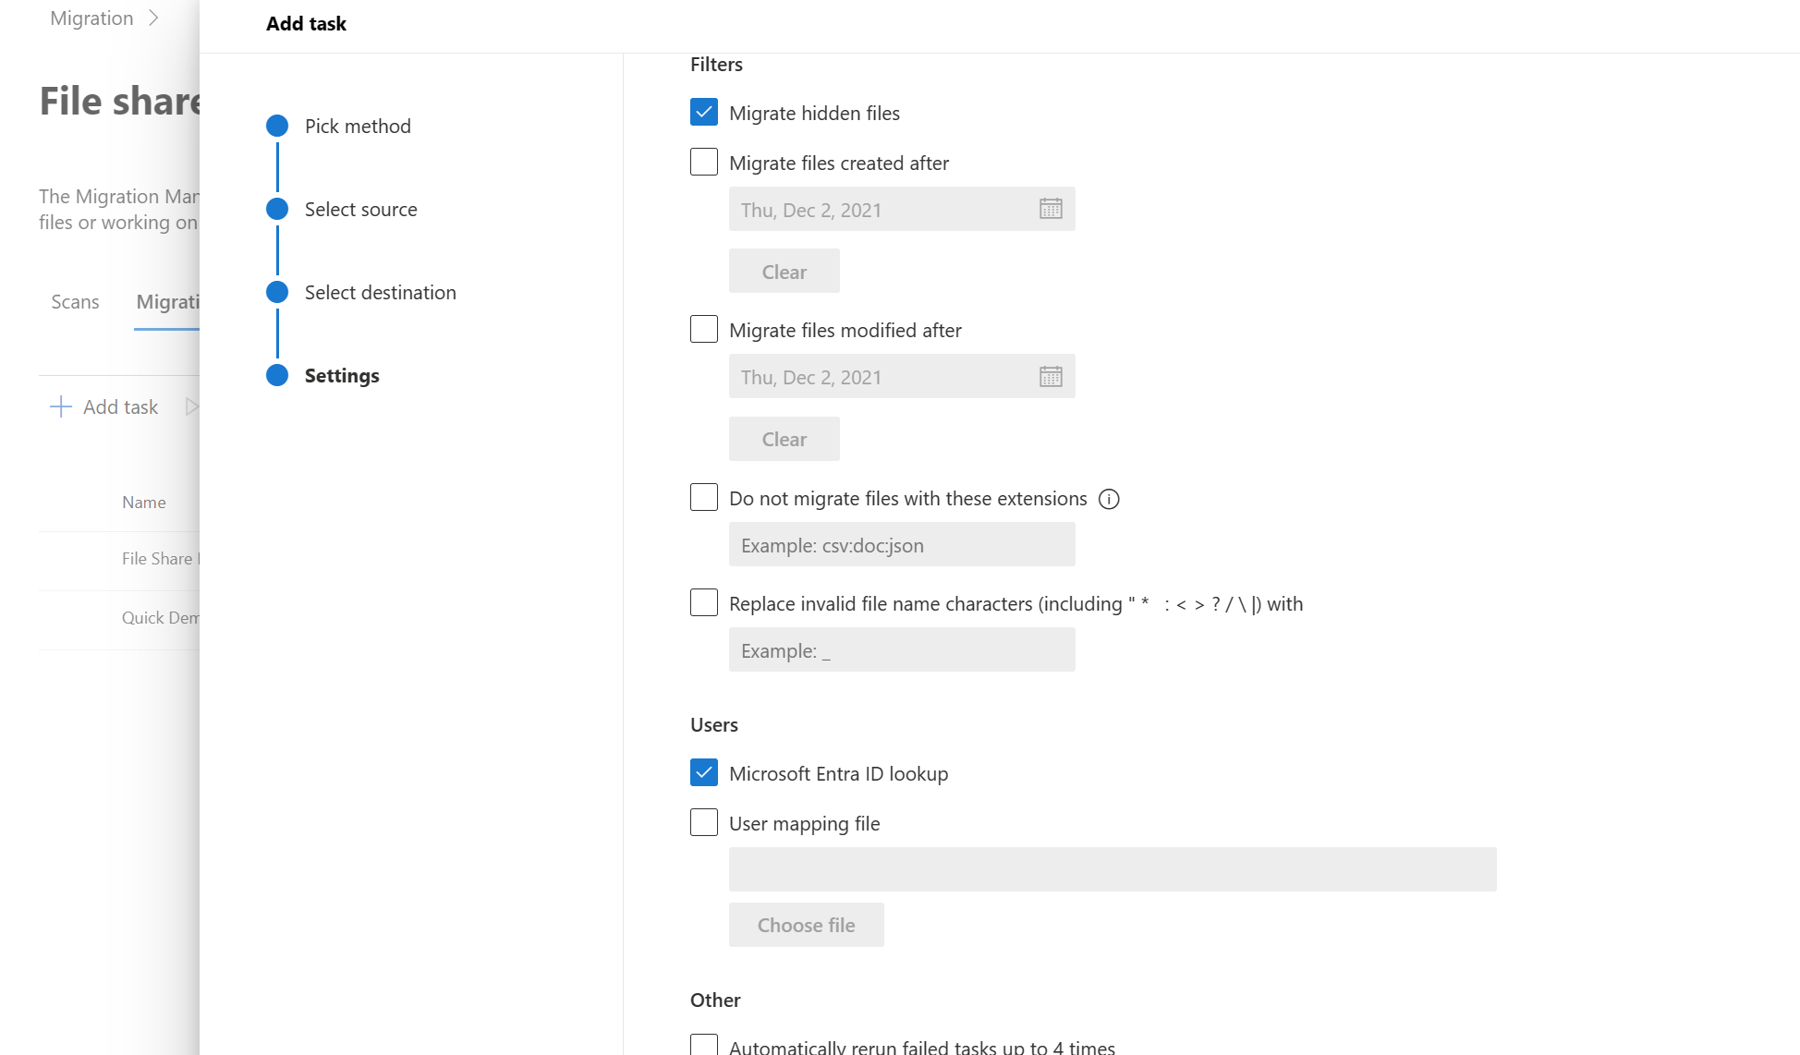
At the bottom of the default setting screen (shown in Figure 6) you can expand the All settings option to see additional more granular configurations associated with this task as shown in Figure 7. These settings allow you to filter what content is migrated based on file types, date created, date modified, and files with invalid characters.
In addition, you can specify how the users are handled using a lookup in Entra ID or a user mapping file, and if you want to rerun the task if it fails, which will try up to 4 times.

Monitor and Report the Progress of Migrations
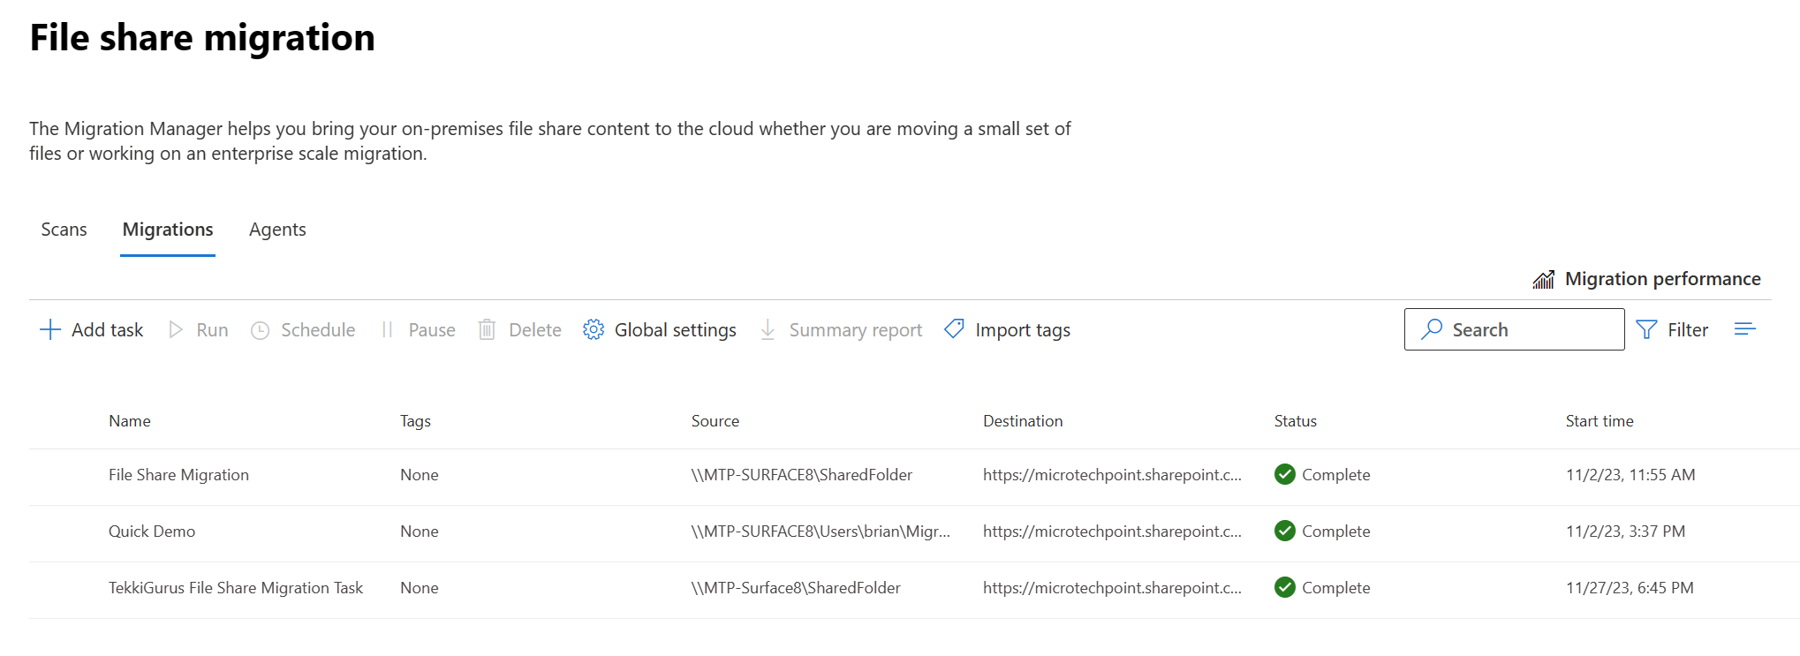
After waiting a few minutes, I navigated back to the Migrations tab, and as you can see in Figure 8, my TekkiGurus migration task ran successfully.

You can also use this screen to monitor the progress of the migration. The Status column shows the percentage of the migration progress as the migration is being performed.
Notice in Figure 8, there is a Migration performance option on the top right-hand side of the screen. Click that option to see a graph displaying information about your migration performance, as show in Figure 9. By default, it displays the performance of all migration tasks, but you can click on the View and select the performance from a specific computer. You can also change the default type from Files and Folders to Bytes. Lastly, you can configure the Last 7 days default date range to display information over the Last 14 days, Last 30 days, or specify a Custom date range.
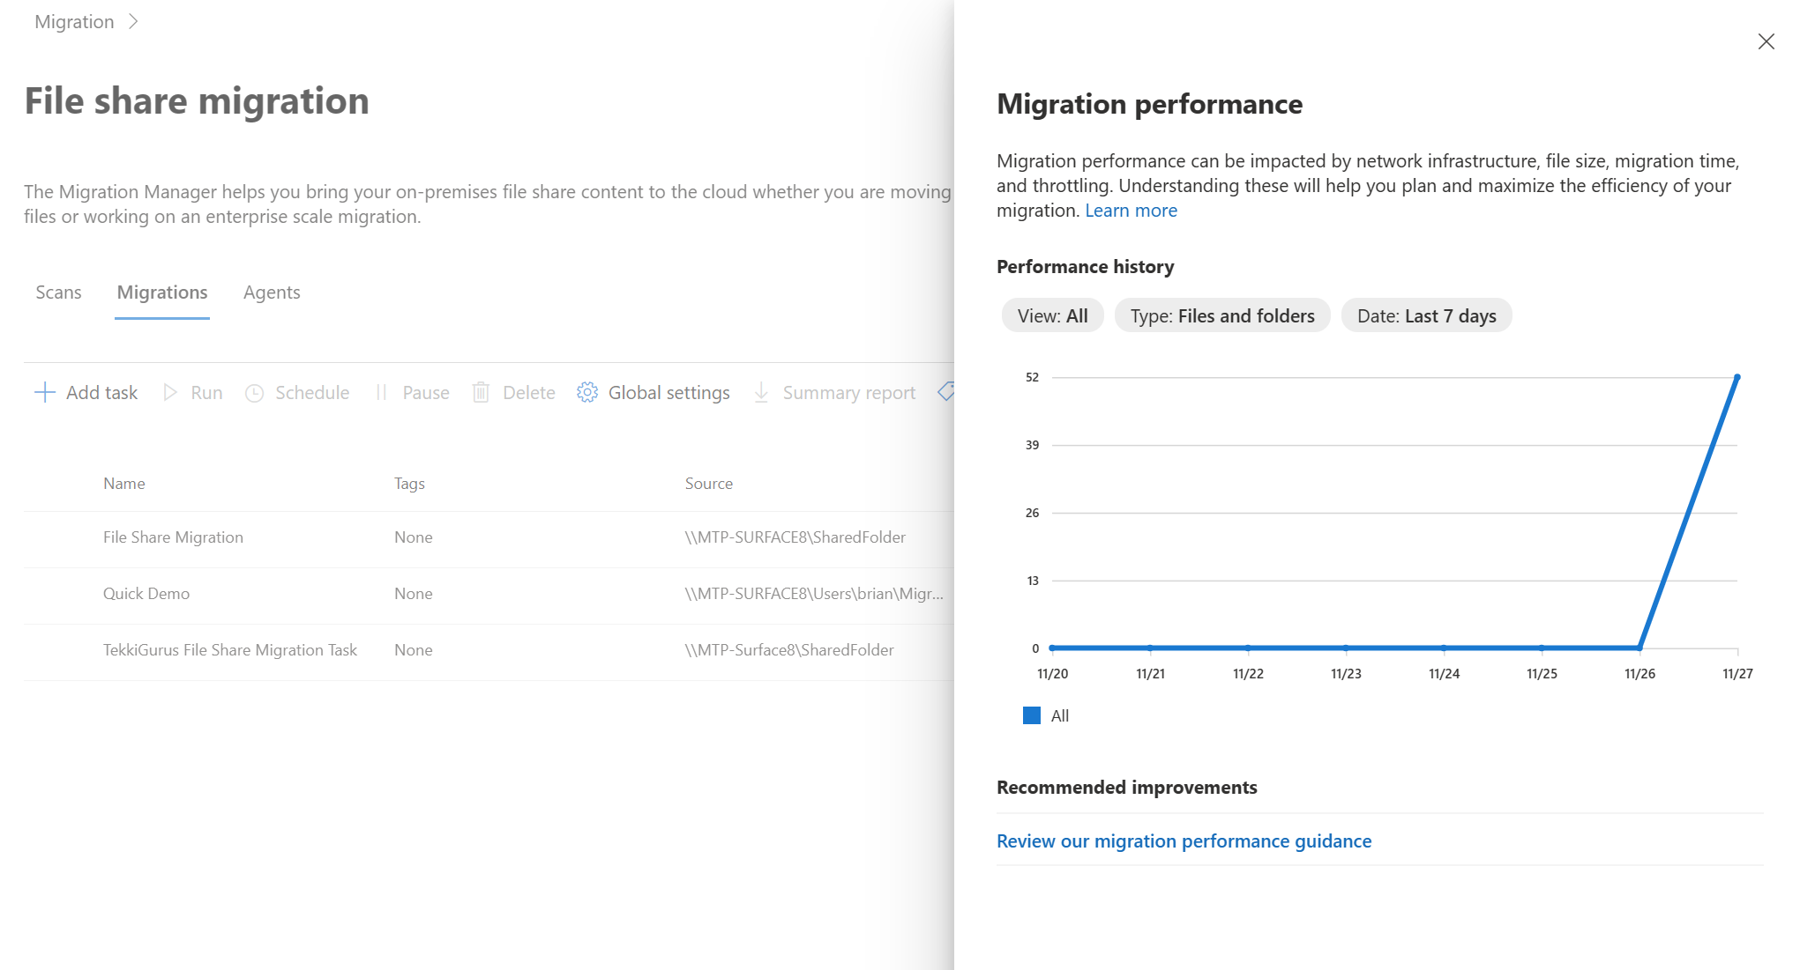
If you return back to the Scans tab where you saw the scan graphs shown in Figure 1, you can scroll down on that page and click on a Download summary report option, as shown in Figure 10.

Figure 11 is a sample Excel spreadsheet containing the type of information you will find in the summary report that is created after clicking the Download summary report option on the Scans page.
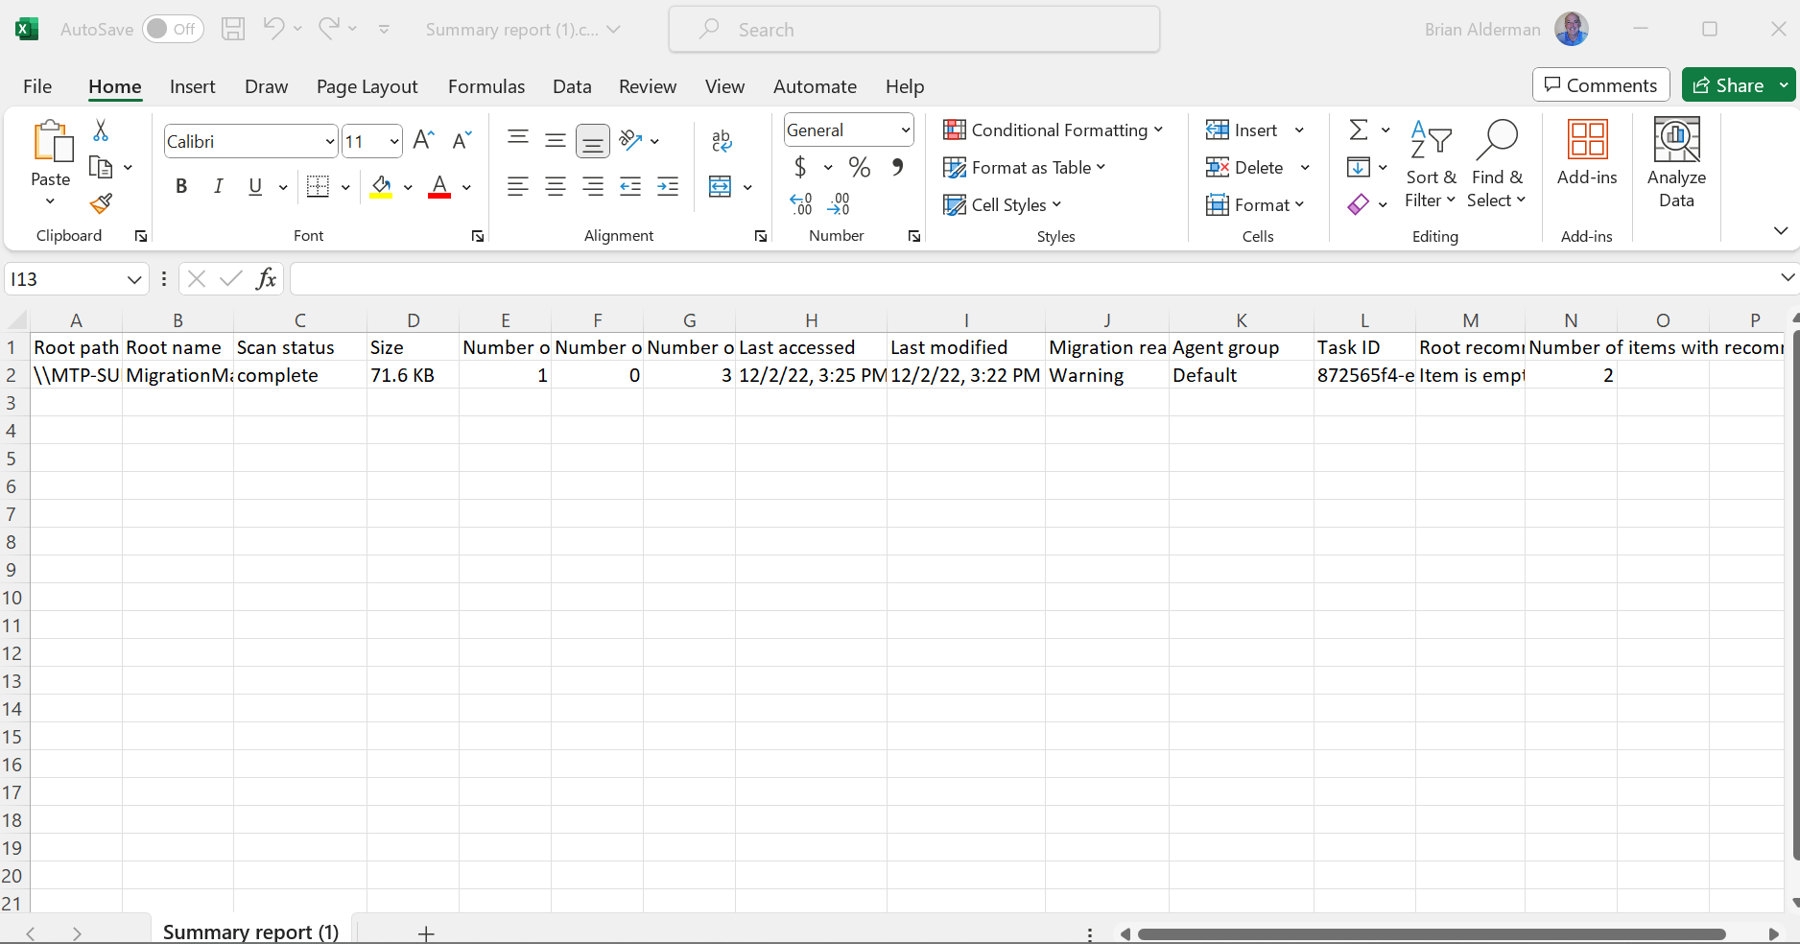
Cloud Migrations in Migration Manager
As I previously mentioned there are four cloud-based migrations supported by the Migration Manager and an option to migrate Stream (Classic) to Stream (on SharePoint). You can configure these to perform cloud-based scans and migrations to Microsoft 365.
Each of the four cloud migrations options have unique nuances in regards to file types.
Note: All four cloud-based migration options have a 15 GB maximum file size limit.
Box
After clicking on Get started you will have the option of connecting to Box, and a Migration time estimator. There are three tabs where you can configure, scan, and migrate from Box to Microsoft 365. These three tabs are:
- Overview
- Users
- User migrations
The Overview page is broken into the following four sections:
- Scan result
- Copy to User migrations
- Destination planning
- Migration result
For additional information on migrating from Box to Microsoft 365, you can visit the Box reference site.
Google Workspace
After clicking on Get started you will have the option of connecting to Google Workspace, and a Migration time estimator. There are three tabs where you can configure, scan, and migrate from Google Workspace to Microsoft 365. These three tabs are:
- Overview
- Drives
- Drive migrations
The Overview page is broken into the following five sections:
- Scan result
- Copy to Drive migrations
- Destination planning
- Migration progress
- Migration result
For additional information on migrating from Google to Microsoft 365, you can visit the Google reference site.
Dropbox
After clicking on Get started you will have the option of connecting to Dropbox and a Migration time estimator. There are three tabs where you can configure, scan, and migrate from Dropbox to Microsoft 365. These three tabs are:
- Overview
- Folders
- Folder migrations
The Overview page is broken into the following four sections:
- Scan result
- Copy to Folder migrations
- Destination planning
- Migration result
For additional information on migrating from Dropbox to Microsoft 365, you can visit the Dropbox reference site.
Egnyte
After clicking on Get started you will have the option of connecting to Egnyte and a Migration time estimator. There are three tabs where you can configure, scan, and migrate from Egnyte to Microsoft 365. These three tabs are:
- Overview
- Folders
- Folder migrations
The Overview page is broken into the following four sections:
- Scan result
- Copy to Folder migrations
- Destination planning
- Migration result
For additional information on migrating from Egnyte to Microsoft 365, you can visit the Egnyte reference site.
Stream
After clicking on Get started you will have two tabs where you can configure, scan, and migrate from Stream (Classic) to Stream (on SharePoint) in Microsoft 365. There are two tabs:
- Scan
- Migrate
The Overview page just has one section called Containers, that is broken into the following three categories:
- Containers
- Scanned videos
- Scanned data
For additional information on migrating from Stream (Classic) to Microsoft 365, you can visit the Stream references site.
If you encounter problems with any of these cloud-based migrations, there is a very detailed website called Reports, Errors, and Status Codes for Cloud Migrations that you can visit to help you troubleshoot these problems.
As you can see, Migration Manager is a powerful tool that can be used in many migration scenarios and there are several configurations, which means more opportunities for configuration, scanning, or migrating issues to occur. For assistance in troubleshooting issues with Migration Manager you should visit and bookmark the website called Troubleshooting Microsoft Migration Manager. You’ll see there are a lot of helpful articles that will help you troubleshoot most issues that occur when working with Migration Manager.
Like most Microsoft products and services, Migration Manager is constantly being updated and you will want to be aware of what is changing and when. I suggest you also visit and bookmark the website What’s New in Migration Manager to help you keep on top of what is new in Migration Manager, and how it will affect your organization when deploying these updates.

Brian Alderman
Brian Alderman is a former Microsoft MVP, and has his Master's in Computer Information Systems. Since 1995, he has held several Microsoft certifications that currently include; MCT, MCSE for SharePoint, MCSA for Office 365, MCITP for SQL Server(R), MCSA and MCSE for Windows Server(R), and also his PMP certification. As a Senior Technical Instructor and Consultant, he has 30 years of experience in networking, SQL Server databases, SharePoint technologies, and project management. Brian's publications include Windows 2000 Professional, SQL Server 2000 Administration, SharePoint 2010 Administrator's Companion, and Microsoft SharePoint 2013 Administration Inside Out. He is an active speaker at SharePoint Industry conferences including SharePoint Saturday's, SPLive, DevIntersection, SharePoint Fest, Microsoft Ignite, and several international SharePoint conferences including London, Milan, and Madrid.