Managing Microsoft Teams for Education as an IT Professional

Managing Microsoft Teams as an IT admin is critical to ensuring a consistent, secure work environment that is customized for all user profiles within the organization. Even though managing Microsoft Teams in a business environment has some similarities (deployment control, policies) to managing Teams in an educational environment, there are some specifics for educational users (staff, teachers, and students) for whom the settings in the Teams admin center will be quite different.
In this second of a three-part series (read the first article here), I will walk you through the best choices you can make as an IT administrator to ensure a secure learning environment for all users. We'll focus specifically on the following: deployment and class creation, student education policies, managing files within a Class team, preventing external sharing, and more.
Reminder: Choice of Team Type Is Permanent
I mentioned this in the first article: Microsoft Teams for Education offers four different types of team, each with its own technical and functional limitations. So be sure you know which team type you need because it is impossible to change the type of team once it is created.
In addition, IT professionals need to keep some general limitations in mind about Teams for education:
- Maximum number of members using a OneNote Class Notebook in a Class team: 300
- Maximum number of private channels per team: 30
- Shared channels are not supported in Class teams
Provisioning Options
This likely isn’t news for IT staff, but by default, all users can create Microsoft 365 groups, which means they can also create teams. This can be a real source of difficulty for business owners and can lead to team sprawl. Imagine the situation with students who are also able to create groups: a happy mess in the making!
In general, the wisest decision is to prevent students from creating Microsoft 365 groups. The easiest way to do this is to create a security group with the people who are authorized to create groups, then issue PowerShell commands. Microsoft's documentation explains this process very well.
Once you’ve completed this step, you need to understand the three ways to create class teams:
- School Data Sync (SDS)
- PowerShell scripts using graphical APIs
- Creating teams manually
Let's take a closer look at each method.
Automatic Team Class Creation with SDS
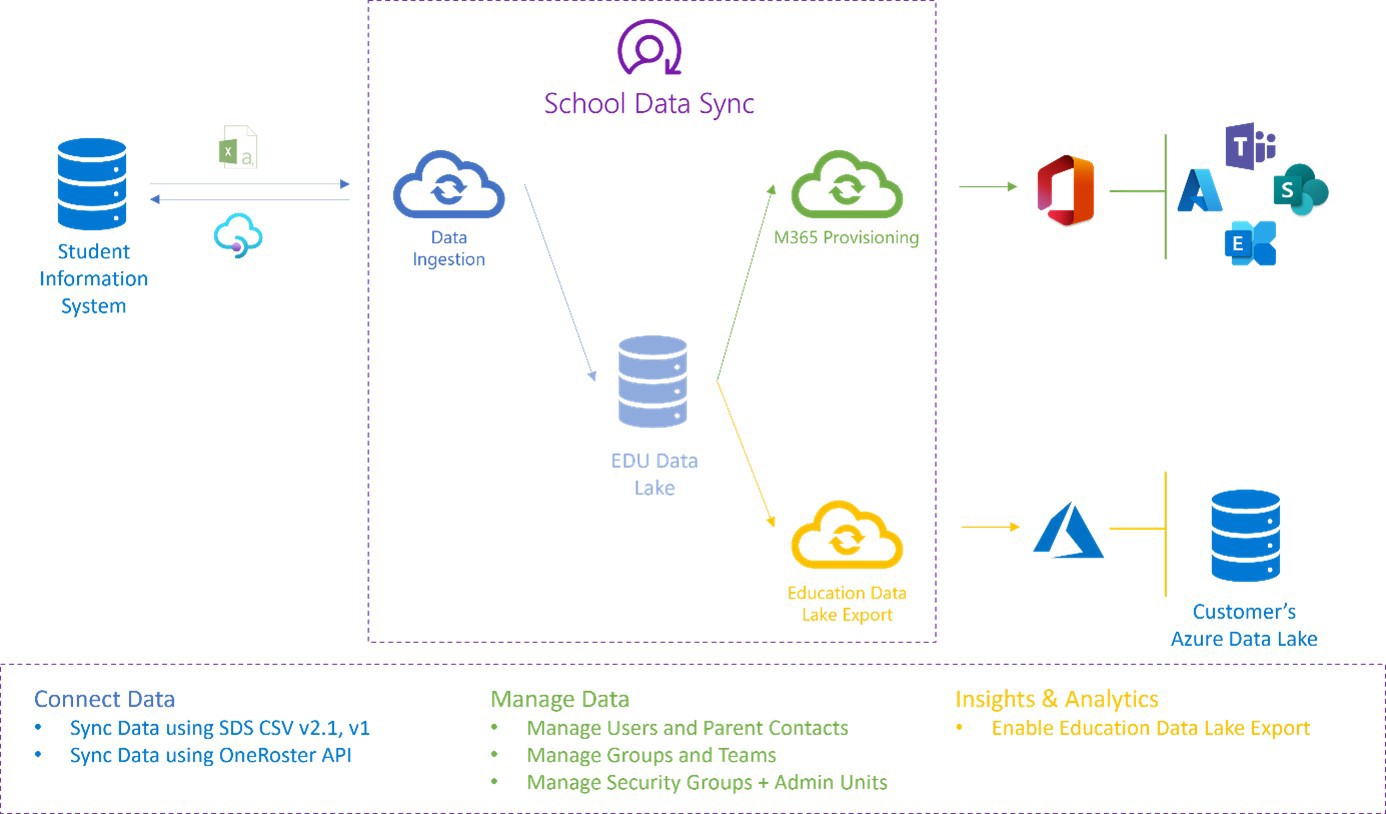
SDS is a free service from Microsoft that automates the process of synchronizing user data and student rosters with Microsoft 365. It supports virtually all Student Information Systems (SIS) / Student Management Systems (SMS) that can export data to CSV files. See this page for a list of SISs SDS supports.

This is by far the simplest and least time-consuming solution for administrators and provides the following benefits:
- Automatically creates users and applies licenses
- Automatically creates a Microsoft 365 group and turns it into a Class team
- Provides early access to Class teams for teachers so they have time to prepare, add files, and get organized before granting access to their students
- Cleans up classes when transitioning between academic years or semesters; classes are marked as expired (EXP in the display name) and archived (teams are placed in read-only mode and moved out of the active view within Teams)
For more information, please refer to the official links listed below:
https://learn.microsoft.com/en-us/schooldatasync/school-data-sync-overview
https://learn.microsoft.com/en-us/schooldatasync/academic-year-transition
PowerShell or Graph API Scripts
If you are familiar with PowerShell or Graph API, you can create scripts to configure many of the team parameters.
With the Microsoft Graph API (Preview) you can:
- Create a team
- Add members and owners
- Add channels
- Add applications
- Give users a link to the team you created
- Remove members, owners, channels, and applications when you no longer need them
- Archive the team when it's no longer active
- Delete the team
With PowerShell you can:
- Create a team
- Add members and owners
- Add channels
- Remove members, owners, and channels when you no longer need them
- Delete the team
Unlike the first solution, this process requires more technical knowledge and time on the part of the administrator to perform all these actions.
For more information, please refer to these official links:
https://learn.microsoft.com/en-us/graph/api/resources/teams-api-overview
https://learn.microsoft.com/en-us/powershell/module/teams/?view=teams-ps
Create Teams Manually
Depending on the permissions an administrator has granted to teachers, they can:
- Create their own teams and invite users, including students
- Manually add users to the team
- Share a membership code
- Share a link to the team
This solution may have drawbacks such as:
- Teachers having the responsibility of creating classes
- Teachers having to manually intervene
- Time spent on these manipulations
- Students not having early access to the team
As you can see from these solutions, the first is by far the most advantageous and timesaving. But it all depends on your context. It's up to you to decide what's best.
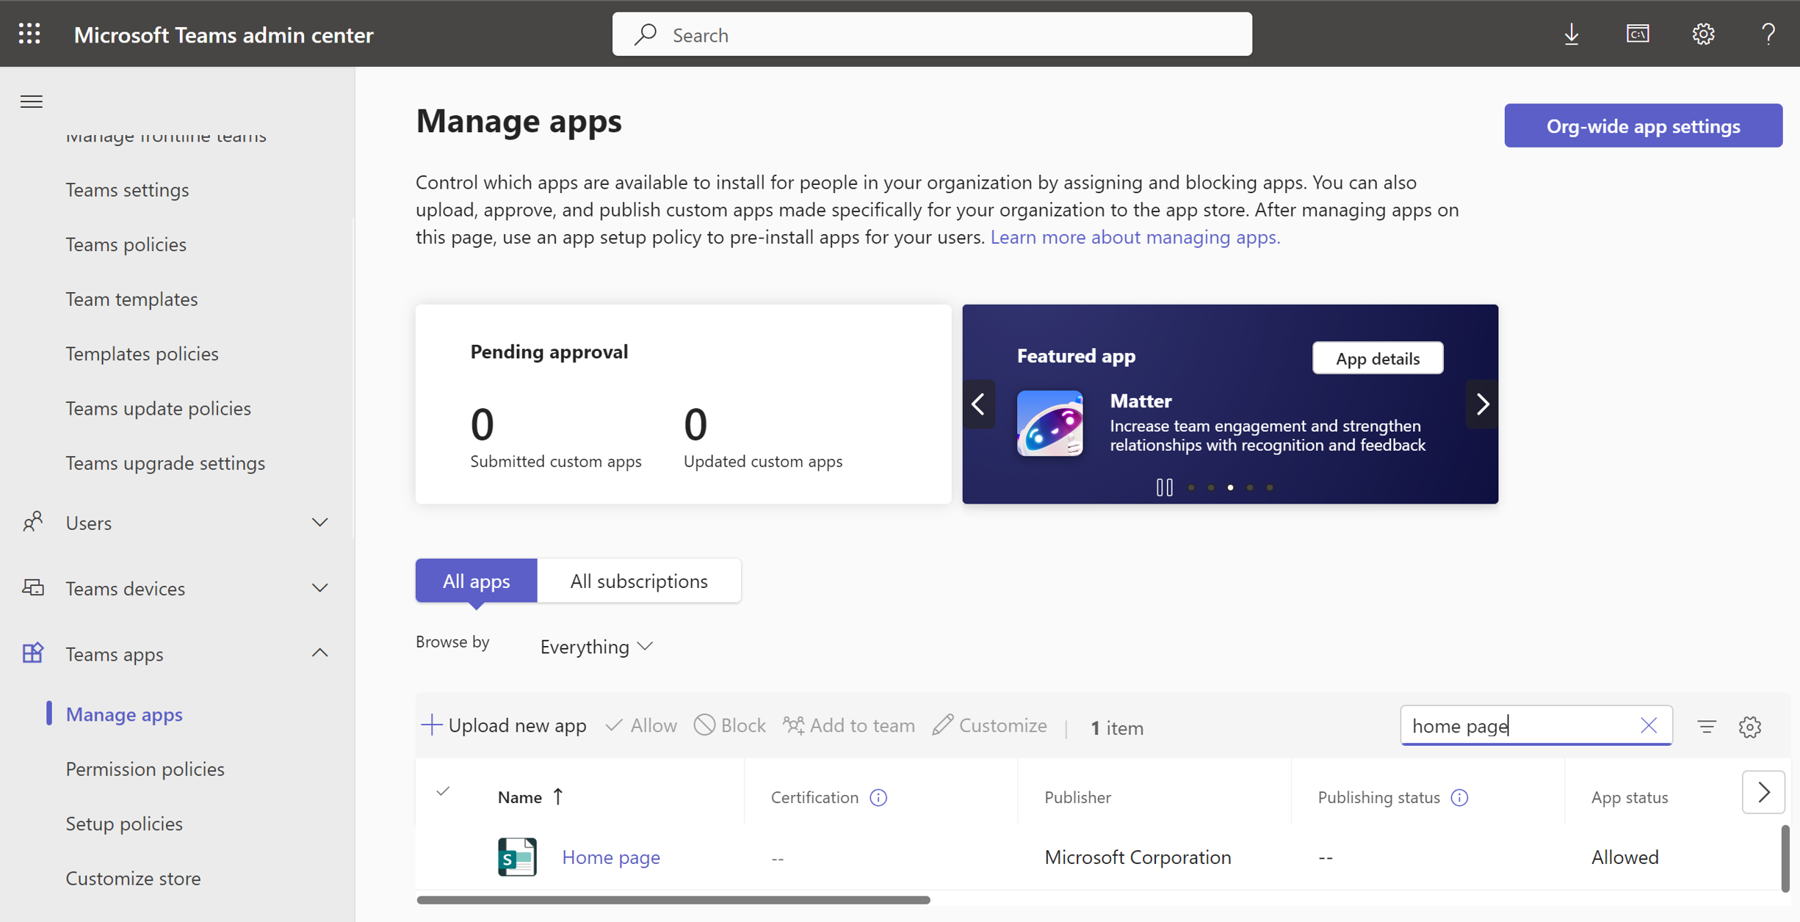
Policies in the Teams for Education Admin Center
If you're a Teams administrator, you're probably familiar with policies in the Teams admin center.
A policy is a set of rules that determine the behavior of a particular feature or service based on the user population to which you're assigning that policy. While policy management is recommended for business applications, it is mandatory for education applications because you cannot grant the same rights to teachers and students.
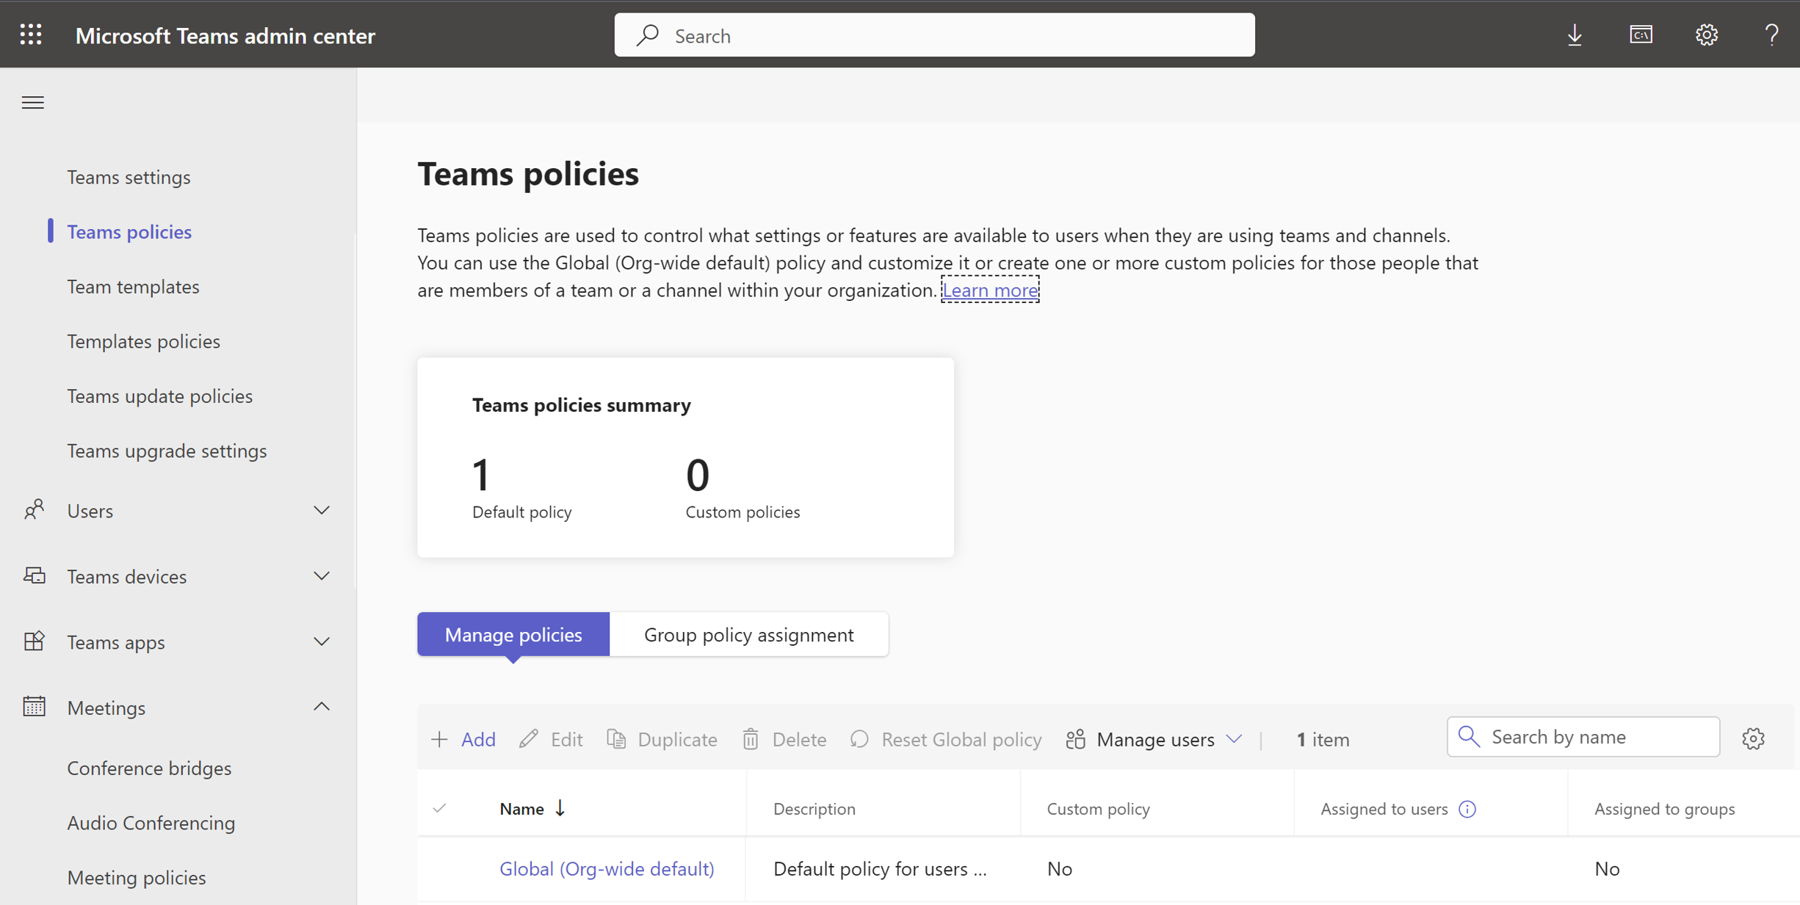
By default, the Teams admin center proposes only the global (organization-wide default) policy for the following component policies:
- Teams
- Teams templates (not available in education tenant)
- Teams updates
- App permissions
- App creation
- Meetings
- Events
- Meeting templates (Teams premium add-on licensing needed)
- Messaging
- Calling
Every new user (student or educator) is assigned the global policy definition for each capability area. Therefore, policies must be adjusted for both students and educators to keep the Teams environment safe.
I recommend that you set the global policy to match your strictest set of policy definitions. This will be the policy definition for students to reduce the risk that a student will receive inappropriate levels of access. And then, for users belonging to populations with elevated access (management, administrative staff, teachers), the administrator can create customized policies to adjust who is allowed to do what.
There are several ways of assigning a policy:
- Individual user policy assignment
- Group policy assignment
- Policy package assignment
But there's a precedence rule to be aware of: A policy assigned directly to a user overrides any other policy of the same type assigned to a group. If a user isn't directly assigned a particular policy type, the policy assigned to a group of which the user is a member takes precedence. If a user is a member of multiple groups, the policy that has the highest group assignment ranking for the given policy type takes precedence. If a user isn't directly assigned a policy or isn't a member of any groups that are assigned a policy, the user gets the global policy for that policy type.
As a reminder, assigning rules to groups only considers Microsoft 365 groups, security groups, or distribution lists.
Then there are policy packages, which are a collection of predefined policies and policy settings that you can assign to users. Policy packages support the following types of Teams policies:
- Messaging
- Meetings
- Application setup
- Calling
- Live events
- Call park
- Teams
- Voice routing
- Caller ID
- Updates
- Events
While it's a good idea to rely on the pre-defined policy packages, it's also good to understand what's behind each policy parameter so you can customize policies according to your institution’s needs. We'll look at that below.
A Detailed Look at Teams for Education Policies
As I explained above, I recommend putting all students under the global policy and then creating customized policies based on the two main target populations (students and teachers/administrative staff).
All of this will depend on your context. I'm not in favor of systematically blocking functionality for students, but rather giving them the freedom to use Teams as long as there's real upstream education and empowerment of students about their practices in Teams. That said, it's best to know what's behind each setting. The tables throughout the rest of the article will give you a clearer idea.
Suggested Messaging Policies
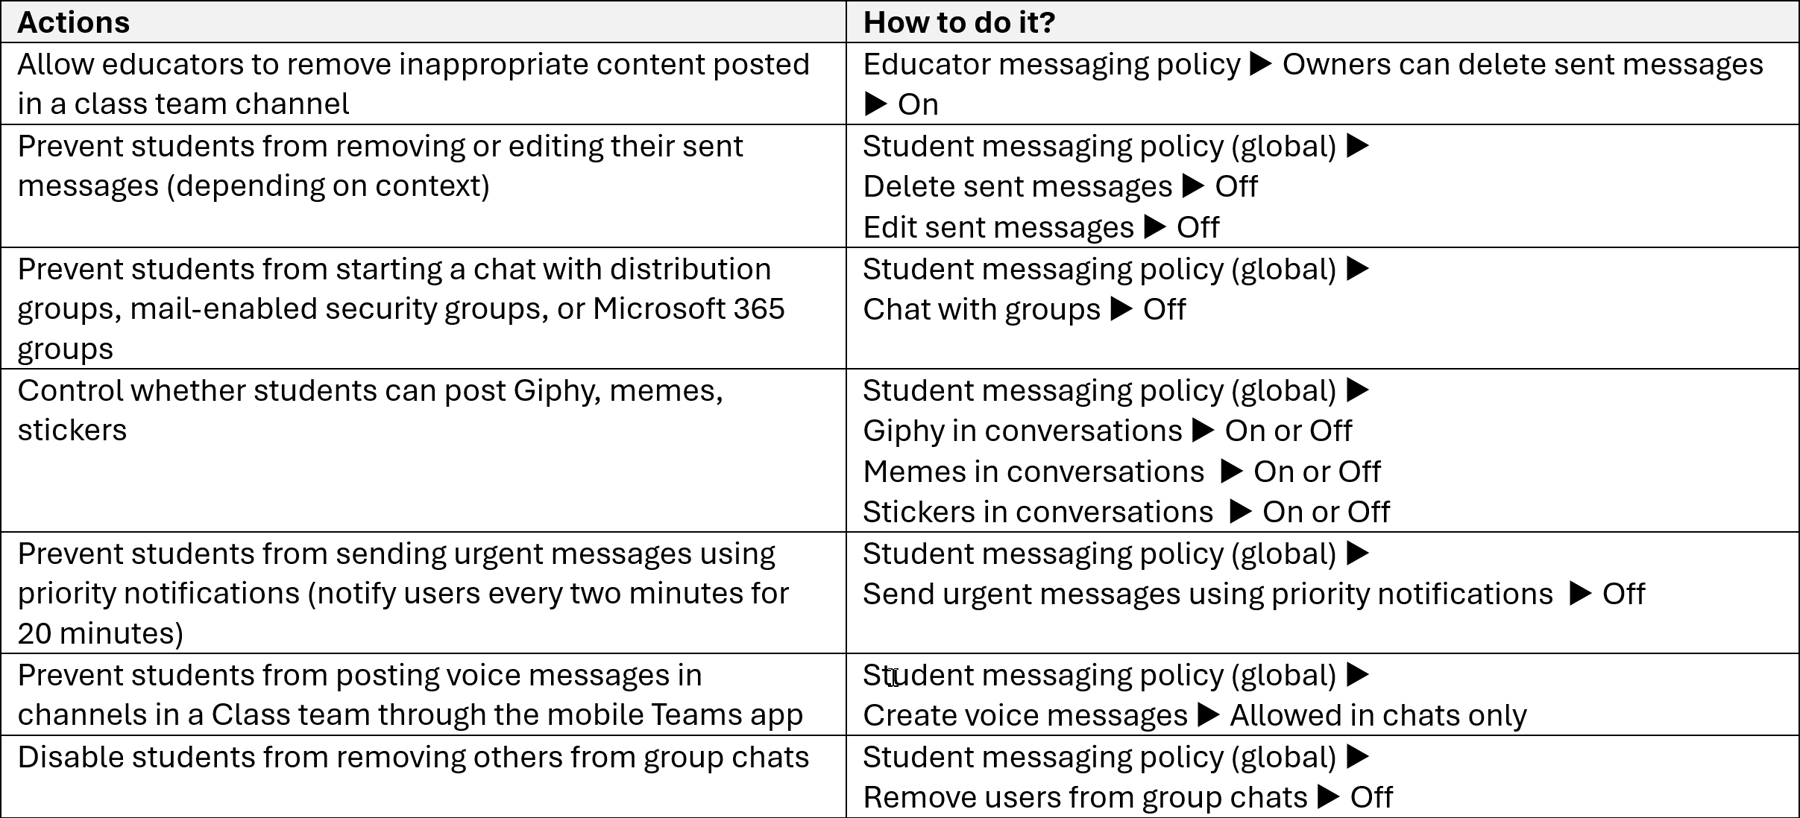
What about disabling chat for students?
This is the main question that always comes up. Disabling chat for students isn't necessarily a good idea because it blocks students from talking to each other when they need to organize themselves for group work or presentations, and it also blocks a teacher from contacting a student individually.
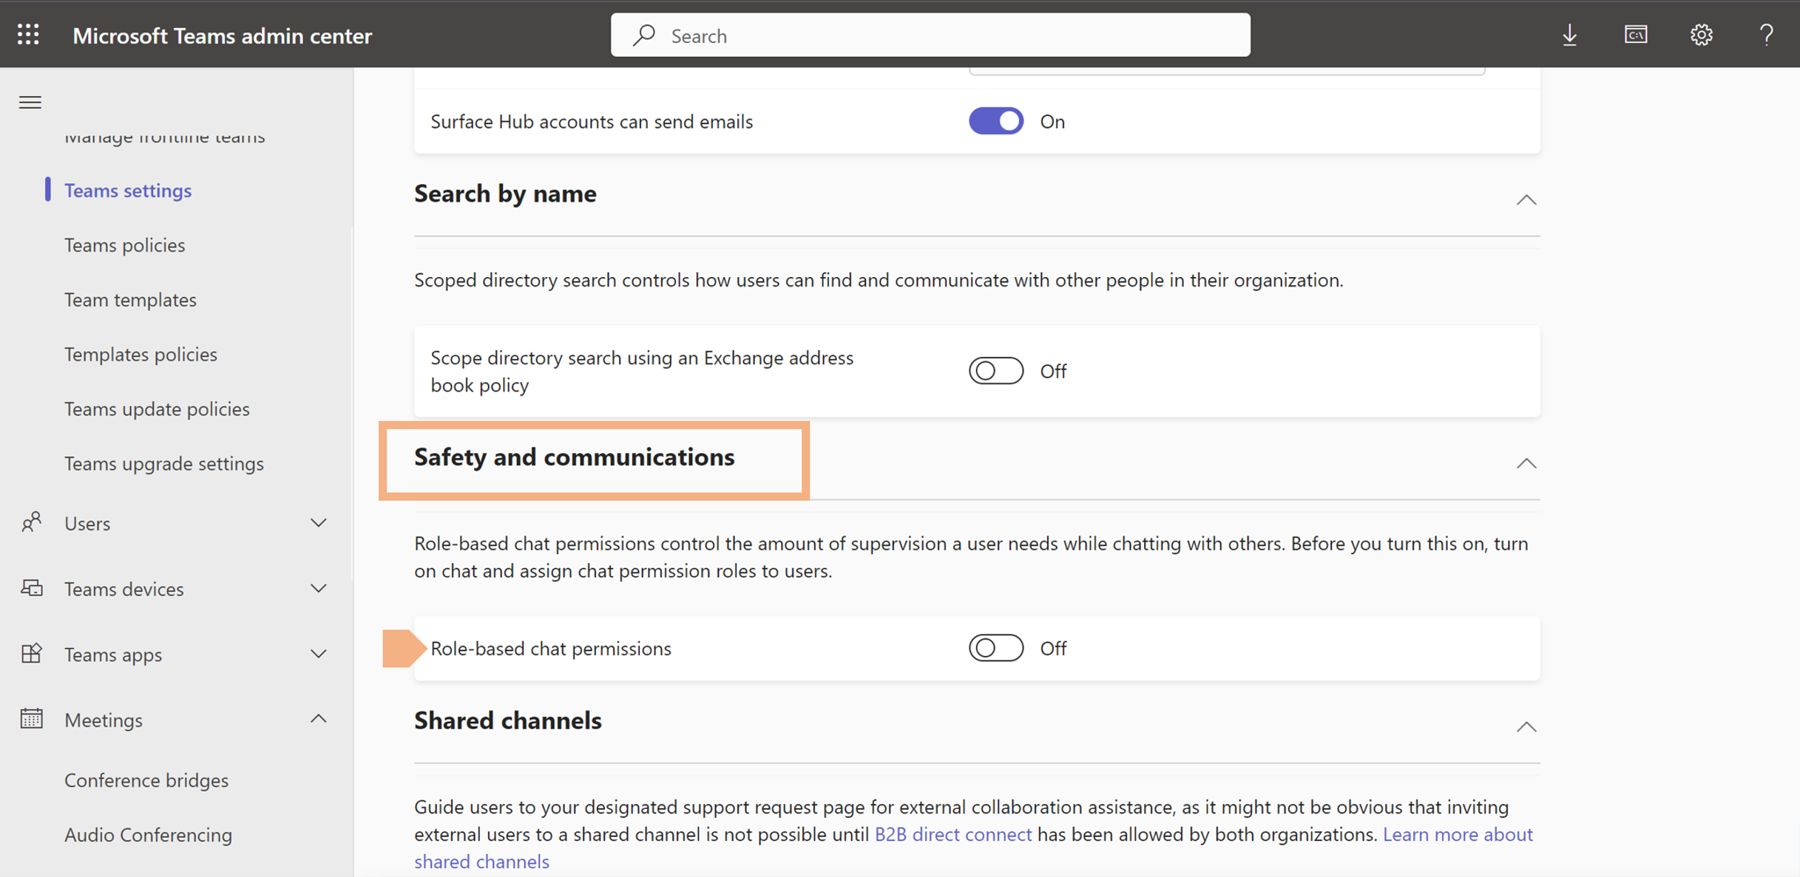
If you want to have greater control over student chat without disabling chat altogether, you should look at the supervised chat feature. It allows designated educators to initiate chats with students and prevents students from starting new chats unless an appropriate educator is present. This setting is disabled by default in a tenant, and to enable it, you must first configure chat permission roles for your users.

There are three roles:
Full Permissions. Users with full access to students and other staff.
- They can start chats with any user in your environment.
- They oversee the chats they join.
- They cannot leave or be removed from chats they have started.
Limited permissions. Staff members who should only have supervised access to restricted users.
- They can start chats with any full user.
- They cannot start chats with restricted users.
Restricted permissions. Users who must be supervised.
- They can only start chats with users with full permissions.
- They can participate in all conversations.
Suggested Meeting and Calling Policies
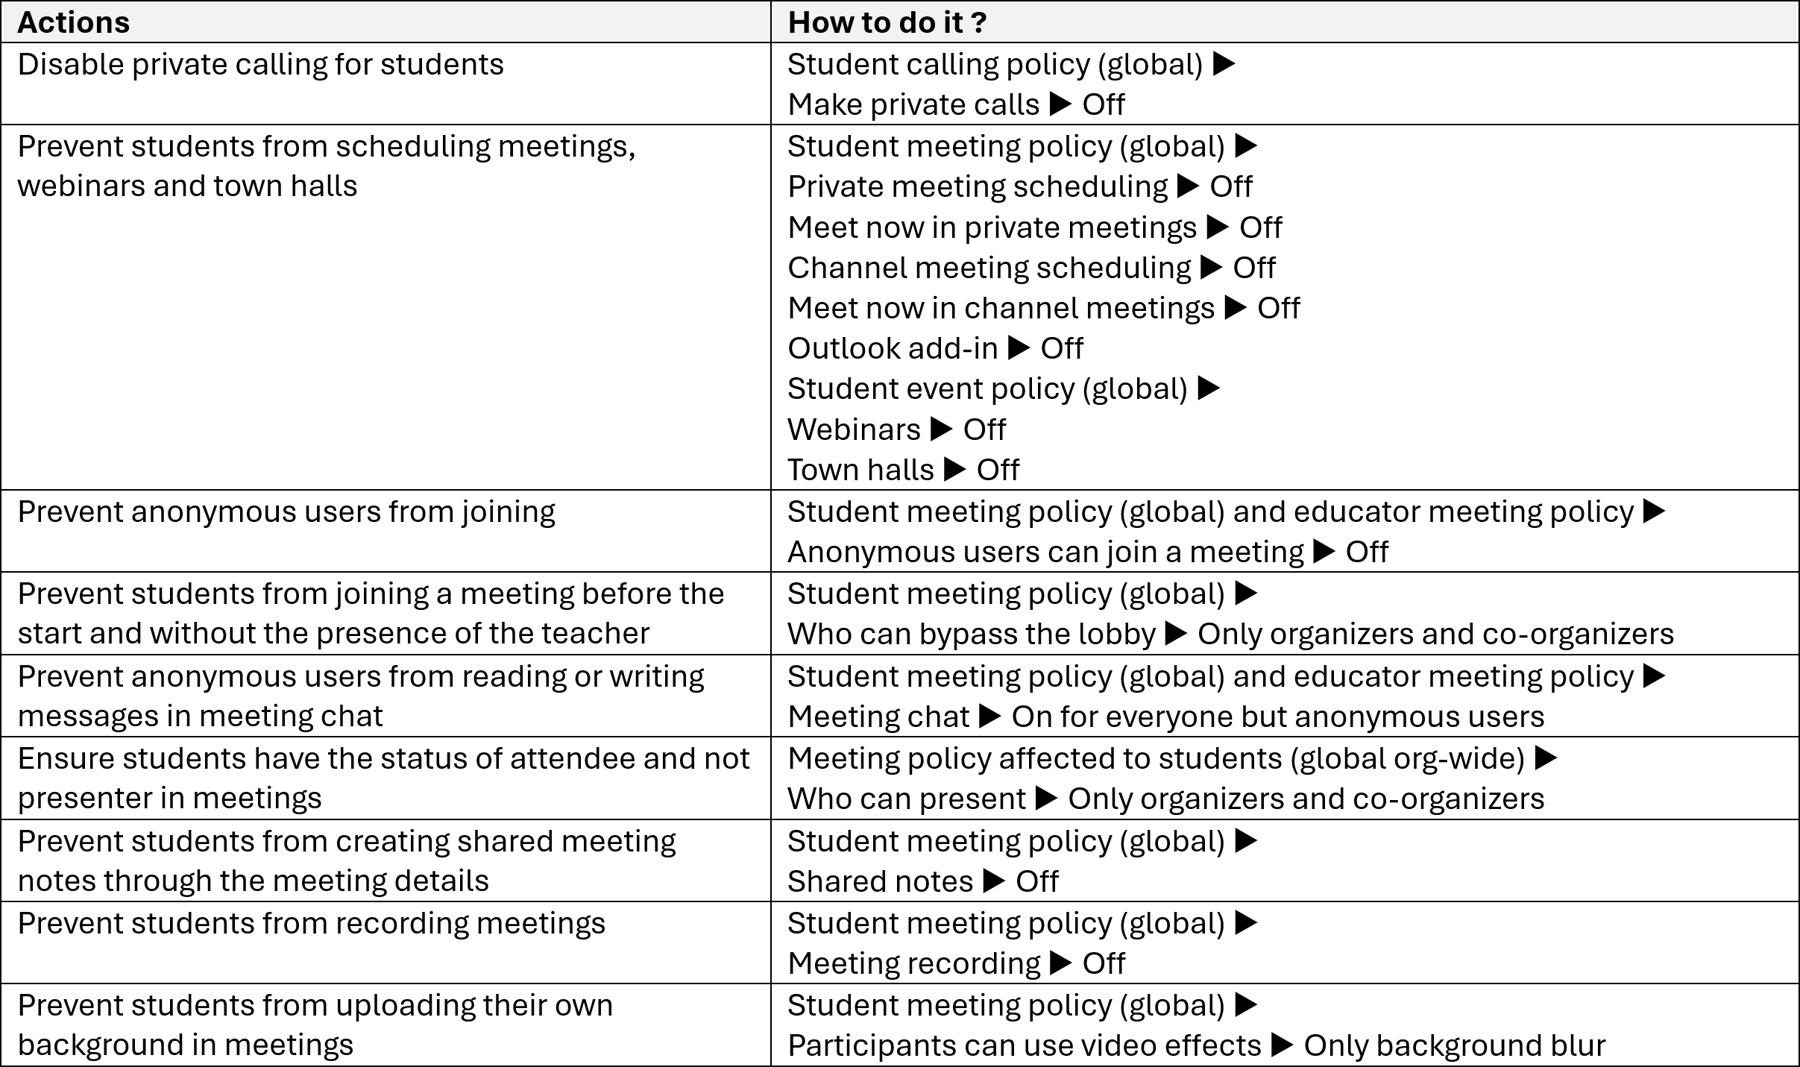
What about setting up meeting templates with predefined parameters so that teachers don't have to set up meeting options themselves?
That's a good point, and it's technically possible. It's called Teams Meeting Templates, and it's available to education tenants. You'll need a premium Teams license to use them.
However, two free templates are available by default. These are:

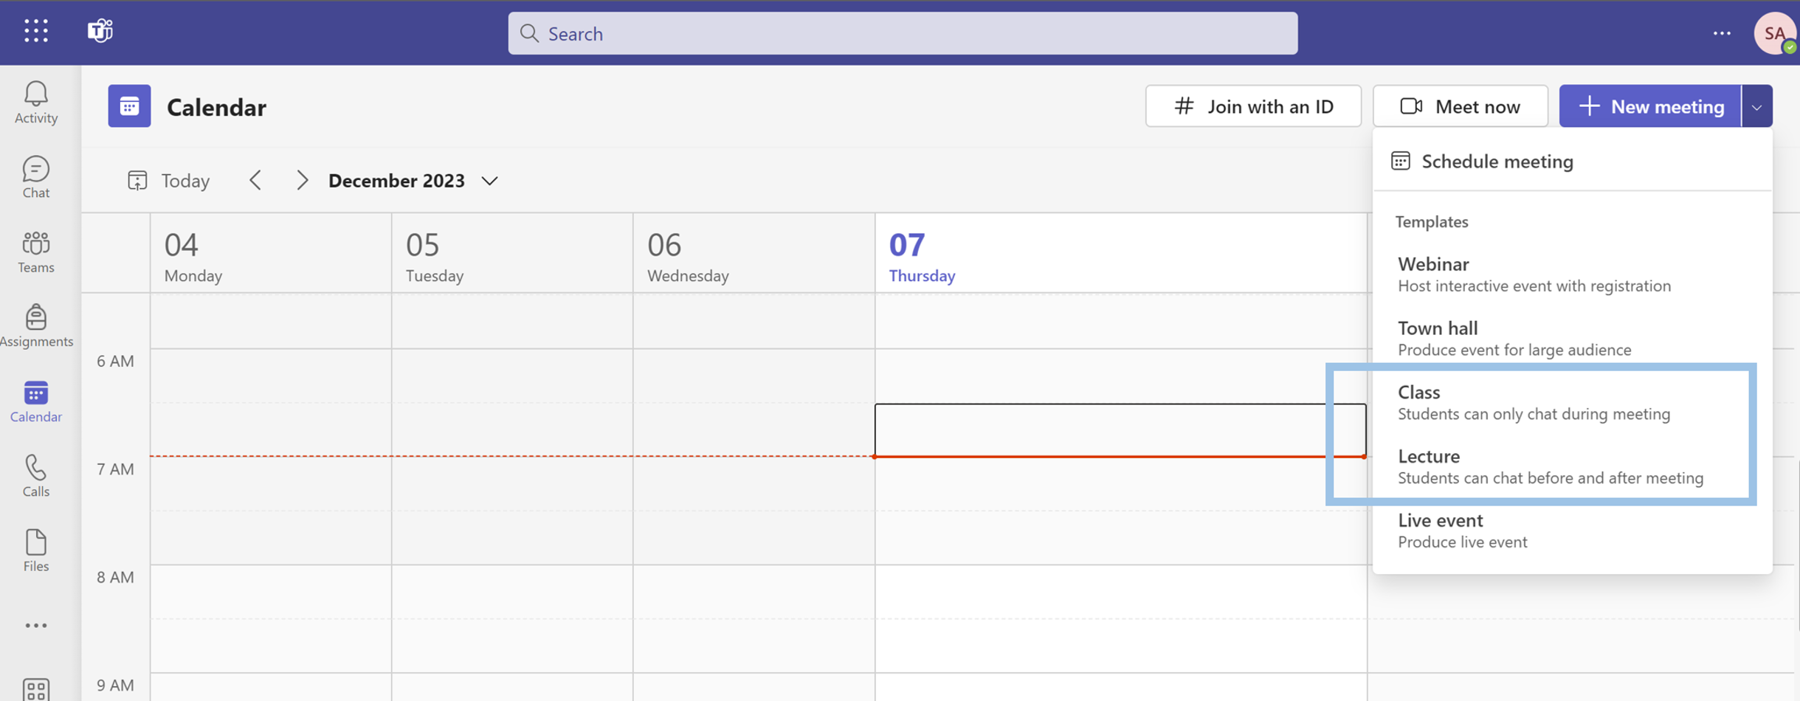
In addition to these two templates, you can set up your own templates to specify values for many of the meeting options available to meeting organizers. And for each value, you can unlock it so that meeting organizers can change it, or lock it so that organizers cannot change it.
For example, template options can specify whether the meeting chat is open or closed, what attendees can see, or whether microphone and camera are allowed for attendees.
Here are all the options you can configure in Teams meeting templates:
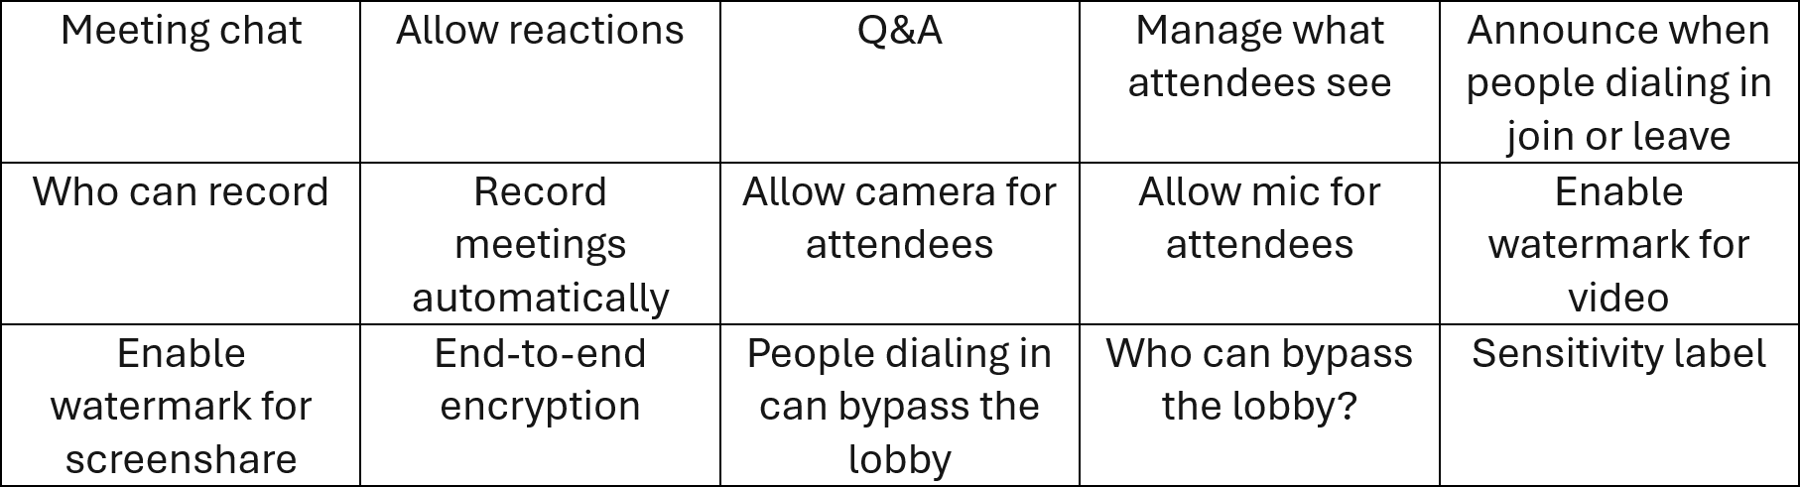
This may be an interesting option for administrators who want to set up meeting templates for teachers to use in their virtual classes, or for staff to use in their professional meetings.
For more information, please refer to this official link:
https://learn.microsoft.com/en-us/MicrosoftTeams/enhanced-teams-experience
Suggested Channels Policies
I'm only covering private channels here, as it's not possible (yet) to create shared channels in Class teams.

What about Teams templates?
This is a good question, and unfortunately regular Teams templates and Teams template policies are not available for education tenants. As I described in my first article, it is possible to take a template from an existing team, but my best advice is to start from scratch, as not all Class teams will be the same.
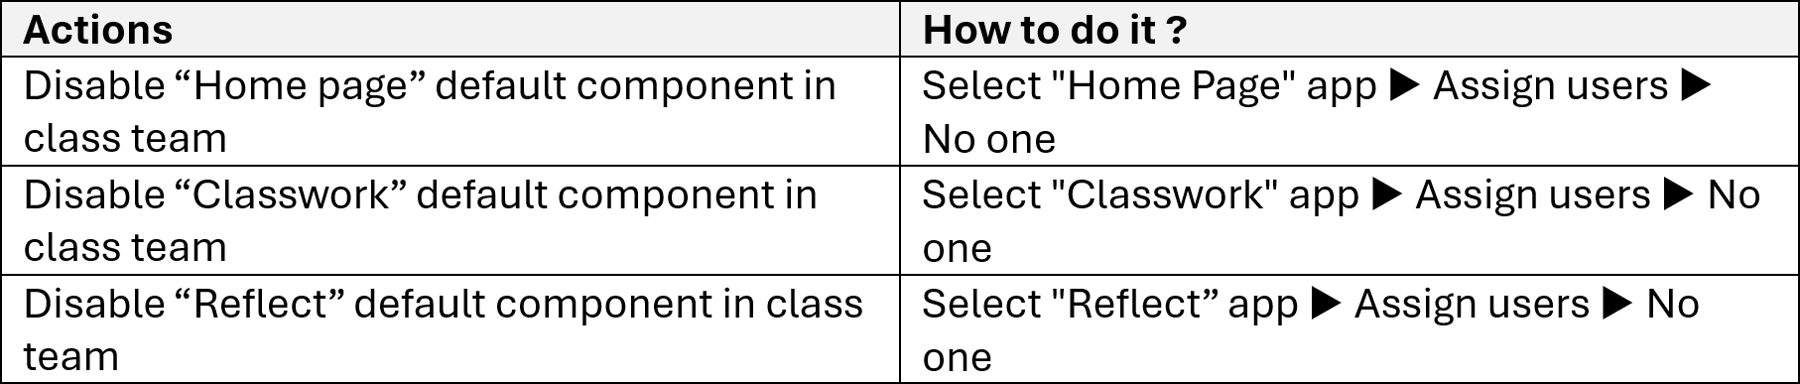
Suggested Class Team Apps Management
As I explained in my first article, there are several standard components that come with the Class team. Some of these may be of interest to certain classes, while others may not. If you want to disable these components that are installed by default, you can do so through Application Management in the Teams administration center. Please note that Microsoft is in the process of changing its central application management system, so you'll need to consider applications on a case-by-case basis.
Since we’re talking about applications here, it’s also important for an administrator to look at the application permission settings to prevent a teacher from authorizing access from a third-party application to the tenant instead of the administrator.
In this case, I recommend the following settings in Microsoft 365 admin center:
Settings ▶ Org Settings ▶ Services ▶ User consent to apps ▶ Deselect
If you want users to send a request for admin approval, you can set up an admin consent workflow in Microsoft Entra:
Identity ▶ Applications ▶ Enterprise applications ▶ Consent and permissions ▶ Admin consent settings
And then you will be able to configure "Who can review admin consent requests," "who will receive email notifications for requests," "who will receive request expiration reminders," and the delay for consent request.
File Management in Teams for Education
The control and management of files by students is a vast question, and the actions that an administrator can take can be either restrictive or, on the contrary, more open. Again, it's a matter of good intelligence, adapted to your context. And it's best to make students aware of the risks and consequences of any given behavior.
But if you want to take preventive measures, here's what you can do:
Set read-only permissions for all class resources that students will have access to.
This isn't a real problem, nor is it something an administrator needs to do if teachers are using Class Notebook in Class teams, which is set up by default with precise permissions depending on the person's status (teacher or student) in the three key areas of the content library, collaboration space, and individual student notebooks.
If you are not using Class Notebook, the administrator or owner of the Class team must go through the team SharePoint to set the desired permissions for the students, folder by folder or file by file. See my first article for more details.
Disable the synchronization button in channels files into Teams class.
There are several ways to do this, with varying degrees of complexity, using automated flows. Let's take the simplest method for a Class team in which you want the channel files space synchronization button to disappear.
To do this, the team owner needs to open the team SharePoint, go to Library Settings ▶ Advanced Settings ▶ and select no for "Allow items from this document library to be downloaded to offline clients."
Prevent students from synchronizing potentially dangerous files from their OneDrive.
These settings are changed in SharePoint Admin Center ▶ Settings ▶ OneDrive Sync.
You'll need to check the "Block upload of certain file types" button and enter the file name extensions you want to block, e.g. exe, zip, rar.
Please note that if you set this parameter, it will take about 8 hours for the OneDrive sync application to detect and apply the change.
Managing Sharing and Preventing External Sharing
The sharing settings you configure for SharePoint and OneDrive determine who your users can collaborate with, both inside and outside your organization.
Depending on scenarios, you may want to limit sharing to specific domains. It is also worth checking the external sharing permissions defined in the Class team. By default, it's aligned with what you've configured in the SharePoint admin center.
However, depending on the needs of the institution, it may be appropriate to block external sharing for the team class and/or change the default link type that is selected when users share files and folders on this site. All of this is done through the SharePoint Admin Center, as Teams is tightly integrated with it. Here's how it works:
Sharepoint Admin Center ▶ Active sites ▶ Select class team ▶ Settings ▶ More sharing options ▶ Only people in your organization.
And voilà! That's it for now.
I hope you found this article useful. Please don't hesitate to get in touch with me if you need any further information.

Laurent Carlier
Laurent is an experienced Microsoft 365 consultant and has a unique combination of technical and functional expertise.
He works daily with worldwide clients in business and education sectors, helping them building, designing and implementing modern workplace & modern teaching with Microsoft Teams and many other Microsoft 365 tools, such as Microsoft Viva.
Covering all aspects from strategies to change management & IT governance, he is always advocating about the importance of human-first approach and the necessary but always forgotten bridges between IT staff, end users & stakeholders.
He loves sharing as a Microsoft MVP his dual expertise in adoption change management & technical governance and can be found presenting in many languages (french, english, japanese) at international conferences and user groups.