How to Create Microsoft Forms Notifications in Under 15 Minutes Using Power Automate

A common complaint about Microsoft Forms is that the notifications built into the application are not helpful or reliable. There is, however, a quick and easy solution that also enables you to get some experience with Power Automate.
For those who are unaware, Power Automate is a low-code workflow tool for automating a wide range of tasks, from cloud to desktop actions. One of those tasks is automating the notifications from Microsoft Forms. You can also customize where those notifications appear:
- An emailed notification
- A notification in Teams
Getting Started
To start, you’ll need the following:
- A Microsoft account
- A Microsoft Form that has already been created
- An internet-connected device
If you haven’t created a form yet, go to Microsoft Forms and follow the prompts there.
Next, go to the Power Automate hub. Dig around here if you have a moment; I recommend looking at the templates for hundreds of ideas for what else you could automate.
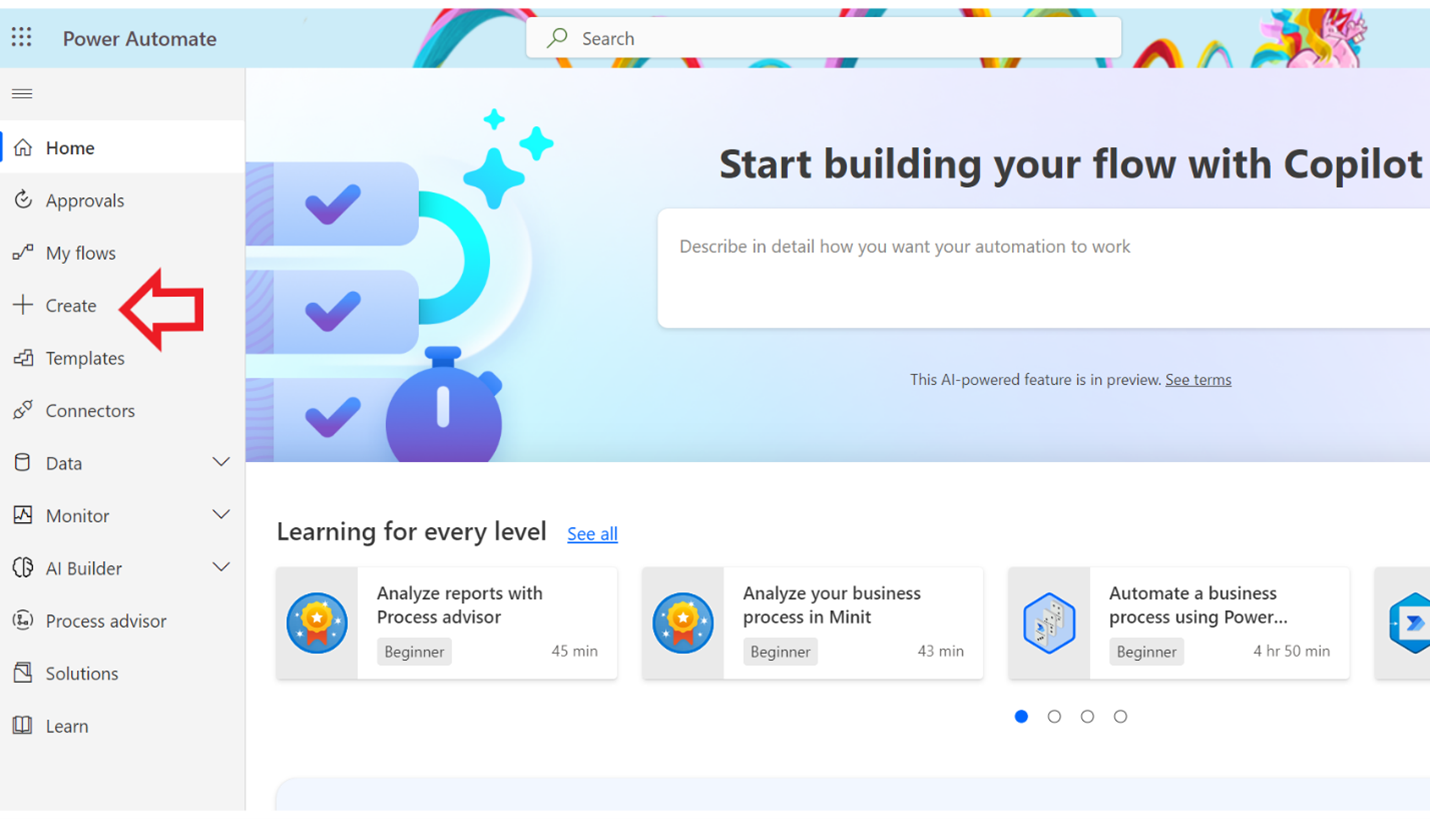
To make your first form, click Create on the left-hand side of the Power Automate hub, as in Figure 1.
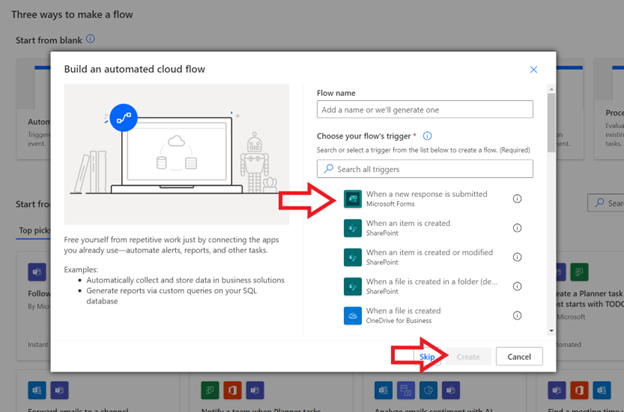
There are multiple types of triggers, which is what starts the flow. For purposes of this article, the type of trigger to pick is Automated cloud flow, which means the flow will trigger when a designated event occurs. In this case, make it trigger when a new submission to your form occurs.
Select Automated cloud flow. A new window appears. At the top in Flow name, give your flow a descriptive name. For the trigger, select When a new response is submitted (Microsoft Forms). For me, it’s the top option, so you might not even have to search for it. When you have a name and have selected a trigger, click Create, as in Figure 2.
View Full Size
Now you are taken to the flow editor, and your trigger is already there for you.
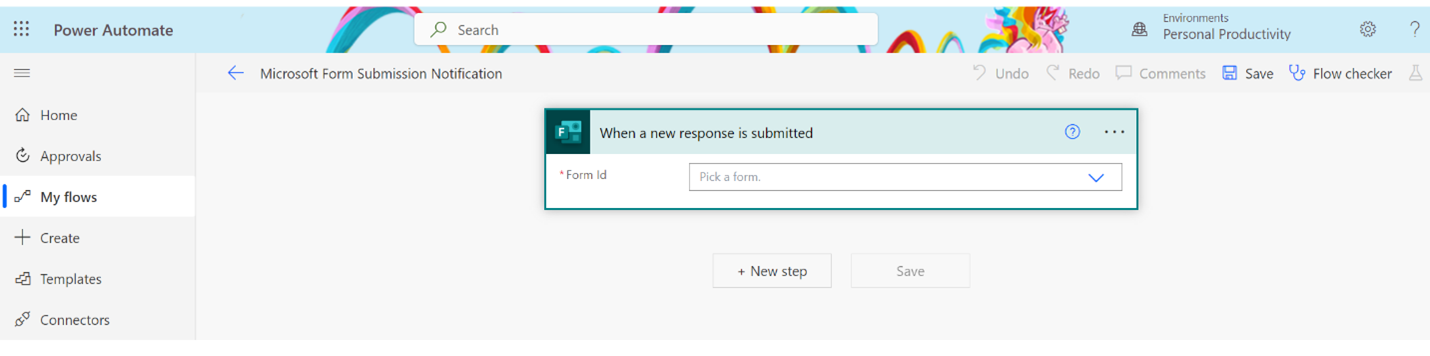
It isn’t totally ready to go, though — you have to tell it what form to look at for the trigger. To see available options, expand the drop-down menu on the trigger.
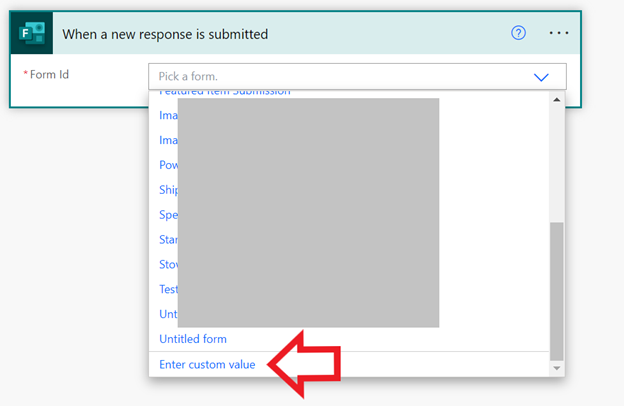
If your form is not in that drop-down list, you can still use it. Go to your form and copy everything that comes after “id=” in the URL, as in Figure 4. (Part of mine is blocked out for security reasons.)

It will be a long string of gibberish to you and me, but that’s fine. Go back to your flow editor and at the bottom of the drop-down menu, click Enter custom value, as in Figure 5.

View Full Size
Note: Again, you only need to do this step if your form isn’t listed in the drop-down menu. Once you’ve clicked Enter custom value, paste in your form ID, and you are ready to go to the next step. If your form is in the drop-down menu, select it, and you are ready to proceed.
Building Your Flow Actions
To add your first action, click the plus sign (+) and New step below your trigger. Actions are what happens when your trigger is triggered. Theoretically, you can have an unlimited number of actions for every trigger.
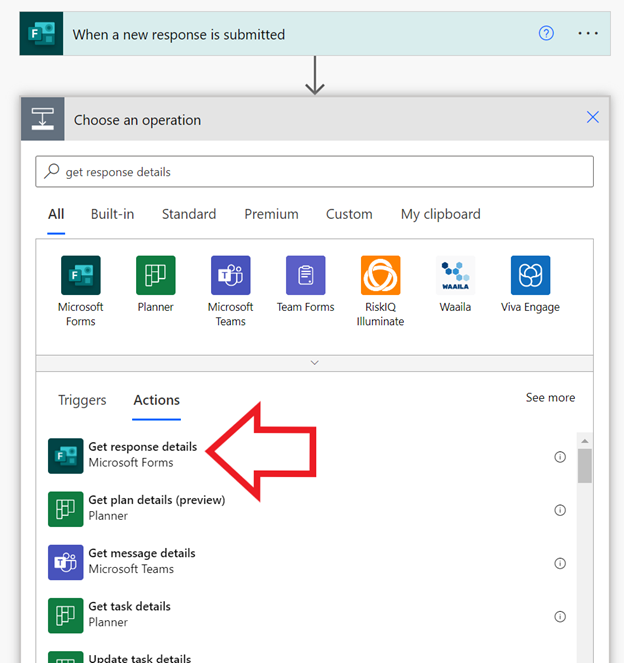
You then have a window to choose an operation or to search for one. To search for the first action, enter “get response details”. Look for Microsoft Forms in the results, and then select the one that matches Figure 6: Get response details (Microsoft Forms).
View Full Size
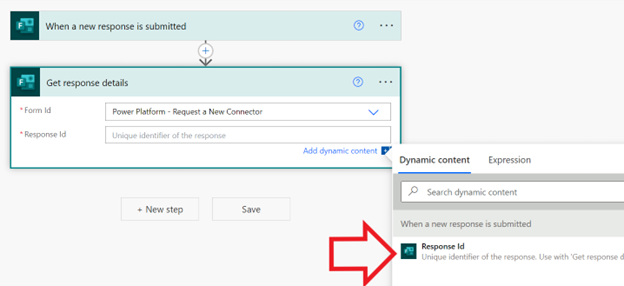
Now you have your first action, with two fields to fill in. You should already know how to fill in Form Id. Fill this out the same way you filled out the trigger earlier, either by selecting the form name from the drop-down menu or by using Enter custom value and pasting in the form ID manually.
The other field, Response Id, involves another important Power Automate concept: dynamic content. Dynamic content is a list of variables that grows every time you add a trigger or a new action. There won’t be much in the list right now because you just have one trigger. You have what you need, however, which is the response ID.
To access dynamic content, put your cursor in the Response Id text box. The Dynamic content window opens to the right, as in Figure 7.
View Full Size
Select the only dynamic content option you have right now, Response Id, and it will appear in your text box for Response Id. The prompt tells you which action (Get response details) to use with that piece of dynamic content.
Use this step to get the details of the response that triggered the flow. As a result of adding this action, there’s a lot more dynamic content to pick from for future actions. This is because every form question now has dynamic content and metadata, such as the responder email and the submission time.
Next, click New step again. This time, what you search for is up to you! It depends on where you want the notifications to go. This tutorial covers two common options: an email notification and a notification in Teams. You can also stack these options, if you want notifications in both places.
Option 1: Email Notifications
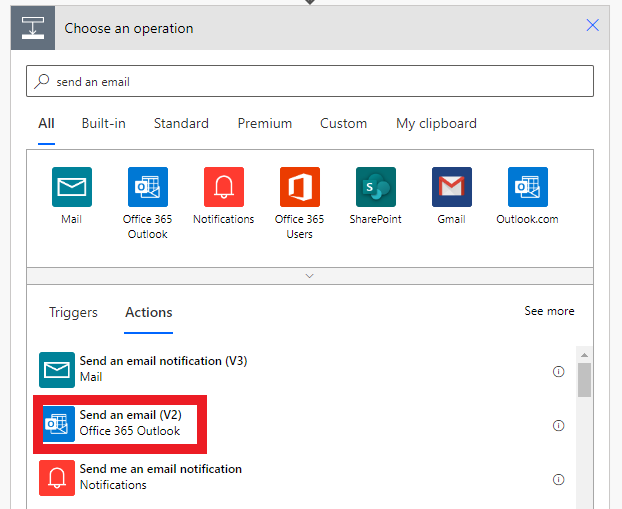
If you want email notifications about form submissions, search for “Send an email”.
Important: Select the Outlook connector that reads Send an email V2, not one of the other random ones. They might work, but this is the connector that Microsoft has made available.
Select Send an email (V2) – Office 365 Outlook, as highlighted in the red box in Figure 8.
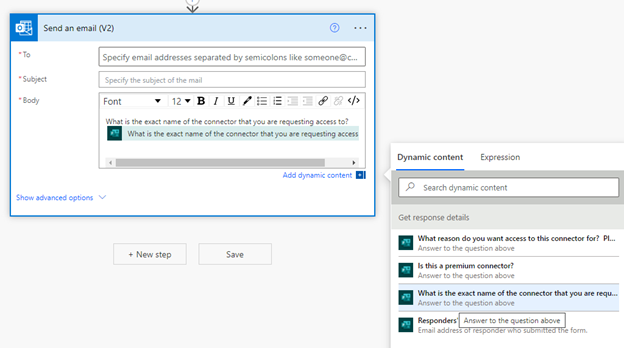
From here, it’s self-explanatory. You have three required fields:
- To: The intended email recipients. You can either enter email addresses or names for members of your organization; the latter should suggest their email addresses for you. You can enter multiple email addresses as the To: recipients; just separate the emails with semicolons.
- Subject: The subject line of your email. Fun tip: you can use dynamic content in this if you want! I explain more in the next bullet (regarding the body) about how to use dynamic content, but the same rules apply in the Subject: field.
- Body: The bulk of what you will send out in your email. I encourage you to use more than just a simple message saying, “Your form has a new response” though that’s totally fine, too!
For example, if you want to include all the questions AND their answers in the form of dynamic content, enter the questions in the Body: section. You then place your cursor where you want the answer to go, and select the answer in your Dynamic content window that pops out to the right. Let’s say my question was “What is the exact name of the connector that you are requesting access to?”. I can paste that into the Body: section, and then look for this in my dynamic content, as in Figure 9.
I can see the name of the question (it’s a bit long). I click it to insert it where I want, right after the question itself in my email body.
When I get the email, this will now look something like, “What is the exact name of the connector that you are requesting access to? Send an email (V2)” (the answer to my question).
Now for the most important step: save your flow! This does NOT get saved automatically. In the top right-hand corner, click Save, and boom! You are ready to test that new flow.
Option 2 – Teams Notifications
This is similar to setting up email notifications. This time, search for “Post message in a chat or channel” and look for the connector with the Teams logo and Microsoft Teams as the publisher. Click it to select it.
Here things are a little different, and you will get more options as you select your first few options. See Figure 10.

| Used with permission from Microsoft. View Full Size
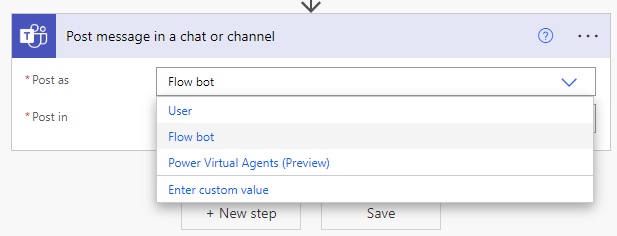
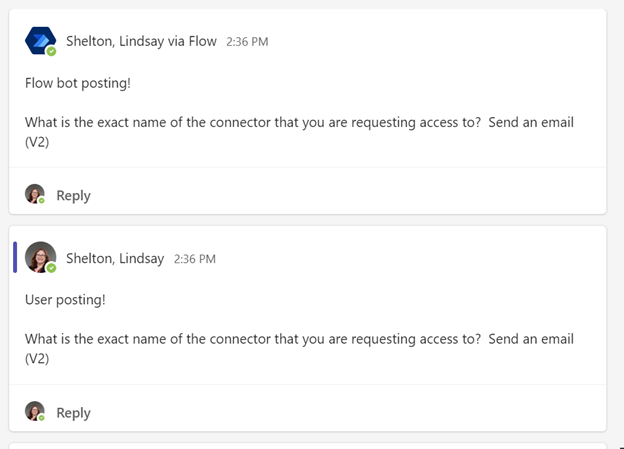
You can choose to post as yourself (User) or behind a flow bot. There isn’t much difference between the two; see for yourself in Figure 11.

The main differences between a user posting and a flow bot posting are that:
- You can’t delete a post from a flow bot if you need to.
- Your icon won't appear, if you post behind a flow bot.
Other than that, it’s the same experience. You can’t anonymously post to Teams, just like you can’t anonymously send an email. I recommend that you use a service account to set up these connections, but that’s a separate blog post of mine: Connections in Power Automate (and How to Take Control of Them).
Before the rest of the options appear, you also need to decide whether to send this to an individual/group chat or to post it in a channel.
Once you’ve made these choices, new options present themselves:
- If you selected Group chat, you now need to find the conversation ID (there’s a drop-down menu to help with this if it’s a chat with a name, or you may need to find the conversation ID elsewhere and put it in as a custom value) and put it in your message.
- If you selected Channel, put in your team ID, channel ID (there are drop-down menus for both), your message, and an optional subject.
- There’s a third option if you picked to post as the flow bot: Chat with Flow bot. In this case, you get a chat from a flow bot individually. Provide a recipient and a message.
As for the message contents themselves, see Option 1 (earlier) for how to work with dynamic content in your message body. I put in all the questions and their answers, PLUS I include the link from Forms in my message body. This way, I can view the exact answer if I want to.
Be sure to save your flow by clicking Save in the upper right-hand corner!
Conclusion
Today you’ve built a simple, but powerful, Power Automate flow. Now whenever someone fills out your Microsoft Form, you know how to send either email notifications or Teams notifications to a variety of places. From here, the world is your oyster. Dig around in the available actions and triggers, and see what else you can do!

Lindsay Shelton
In Lindsay's second career, she currently works as an Application Programmer at a medical research institute non-profit, supporting scientists in advancing their mission.
She spent the last decade teaching English Language Arts. During that time, she was selected to receive training to become a technology and pre-engineering teacher based on her aptitude for learning and adapting new technologies with her own students and colleagues.
Lindsay holds a BS in Secondary English Education from the University of Kansas and an MS in Curriculum and Instruction from Emporia State University. In addition, she is certified in Microsoft 365 Teams Administration, Microsoft Power Platform Fundamentals, Microsoft 365 Fundamentals, and she is a Microsoft Certified Trainer. As of 2023, Lindsay is also a Microsoft MVP in Business Applications.
In her spare time, Lindsay enjoys spending time with her two kittens Charlie and Trixie, and marathoning a wide variety of television shows.