Use Your .NET Skills to Extend Microsoft 365

Microsoft 365 is a cloud-based suite of productivity tools that includes Office, SharePoint, and Teams, among others. With a huge global user-base, it also provides an important platform for delivering custom code. Almost every computer has a web browser installed, and that’s made web applications the dominant platform for delivering custom functionality to consumers. In a similar way, in the business world, our target users are spending most of their day in Teams or Outlook, so it makes a lot of sense to deliver business solutions inside those applications if we can. If they can get their work done without having to switch to an external website, they can be more efficient.
To build solutions for Microsoft 365, many developers use client-side development languages like JavaScript or TypeScript, with server-side elements built using various technologies, including NodeJS. This is the typical path for a developer who starts with Visual Studio Code, especially if they come from a web development background. For these developers, the opportunity to re-use their web development toolchain skills is compelling.
But what about developers who are more familiar with Visual Studio and .NET? That’s what this article’s about. We’re going to look at some of the ways you can use the .NET platform to build great solutions for Microsoft 365. And if you were a .NET developer a few years ago and switched to TypeScript, it might be time to take another look. If you thought .NET was a proprietary framework for Windows developers, think again! In the last few years, .NET has been completely transformed into a fully-fledged open-source cross-platform framework, along with enterprise-level support and a robust set of tools, libraries, and APIs.
Teams Toolkit
One of the key extension points in Microsoft 365 is Teams. It’s important because, for a lot of users, Teams is where they spend the majority of their time, and where they get prompted to do things. Suppose you have a web app for, say, retrieving invoices, or HR requests. These kinds of things very frequently arise as a result of a question or conversation, which probably occurred in Teams. Normally the user deals with an enquiry by leaving Teams and switching context to a website in the browser, and then logging into a web application. It would be much more efficient if they could do that without leaving Teams, perhaps right in the conversation flow, and without having to sign into another application. That’s the fundamental idea behind Teams extensions.
A challenge in building for Teams extensions was the complexity in setting up projects, along with all the dependencies, such as app registration and configuration in Azure. The original approach was to set this up by hand, find an existing sample application and adapt it, or use a Yeoman generator to scaffold a new application. But this still left a lot of configuration and ceremony before you could see anything working. So Microsoft has created the Teams Toolkit to make this much easier, whether you use the command line, Visual Studio Code, or Visual Studio.
Interestingly, if you use the Teams Toolkit for Visual Studio Code, it takes you down the web toolchain path, using JavaScript or TypeScript, NodeJS, and Node-based tooling. But if, on the other hand, you choose to install Teams Toolkit for Visual Studio, you’ll instead get a solution based on ASP.NET Core and Blazor. These are relatively recent developments in the .NET world, and they have unlocked some exciting new ways of building client-server applications. And now we can use them to build solutions for Teams.
Getting Started
Before you start, make sure you have access to a Microsoft 365 account and an Azure subscription. You can get a free Microsoft 365 developer account by signing up for the Microsoft 365 Developer Program (https://developer.microsoft.com/microsoft-365/dev-program), and there are free trial options for Azure if you need them. You also need to ensure that sideloading is enabled in Microsoft Teams ahead of time. This is configured in the Microsoft Teams admin center under Setup policies, by enabling the Upload custom apps policy. It can take up to a day to take effect, so it’s worth planning ahead.
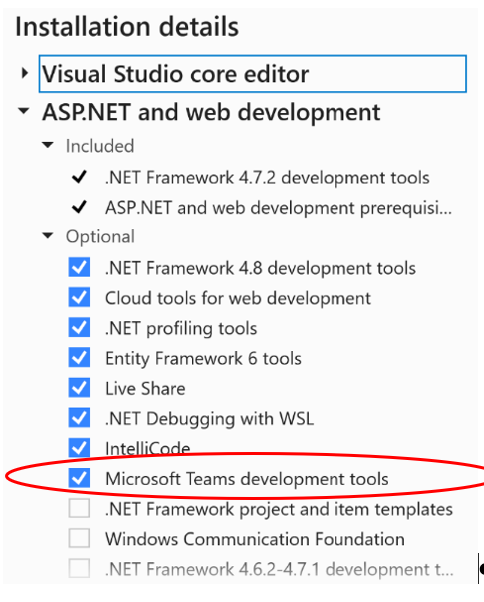
Next, you’ll need Visual Studio 2022, version 17.4.1 or later, and you’ll need the ASP.NET and web development workload installed. You also need to go into the Installation details pane and make sure that the “Microsoft Teams development tools” option is selected, which is a fairly modest additional download that’s about 40Mb compressed:
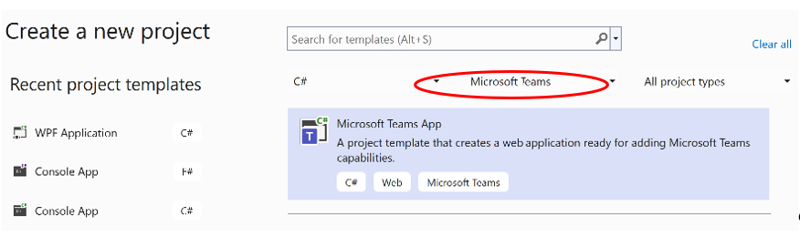
Once you have the option installed, you’ll also see an extra “Microsoft Teams App” project template when you use the File > New > Project menu. To make things easier, you can use the platform filter (highlighted below) to filter the project list to just Microsoft Teams, which consists of a single multi-purpose template:
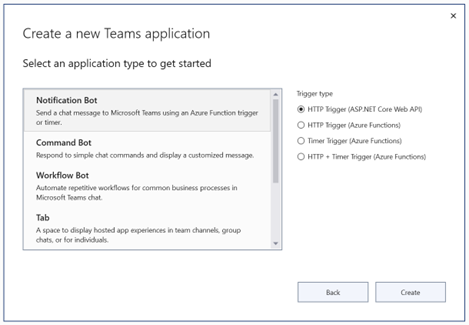
The project description rather undersells the template, which actually gives you a lot more than just a regular web application. When you create a Microsoft Teams App project, you get a choice of what type of Teams application you want, so it’s really five templates in one. These are for creating different types of Teams extensions and cover the main options: tabs, command bots, notification bots, workflow bots, and message extensions. In the case of the notification bot, which is intended to send notifications into your Teams feed, you can also choose how you want it triggered (e.g., by a web-hook or by a timer), which will depend on the business requirements. With the command bot app, you can type a command or request to talk to the bot. The message extension is another kind of bot that integrates into the message composition box in Teams chat, and can perform contextual tasks like searches or render an Adaptive Card.

You’re not limited to having a single type of Teams extension in each project. For example, you might have a Teams app that has a tab and also a message extension. The dialog in Figure 3 asks you to choose a single application type, but you can always add more capabilities to the solution later, if needed.
When you open a Teams project, you’ll see an extra Teams Toolkit sub-menu on the Project menu, and also on the context menu for your project in Solution Explorer. This contains various tools for managing the Teams manifest and deploying Teams solutions. The Teams manifest is a JSON file that tells Teams how to configure your app, what capabilities it has, and where it’s hosted. Probably the most useful of these is the Prepare Teams App Dependencies option, that can take care of the more complex tasks like registering a Teams app in your Microsoft 365 tenant, setting up authentication using Azure AD, and registering bots. There are also options for editing, provisioning the resources in your Azure tenant, and deploying and updating the manifest file and app package.
Building a Tab
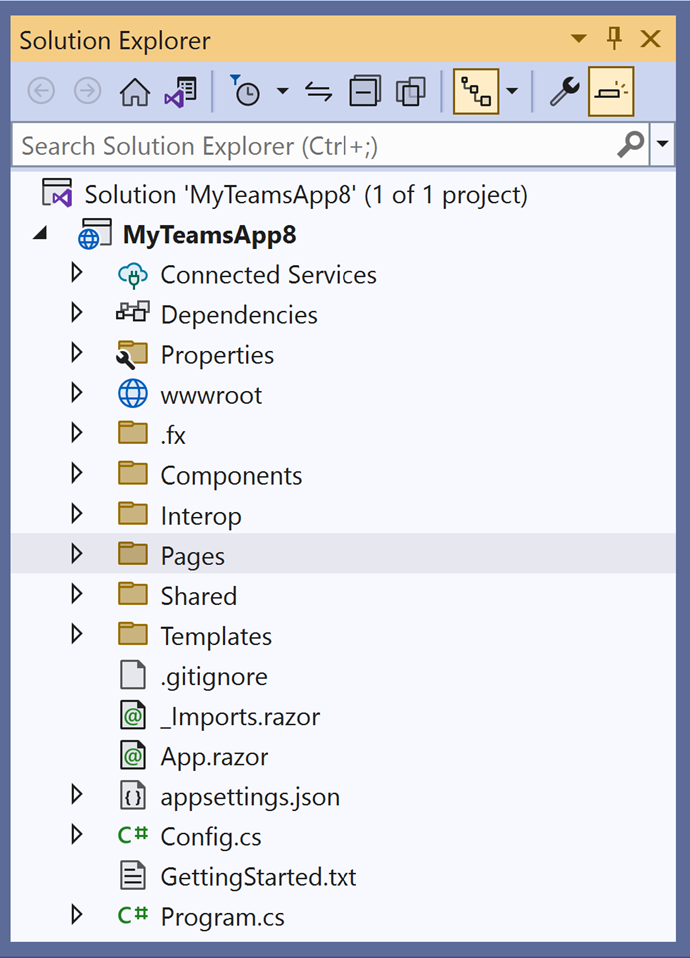
We’ll start by creating a Tab, which shows a Teams-aware webpage inside Teams, and takes advantage of single sign-on. Make sure that it’s selected in the checkbox if you want that feature (you can also add it later using the Teams Toolkit menu). Once you click Create and Visual Studio scaffolds the project, you’ll get a project structure that should look familiar to you. It’s essentially an ASP.NET Blazor Server web application, plus a few other bits and pieces to support the Teams app, including an fx directory with some configuration files specific to Teams development. The critical difference is that it’s a web application that’s designed to be embedded in Microsoft Teams, and it includes some additional client-side components to achieve this.
The first step is to right-click your project and select Teams Toolkit > Prepare Teams App Dependencies. If this is the first time, you’ll be asked to sign into your Microsoft 365 account. This kicks off a number of app registration steps in Azure AD and configures single sign-on in the app. Once this is done, you can use the Debug > Start Debugging menu (or the big green arrow in the ribbon, or just press F5) in much the same way as any other project in Visual Studio. It builds the application and then opens a browser window running Teams.
At this point, things get interesting. You have two environments created by default: the local environment for your machine, and a dev environment, which will be a remote cloud environment for shared development. You can create more environments if needed, for example, for test or staging. Teams Toolkit allows you to get up and running in a real Microsoft 365 and Azure environment, so that you can start prototyping and building solutions to real business problems, rather than having to waste large amounts of time getting the fundamentals working.
Once you start debugging the application, you’ll get a browser window opening in Teams at the Teams app installation dialog. You can then add the app to a chat or, more likely, a team. You’re actually adding a local version of the app, which is being hosted in your development environment. If you’re deploying to a team, you’re building a configurable tab and you’ll see the Tab Configuration page. This doesn’t do much configuration in the starter app, but you can modify your TabConfig.razor page in Visual Studio to add any configuration you need as you build out your app’s functionality.

Once you save the (in this case, non-existent) configuration settings, it takes you to the tab in whichever team you chose to add it to. The simple “hello world!” type sample congratulates you on getting this starter app running. It’s perhaps a sign of the times that the degree of success needed to merit congratulation seems to be getting lower and lower.

You may remember that you enabled single sign-on. At the bottom of the tab page, there’s a button to authorize the application. The app already knows who you are because it has the username, but that’s part of the Teams context. Typically, you’ll want to get more information through the Microsoft Graph, such as the user’s profile photo, and so you need to give the application permission to do this. If you click on the Authorize button, you’ll see a consent dialog in a new window that asks for permission to sign in (to Microsoft Graph) and read the user’s profile. This is called the permission scope and is defined in the app manifest. The user (or in some cases an administrator) needs to approve this permission by clicking Accept in the consent dialog. When you’ve done this once for an app, you won’t be asked again. You might find that the tab doesn’t update immediately, and if you’re impatient, you can get Teams to refresh the tab somehow, for example, by switching to another tab and back. Then you’ll see that a simple profile card has been loaded in place of the Authorize button, proving that your app is now able to retrieve data from the Microsoft Graph without needing the user to sign in again.

If you go back to the solution in Visual Studio, you’ll see that the corresponding page is Tab.razor, which isn’t very exciting:
@page "/"
@page "/tab"
@using MyTeamsApp8.Components;

<div>
    <Welcome />
</div>
All the hard work is done by a Blazor component called “Welcome.” If you go into the Components folder in the project, you can see how this is then built out of other components, many of them being pulled in from the Fluent UI Web Components for Blazor package, and that provide Blazor components that wrap the FluentUI web components. You’ll also notice that the app makes extensive use of ASP.NET Core’s dependency injection feature. This simple template is a great starting point for building a robust Teams application using some best practices.
Building a Bot
In addition to tabs, you can build various kinds of Teams bots and message extensions (a specialized type of bot that can be used when composing a chat message). The notification bot gives you several options for how it’s triggered. For example, you could choose to set up a timer trigger to send a message into the Teams feed at regular intervals. Some of these options take the “serverless” approach and require an Azure Function to host your bot, which does necessitate having an Azure subscription. Another option is to use an ASP.NET Core Web API to provide the HTTP trigger, which could be hosted anywhere, including on-premises as long as it’s publicly visible, although the most natural choice would be to host it in Azure.
You’ll probably want to test and debug locally, which requires the use of a tunnelling proxy such as ngrok, that you need to set up yourself. You can install ngrok from the site https://ngrok.com, but it does require you to sign up to the service. All of these bot-type extensions require the additional steps of registering the bot with the Bot Framework in Azure, which is done for you as part of the Prepare Teams App Dependencies step. Note that this process uses the tunnelling proxy mentioned above, and it only seems to work with ngrok, so make sure this is set up first.
Let’s set up a command bot by creating a new Teams app and choosing the Command Bot application type. This application template generates the project structure shown in Figure 9, which is slightly different from the tab example that’s in Figure 4.

Make sure that you have ngrok running on port 5130, and then right-click on your project and select Teams Toolkit > Prepare Teams App Dependencies. Once you’ve entered your credentials for your Teams tenant, this starts the fairly involved process of obtaining all the correct app registrations, which might take a minute or two. Once this process has finished, you can use Debug > Start Debugging (or F5, etc.), the app will run, and a browser window will open in your Teams client. You then get the installation dialog for the app, and you can choose whether to add it to a team, a chat, or a meeting.

You can then start a chat with the bot. The starter app has been set up to respond to the exact string “HelloWorld”. If you initiate a chat with the bot and send it this message, it sends back a card. It ignores anything else:
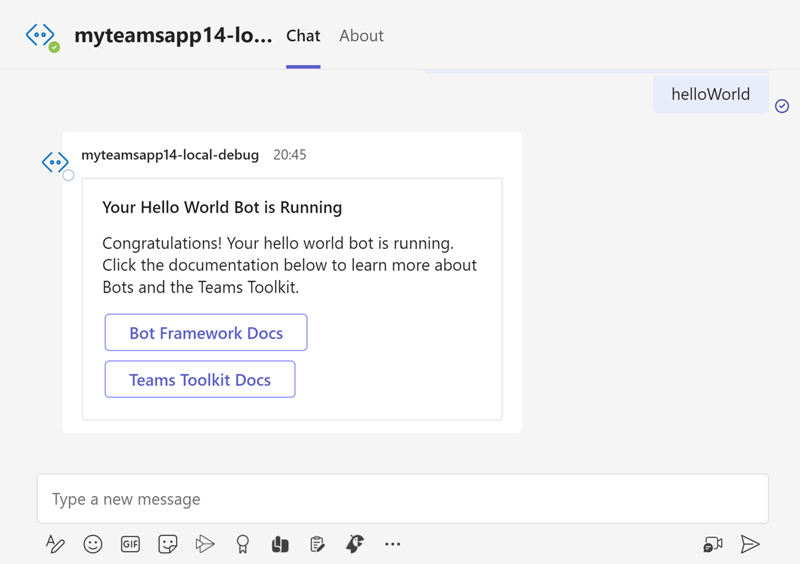
On this occasion, perhaps the congratulations are justified. A very complex series of steps have been required to get to this point, and setting all this up manually has been a step too far for many would-be Teams bot developers. So the Teams Toolkit has handled all this complexity for us, as evidenced by the extensive output of the Teams Toolkit.
Once it’s all working, any message posted to the bot is received by the Bot Controller action, and then forwarded to the Bot Framework code. If the request matches the trigger pattern, it’s handled in the HandleCommandAsync method of the HelloWorldCommandHandler class, which implements the special command handler interface ITeamsCommandHandler. This returns an adaptive card defined in Resources/HelloWorldCard.json:
publicasync Task<ICommandResponse> HandleCommandAsync(
    ITurnContext  turnContext,
    CommandMessage message,
    CancellationToken cancellationToken = default)
{
    _logger?.LogInformation($"Bot received message: {message.Text}");
    // Read adaptive card template
    var cardTemplate = await File.ReadAllTextAsync(
        _adaptiveCardFilePath, cancellationToken);
    // Render adaptive card content
    var cardContent = new AdaptiveCardTemplate(cardTemplate).Expand
    (
        new HelloWorldModel
        {
          Title = "Your Hello World Bot is Running",
          Body = "Congratulations! Your hello world bot is running."
        }
    );
    // Build attachment
    var activity = MessageFactory.Attachment
    (
        new Attachment
        {
          ContentType = "application/vnd.microsoft.card.adaptive",
          Content = JsonConvert.DeserializeObject(cardContent),
        }
    );
    // send response
    return new ActivityCommandResponse(activity);
}
The handler doesn’t have to return an adaptive card – it could just return some text. You typically want to return some structured information, and the adaptive card provides an excellent way of defining formatting that’s supported on all the platforms where Teams is able to run, while using a simple JSON format.
Obviously, you can use that code as a starting point to create handlers for whatever commands you need in your application. All of the bot-based templates, with the exception of the serverless notification bots that use Azure Functions, are essentially an ASP.NET Core web application that provides a service endpoint implemented using the Bot Framework. The bot code itself is implemented as a service and injected into the controller using the ASP.NET Core dependency injection mechanism.
Deploying to Production
When it’s time to deploy your app into production, there are options within Teams Toolkit to do this. Right-clicking on the project, as before, will give you additional options for provisioning and deploying to the cloud (i.e., Azure). This is great for prototyping and proofs of concept. But for a proper production rollout, and as with other development projects, it’s not a very good practice to deploy to production using developer tools like Visual Studio. Instead, you should set up a proper deployment workflow, but that’s beyond the scope of this article.
For documentation of the Teams Toolkit, see https://learn.microsoft.com/en-us/microsoftteams/platform/toolkit/install-teams-toolkit?pivots=visual-studio.
Office Add-ins
Office Add-ins are extension points for Microsoft Office applications such as Word, Excel, PowerPoint, and Outlook. There have been a few iterations of the Office application extension model, including COM Add-ins, and VSTO (Visual Studio Tools for Office, a .NET solution). One of the chief drawbacks of these earlier models was that they only worked for the Windows client applications. The Office apps now have cross-platform mobile versions and web clients in addition to running natively on Windows, and so Office web add-ins were introduced. This model enables the Office application to host what’s essentially a web page, augmented by some JavaScript libraries, to provide additional functionality.
Like all the other Microsoft 365 extension models discussed in this article, the fundamental model is that of a manifest file that points to a web endpoint (either to present a UI, or to act as a web service endpoint). That endpoint can be built using any web technology, including static content served from a static site or a CDN, or, of course, ASP.NET. If you install the Office extensions for Visual Studio, that’s the direction that you’ll be guided down. As before, you need to ensure that the correct Visual Studio workload is installed:
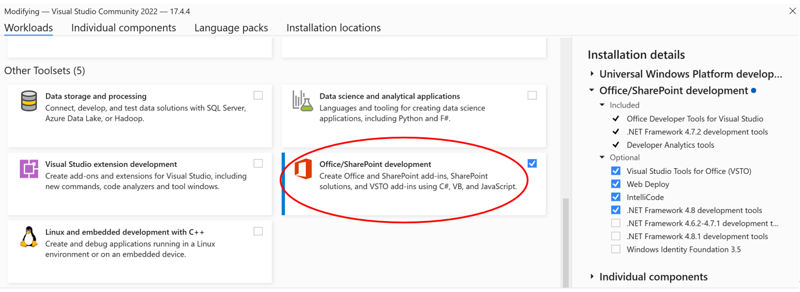
This Visual Studio workload dates from the time Office Add-ins were introduced, around 2015, so there are a couple of things to notice. The legacy VSTO tools are installed, along with .NET Framework 4.8. This is the latest, and possibly last, version of the .NET Framework. For those who haven’t been following the twists and turns of the .NET platform, “.NET Framework” refers to the legacy version of .NET, as opposed to the newer re-incarnation of .NET as a cross-platform development framework. For a while, this new version, actually a complete re-write, was referred to as “.NET Core,” and is now called simply “.NET.” You’ll probably want to use the LTS (Long-Term Support) version, currently .NET 6 at the time of writing, along with ASP.NET Core, instead of .NET Framework. But that’s something that can be addressed later.
This workload also supports “classic” SharePoint development, which is of limited use unless you have on-premises SharePoint 2016 or SharePoint 2019. For SharePoint development moving forward, you should really be using the newer SharePoint Framework (SPFx), which is primarily a front-end JavaScript solution. SPFx isn’t supported by the Office/SharePoint workload in Visual Studio, although there is a community developed Visual Studio extension.
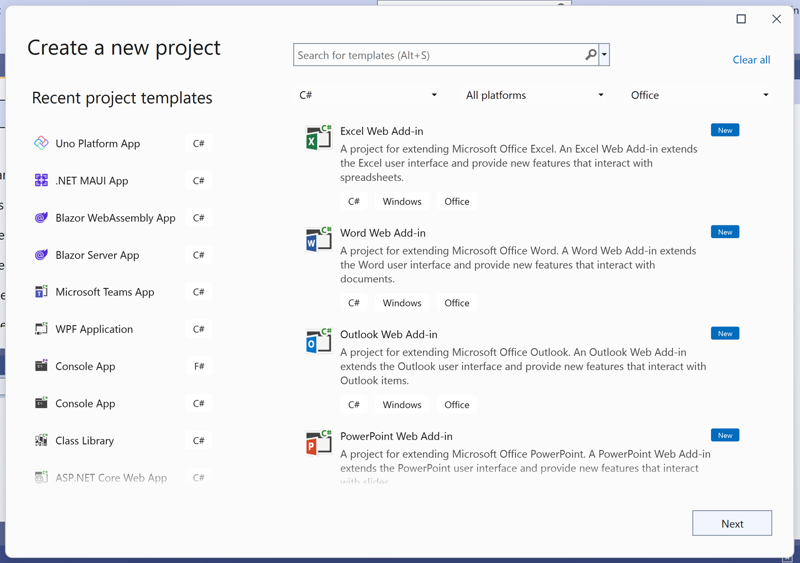
Once you have this workload installed, you’ll see some more options in the File > New > Project dialog, some of which are more useful than others. The ones we’re interested in are the web add-ins. In Figure 13, you can see the Excel, Word, Outlook, and PowerPoint Web Add-in project templates.
Let’s take a look at the Word Web Add-in. This creates a project with a manifest file and an ASP.NET project using .NET Framework 4.8. Most of the other manifests in Microsoft 365 extensions use JSON, but this one’s in XML (Office Add-ins have been around since before JSON became ubiquitous). The project includes all the client-side libraries and styling to support a Word Add-in that maintains the look-and-feel of Word, and gives access to the current Word document.

The template hasn’t been updated to the newer version of .NET, and perhaps it never will be. That really doesn’t matter too much, because apart from AssemblyInfo.cs, there’s no substantial ASP.NET code in the web application; it’s just static content.
So much for .NET, you might be thinking. But if you want to switch to .NET 6 and ASP.NET Core, you’ll need to add at least a minimal Program.cs file to serve the static content. You’ll also want to move the content files into a “www” folder for convention, and you’ll be able to dispense with a few of the files that don’t carry over to ASP.NET Core.
Things get more interesting if you want to add some dynamic behaviour behind the add-in. For example, you might want to back your add-in with some data and logic. One way of achieving that is to include a web service endpoint in your application using MVC or using Minimal API. You can then call that service endpoint from your client-side JavaScript. Of course, you could call some pre-existing service endpoint, but you’d then have to worry about CORS (Cross-Origin Resource Sharing). Building your service within the same web application that’s serving the client-side code means that you don’t need to worry about CORS because it’s the same domain. Implementing server-side code also protects your intellectual property because, unlike client-side code, there’s no way for another party to get access to your code to decompile and analyse it.
A nice feature of the Visual Studio tooling is that you get a very good local debugging experience. Clicking on the green debug arrow starts the appropriate Office application, as indicated in the project properties, and you can then use breakpoints and all the other run-time tooling in Visual Studio as you develop your add-in.
To learn more about developing Office Add-ins, see: https://learn.microsoft.com/en-us/office/dev/add-ins/develop/develop-overview.
Microsoft Graph
With the Microsoft Graph API, developers can build applications that integrate with Exchange, SharePoint, and Teams, and can also access other Microsoft 365 services such as OneDrive and Planner. The Microsoft Graph API provides a single endpoint, using a single access token, for accessing data and insights from Microsoft 365 services. The name graph comes from the mathematical term for a network of connected nodes and reflects the conceptual organization of the data, and the possibility of traversing from one node to another in order to discover information.
The Microsoft Graph is exposed as a REST endpoint, so it can be called in any programming language that supports HTTPS requests over the network. You also need to be able to convert native language objects to and from JSON, which is easy in JavaScript because JSON is JavaScript’s own native serialization format. When working with .NET, it used to be necessary to import a third-party NuGet package (or you could build your own serializer if you had nothing else to do). That’s no longer needed because it’s now built-in (as of .NET Core 3.1 and later) and can be found in the System.Text.Json namespace. You can also use the HttpClient class in the System.Net.Http namespace to make and receive HTTP requests.
There’s an easier way. You can use one of the language-specific Microsoft Graph SDKs. These libraries allow you to use the Microsoft Graph without the need to build requests and parse responses. They’re designed to form the basis of robust, high-quality applications that access Microsoft Graph. The SDKs consist of two components, a service library and a core library, and they’re available for several languages, including JavaScript, Java, Python, and PowerShell, in addition to, of course, C#. The languages are open source and are code-generated from the REST metadata, so they’re kept up to date with new developments in the underlying Microsoft Graph API. The C# SDK can be found at https://github.com/microsoftgraph/msgraph-sdk-dotnet and can be installed using the Microsoft.Graph.Core NuGet package (or Microsoft.Graph if you’re using the legacy .NET Framework).
An important aspect of building Microsoft 365 solutions with .NET is the use of authentication and authorization. This is also made easier when using the SDKs. You don’t need to worry about getting authorization tokens and including them in your requests. This is handled for you by the SDK using the TokenCredential classes in the Azure.Identity library, once you’ve obtained a token using the .NET version of the Microsoft Authentication Library (MSAL). This requires your application to be registered in Azure AD, and then you use the authorization code authentication flow, as in the example:
var cred = new AuthorizationCodeCredential(
     tenantId, clientId, clientSecret, authCode);
var graphClient = new GraphServiceClient(cred, new string[] {
    "User.Read" });
var user = await graphClient.Me.GetAsync();
var drive = await graphClient.Me.Drive.GetAsync();
return new string[] { user.AboutMe, drive.Name };
The fluent API style allows for a very natural way to get strongly-typed objects in the Microsoft.Graph.Models namespace that you can then work with. This is a huge advantage over parsing JSON or using the “cast and hope” approach when using weakly typed objects. You also get all the benefits of IntelliSense in Visual Studio while developing.
As well as using it in Microsoft 365 extensions, you can use this SDK to build .NET console apps, Windows desktop apps, or mobile apps based on .NET MAUI.
To learn more about developing with Microsoft Graph, see: https://learn.microsoft.com/en-us/graph/overview .
SharePoint Framework (SPFx)
The SharePoint Framework is fundamentally a client-side technology for building solutions on SharePoint, such as web parts. As a .NET developer, you’re going to have to bite the bullet and use some form of JavaScript. It’s not everyone’s favourite language (although to be fair, it has many good parts, and a lot of the historical angst in web development relates to the various inconsistent implementations of the Document Object Model). There’s some good news in that you can use TypeScript, a strongly typed superset of JavaScript, which provides a much smoother transition from C#.
There’s a community-led extension for Visual Studio to support SPFx, but it still uses the NodeJS toolchain behind the scenes. The fact is that most developers use Visual Studio Code and command-line tooling based on NodeJS. However, there’s some merit to the idea of serving the various components of an SPFx solution from an ASP.NET Core web application, and providing a service endpoint using MVC or Minimal API, for the same reasons as described above for Office Add-ins. But you’ll still be doing most of the UI development in TypeScript, typically using a JavaScript framework such as React.
It might be possible to render a server-side control in an SPFx web part using Blazor Server or even Blazor WebAssembly. Although it would be an interesting exercise, this certainly isn’t supported at the time of writing. For now, at least, the recommended practice is to build the UI using the client-side tooling provided with SPFx and consume web services. That gives you the option of building those services in a robust and secure way using ASP.NET Core or Azure Functions in C#.
To learn more about the SharePoint Framework, see: https://learn.microsoft.com/en-us/sharepoint/dev/spfx/sharepoint-framework-overview .
Conclusions
.NET provides a number of tools and technologies that can be used to build Microsoft 365 solutions, including ASP.NET, C#, and Visual Studio, among others. These tools and technologies make it easy for developers to create custom applications that integrate with Microsoft 365 and provide additional functionality to users. You can think of Microsoft 365 as another target runtime environment, in addition to desktop, mobile platforms, and the web. The advantage of shipping a solution integrated into a Microsoft 365 canvas, such as Teams or Office, is that the application is available to users without them having to switch context to a separate application or website. This results in measurable productivity gains. Building Microsoft 365 solutions with .NET provides a powerful platform for applications that integrate with Microsoft's cloud services. These APIs and services let you quickly build scalable and secure business applications that run on the cloud and on-premises.

Bill Ayers
Dr. Bill Ayers is a consultant developer and solution architect who has been working with computers for over 30 years. He originally earned his PhD in applications of computers in engineering before specializing in collaboration with SharePoint and, more recently, Microsoft 365 and Azure. He also specializes in AI, mobile development, and agile software development practices. He’s a Microsoft Certified Master and Charter MCSM for SharePoint, and a Microsoft Certified Trainer and Office Development MVP. He has also taken over forty Microsoft certifications and is a CompTIA CTT+ certified classroom trainer. He speaks regularly at international conferences and user groups and is based in Sheffield, UK.