Deep Linking for an In-App Admin Approval Screen in Power Apps

Deep linking is a powerful feature that enables users to access specific screens or forms within a mobile or web application directly, without having to navigate through the traditional user interface. In this article, I explore how to implement deep linking for an in-app admin approval screen in Power Apps. In organizations, certain actions like approving leave requests, expense claims, or project submissions require administrative approval. Traditionally, this involves manual steps and navigating through the app's screens. With deep linking, administrators can directly access the approval screen without going through the usual steps. By using deep links, you can streamline the approval process and make it more convenient for administrators to access and approve requests.
| Used with permission from Microsoft. View Full Size
I’ll walk you through each step in the process:
- Creating the information screen
- Creating the approval screen
- Setting up the OnStart function
- Handling the StartScreen function
- Editing the shareable app link
- Creating the automated cloud flow for email notifications and deep linking
- Configuring the OnSuccess property for the approval screen
- Final testing
Step 1: Creating the Information Screen
In this step, you design and create the information screen for your Power App. The information screen serves as the front-facing interface where users will access and view relevant data or content. Follow these steps:
- Create a new screen, and name it InformationScreen. This screen will contain a form connected to your database, which users will fill out to request approval.
- Add a form to the screen and connect it to your database. Set its display property to New for users to enter new data.
- Edit the fields displayed in the form, excluding the approval field from your database.
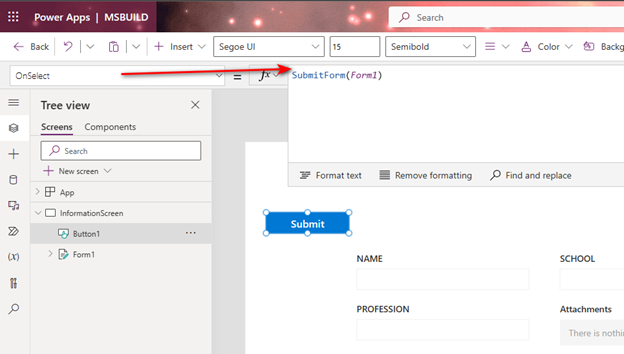
- Add a button control with the text property set to Submit, and assign the OnSelect function to submit the form: SubmitForm(form1)
| Used with permission from Microsoft. View Full Size
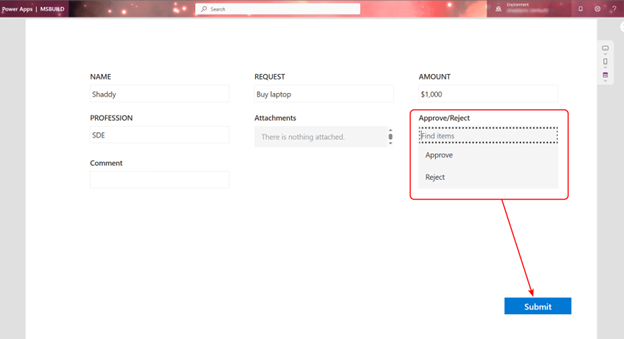
Step 2: Creating the Approval Screen
In this step, you build the approval screen for your admin. The approval screen is a crucial component when dealing with workflows or processes that require authorization from specific individuals or teams. It typically includes options for users to approve or reject requests, comments, and additional information necessary for decision-making.
- Create another screen, and name it ApprovalScreen. This screen will display the form for approving or editing submitted requests.
- Add a form to the screen and connect it to your database. This time, set its display property to Edit to allow administrators to review and approve requests.
- Edit the fields displayed in the form, this time including the approval field from your database.
- Add a button control with the text property set to Submit, and assign the OnSelect function to submit the approval form: SubmitForm(form2)
Step 3: Setting Up the OnStart Function
In the app, input the following code at the OnStart function. This code handles the initialization of the app and sets the appropriate mode based on whether the app was launched with a specific request ID (deep link) or not.
If(
    !IsBlank(Param("ID")),
    Set(
        varItem,
        LookUp(
            'Database_name',
            ID = Value(Param("ID"))
        )
    );
    Set(
        varMode,
        FormMode.Edit
    )
)
Explanation
Here’s how it works:
- The OnStart function runs when the app starts.
- The If statement checks if the ID parameter is present in the app's launch URL (deep link). If present, it means the user clicked on a specific request to view or approve it.
- The LookUp function finds the database record with the specified ID.
- The Set function assigns the found record to the varItem variable.
- The Set function also changes the form mode to Edit to enable editing of the request.
Step 4: Handling the StartScreen Function
In the app, input the following code at the StartScreen function. This code determines which screen to display based on the presence of an ID parameter (deep link).
If(
    !IsBlank(Param("ID")) && !IsBlank(LookUp('Database_name', ID = Value(Param("ID")))),
    ApprovalScreen,
    InformationScreen
)
Explanation
Here’s how it works:
- The StartScreen function determines the first screen to display when the app launches.
- The If statement checks if the ID parameter is present in the app's launch URL (deep link) and also verifies if the corresponding database record exists.
- If both conditions are met, the user is taken to the ApprovalScreen to view or approve the request.
- If the ID parameter is missing or the associated record doesn't exist, the user is directed to the InformationScreen to submit a new request.
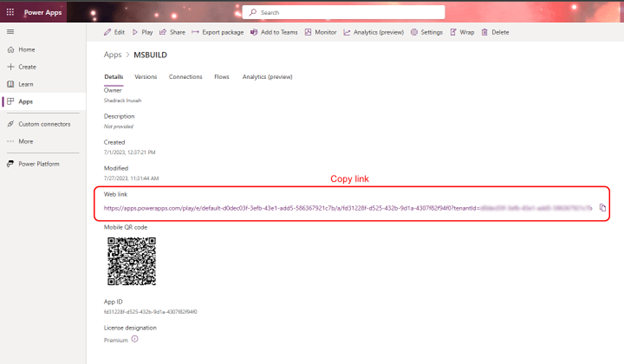
Step 5: Editing the Shareable App Link
To make the app link shareable and include the deep link, follow these steps:
- Click the Share
 icon in Power Apps, which opens the share page in a new tab.
 - Copy the app link and paste it into a code editor or a Notepad app.
- Apply the href attribute to the link as shown here: <a href="link&ID=">Take Action</a>
- Replace "link" with the copied app link.

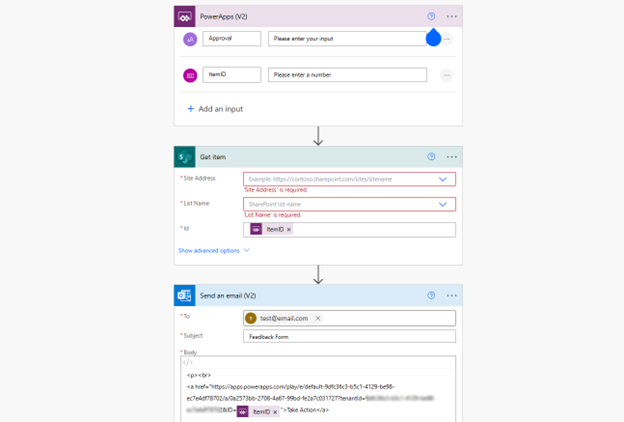
Step 6: Creating the Automated Cloud Flow for Email Notifications and Deep Linking
To handle email notifications and deep linking, create a cloud flow (Power Automate) with the following steps:
- Choose PowerApps (V2) as the main trigger for the flow.
- Add the Get Item action to collect more information from your database (if using SharePoint list).
- Select and add the Send an email (V2) action to send an email notification to the administrator.
- Click the code view icon in the body of the Send an email (V2) action and paste the deep link with the following format:
<a href="https://apps.powerapps.com/play/e/default-9dfc36c3-b5c1-4129-be98-ec7e4df78702/a/0a2573bb-2708-4a67-99bd-fe2a7c031727?tenantId=9dfc36c3-b5c1-1234-be98-ec7e4df12345&ID=">Take Action</a>
Replace the part after "ID=" with the dynamic content "ItemID" from the Power Apps trigger.
The Get Item action within the flow allows you to retrieve additional fields from your SharePoint list, which you can include in your email notification.
Step 7: Configuring the OnSuccess Property for the Approval Screen
Input the following code at the OnSuccess property of the screen containing the approval form in Power Apps. This code handles the submission of the approval form, triggers the automated cloud flow, and shows a success notification.
Set(varApproval, LookUp('Database_name', ID = form1.LastSubmit.ID));
ApprovalFlow.Run(varApproval.ID, "Approval");
Notify("Form Submitted", NotificationType.Success);
Explanation
Here’s how it works:
- The Set function assigns the database record of the last submitted request to the varApproval variable.
- The ApprovalFlow.Run function triggers the automated cloud flow, passing the request ID and the action Approval as parameters.
- The Notify function displays a success notification to the user, indicating that the form has been successfully submitted.
Step 8: Final Testing
- Fill out the form on the InformationScreen and submit it. An email notification is sent to the administrator containing the Take Action hyperlink.
- Click on the hyperlink in the email, which will take you to the ApprovalScreen, allowing you to review and edit the request using a drop-down list of feedback options.
- After making any necessary changes, click Submit on the ApprovalScreen to finalize the approval process.
Conclusion
You can use deep linking to streamline the approval process in Power Apps by making it easier for administrators to access and approve requests. By following the steps in this article, you can learn how to implement deep linking for an in-app admin approval screen, which will improve the user experience and efficiency of your Power Apps solution.
Resources
For more information, see the following:

Shadrack Inusah
Shadrack is a Power Platform specialist at Fidelity Bank Ghana and a recipient of the Microsoft Business Applications MVP award. He has expertise in tech community building and management. Shadrack is a former Gold Microsoft Learn Student Ambassador and First Runner-Up for the inaugural Africa Power Platform Challenge with 300 participants. He's also a senior member on the Microsoft Tech Community platform, writes about the Power Platform to assist people globally, and has spoken at Power Platform Community events. Shadrack is dedicated to assisting others in learning and collaboratively solving technical issues.