Azure Machine Learning Compute Review

The second step of preparing a machine learning project is to prepare a machine learning compute where code will run and train the machine learning model. You need a proper compute not only for model training, but also for model exploration, deployment, and retraining.
In the previous blog of this series – Azure Machine Learning Workspace Review – I discussed the option of creating an Azure Machine Learning workspace. In this article of the series, I'll talk about compute options, why you need compute, and how proper compute selection can accelerate the model development and deployment process.
What Is Machine Learning Compute?
Machine learning compute is a fully managed and cloud-based workstation where you can run your machine learning code to train and develop your models. In terms of machine learning compute, compute machines are optimized and developed for machine learning workloads.
From an Azure Machine Learning workspace, you can get compute options for using these machines to train your models based on dataset size, the type of model that you choose, and the complexity of training. These compute resources are necessary for optimized and cost-efficient model development.
It is important to have compute options with or without GPUs and the flexibility of choosing the right compute resources such as the number of CPU cores, number of RAMs, CUDA cores, and other options. Machine learning compute needs to be within a secured virtual private network. Your machine learning code will bring data to that compute cluster for model training purposes, and the compute machine will have access to different data sources.
You can also develop your codebase in your local environment and run it on a remote cloud compute. Local machines have a limited number of resources, whereas cloud computing has scalability options. In this case, you don’t need to develop your codebases in a big compute cluster. Once the code is ready, you just need to push it to run in the compute cluster for efficient model training.
Importance of Selecting the Right Machine Learning Compute
Consider the following points when you are selecting a machine learning compute:
- Machine learning compute is used for code development, testing, and deployment. To save time and resources, you can develop the code in your local IDE and deploy it to a compute cluster.
- When training a machine learning model on a large dataset, running the training code on a local machine can take hours. With machine learning compute, you can use distributed model training environments to train large-scale machine learning models.
- Cloud-based machine learning compute machines provide a fully optimized, scalable, and cost-effective development environment. You also get autoscaling options during the model training process to avoid any memory limitations.
- GPU machines can be expensive to own, making it cost-ineffective to buy them for short tasks like model training or re-training. Compute machine gives you the option to rent GPU-based machines for a usage-based fee.
- Both GPU and CPU-based compute machines offer the flexibility to train models faster with fewer technical limitations.
- Machine learning production clusters allow you to autoscale the number of available machine learning instances based on usage. You can also create distributed real-time inferencing mechanisms using Azure Kubernetes Service (AKS).
- Machine learning compute has the option of batch endpoint-based offline inferencing pipelines. Based on the batch size, you can add compute resources to complete the machine learning inferencing on a larger scale in a shorter amount of time.
- A proper compute platform provides a secure machine learning deployment mechanism using SSH, Azure Virtual Network (VNet) integration, Azure Key Vault–based access management, and private endpoint-based integrations.
How to Create Machine Learning Compute in Azure Machine Learning Studio
In Azure Machine Learning Studio, you will find sections such as:
- Authoring: This section gives options to prepare your machine learning workflow using automated machine learning pipelines, designer pipelines, and Jupyter notebooks.
- Assets: This section helps you connect your data sources, environment, manage deployed models, and prepare and schedule jobs.
- Manage: This gives you compute options, data labeling/annotation tools, and linked services.
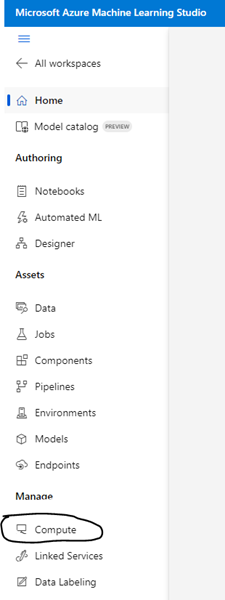
To see all the available compute options of Azure Machine Learning Studio, select Compute, as shown in the circled portion at the bottom of Figure 1.
| Used with permission from Microsoft. View Full Size
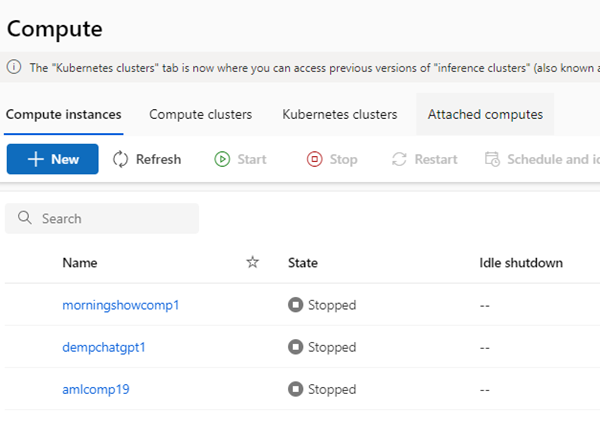
Four Types of Machine Learning Compute
Four types of compute options are available in Azure Machine Learning Studio:
- Compute instances
- Compute clusters
- Kubernetes clusters
- Attached computes
Figure 2 gives you an overview of the Compute page within Azure Machine Learning Studio.
Compute Instances
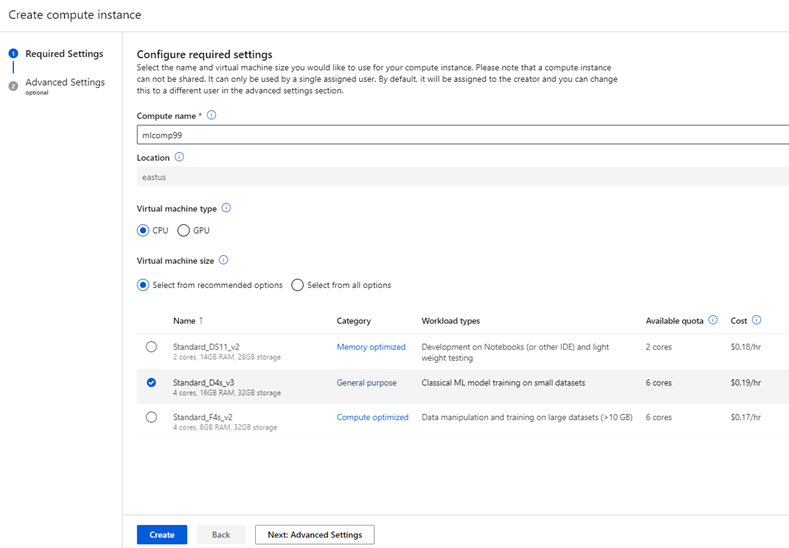
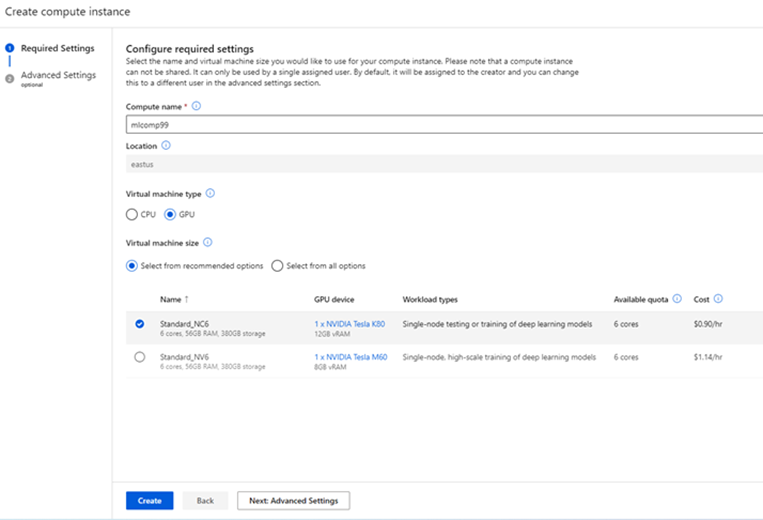
A compute instance is the fully managed single cloud-based workstation for your machine learning workloads. It is well optimized and equipped with proper resources that you will need for your model training and testing. Once you click on the new section from compute instances, you can configure required settings on the Create compute instance page, as shown in Figure 3.
You can select CPU or GPU-based virtual machines for the compute instance. You will see both Select from recommended options and Select from all options, as shown in Figures 3 and 4. Recommended options are based on your recent use cases. If you choose Select from all options, you can choose any compute you want. The cost of each compute instance, available quota, workload type, and category are included in the selection pane.

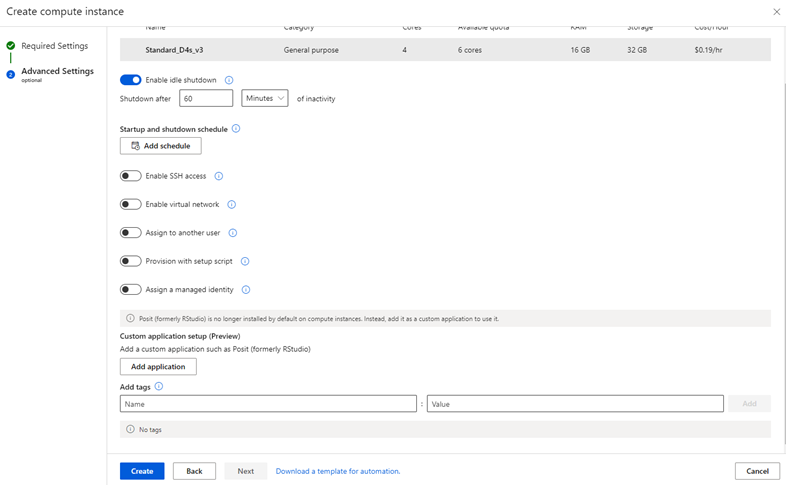
Once you choose your selection, you can click on advance option, as shown in Figure 5, to add advanced features like auto shutdown, SSH integration, VNet connection, and other options. If you select Enable idle shutdown, your compute instance will automatically turn off after a certain time or following a scheduled mechanism, to avoid any cost issue.

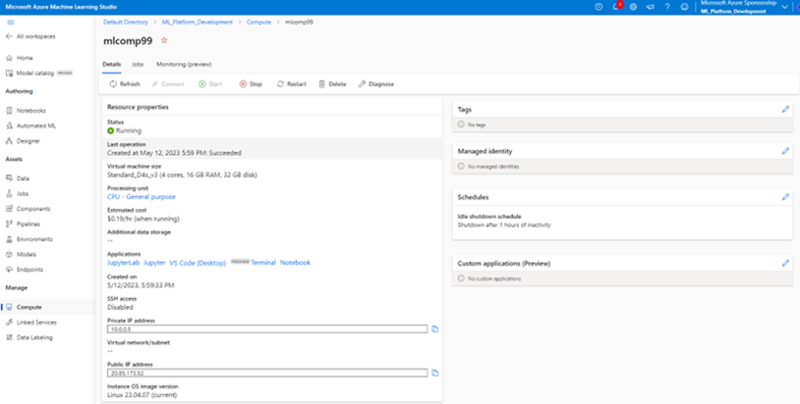
Once your compute instance is ready, you will see the status from provisioning to running. You will get a full overview of your compute platform from here, such as cost, processing unit type, private IP address, and other details, as shown in Figure 6.

From the compute instance page, in Resource properties, you will see applications and available options such as the following:
- JupyterLab
- Jupyter
- VS Code
- Terminal
- Notebook
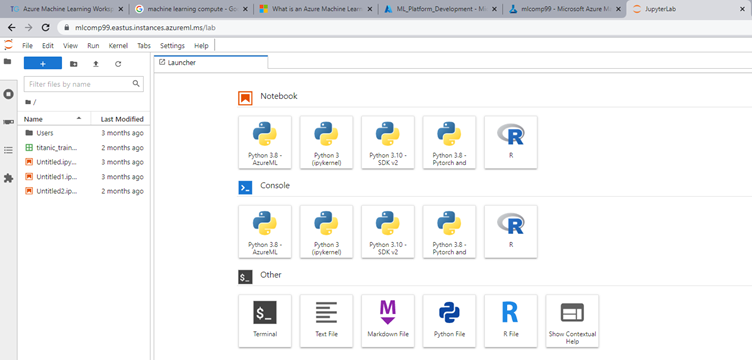
Those applications are installed by default and are ready within the compute instance for you to use. If you choose the JupyterLab option, this will open a JupyterLab instance, as shown in Figure 7. Here you can select your notebook type, console type, and environment configuration.

Compute Clusters
Compute clusters are used for machine learning model training as well. When a single compute instance is not enough for your machine learning load, you can select compute clusters. A cluster has multiple nodes that will support autoscaling to accelerate your large-scale model training.
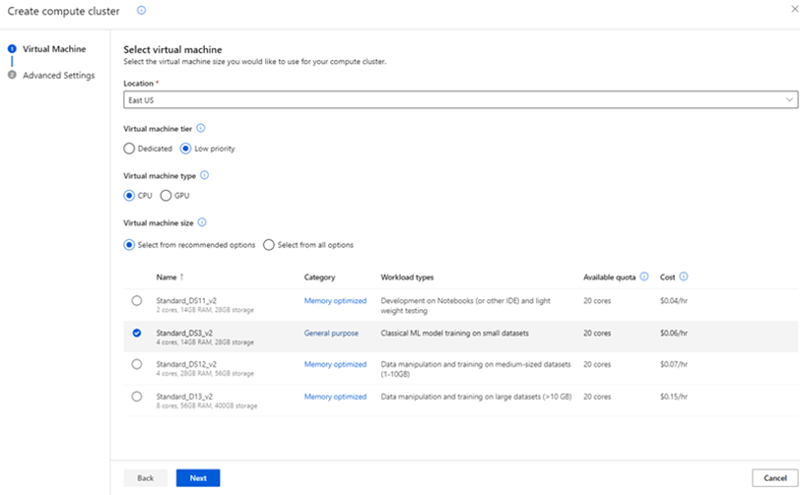
From the option of creating a new compute cluster, you will see a virtual machine tier where low priority machines are cheaper, but they do not guarantee availability of nodes. You need to preschedule your machine learning job to use low priority VM clusters. Dedicated VMs are the costly ones, but all the selected nodes will be instantly available. You can select CPU or GPU-based compute machines. Also, you can follow the recommendation or choose your own VM type.
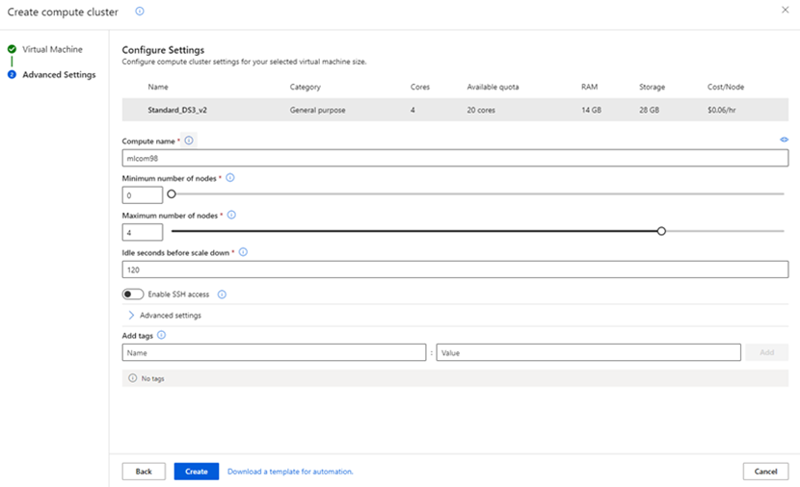
Once you select your VM tier and VM type, select the number of minimum and maximum nodes in your cluster, as shown in Figure 9. You can select a higher number of nodes; they will only be used when necessary and when you submit a model training job. You can configure the number of idle seconds before the cluster scales down from maximum number of nodes to minimum. Advanced security features are available here also, just like compute instances.
Kubernetes Clusters
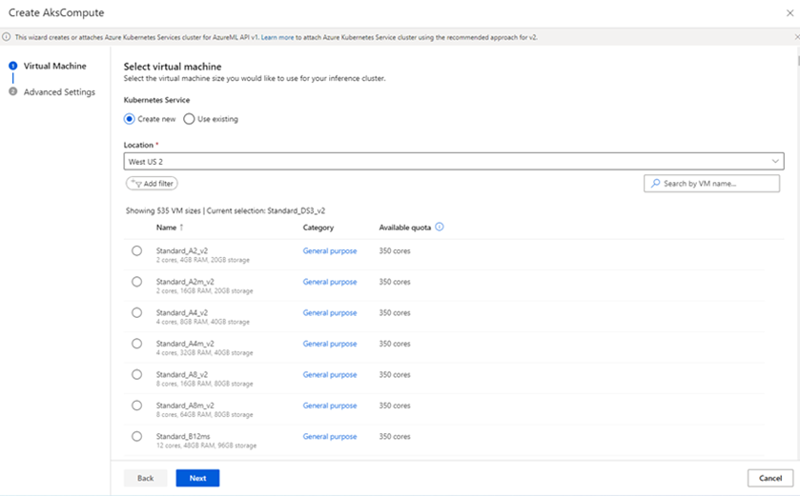
Kubernetes clusters are used for two purposes. You can bring your own Kubernetes cluster for model training, or you can use an AKS cluster for your model inferencing platform. AKS compute is usually used for model deployment. Once you select AKS compute, select the region and you will see all the available VMs, VM category types, and available quota for your subscription.
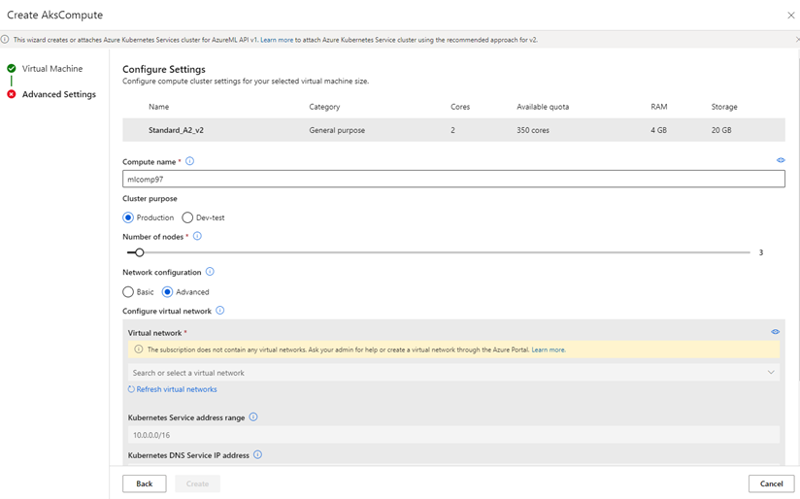
Once you choose the VM type, under Cluster purpose you can select Production or Dev-Test. This option is for cost, SLA, and security features. Select the number of nodes for your cluster. Production clusters need to have at least three nodes whereas Dev-Test can have a single node. You can choose basic and advance network configurations with proper DNS peering, SSL configuration, and VNet integration.
Attached Computes
Attached computes enable you to use your own compute resources instead of having to create a new compute. If you already have an Azure Data Lake Analytics compute, an Azure Databricks cluster, or a virtual machine that you're deploying for other purposes, you can bring your own compute by selecting an attached compute to train your model in your own compute and reduce cost. Azure Machine Learning supports five types of attached computes:
- Virtual machine
- Data Lake Analytics
- Azure Databricks
- Synapse Spark Pool
- Azure HDInsight
How to Increase the Quota of Machine Learning Compute in Your Subscription
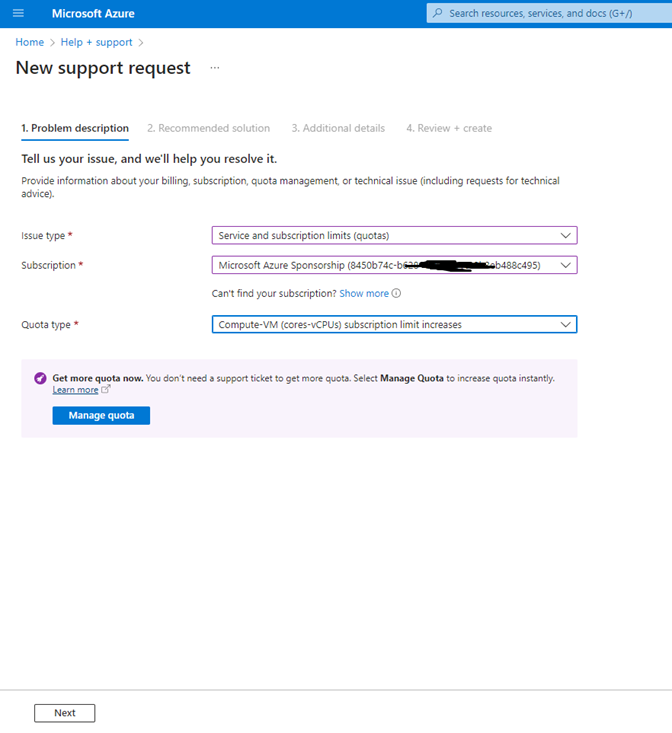
You may notice that you do not have enough compute quota available for your subscription to create a new compute cluster. To increase the quota of machine learning compute, you need to submit a request. Go to your Azure portal, click Help, and then click Support.
From here, select your issue type, which is Service and subscription limits (quotas), as shown in Figure 12. Select your subscription and what type of quota you want to increase. In this case, it is Compute-VM (core-vCPUs) subscription limit increases.
From there, to increase your quota limit, you can go directly to manage quota option. Select the type of computer you are looking for, and then add a new limit, as shown in Figure 13. This limit will be available within a few minutes of applying. You won’t be charged to ask for a quota increase. You will only be charged based on your usage.
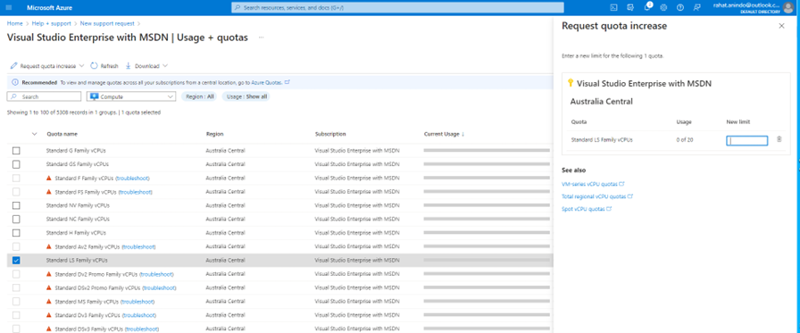
Conclusion
In this article, I discussed the compute options of Azure Machine Learning platform. I also reviewed the importance of ML compute and how it affects the overall model development process. In the next article of this series, I’ll review the Azure Machine Learning workflow and the steps of training an end-to-end machine learning project.
Next Stop: Machine Learning Workflow Review, article 4.
Series articles (will have links as they are published)
Article 1: MLOps Components and Machine Learning Platform Selection
Article 2: Azure Machine Learning Workspace Review
Article 3: Azure Machine Learning Compute Review (this article)
Article 4: Machine Learning Workflow Review
Article 5: Azure ML Notebook Selection and Development Process
Article 6: Connecting Data Sources with Azure ML Workspace
Article 7: Azure ML Security Review
Article 8: Azure ML Model Training
Article 9: Azure ML Model Registration and ML Job Automation
Article 10: Azure ML Model Deployment in ACI
Article 11: Azure ML Model Deployment in AKS
Article 12: Azure ML Model Health Monitoring
Article 13: Azure ML Model Drift and Data Drift Review
Article 14: Azure ML Model Retraining Pipeline
Article 15: Azure ML Model Result Analysis Dashboard with Power BI

Rahat Yasir
Rahat Yasir works at ISAAC Instruments as Director of Data Science & AI to lead their Data & AI initiatives for data-driven & AI-powered transportation industry. He was selected as Canada's top 30 software developer under 30 in 2018. He is an eight times Microsoft Most Valuable Professional award holder in the Artificial Intelligence category. He has years of experience in imaging and data analysis application development, cross-platform technologies and enterprise system design.