Azure Database for PostgreSQL: A Quickstart Guide

If you’re already using large language models (LLMs) such as Azure OpenAI (AOAI), you’re likely looking for a vector database to at least experiment with retrieval-augmented generation (RAG). In this article I will look at Azure Database for PostgreSQL (ADP) database-as-a-service. This service should be very familiar if you’re already using Azure SQL. Azure takes care of the underlying server infrastructure so your database admins can focus on creating tables, managing users and connecting applications to your data.
This tutorial guides you through the shortest and lowest cost path to create a new ADP server, a new database, a test table, some handy extensions, and teaches you the basics of vector search so you can fast-track your RAG experiments. This tutorial assumes:
- Your organization has an Azure account
- You have been granted the necessary permissions to create Azure Database for PostgreSQL resources
- You have basic familiarization with the Azure Portal
Let’s get started!
Steps to Create a New Azure Database for PostgreSQL Server
1. Navigate to portal.azure.com and login with your Microsoft Entra credentials.
2. If there is an existing Resource Group where the new ADP resource will live, navigate there, otherwise create a fresh Resource Group.
3. From within the Resource Group, click the Create button, as shown in figure 1.

4. Type “postgresql” then select the result.
5. Under the Azure Database for PostgreSQL card (figure 2), click Create then Azure Database for PostgreSQL.

6. Next, you want to enter the appropriate Server Details to configure your new ADP resource. For this article, you can see my details in figure 3.

Note: Many of the following values cannot be changed after the server is created.
- Project details: Ensure the correct Subscription and Resource Group are selected
- Server details
- Server name: must be 3-63 characters, only lowercase letters, numbers and hyphens, and globally unique
- Region: Select a region that aligns with your organization’s needs.
- PostgreSQL version: If your project doesn’t need a certain version, pick the latest supported version.
- Workload type: Select Development for this tutorial. This choice will give 1 vCore, 2 GiB RAM and 32 GiB storage
- Availability zone: No preference
- High availability: Leave “Enable high availability” unchecked.

- Authentication method: Select the option PostgreSQL and Microsoft Entra authentication
- Set Microsoft Entra admin:
- Click “Set admin”
- Search for the desired administrator name or group name in your Entra directory
- Click “Select”
- Admin username: I recommend that you use a password manager such as KeePass to generate a complex username and password to make brute force attacks difficult.
- Password: Enter the password then confirm.
7. Click “Next : Networking” and you can set network connectivity options and configure firewall rules as shown in figure 5.

- Networking connectivity:
- For the purpose of this tutorial, set the Connectivity method as Public access (allowed IP addresses). Note: By default, no IP address has access to the server. You’ll add your computer’s IP address to an Allowed List below.
- If you already have a VNet established, feel free to select Private access.
- Firewall rules:
- Optional: Check the box next to “Allow public access from any Azure service within Azure to this server”. This option allows other Azure services, such as your AOAI resource, access to the server. Exercise caution here. This option allows access from ANY Azure IP address, even those outside of your organization, though a malicious actor would still need to know the server name and a valid username and password to access the server.
- Click “+ Add current client IP address” to allow your computer to access the server. Without this, you will not be able to access the server.
- Encrypted connections: Connections to the server are encrypted by default.
8. Click “Next : Security”. Under Data encryption, for this tutorial, select Service-managed key.
9. Click “Next : Tags”
- I like to use at least “Project” and “Technical Contact” tags so that others know what the services in this Resource Group support and who to contact.
- Other ideas for tags include: “Status”, “Environment”, “Business Contact”, “Cost Center”
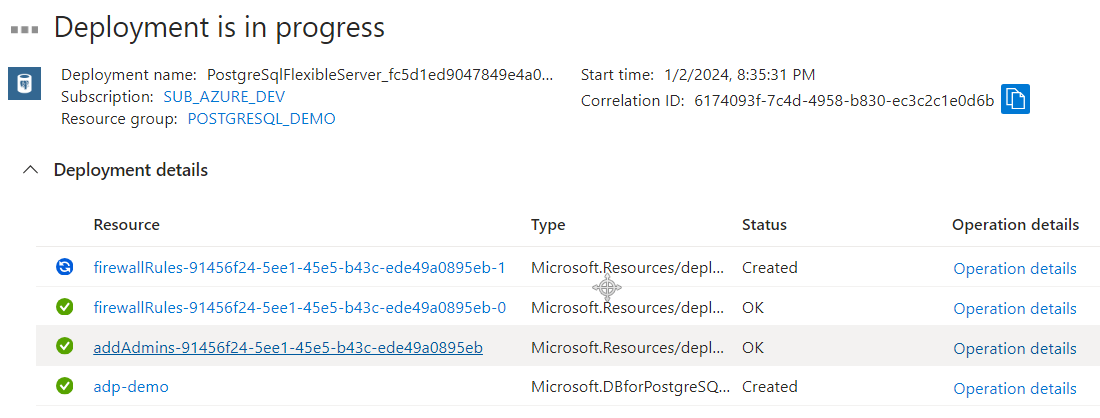
10. Click “Review + Create” then “Create”. You should see something like figure 6.
It will take about 5-7 minutes for the server to deploy to Azure. Congratulations! You’re one huge step closer to having an Azure-native vector database.
Steps to Create a New PostgreSQL Database
After the server has been deployed, click “Go to resource” to open the ADP resource. It is very easy to create a new PostgreSQL database.
- In the left navigation, select “Databases” then click “+ Add”.
- Enter a name for the new database then click “Save” as I have done in Figure 7.

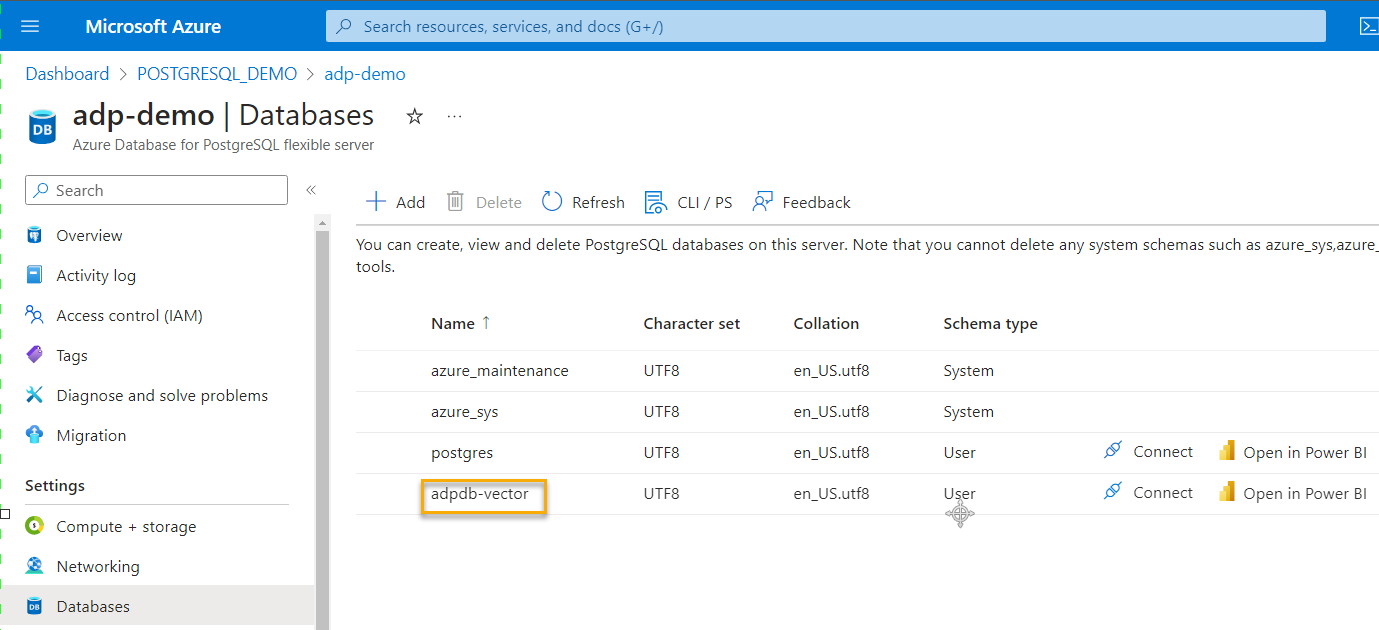
You will now see the new database listed (figure 8). The other databases (“postgres”, “azure_sys” and “azure_maintenance”) are used internally by PostgreSQL and Azure. They can be ignored for this tutorial.

Steps to Enable Useful PostgreSQL Extensions
PostgreSQL provides a way for developers to extend the base functionality of the database by creating extensions. An extension is like a plugin. It provides custom functionality to a product. Some of the extensions you’ll likely use are the “Azure AI”, “Azure Storage” and the “Vector” extensions. How to use each of these is beyond the scope of this quickstart guide, however, in figure 9 and the steps below, I will show you how to install them.

- In the left navigation, click “Server parameters.”
- In the search bar, type “Extensions.”
- Click the drop down under the “VALUE” column.
- Select “AZURE_AI”, “AZURE_STORAGE” and “VECTOR” extensions.
- Click “Save.”
Provisioning these extensions takes a couple of minutes. Nice! You’ve now deployed a new PostgreSQL database server, a database and set up some useful extensions. In the last part of this tutorial, we’ll create a new table, populate it with some sample data and perform a vector search.
Steps to Configure Azure Cloud Shell to Connect to Database
There are a few ways to connect to your new PostgreSQL server and database. One of the most popular is the third-party tool pgAdmin. Another is using Azure Cloud Shell. To keep everything in Azure for this tutorial, these steps will use Azure Cloud Shell.
Once the extensions have been successfully deployed, click “Go to resource” or open the Resource Group and select the ADP resource.
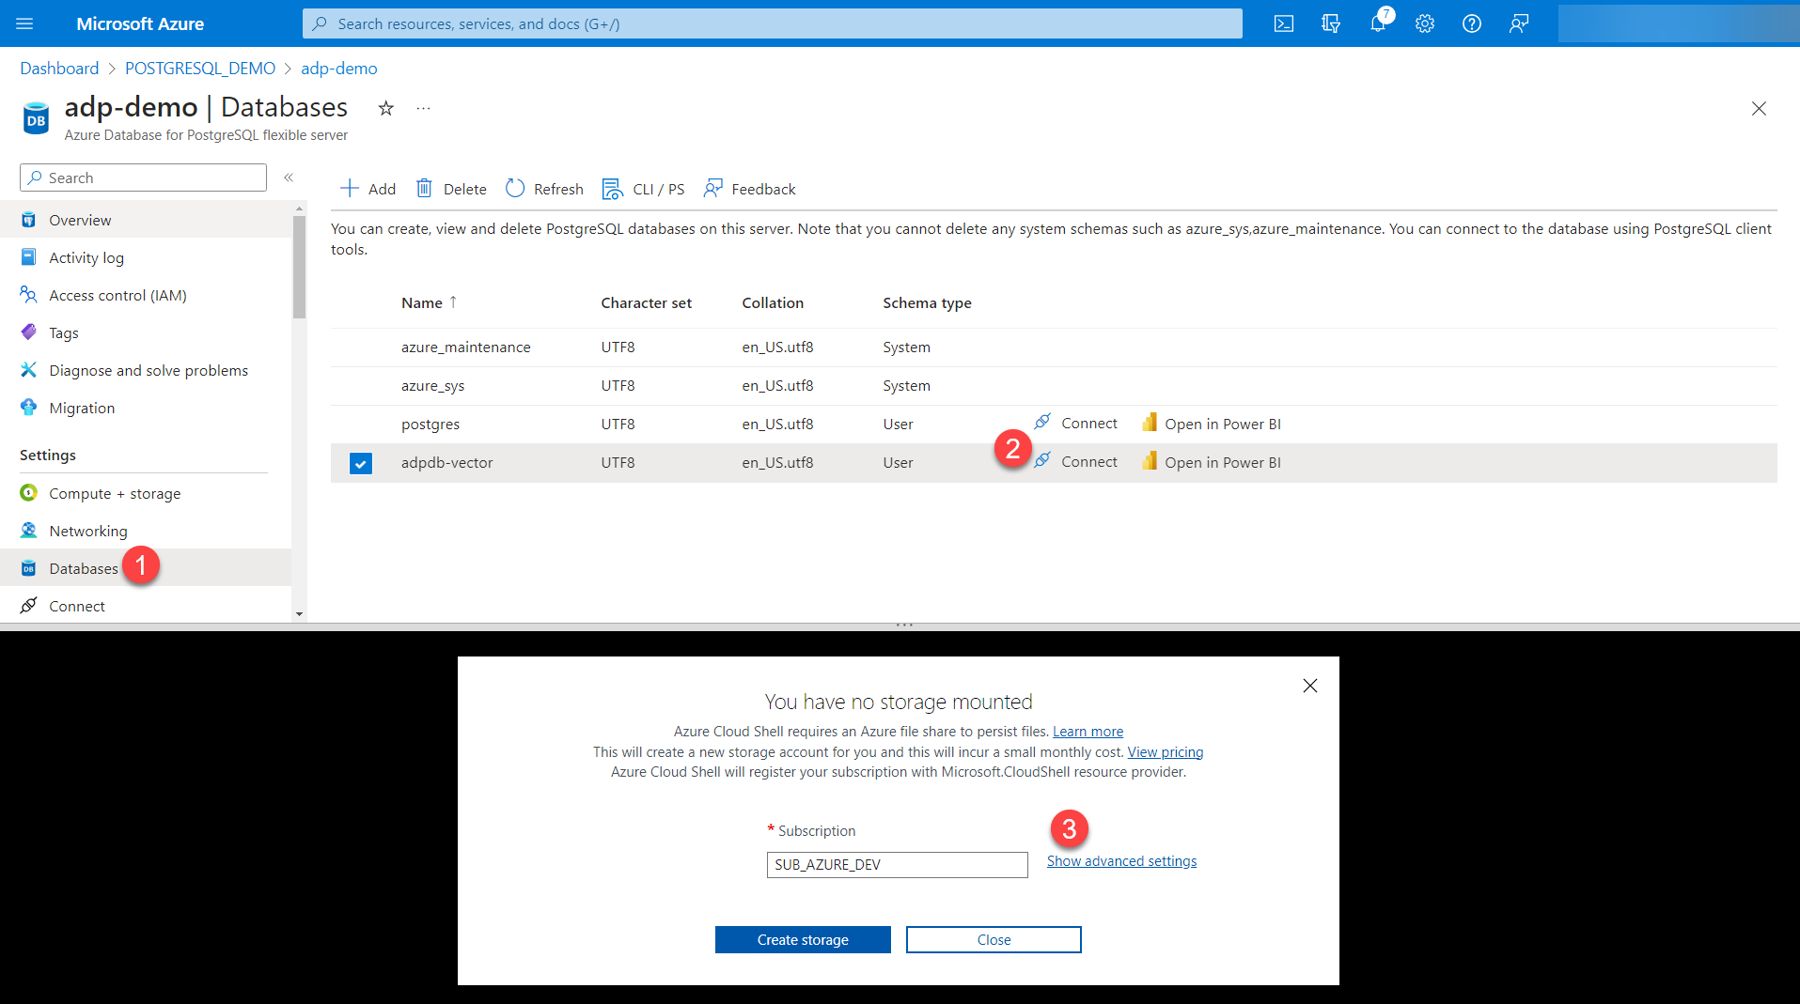
1. On the left navigation pane, click “Databases.”
2. Click “Connect” next to the adpdb-vector database you set up earlier. This will create a horizontal split screen where the Azure Cloud Shell terminal be displayed.
3. If this is your first time using Azure Cloud Shell, click “Show advanced settings.”
4. Enter the critical storage account values as shown in figure 11:

- Ensure the Subscription, Cloud Shell region and Resource group values are correct.
- Storage account (name) must be globally unique. Note: If you enter a name that has already been used by someone in Azure, you will receive a Status 409 error.
- File share does not need to be globally unique. Stick to your organization’s naming convention.
5. Click “Create storage.”
After a few moments, the Azure Cloud Shell terminal will open to a Bash prompt. At the time of this writing, there seems to be some incorrectly escaped characters in the default command that Azure Cloud Shell starts with. Paste in the following command to get past this issue:
psql "host=<your-server-name>.postgres.database.azure.com port=5432 dbname=<your-database-name> user=<your-admin-name>@<your-domain.com> password=$(az account get-access-token --resource-type oss-rdbms --output tsv --query accessToken) sslmode=require"
Your Azure Cloud Shell session is now logged into the PostgreSQL database, and you can now issue terminal commands.
Steps to Create a Sample Table in the Database and Add Test Data
We’re almost there! Let’s create a quick table with a vector column and some test data.
Critical: Every PostgreSQL command must include a semicolon (“;”) at the end. Otherwise, the terminal will just flash with no output displayed. This can be quite baffling for the new admin!
Create a table named “tbltest” with these three columns:
- id:
- “id” values will be automatically added every time a new record is added to the database.
- text_content:
- This is the (English) text that the vector_content represents.
- This is your “chunk” when doing RAG.
- vector_content:
- The vector representation of the text in text_content.
- This is a fictitious vector meant only to illustrate the how vector search works.
- Text in the text-embeddings-ada-0002 model has 1536 dimensions. When you use this PostgreSQL database for RAG, this column would be of type “vector(1536).”
Type these PostgreSQL commands (psql) into Azure Cloud Shell:
CREATE TABLE tbltest (
id bigserial primary key,
text_content text,
vector_content vector(3)
);
Note: When you start working with embedding models such as Azure OpenAI’s text-embedding-ada-002, the data type for a “vector_content” column will be “vector(1536)”. This is because the model returns vectors with 1536 dimensions.
In your Azure Cloud Shell terminal, type the following psql statement to insert some test data:
INSERT INTO tbltest (text_content, vector_content) VALUES
('TekkiGurus ROCKS!', ARRAY[1.0, 0.5, 0.2]),
('Home repairs', ARRAY[-0.3, -0.7, 0.9]);
Notice how different the vector values are for each sample record. The text “TekkiGurus ROCKS!” is represented by significantly different vector numbers than the text “Home repairs.” This is because when text is embedded into vector space by embedding models, the semantic meaning of these terms are also discernible. My favorite visualization for this concept is the Tensorflow Embedding Projector. By the way, it’s not just text that can be embedded in this way. Entire documents, images, audio and video can also be represented in vector space.
As you will soon see, you are going to retrieve the vector representation of the term “Techie” from our fictitious embedding model. When you search the sample data, do you think you’ll get “Home repairs” as a result or something that contains the term “TekkiGuru”?
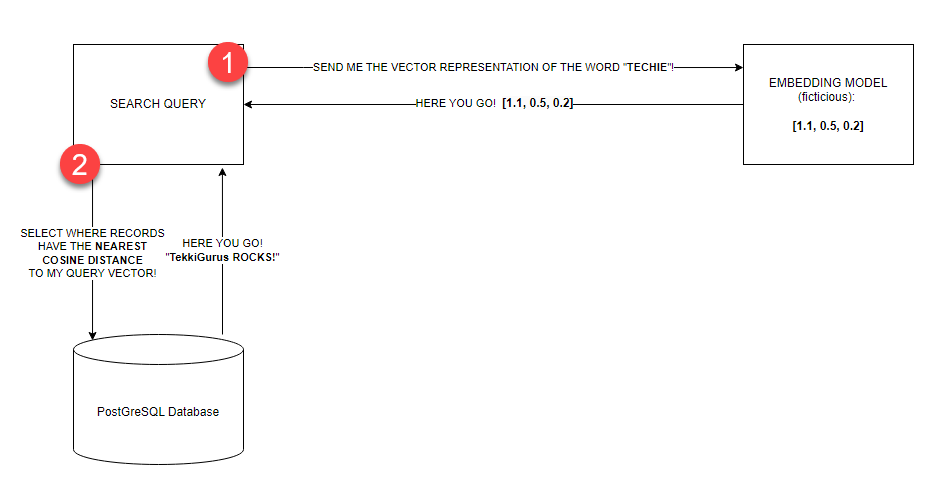
Let’s now mockup the vector similarity search. The following queries will return the "text content" values where the corresponding "vector content" values have the nearest cosine distance with our query vector. This language can be challenging to grasp, so before you issue the query, review this visualization of the scenario (figure 12) you are mocking up:
- You will (fictitiously) send the query text (the word “TECHIE”) to an embedding model such as Azure OpenAI’s text-embedding-ada-0002.
- The model “embeds” the text into the vocabulary, grammar, and entire language structure the model was trained on. Note: In my mind, the model places each word in our query text nearby where it fits inside the language corpus it was trained on.
- The model then responds with the vector representation of the text. Note: A vector is an array of floating-point numbers.
- You will then use this vector representation to query the “vector_content” column in the database. The database returns the records where the vector_content values have the nearest cosine distance to the query vector.

One of the reasons vector databases exist is because it’s quicker for computers to search for results using vector math than it is for them to search based on human language. Once content has been embedded by a model, there are exciting semantic characteristics that mathematically emerge. The famous example of king – man + woman = queen is possible because of these vector representations. If you are excited about experimenting with some of these concepts yourself, follow on!
Steps to Perform Vector Search on the Sample Data
In your Azure Cloud Shell terminal, issue the following psql statement:
SELECT text_content
FROM tbltest
WHERE (vector_content <=> ARRAY[1.1, 0.5, 0.2]::vector)
ORDER BY vector_content
LIMIT 1;
This query translates loosely to:
- FROM the table tbltest
- SELECT only the values in the text_content column
- WHERE the corresponding vector_content values, are nearest the vector representation (ARRAY[1.1, 0.5, 0.2]), of our original query text (“Techie”)
- ORDER the results according to the values in the vector_content column
- LIMIT the results to the top one
You should see the results:
text_content
-------------------
TekkiGurus ROCKS!
This is because the fictitious query vector is closest to the “TekkiGurus ROCKS!” vector than to the “Home repairs” vector. What happens if you use the fictitious vector representation for “Casa” of “ARRAY[0.5, 0.5, 0.8]”?
SELECT text_content
FROM tbltest
WHERE (vector_content <=> ARRAY[0.5, 0.5, 0.8]::vector)
ORDER BY vector_content
LIMIT 1;
text_content
--------------
Home repairs
I’ll let you take it from here. So far, you’ve successfully deployed your own PostgreSQL server and database. You’ve enabled valuable extensions and set up Azure Cloud Shell to interact with your new database. You’ve even created a table, populated the table with test data and queried the table using vector search. I can’t wait to see what you build moving forward.
Take care!

Eric Thomas
Eric Thomas is a Senior Software Engineer focused on developing cloud-first apps and automations. Eric is focused on Power Apps, Power Automate and deploying Azure Services. His language of choice is Python. Some favorite Azure resources include Logic Apps, Functions, Azure SQL, Azure OpenAI, Blob Storage and Key Vault. Eric is data fluent and astute with REST APIs, basic app security and systems administration. He always engages thoughtfully with each team he is a part of and creates rich documentation and diagrams for each project he is lucky to work on.