Managing Custom Office Templates With an Organization Assets Library

An organization assets library is a feature of SharePoint Online that organizations can use to:
- Store images in SharePoint Online sites and pages.
- Provide templates for use in Microsoft 365 apps (Word, PowerPoint, and Excel).
This article focuses on how to use an organization assets library for templates.
Serving as a starter file for a document, a template can include content and design elements and often helps organizations easily enforce their brand and style.
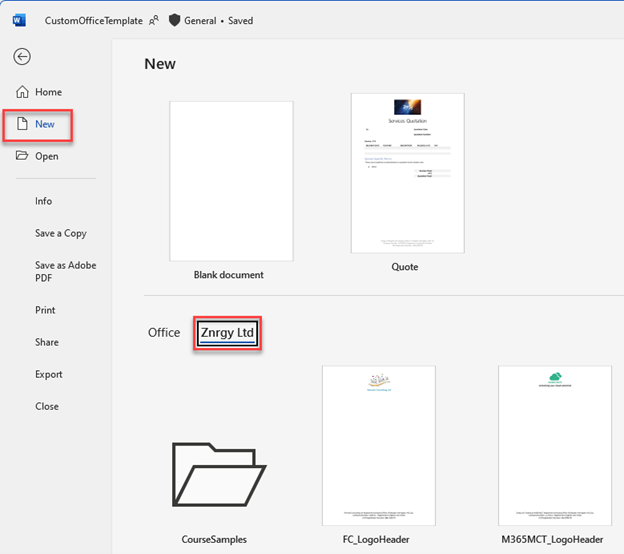
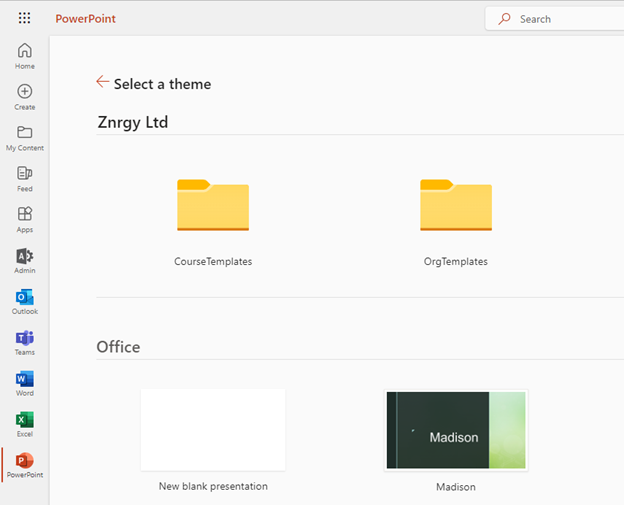
Once you implement a library, the templates will appear in the desktop application in New under the name of the organization. In Figure 1, for example, the organization name is Znrgy Ltd. In this example, there are two organization templates and a folder for course samples in the organization assets library.
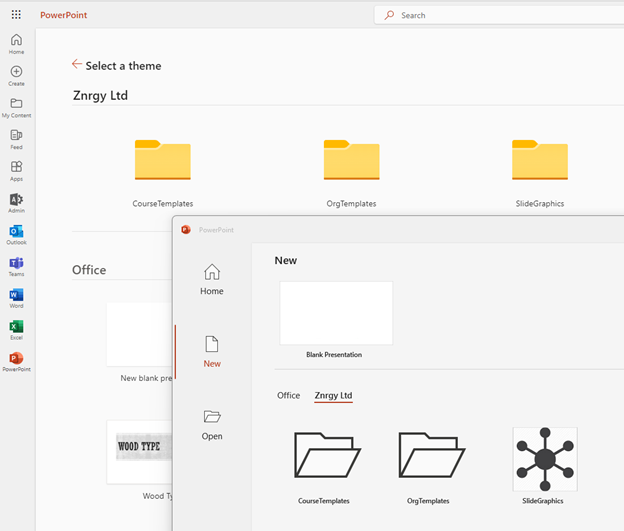
To use the templates in PowerPoint for the web, go to the PowerPoint start page, or in Microsoft 365 select the PowerPoint icon on the app launcher. At the top of the page, choose More Themes. You will see a folder for the organization assets library, which contains your templates. In Figure 2, the library in Znrgy Ltd is called OrgTemplates and this shows as a folder.

In both the desktop and web apps, when you choose a template, this creates a new file that includes all content and formatting in the template.
This feature is available in Word, PowerPoint, and Excel apps on both Mac and Windows from version 2002 and later. Users with an Office 365 E3 or E5 license can also use the templates in PowerPoint for the web.
This feature is not available in US Government plans nor in Office 365 tenants operated by 21Vianet.
Background Information
There are multiple features in SharePoint Online that provide templates. This article focuses on the organization assets library feature to provide templates for use in desktop office applications.
Note: It is possible to use other template features in conjunction with organization assets libraries, such as the Add a template feature in each library and content types at the tenant and site level. However, using multiple template features together adds complications that you should consider BEFORE implementing the templates for desktop apps.
This is especially true if you use content types at the tenant level and organization assets libraries, since the location for templates will need to fit both features to avoid duplication of effort. I discuss working with multiple template features together in the final section of this article (“What About Add a Template and Content Types?”).
To learn more about content types, see Create or customize a content type - Microsoft Learn Documentation.
The Microsoft 365 CDN
The organization assets library uses the Microsoft 365 Content Delivery Network (CDN) to provide reliable access to the templates. The purpose of a CDN is to provide faster download of common resources by using multiple servers. The Microsoft 365 CDN for files is included in your SharePoint Online license.
Normally, when working with organization templates, we want these templates to be accessible only to authorized users, which is why there was a step to customize library permissions earlier. The default behavior of the script to turn the library into an organization assets library sets the CDN to private, which honors the permissions on the library.
It is possible to set the CDN to be public. This allows anonymous access to the content, in this case, to the templates in the organization assets library. If you need to provide users access to the templates via a URL without verifying permissions, set the CDN type to Public when carrying out step 5 in the section “Step 4: Declare the Library an Organization Assets Library,” later in this article. Get full details on the Set-SPOOrgAssetsLibrary script in this Microsoft Learn documentation, including setting the CdnType parameter.
More information on the Microsoft 365 CDN is available in this Microsoft Learn documentation.
Setting up an Organization Assets Library
First decide where you want to host the library. Organizational templates are normally available to everyone in the organization and therefore you should store them somewhere everyone can access. However, you may also choose to have templates at the department level, which only one department can access.
In the following steps, I’ll describe how to limit edit rights to the library to protect the templates from accidental or unauthorized edits.
Prerequisites
When setting up an organization asset library, remember:
- All organization asset libraries must be on the same SharePoint site.
- Organization assets libraries can either be template libraries for use in Microsoft Office or image libraries for use in SharePoint Online sites and pages.
- You can have up to 30 organization asset libraries per tenant covering both templates and image banks.
- Site Member permissions are enough to create a library.
- Site Owner permissions are needed to modify permissions for a library.
- SharePoint Admin or Global Admin permissions are needed to run PowerShell to set the library to be an organization assets library.
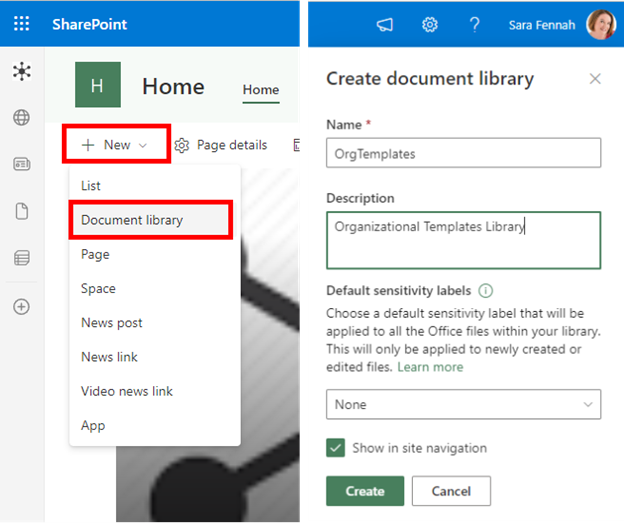
Step 1: Create the Library
Once you have chosen the site that will host the templates library, navigate to the home page of the chosen site and create a new library, as shown in Figure 3. The name of the library is not important for the feature to work, but it should be informative to your users.
I recommend not setting a default sensitivity label for the library without first testing how the templates behave with the desired label assigned.

Step 2: Customize the Library
You can add columns to the library and set up custom views, as with any SharePoint library. Although this will not show in the template experience for users, it can help with managing the templates.
For example, I recommend adding a review date and owner column. You can set up a Power Automate flow to remind the owner to review and update templates. Also, this way other users know whom to contact for any template questions or issues.
Step 3: Customize the Library Permissions
Template users must have at least read access to the library where templates are stored.
Depending on the permissions on the site where the library is created, you can customize the permissions for the library to either:
- Limit user access to edit the templates.
- Grant the required read permissions.
As with SharePoint permissions generally, it is best practice to set permissions at the site level and customize at the library level if required, but no lower. Avoid setting permissions on folders within libraries.
Because organization assets libraries must all be within the same SharePoint site, I recommend creating separate libraries for different template audiences rather than setting permissions on folders within the library. As mentioned, you can create up to 30 organization asset libraries within a tenant.
For more information, review the Microsoft Learn documentation on SharePoint permissions.
Step 4: Declare the Library an Organization Assets Library
Once you have created the library and even before adding templates into the library, you can use PowerShell to declare the library an organization assets library. You can also do this after the library has content in it and even convert an existing library into an organization assets library. It can take up to 24 hours for the template library to show up in the Microsoft 365 apps. New templates show up within minutes. Choose when to declare the library an organization assets library with these timings in mind to suit your needs.
For more information on using PowerShell with SharePoint Online, review the Microsoft Learn documentation.
To declare a library an organization assets library:
- Copy or note the URL of your SharePoint admin center and the library that you want to declare an organization assets library.
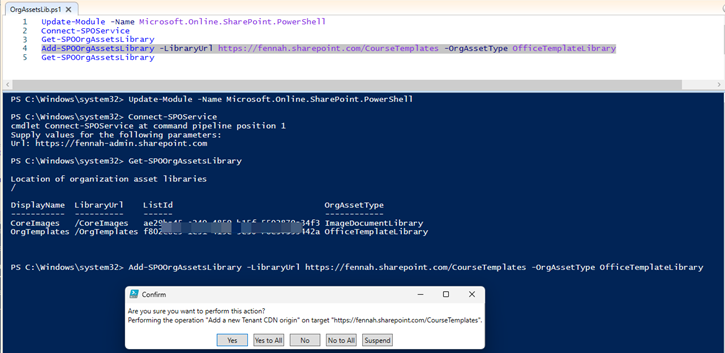
- Connect to SharePoint Online using the Connect-SPOService cmdlet (Figure 4). I prefer to provide the URL when prompted in the PowerShell window and wait for the sign-in prompt. However, you can also include the URL parameter in the cmdlet. For example, Connect-SPOService -URL https://tenant-admin.sharepoint.com. Do not include the credential parameter if the account to be used is protected with multifactor authentication (MFA).
- Verify the current configuration of organization asset libraries within the tenant using Get-SPOOrgAssetsLibrary to ensure you have not exceeded the limit of 30, and the library is not already an organization assets library. In Figures 4 and 5, there are two libraries declared already (CoreImages and Org Templates), and they do not exceed the limit of 30. Because the OrgTemplates library has already been declared a template library, if that were the library you planned to declare, you would not need to proceed.
- Declare the chosen library to be an organization assets library with a type of Office Template Library using the Add-SPOOrgAssetsLibrary cmdlet. For example, Add-SPOOrgAssetsLibrary -LibraryUrl https://tenant.sharepoint.com/sites/site/library -OrgAssetType OfficeTemplateLibrary
- To confirm adding a content delivery network (CDN) for delivering these templates to users, select Yes (Figure 4).
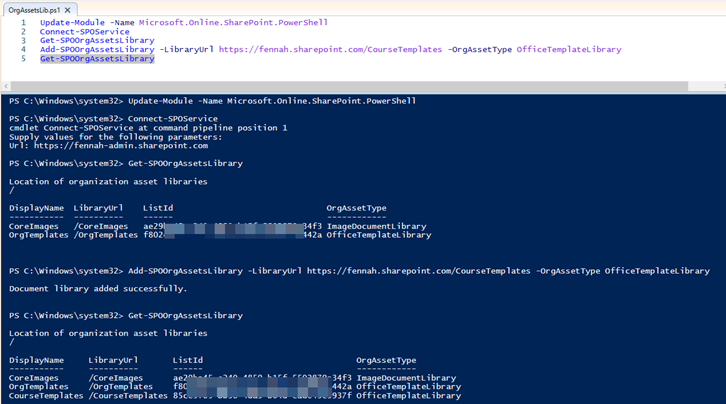
- Confirm the setup using the Get-SPOOrgAssetLibrary cmdlet to check that the new library has been added to the list. Figure 5 shows the completed PowerShell process.
- Use PowerPoint for the web to verify that the library shows up; the library will appear there almost instantly. It can take up to 24 hours to show in the desktop apps. In Figure 6, there are two template libraries (CoreImages and OrgTemplates) in PowerPoint for the web, as compared to Figure 2 earlier, where there was only one (OrgTemplates).
| Used with permission from Microsoft. View Full Size

| Used with permission from Microsoft. View Full Size

View Full Size
Adding a Logo to the Template Library
If you want the template library to display a custom image, you can set a thumbnail for the organization assets library. Store the thumbnail image in the library for which it will display as the thumbnail.
There are two options for setting up the thumbnail:
- Specify the thumbnail when setting up the library using the -ThumbnailUrl parameter on the Add-SPOOrgAssetsLibrary cmdlet (see example 1).
- Set the thumbnail on an existing organization assets library using the Set-SPOOrgAssetsLibrary cmdlet (see example 2).
Example 1: Set thumbnail when setting up the library
Use the following to set the thumbnail when you set up the library:
Add-SPOOrgAssetsLibrary -LibraryUrl https://tenant.sharepoint.com/sites/site -ThumbnailUrl https://tenant.sharepoint.com/sites/site/thumbnail.jpg -OrgAssetType OfficeTemplateLibrary
Example 2: Set thumbnail after setting up the library
Use the following to set the thumbnail after you set up the library:
Set-SPOOrgAssetsLibrary -LibraryUrl https://tenant.sharepoint.com/sites/site -ThumbnailUrl https://tenant.sharepoint.com/sites/site/thumbnail.jpg -OrgAssetType OfficeTemplateLibrary
To obtain the thumbnail URL:
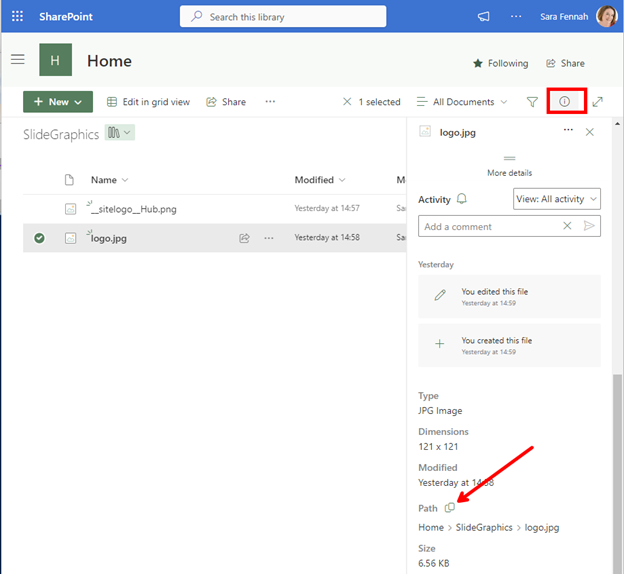
- Navigate to the library in the web browser and select the required image file, in this case, logo.jpg.
- Open the file details blade to view document properties using the i icon highlighted toward the upper-right corner of Figure 7.
- Scroll down to see the path, and then use the copy icon to copy the path to the clipboard, as indicated toward the lower-right corner of Figure 7.

When set, the icon will show in the desktop applications but not in PowerPoint for the web, as shown in Figure 8.
| Used with permission from Microsoft. View Full Size
Create, Edit, and Remove Templates
In Office, templates have their own file format. Use these formats when creating templates for your organization assets library:
- Excel templates use the .xltx file extension.
- Word templates use the .dotx file extension.
- PowerPoint templates use the .potx file extension.
Create a Template
Normally you create templates by first creating a file with the required guidance, content, formatting, structure, and other components. When finalized, save this file as a template to the appropriate template library. The user who saves the templates into the template library will need a minimum of contribute permissions in the library. Although creating a template in the template library works when the location is synced to the PC via OneDrive, this is not necessary.
To facilitate editing the template and using it in other scenarios later, which I discuss later in this article, I recommend storing the document in both standard file format and template format in the template library. Working on the standard format file is simpler and allows for easier document versioning when updating the template. With this methodology, you always open the standard format file and then save it as a template in the same location.
To create a template:
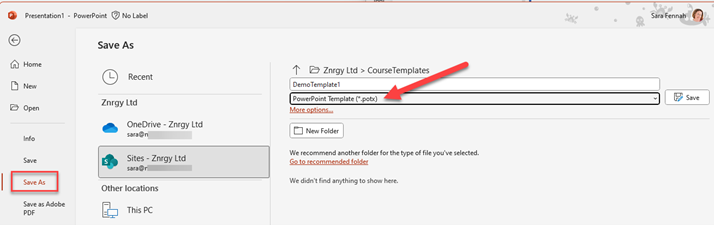
- Working in the desktop application, open the file that you want to turn into a template.
- Choose File > Save As.
- Navigate to the template library.
- Select the template format file type, as shown in Figure 9.
- Click Save.

Edit a Template
To edit the templates in the template library, a user will need a minimum of contribute permissions in the library. Although it is possible to edit the template from a synced copy when the location is synced to the PC via OneDrive, the default behavior when opening a template from File Explorer is to create a new file from the template, not open the template for editing.
I recommend working with templates using the navigation to SharePoint sites built in to the desktop apps, rather than using sync.
To edit a template:
- Open the appropriate desktop application.
- Choose File > Open.
- Select Sites and navigate to the relevant site and template library.
- Locate the template to edit.
- Open the file as you would with any normal file.
- Edit and save the file as you would with any normal file.
Users with read-only access to the library can open templates in this manner, but not save changes to the library. This is why it is important to ensure library permissions are correct when creating the library.
Editing the template will instantly update the file that users see in their templates list. In the “Create a template” section of this article, I advocated having the document in both the file and template format in the template library. If you follow that advice to update a template, make the edits in the standard file and then save as a template when you are ready to update the template. This avoids challenges with controlling when the template is updated and with accessing the template to update it.
Remove a Template
To remove a template from use, remove the file from the template library. If it is no longer needed, delete it. Deleting the template won’t affect files created from the template.
If you need to keep the template for any reason, move it to another location.
What About Add a Template and Content Types?
Organization asset libraries are not the only way to manage templates in SharePoint Online. You can also add templates to libraries by selecting Add a template or using content types at the site or tenant level. Neither of these features push the templates to the desktop applications. The templates are used when creating documents from the SharePoint Online web interface or, in the case of team sites that are connected to Microsoft Teams, from the Teams application.
It is possible to use the same templates in many locations. However, it is important to remember the following points related to the Add a template feature and content types at the site and tenant level:
- Add a template feature:
- Shows template under the New button within SharePoint libraries and Microsoft Teams file tabs
- Uses file format, not template format
- Stores the file attached to the single library it is added to
- Does not detect if the same template is used in multiple libraries
- Creates a new file in the web application
- Content types at site level:
- Shows template under the New button within SharePoint libraries and Microsoft Teams file tabs
- Uses template format
- Relies on a hidden SharePoint site to store and publish templates called the content type hub. The content type hub is only accessible to SharePoint administrators. Because of how content types are created and managed in SharePoint Online, you do not need to browse to the content type hub. The content type hub URL is of the format https://tenant.sharepoint.com/sites/contentTypeHub where tenant is replaced with the name of your tenant.
- Creates a copy of the template or can reference a template within the content type hub site
- Can only be applied to libraries within the site and any subsites
- Creates a new file in the web application
- Content types at tenant level:
- Shows template under the New button within SharePoint libraries and Microsoft Teams file tabs
- Uses template format
- Creates a copy of the template or can reference a template within the content type hub site
- Can be applied to any library within the tenant
- Creates a new file in the web application
Based on this analysis, to present the same templates to users from the New button within SharePoint libraries and Microsoft Teams file tabs and in desktop applications, there are three choices:
- Manually update templates used in Add a template and content types when updating a template in an organization assets library. The main downsides of this are the effort required. Also, since this is a manual process, it is not 100 percent reliable.
- Create your organization assets libraries within the content type hub. This requires granting read-only access to all users in your tenant to libraries on a SharePoint site. This is normally hidden, with access limited to SharePoint admins when working with content types. Changes also require the republishing of content types when the template is updated.
- Create a process where the template in both the organization assets library and content type hub is updated, and the content type is published.
Conclusion
The focus of this article was to show how to use an organization assets library in SharePoint Online for templates in Microsoft 365 apps (Word, PowerPoint, and Excel). Use these steps and guidelines for tasks such as the following:
- Setting up the library
- Creating, editing, and removing templates
- Runing PowerShell to set the library to be an organization assets library
References
For further reading, see:
Create an organization assets library - Microsoft Learn Documentation
Differences between templates, themes, and Word styles - Microsoft Support
Create or customize a content type - Microsoft Learn Documentation

Sara Fennah
Sara has over 25 years’ experience, has been a Microsoft Certified Trainer (MCT) for over 15 years, and is also a MCT Regional Lead and Microsoft MVP (Most Valuable Professional) for Microsoft 365 Apps and Services. Sara has been working with Microsoft 365 since the preview in April 2011 and holds over 50 Microsoft Certifications. Sara’s company still uses the same Microsoft 365 Tenant opened back in 2011.
As a trainer, Sara’s professional aim is to help make technology more accessible by increasing knowledge and decreasing fear. In her own words “I love helping others advance their own skills and use of technology, whilst challenging myself to advance my own skills and expertise.”
Sara provides training across Microsoft 365 from beginner to admin and everyone in between. She specializes in productivity, security, and compliance in Microsoft 365. In 2021 Sara cofounded a group of other like-minded MVPs to form the Viva Explorers, who actively promote, evangelize, and champion a modern employee and workplace experience underpinned by tools such as Microsoft Viva. Sara’s Viva Explorer persona is the Viva Realist, highlighting her expertise in helping organizations implement Viva and the wider Microsoft 365 suite.