Important Windows Image Cleanup Maneuvers
When it comes to deploying Microsoft Windows for general and specific use in an organization, issues of scale and scope often grow in importance. That’s because Windows is typically deployed from some kind of purpose-built image that’s ready to be written to target devices from a centralized and tightly managed store. Although that store may house a collection of dozens of images – where each one targets some specific job role (and its application, app, and access requirements) – each such image may be deployed to hundreds or even thousands of individual devices.
What Happens to Windows Images Over Time?
As Windows images get updated or patched, the Windows Component Store gains additional entries. This master collection of files, which typically resides at C:\Windows\WinSxS, supports functions that customize and update Windows, including new component versions, enabling or disabling Windows features, and more. As new update packages take up residence in the Component Store, they may make older packages obsolete. In the wake of an update cycle, it is not unusual for a Component Store analysis to reveal two to five “reclaimable packages” eligible for removal from that store. The total disk footprint for items involved often runs from 2-5 GB in size. (Because of compression, image size impact will be somewhat less.)
In addition, as device drives are updated in Windows operating systems, entries are written into a pair of folders, collectively called “the Driver Store” (C:\Windows\System32\Drivers or C:\Windows\System32\DriverStore). Interestingly, as new drivers are added, old ones are not removed. Here again, it is not unusual to find half-a-dozen or more drivers that are unused: either duplicates or obsolete items. Drivers vary widely in size, with graphics devices often consuming 1 GB or more (my Nvidia discrete adapters run 1.5 -1.6 GB, Intel Iris Xe 1.1-1.2 GB), and other drivers ranging from under 100,000 to as high as 900,000. Here again, removing even a handful of drivers can reduce the total disk footprint anywhere from 1-5 GB (less in compressed images).
And finally, there’s basic Windows cleanup hygiene. Using a tool like Disk Cleanup (or a GitHub project, Managed Disk Cleanup) can find and clean up from hundreds of megabytes to tens of gigabytes on a running Windows image. Similarly, the old but still capable UnCleaner tool invariably finds 500-900 MB of unnecessary and removable files on running Windows images as well. I often use both as a final cleanup step on a mounted Windows image before restoring it to an equivalent image format for deployment.
After a discussion of image cleanup’s benefits (next section), I’ll take you through the preceding image cleanup activities in illustrated detail. Then, I’ll conclude with mention of a more controversial (and perhaps unwarranted) maneuver: operating system (OS) compaction. I’ll explain briefly how to build an initial image that’s compacted, and how to compact an already built (and running) OS.
What Image Cleanup Buys
Simply put, image cleanup buys time and space. A smaller image takes less time to move from sender to receiver. It also consumes less disk space when stored and fewer system resources when run. This might not sound significant. However, when dozens of copies must be staged from a central repository to staging servers, and then hundreds to thousands of copies must be deployed onto target devices, the multiplication effect can be significant. A savings of 5-10 GB on image size multiplies to 60-120 GB for a dozen staging servers, to 500 GB to 100 GB for 100 instances, and ten times that for 1,000 instances. It adds up!
Using DISM for Image Cleanup
The Windows Deployment Image Servicing and Management (DISM) tool works at an administrative command line (and in PowerShell, too) to service and prepare Windows images. Managing involves listing image components, updates, drivers or applications; capturing or splitting an image; appending or deleting images inside a Windows Image (.wim) file; or mounting an image. Servicing involves adding or removing drivers or packages, modifying image settings, enabling or disabling Windows features, and yes, cleaning up a Windows image. That’s the focus for this discussion.
Before cleaning anything up, it’s a good idea to check whether cleanup is needed. The following DISM command will tell you what’s what for a running Windows image:
DISM /online /cleanup-image /analyzecomponentstore
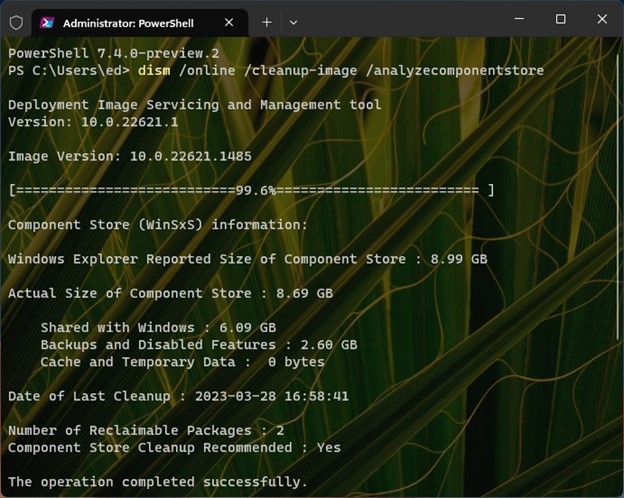
Here’s what the output from that command looks like in PowerShell on a Windows 11 22H2 PC with some recently applied updates.
Note in Figure 1 that the running Windows image (flagged using the /online parameter in the DISM command string) has two reclaimable packages. Also, the size of the component store is reported at 8.99 GB, with an actual size of 8.69 GB.
The cleanup operation is likewise simple. It uses a different DISM command string, to wit:
DISM /online /cleanup-image /startcomponentcleanup
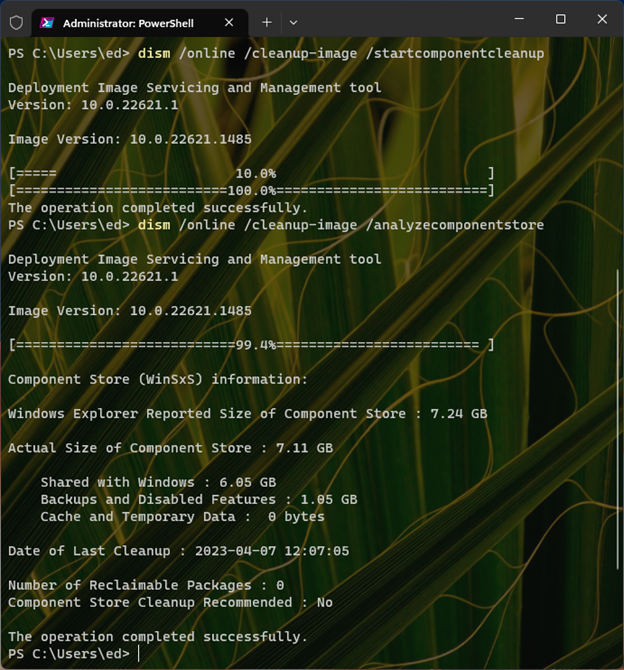
On the PC that generated Figure 1, the results are shown in Figure 2 after running that command.
The reclamation is successful. (The incomplete 10% progress bar appears ahead of the 100% complete one, when a PC hasn’t been restarted since the last update was applied, for no obvious reason.) Afterward, another invocation of /analyzecomponentstore shows the reported size at 7.24 GB, and the actual size at 7.11 GB. Compared to the pre-cleanup check, those numbers dropped by 1.75 GB (reported) and 1.58 GB (actual). That difference represents image size reduction achieved. I’ve seen numbers as high as 5-6 GB on less frequently cleaned PCs.
Using DISM on an offline (non-running) image is also doable. The same commands for analyzing and cleaning the component store work with /Imagefile and /Index parameters for offline images. For all the details involved (and there are quite a few), see the 2021 MS Learn article Reduce the Size of the Component Store in an Offline Windows Image. This article also explains how to mount such an image. If booted, that becomes a running image on which you can work by using the following techniques. Once such actions are complete, it also explains how to commit and save changes, then unmount that image. At that point, it’s offline once again (and ready for staging and deployment).
Using RAPR for Driver Cleanup
The GitHub project known as Driver Store Explorer (aka RAPR, or RAPR.exe) provides a useful graphical interface to show drivers installed on a Windows PC. Run with administrative privileges, it will allow the user to eliminate unused drivers that are obsolete or unneeded duplicates.
But first, some observations and caveats. First, it’s safe to use the built-in Select Old Drivers button, followed by the Delete Driver(s) button, to attempt to delete unwanted drivers. Why? Unless you select the Force Deletion checkbox, RAPR will not delete anything in use, even if it’s targeted in a delete command. This provides useful self-protection against unforced errors. One more thing: you will often see duplicate drivers in the listings that RAPR displays. Indeed, one instance of a driver is required for each associated device. Since many devices on PCs come in multiples (think USB hubs and ports), one driver instance is required for each such device.
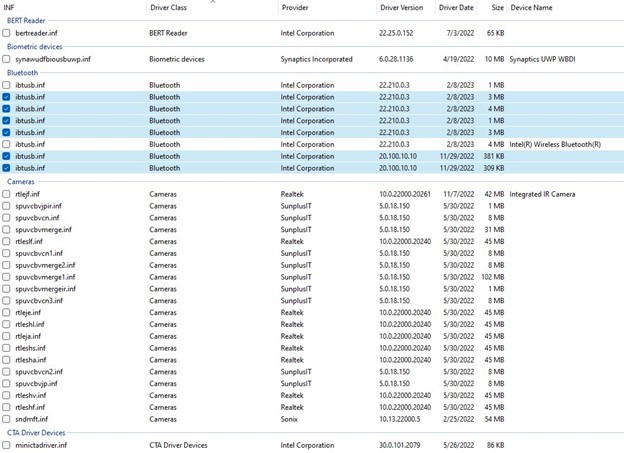
Figure 3 shows a sizable number of obsolete and duplicate Bluetooth drivers on a Windows 11 22H2 test machine (thanks to Intel’s monthly Bluetooth updates via its Driver & Support Assistant tool).
Figure 4 shows what’s left over after I select the Delete Driver(s) button to purge unneeded items there. The before shot shows eight items, while the after version shows only two items.

The space savings from those deletions alone come to just over 11.5 MB. Given the size of modern graphics drivers (1.5-1.6 GB for NVIDIA, 1.2-1.5 GB for AMD, and 1.1-1.2 GB for Intel ARC or Iris Xe), such savings can be even more significant if you apply them after you update any drivers. Indeed, any time you update drivers in an image for staging and deployment, you should mount, run, and clean up its Driver Store to avoid pushing duplicate or obsolete drivers out to all recipients. Similarly, you should schedule a cleanup task to remove such drivers near or at the end of an update pass on deployed PCs. For more information, see the Microsoft Hardware Developer article DISM Driver Servicing (.inf) Command-Line Options (this approach is eminently suitable for inclusion in an end-of-update cleanup script).
General Windows Cleanup
The built-in Windows Cleanup tool removes lots of unnecessary dross from a Windows image. I prefer the Managed Disk Cleanup tool, which is a more usable reimplementation of the same utility. A pair of side-by-side screenshots explains my preference, as shown in Figure 5.

You can stretch the display area for cleanup items in Managed Disk Cleanup. The built-in Disk Cleanup utility only lets you see five at a time. I definitely prefer being able to see and select everything in one go. It offers a way to clean up systems quickly and easily. I’m used to getting 10-30 GB back when I run this tool.
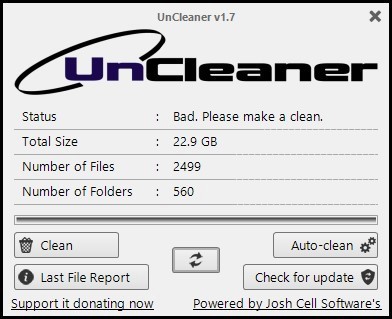
An old (2012) French-Canadian utility named UnCleaner (mentioned earlier) remains a hidden gem for finding and eliminating excess Windows files. The operator’s site is no longer active, so I recommend downloading it from MajorGeeks. It found 0.45 GB of files (total: 22.9 GB) to remove, which even Managed Disk Cleanup (Figure 5) did not find, as shown in Figure 6.

Despite its age, UnCleaner remains an important tool in my Windows cleanup kit. I suggest you keep an eye on it if you use it, in case it shows signs of wear or runtime issues. But so far, it has withstood the test of time across Windows versions from XP to 11. It’s fast, too (much faster than either Disk Cleanup or Managed Disk Cleanup).
To Compact the OS, or Not?
There’s a compact OS option that applies to both installation and post-installation use. Microsoft Learn covers its ins and outs in an article entitled Compact OS, single-instancing, and image optimization. There’s a /compact option for DISM’s apply-image operation (which is the equivalent of installing Windows, but in the form of an image not a running installation). There’s a compact.exe command that does the same thing for a running Windows image. Essentially, it runs the operating system from compressed files rather than uncompressed ones.
Figure 7 shows where the controversy comes into play.
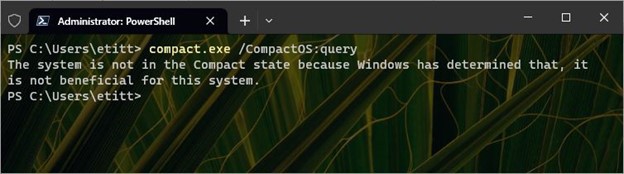
For sure, if Windows recommends against compaction, other benefits should be carefully considered to see if they trump its determination. It can be incredibly useful on embedded systems or other devices with limited CPU, memory, and/or storage resources.
This compaction approach does work, however, on both older BIOS and newer UEFI based PCs. There’s a handy size comparison table in the afore-cited article that shows savings on a Windows 10 system (varies from ~4 GB with all minimizations applied to about 2.75 GB in a more conservative compaction scheme). Depending on the target hardware, users shouldn’t notice much, if any, performance degradation resulting from compaction. That said, I wouldn’t recommend large-scale deployment without lab testing first, then pilot testing second, to make sure the results are acceptable to admins and users. But if you want (or need) to squeeze another 3-4 GB out of the Windows deployment image footprint, this approach will do just that.
Cleanliness Is Next to Godliness
When deploying Windows images, every byte counts because those images are copied to dozens of staging servers, and then hundreds to thousands of target PCs. Cleaning up a Windows image before shipping it helps save time, space, Internet bandwidth, and energy. It’s worth doing!
The old saying that entitles this section is as true for Windows images, especially for deployment, as it is for other things in life. Please take advantage of one or more of the techniques described in this article to slim down your deployment images prior to staging them. You could easily save as much as 20 GB in the resulting footprints involved. Multiply that by the number of images deployed, and you may achieve some eye-popping savings. I myself regularly use all the techniques mentioned here, except for compaction. It’s more of a case-by-case kind of thing.
Ed Tittel
Ed Tittel is a long-time computing industry writer, consultant, and occasional expert witness. He’s the author of over 100 computer trade books, countless articles, and other stuff. For more info, please visit https://edtittel.com.