How to Import Microsoft 365 Users Via CSV Using PowerShell

When your organization is moving to Microsoft 365, creating every user manually can become a tedious task. Also, your administrators end up wasting valuable time doing a task that they can easily automate by writing a simple Windows PowerShell script. In this article, learn how to bulk import users into Microsoft 365 using PowerShell, and thereby save admin time for investing in other critical tasks.
For those who like to watch and learn, check out the 3-minute video at the end of this article, which is a shortened version of this content.
Creating the CSV File
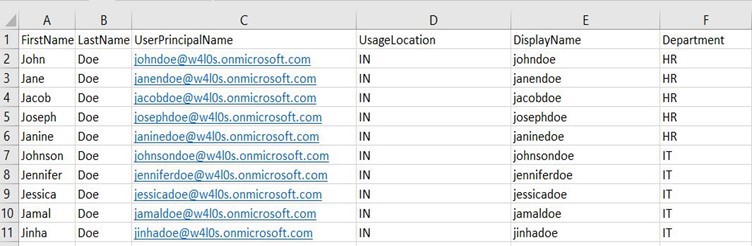
Your comma separated values (CSV) file should look like the one shown in Figure 1. It should contain all the important Microsoft 365 user account properties like FirstName, LastName, UserPrincipalName, UsageLocation, DisplayName, Department. (Also don’t forget to include the license info. The following image does not contain this info because my free DEVELOPERPACK_E5 allows for only 25 user licenses that I had already used up; so basically, I’m importing unlicensed users for demo purposes.)
Note: Don’t forget to save your file with a .csv extension.

Writing and Running the PowerShell Script
Open PowerShell in administrator mode. You can do so in one of two ways:
- Use the PowerShell command start-process powershell -verb runas
- Go to Start, select PowerShell, and then select Run as Administrator
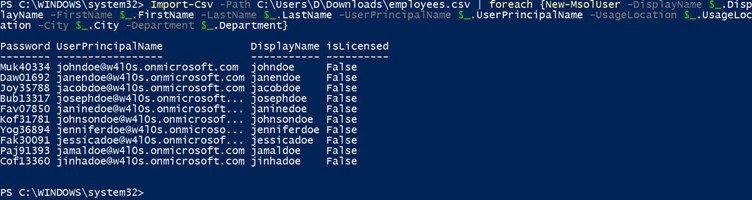
Type the following code (with modifications to suit your needs), as shown in Figure 2.
Import-Csv -Path C:\Downloads\employees.csv | forEach {New-MsolUser -DisplayName
$_.DisplayName-FirstName $_.FirstName -LastName $_.LastName -UserPrincipalName
$_.UserPrincipalName-UsageLocation $_.UsageLocation -City $_.City -Department $_.Department}

Here’s a brief explanation of what the previous Import-Csv cmdlet does:
- Import-Csv is the PowerShell cmdlet for importing a CSV file.
- In -Path, specify the path to your CSV file. In my case, it is C:/Users/D/Downloads/employees.csv
- Run New-MsolUser (cmdlet for creating a new user) for every user listed in the CSV file using the PowerShell for each loop.
- Map the user account attributes specified in the CSV headers ($_.DisplayName, $_.FirstName, $_.UserPrincipalName, etc.) with the respective Microsoft 365 user account properties.
A few seconds after you run the cmdlet, you’ll get a response in the shell, as shown in Figure 3.

Note: Printing out the response right in the shell is feasible only for a limited number of users and demo purposes. The best way to capture the response is to write it into another CSV for your team’s reference, by appending Export-Csv -Path \result.csv to your cmdlet.
Checking for Imported Users in Your Microsoft 365 Tenant
To check for imported users in your Microsoft 365 tenant, sign in to your Microsoft 365 tenant and check under the Admin Users Active Users section. All the users you just imported get listed here.
Possible Errors You Might Face
Here are examples of errors you might come across:
- Not saving your file with .csv extension: As silly as it may seem, sometimes we do end up forgetting to save the file with a .csv extension.
- Not running PowerShell as administrator: Don’t forget to run your PowerShell in administrator mode. You can do so in one of two ways;
- Enter start-process powershell -verb runas in your PowerShell console.
- Go to Start, select PowerShell, and then select Run as Administrator.
- Mismatch between user attributes you have entered in your CSV file headers and the ones you supply to the cmdlet: Ensure $_.FirstName, $_.LastName, $_.UserPrincipalName, etc. match the values you provided as headers in your CSV file. Any mismatch will throw an error.
Conclusion
Microsoft 365 administration can get overwhelming and monotonous, especially when you have to deal with numerous accounts, such as when creating hundreds of users in Microsoft 365. In situations like these, the bulk operations via CSV are your safe bet to manage things effectively without errors. And if you add a sprinkle of PowerShell cmdlets to it, you can considerably reduce the administrative overhead, which you just witnessed in this article. Keep an eye out on this space for more tips and tricks to manage your Microsoft 365 tenant effectively.
For Those Who Like to Watch and Learn
The video below is a 3-minute version of this article. It explains how you can import Microsoft 365 users via CSV using PowerShell.

Thilak Kumar Singh
Thilak Kumar Singh is a trainer who believes in teaching about IT in the simplest possible way with more emphasis on visual mode of learning. He firmly believes in democratizing IT knowledge, especially of Microsoft solutions, in which he specializes as a trainer and consultant.
He observes that in this era dominated by cloud computing and collaboration, where IT has reached users unimaginable hitherto, IT knowledge must not be an obscure science, but rather be available to anyone who wishes to engage with IT.