How To Embed Your Azure Logic Apps in a Metadata-driven Data Platform

In this article, I am going to explain how you can dial your productivity up to 11 when you’re dealing with a lot of Azure Logic Apps in your data platform. Suppose you have a SharePoint List, and you need to extract that data and store it inside an Azure SQL Database. No problem, with a Logic App this is done in just a couple of steps, no code required.
But what if you need to extract 50 SharePoint Lists? That sounds like a lot of repetitive work. By applying the concepts of a metadata-driven framework, you can reduce the amount of work significantly. I will show you how to make one generic Logic App for reading SharePoint Lists and parameterize everything. Using dynamic SQL constructs, you can efficiently store the data into the desired destination table. If this sounds complex, don’t worry, I will guide you through the entire process. I will start first with an introduction to Logic Apps themselves. If you’re already familiar with them, you can skip the following section.
Introduction to Azure Logic Apps
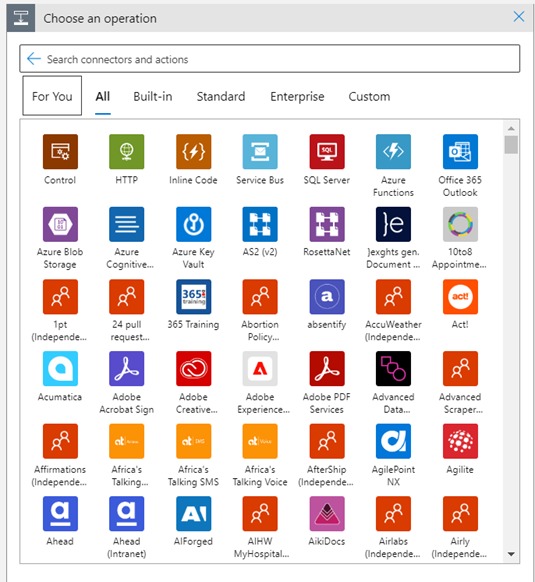
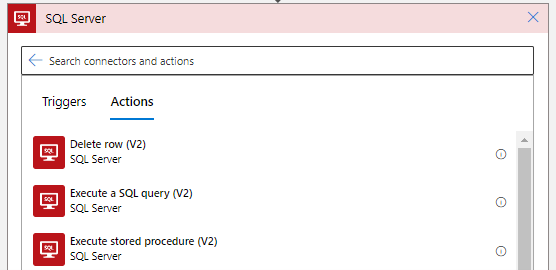
Azure Logic Apps is a cloud-based service provided by Microsoft Azure that allows you to automate business processes and integrate applications and services without writing code. With Logic Apps, you can create workflows that connect to various services (such as SharePoint, SalesForce, Office 365, Dynamics 365, GitHub, many Azure services and dozens of online platforms) and perform specific tasks (called actions) based on triggers. In figure 2, you can view a couple of provided connectors, but these are just the tip of the iceberg. You can find a reference list in the Microsoft documentation. If you’re up for it, you can also create your own custom connectors to connect to (unsupported) services or REST APIs. In this article, you can find an example of a customer connector for the Power BI REST API (only a handful of actions are supported natively).
Using a visual designer, you can build your workflows by connecting various actions and triggers together. Triggers are events that initiate a workflow, such as receiving an email, or a file being added to a folder. Actions are specific tasks that are executed when a workflow is triggered, such as sending an email or updating a database. Logic Apps also provide support for conditions, loops, and other control flow constructs to allow you to create complex workflows, without writing a single line of code (well, that’s not entirely true, sometimes you need to write an expression). Logic Apps are a good example of a no-code to low-code PaaS solution.
Standard Versus Consumption
There are two resource types for Azure Logic Apps: standard and consumption. With standard, you have more control over the hosting environment and access to more advanced features, such as stateful workflows, but the setup is more complex. With consumption, you truly have a serverless, pay-as-you-go solution and there’s no setup at all. In this article, I’ll focus on consumption Logic Apps only.
What about Power Automate?
Azure Logic Apps and Power Automate (formerly known as Microsoft Flow) are both cloud-based services provided by Microsoft with the same goal: automate workflows and integrate services without writing code. In fact, Power Automate is run by Azure Logic Apps behind the scenes! However, there are some key differences between the two services:
- Focus: Azure Logic Apps are designed for developers and IT professionals. They can build more complex and customized workflows using connectors for a wide range of services, including Azure services, while Power Automate is designed for business users to create simple and quick workflows and automate everyday tasks. Since Logic Apps are tightly embedded in Azure, there are more advanced capabilities available such as Azure monitoring, managed identities, VNet (virtual network) functionality or integration with Azure Functions or Azure Data Factory.
- Pricing: the price of Azure Logic Apps is consumption based, where you are billed on the number of executed actions. For Power Automate, you need to buy licenses (which can be included in your Microsoft 365 license) and there’s a difference between standard and premium connectors.
- Customization: Azure Logic Apps offer more customization options, allowing you to create, for example, custom connectors for your own services. Power Automate, on the other hand, offers a more user-friendly interface with pre-built templates and a drag-and-drop designer to create workflows quickly.
In summary, Azure Logic Apps are better suited for developers and IT professionals who require a high degree of customization and control over their workflows, while Power Automate is designed for business users who want to quickly create simple workflows to automate everyday tasks.
Building Your First Logic App
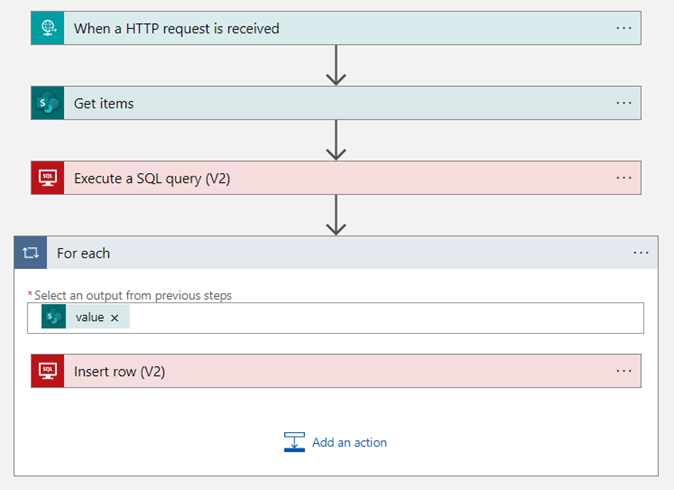
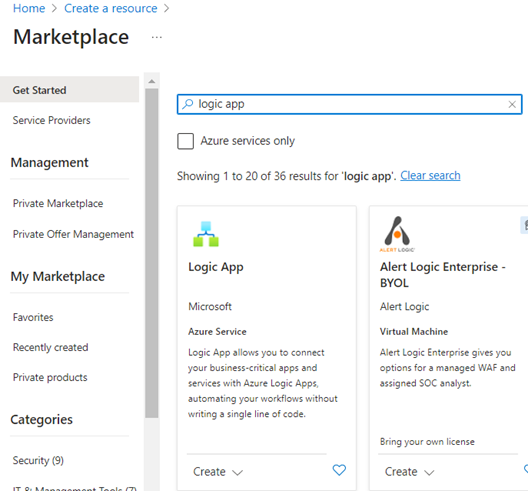
Let’s get our hands dirty and create a Logic App. In this first step, I am going to show you how to build a workflow that reads the items from a SharePoint List and stores them in a database table. Figure 1 gives you an idea of what the workflow will look like. In the Azure Portal homepage, click on “create a resource” and search for Logic App in the Azure Marketplace.
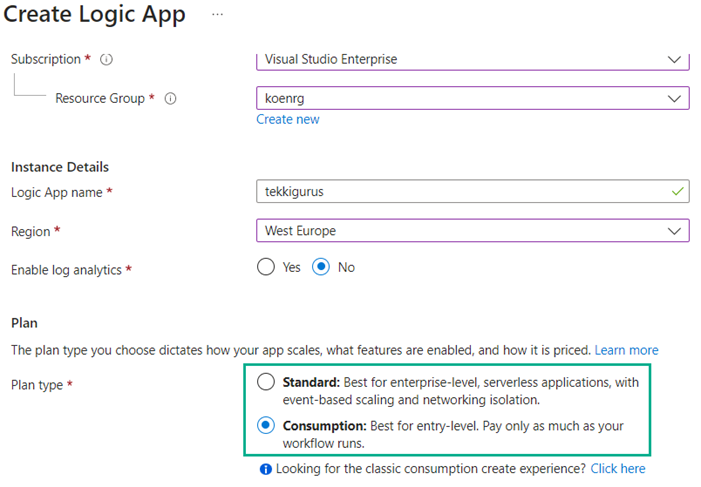
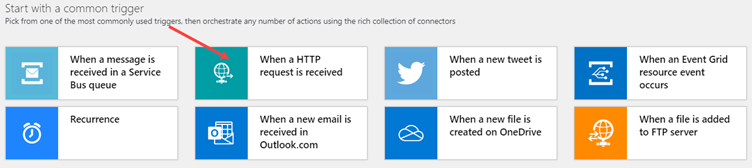
Click Create and configure your Logic App. Figure 3 gives an example of how this can look like (region, consumption vs standard, etc.). Choose a region that is close by your region and give the Logic App a decent name (perhaps your company has naming conventions). When done, click Review+Create and then Create. The deployment process should be fairly quick. When you go to your new resource, you will immediately be taken to the designer where you have the option to choose between common triggers (what makes your workflow start) or a couple of useful templates. For this Logic App, I am going with the HTTP trigger. This means I can start the Logic App by making an HTTP call.
This takes me to a new design canvas (figure 7), with the trigger added to it.

For the moment, I can leave the request body empty. I’ll click New step to add an action after the trigger. You can choose between the hundreds of options available. I will search for “sharepoint” and click on its logo.
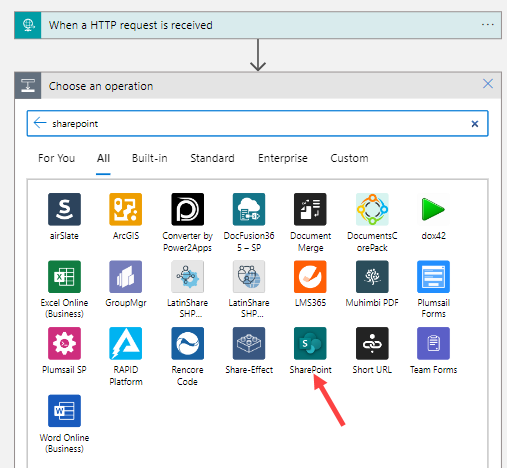
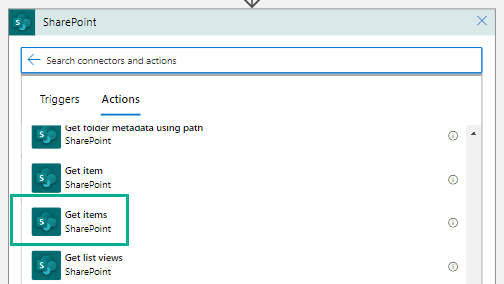
This will then bring up the list of built-in actions. For this SharePoint List, I need the action Get items.
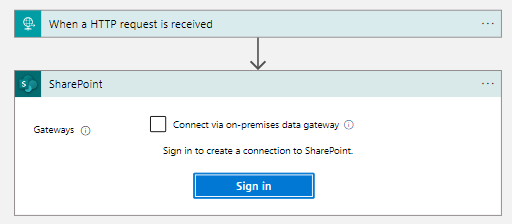
I will be asked to log into SharePoint (or more specifically, into the domain where SharePoint Online is hosted). If you need access to an on-premises SharePoint (2013 or 2016), you can use an https://learn.microsoft.com/en-us/azure/logic-apps/logic-apps-gateway-install (yes, this is the same one you can use for Power BI as well). If you’ve already created a SharePoint connector for another Logic App, you can either reuse the existing connection or create a new one.
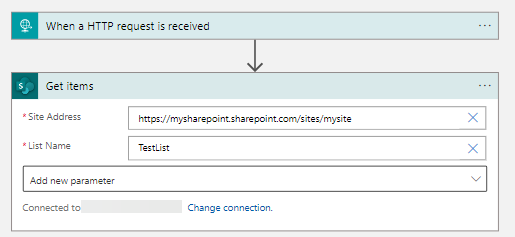
After I’ve logged in, I can configure the action. I’ll choose my SharePoint site address and the name of the list I want to download from the dropdowns.
If I run the Logic App (after saving it), you can see the items of the list in JSON format in the output section of the action.
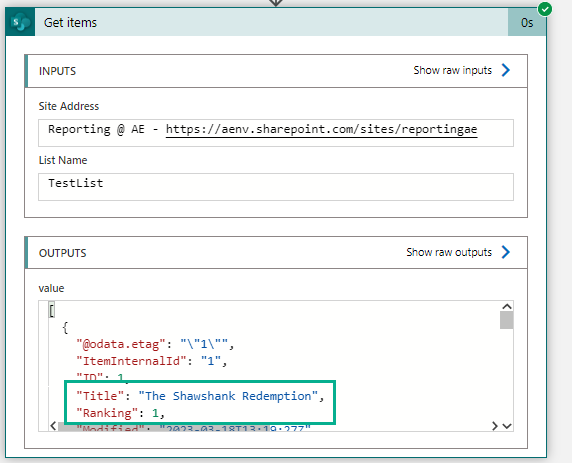
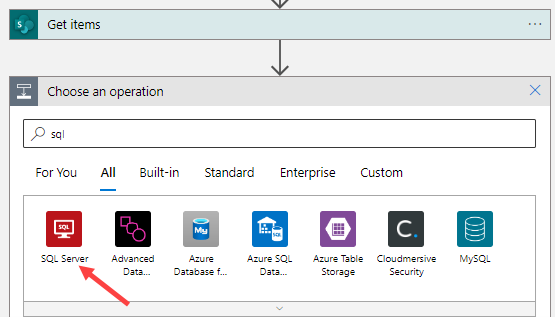
As you can see in Figure 12, SharePoint also returns a lot of additional metadata columns. I can ignore those. Now I need to configure the destination for my data. I’ll click on “Designer” in the menu bar to go back to editing the Logic App and add a new action. I’ll search for “sql” and select the SQL Server connector.
The first action I’m going to implement is emptying the destination table. The table itself can be created with the following SQL statement:
CREATE TABLE dbo.TopMovieList(
     Ranking NUMERIC(3,0) NOT NULL,
     MovieTitle NVARCHAR(250) NOT NULL
);
With the following SQL statement, I can delete all contents of the table:
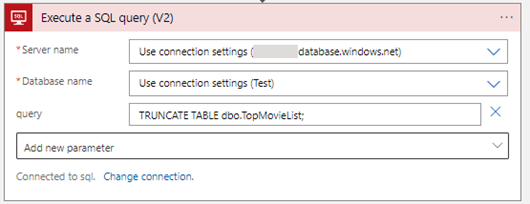
TRUNCATE TABLE dbo.TopMovieList;
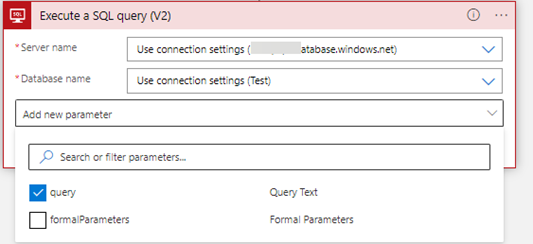
In the actions list, I’ll choose “Execute a SQL query (V2)”.
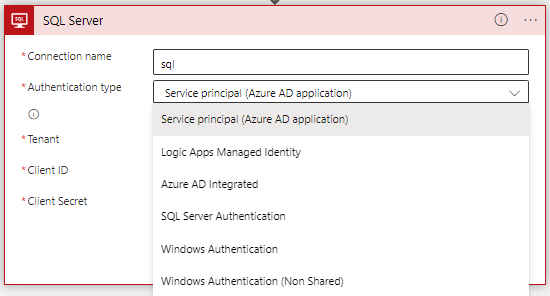
Before I can configure the query, I first need to connect to the database. There are different authentication methods available. In this phase of the Logic App, it’s probably easiest to go with SQL Server Authentication. But you can choose whatever works best for your environment.
Depending on how you authenticate, you need to enter the server and database name in the configuration. In the case of SQL Server Authentication, I can just select them from the dropdown. Next, I need to add a parameter to the action, which will hold the SQL statement.
Here I can add that TRUNCATE TABLE statement. This is – for now – the only line of code I will need to write!
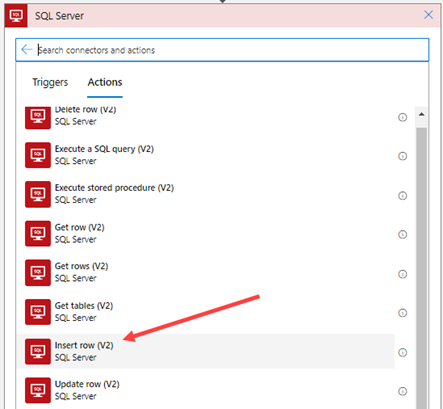
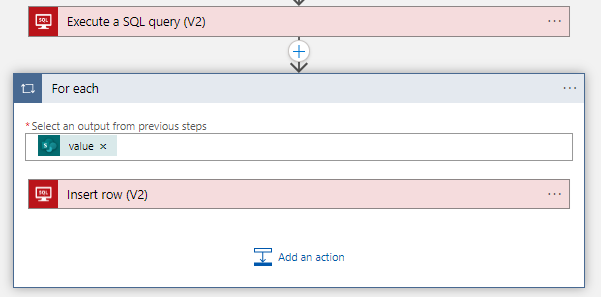
Executing this action will empty the table. Now I need to insert all of the list items into the table. I’ll add another action, select the SQL Server connector again, and this time choose the “Insert row (V2)” action.
Configure your server and database name again if needed and choose the destination table from the dropdown.
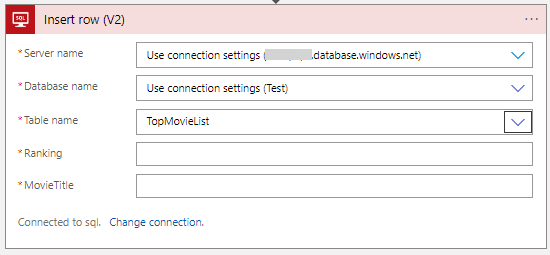
After selecting the table, the Logic App will fetch the column names and add each of them as new fields in the action. In Figure 19 you can see two fields were added, one for the ranking and one for the movie title. When you click inside of the fields, a pop-up will appear that allows you to select “dynamic content”. Dynamic content is the output of any previous action in the Logic App. You also have the option to write an expression (which involves code, but you don’t need it right now). It’s also possible to mix dynamic content and expressions.
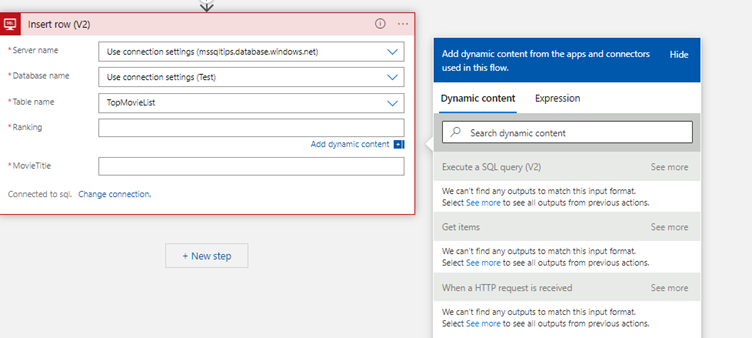
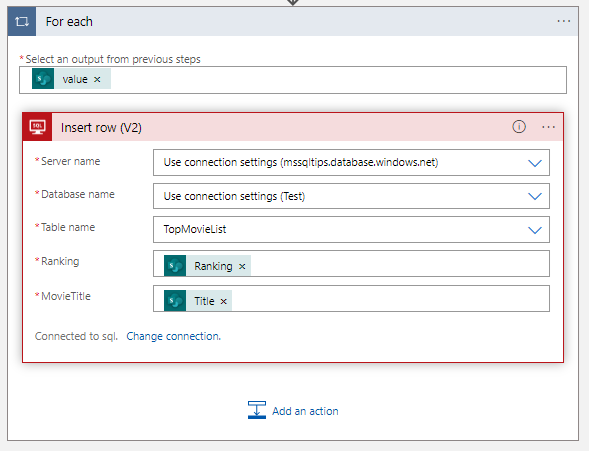
At first the dynamic content window doesn’t display any output. Click on “see more” of the Get items action to load its output. This will fetch all output fields (remember, the two list columns but also those dozens of extra metadata columns). Select Ranking from the list (Figure 21).
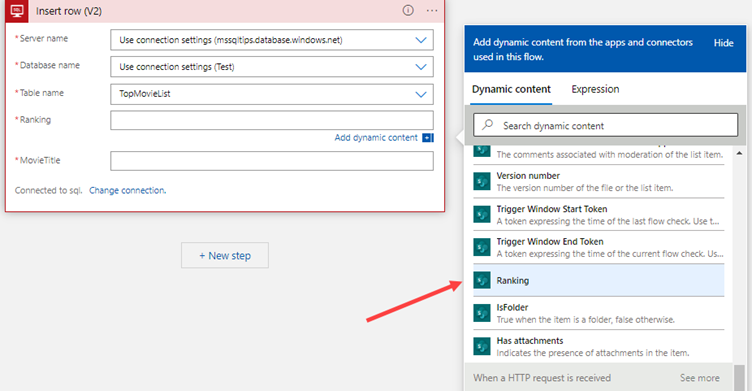
Once you select the Ranking field, Logic App will detect there are multiple rows with this field (after all, the SharePoint List has multiple items). Since the action can only insert one single row into the table, the Logic App will put the Insert row action inside a For each loop. Now that is handy!
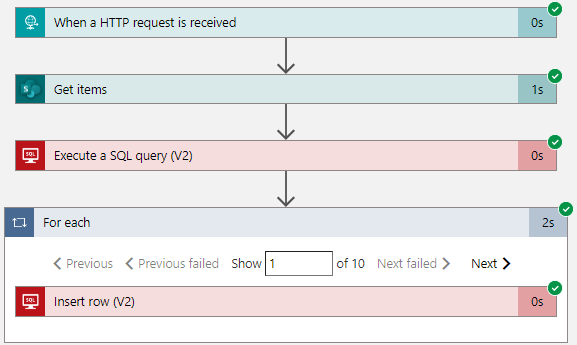
The For each loop takes the value output of the Get items actions. This piece of dynamic content contains the entire JSON output of this action. This is the output you can see in Figure 12. It will parse this output into individual rows and pass these along to the Insert Row action. If the list contains 10 items, the loop will have 10 iterations. Inside an iteration, one single row is sent to the database.
Click on the Insert row action and add Title as the second dynamic output for the movie title.
And that’s it, our first draft of the Logic App is finished. When running it (don’t forget to save it first), you can see the items of the list are inserted into the database.
The Logic App itself is ready, but to make it really production-ready, some additional changes can be made.
- There’s no feedback to the application that triggered the Logic App with the HTTP call. In this article, you learn how you can set this up.
- There’s no error handling. You can add an action and configure it to run only if the previous action has failed. You can send, for example, an e-mail if the database inserts fail. In the same article , you can also find an example of some error handling.
- Instead of authenticating with a SQL Server user, you can also use a managed identity. This is a more secure option as you don’t need to specify a password. The blog post Why Managed Identities are Awesome explains why this setup is preferred.
These improvements are left as an exercise for the reader. If you have any problems configuring them, please let me know in the comments.
How To Make the Logic App Metadata-driven
In the previous sections you’ve learned how you can automate a piece of workflow using an Azure Logic App. This allows you to create event-driven integration pipelines between your various services. But what if there’s not one single SharePoint List that needs to be extracted, but maybe 50? Or a hundred? It would not be ideal to create all those Logic Apps manually. If you have a common pattern in your Logic Apps, it’s a good candidate to be transformed into a more generic implementation which is parameterized. Using metadata (e.g., which lists to extract and which columns they contain, as well as the destination tables in the database), you can then execute multiple instances of the generic piece of workflow. This is what we call a metadata-driven implementation. You can read more about the importance of metadata-driven frameworks in this blog post.
The first step is to use the request body of the HTTP trigger. This is a piece of JSON where I will pass values into the Logic App. I want to pass along three parameter values:
- The name of the SharePoint List I want to import
- The different columns names I want to select from the List. I am assuming here that the columns in the database table have the same names.
- The name of the destination table
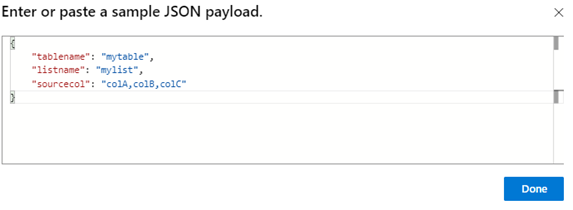
Here’s an example of how such a piece of JSON might look like:
{
"tablename": "mytable",
"listname": "mylist",
"sourcecol": "colA,colB,colC"
}
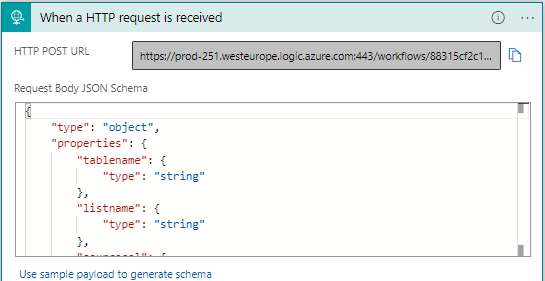
In the Logic App designer, I can specify a JSON schema for the request body. If I don’t want to create one myself, I can let the designer create one for me by supplying a sample payload.
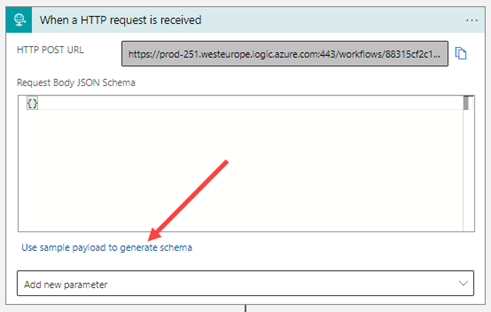
I’ll use the JSON example from earlier to generate a schema, as shown in Figure 26.
The designer will add the generated JSON schema to the trigger.
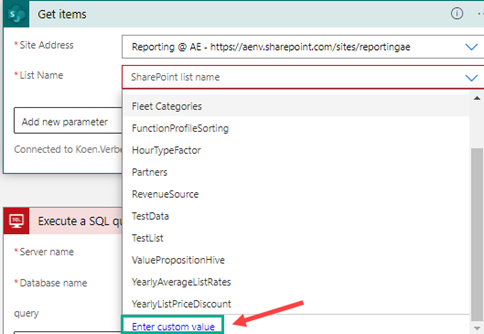
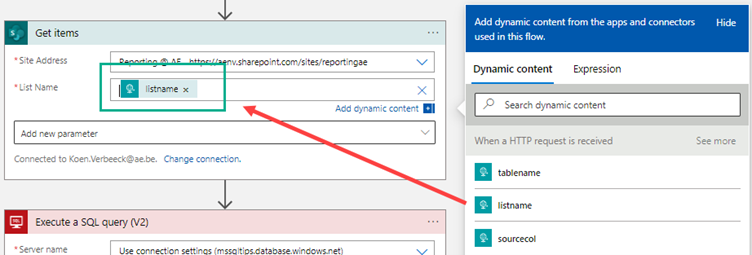
Now I can use the value for “listname” from the body as dynamic content in the Get items action. To do this, I need to scroll all the way down in the dropdown list with all the different names. At the bottom, there’s an option to enter a custom value, as indicated in Figure 28.
Writing to a destination table is a bit more complicated. Sure, I can parameterize the TRUNCATE TABLE statement easily, just like I did with the SharePoint List. But mapping the individual columns in the Insert row action (inside the For each loop) is much more complex. I don’t know in advance how many columns a list will return. The Insert row action has another big disadvantage: it’s slow. It inserts only one single record at a time. When working with SQL and databases, you want to do everything in a set-based manner. This means that instead of inserting all rows one-by-one, I would rather do one single INSERT statement that inserts all records at once. This has much better performance, as databases are designed to deal with large sets of data.
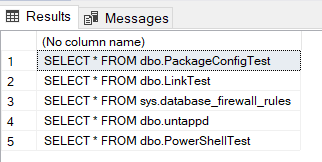
How can I solve this issue? With dynamic SQL. If you’re not familiar with the concept, it’s a SQL script that has another SQL script as output. Allow me to illustrate with an example. Most database vendors have metadata tables in a schema called INFORMATION_SCHEMA. These tables store metadata about the tables, their columns and so on. I can use the TABLES table to write the following dynamic SQL:
SELECT TOP 5
'SELECT * FROM ' + t.TABLE_SCHEMA + '.' + t.TABLE_NAME
FROM INFORMATION_SCHEMA.TABLES t;
The result of this statement are five other SQL statements.
With the sp_executesql system stored procedure, I can execute those generated SQL statements on the fly. To recap, I use the SQL query language and metadata to generate other SQL statements and then execute them. Hence the term “dynamic SQL”.
Note
Dynamic SQL can be dangerous. If you use it, for example, with user input, someone with malicious intent can use dynamic SQL to construct a SQL statement that they can use to gain control of the database. This is called SQL injection. You can learn more about this in the article, The risks of using EXECUTE (‘SQL Script’). In this use case here, I will avoid using SQL injection by using parameters and by giving only the Logic App access to the SQL scripts (hence there’s no user input).
This is what I’m going to do to make the Logic App completely metadata-driven when it comes to writing the data to the database:
- I’m going to create a stored procedure in the database. This procedure accepts the following input: the column names of the list, the name of the destination table and the entire JSON output of the Get items action.
- Inside the stored proc, I’ll use dynamic SQL to create a SQL statement that will parse the JSON and write the result to the destination table.
- Instead of using the Execute a SQL query action, the For each loop and the Insert row action, I’m going to use one single action that will call the stored procedure.
Don’t worry, I will guide you through all those steps.
Creating the Stored Procedure
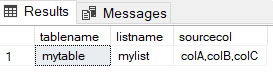
The stored procedure needs to take the JSON output from the SharePoint List and parse this into a tabular structure that can be inserted into a destination table. In SQL Server, this can be done using the OPENJSON function. This function is available in SQL Server 2016 or higher, and in Azure SQL Database. Let’s use a simple example to illustrate how this function works. The following script parses the same JSON as we used in the request body of the Logic App:
DECLARE @json NVARCHAR(max) = '
{
    "tablename": "mytable",
    "listname": "mylist",
    "sourcecol": "colA,colB,colC"
}';
SELECT *
FROM OPENJSON(@json)
WITH (
    tablename VARCHAR(100) '$.tablename',
    listname VARCHAR(100) '$.listname',
    sourcecol VARCHAR(1000) '$.sourcecol'
);
The following result set is returned:
The WITH clause after the function allows me to exactly specify which columns I want to extract, what data types they have, and where they can be found in the JSON (by declaring a path). In the documentation, you can find more complex examples.
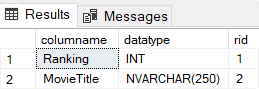
To craft this WITH clause in the dynamic SQL, I will need to fetch the data types for every column of the destination table. The following script uses the built-in system tables of SQL Server to retrieve all the info I need:
DECLARE @tablename VARCHAR(100) = 'TopMovieList';
DECLARE @sourcecol VARCHAR(4000) = 'Ranking,Title';
-- fetch target columns and data types of destination table
DROP TABLE IF EXISTS #TargetCols;
SELECT
   columname = c.[name]
   ,datatype = CASE WHEN y.[name] IN ('varchar', 'char', 'varbinary')
THEN UPPER(y.[name]) + '(' + IIF(c.max_length = -1, 'MAX',
CAST(c.max_length AS VARCHAR(25))) + ')'
                     WHEN y.[name] IN ('nvarchar','nchar')
THEN UPPER(y.[name]) + '(' + IIF(c.max_length = -1, 'MAX',
CAST(c.max_length / 2 AS VARCHAR(25)))+ ')'
                     WHEN y.[name] IN ('decimal', 'numeric')
THEN UPPER(y.[name]) + '(' + CAST(c.[precision] AS VARCHAR(25)) + ', ' +
CAST(c.[scale] AS VARCHAR(25)) + ')'
                     WHEN y.[name] IN ('datetime2')
THEN UPPER(y.[name]) + '(' + CAST(c.[scale] AS VARCHAR(25)) + ')'
                     ELSE UPPER(y.[name]) END
    ,rid = c.column_id
INTO #TargetCols
FROM sys.all_columns c
JOIN sys.tables      t ON c.object_id = t.object_id
JOIN sys.schemas     s ON t.schema_id = s.schema_id
JOIN sys.types       y ON c.user_type_id = y.user_type_id
WHERE t.[name] = @tablename
    AND s.[name] = 'dbo';
The hardest part in the script is puzzling together the data type definition of the column. Not every single possible data type is accounted for, but rather the most common ones (you’re welcome to expand the script to your needs). The result is stored in a temp table for later reuse. Figure 32 displays this result set for this sample table:
In the next part of the script, I’ll populate two variables. The first variable, @targetcol, stores the column list of my destination table. Each column is separated by a new line (CHAR(13) and CHAR(10) are carriage return and line feed respectively), a tab (4 spaces) and a comma. This builds a nicely formatted list. The second variable, @mapping, stores the column list for the WITH clause. This means the destination column name, its data types and its path in the JSON.
The function STRING_SPLIT is used to split the source columns (passed as a parameter to the stored proc) into individual values (you also need SQL Server 2016 or higher for this function). The STRING_AGG is used to do the exact opposite: concatenate different values of a column – spread out over multiple rows – into one single value.
DECLARE @targetcol   VARCHAR(4000);
DECLARE @mapping     VARCHAR(4000);
DECLARE @crlf        CHAR(2) = (CHAR(13) + CHAR(10));
DECLARE @sep         CHAR(7) = @crlf + ' ,';
-- create lists of targetcolumns and the json mapping
--> target columns + data type + json location of source column
WITH sourcecol AS
(
    SELECT sourcecol = [value] , rid = ordinal
    FROM STRING_SPLIT(@sourcecol,',',1) --> we assume same order of columns as defined in the table
)
SELECT
    @targetcol = STRING_AGG('[' + t.columname + ']',@sep)
   ,@mapping = STRING_AGG('[' + t.columname + '] ' + t.datatype + ' ''$.' + s.sourcecol + '''',@sep)
FROM #TargetCols   t
JOIN sourcecol     s ON s.rid = t.rid;
When I run this script – together with the first script – I get the following values for the variables:
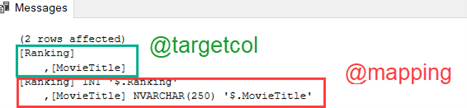
The script assumes the order of the SharePoint List columns – as specified in the @sourcecol parameter – is the same as the column in the destination table. This is done so columns can be renamed. For example, the column MovieTitle in the target table maps to the Title column of the SharePoint List. If all columns have the exact same name, the script can be simplified.
In the last part of the script, I construct the dynamic SQL statement. The CONCAT_WS function is used to concatenate multiple strings together into one big string.
-- build dynamic SQL
DECLARE @sql NVARCHAR(MAX) = '';
SET @sql = CONCAT_WS(@crlf
                   ,'TRUNCATE TABLE dbo.' + @tablename + ';'
                   ,'INSERT INTO dbo.' + @tablename
                   ,'('
                   ,' ' + @targetcol
                   ,')'
                   ,'SELECT *'
                   ,'FROM OPENJSON(@jsondata)'
                   ,'WITH ('
                   ,' ' + @mapping
                   ,');'
);
First, I create a TRUNCATE TABLE statement with the table name variable. Then I assemble the INSERT statement with the @targetcol variable (which contains the list of columns). Finally, I construct the SELECT statement with the OPENJSON clause. The WITH clause uses the @mapping variable as discussed earlier. Executing every part of the script that I have so far, results in the following output:

The OPENJSON function contains a variable @jsondata. It’s possible to use variables in dynamic SQL. This allows me to push the JSON data I get from the Logic App into the SQL statement generated by the dynamic SQL. I can do this with the sp_executesql system stored procedure.
EXEC sp_executesql
    @stmt = @sql
   ,@params = N'@jsondata NVARCHAR(MAX)'
   ,@jsondata = @json;
The @json variable is another input parameter of the stored procedure I am creating. When I tie everything together, I get the following stored procedure:
CREATE PROC dbo.InsertListData
    @tablename VARCHAR(100)
   ,@sourcecol VARCHAR(4000)
   ,@json NVARCHAR(MAX)
AS
BEGIN;
-- fetch target columns and data types of destination table
DROP TABLE IF EXISTS #TargetCols;
SELECT
    columname = c.[name]
    ,datatype = CASE
                    WHEN y.[name] IN ('varchar', 'char', 'varbinary')
THEN UPPER(y.[name]) + '(' + IIF(c.max_length = -1, 'MAX',
CAST(c.max_length AS VARCHAR(25))) + ')'
                    WHEN y.[name] IN ('nvarchar','nchar')
THEN UPPER(y.[name]) + '(' + IIF(c.max_length = -1, 'MAX',
CAST(c.max_length / 2 AS VARCHAR(25)))+ ')'
                    WHEN y.[name] IN ('decimal', 'numeric')
THEN UPPER(y.[name]) + '(' + CAST(c.[precision] AS VARCHAR(25)) + ', ' +
CAST(c.[scale] AS VARCHAR(25)) + ')'
                    WHEN y.[name] IN ('datetime2')
THEN UPPER(y.[name]) + '(' + CAST(c.[scale] AS VARCHAR(25)) + ')'
                    ELSE UPPER(y.[name]) END
   ,rid = c.column_id
INTO #TargetCols
FROM sys.all_columns c
JOIN sys.tables      t ON c.object_id = t.object_id
JOIN sys.schemas     s ON t.schema_id = s.schema_id
JOIN sys.types       y ON c.user_type_id = y.user_type_id
WHERE t.[name] = @tablename
   AND s.[name] = 'dbo';
DECLARE @targetcol VARCHAR(4000);
DECLARE @mapping   VARCHAR(4000);
DECLARE @crlf      CHAR(2) = (CHAR(13) + CHAR(10));
DECLARE @sep       CHAR(7) = @crlf + ' ,';
-- create lists of targetcolumns and the json mapping
--> target columns + data type + json location of source column
WITH sourcecol AS
(
    SELECT sourcecol = [value] , rid = ordinal
    FROM STRING_SPLIT(@sourcecol,',',1) --> we assume same order of columns as defined in the table
)
SELECT
    @targetcol = STRING_AGG('[' + t.columname + ']',@sep)
   ,@mapping = STRING_AGG('[' + t.columname + '] ' + t.datatype + '
''$.' + s.sourcecol + '''',@sep)
FROM #TargetCols t
JOIN sourcecol   s ON s.rid = t.rid;
-- build dynamic SQL
DECLARE @sql NVARCHAR(MAX) = '';
SET @sql = CONCAT_WS(@crlf
                   ,'TRUNCATE TABLE dbo.' + @tablename + ';'
                   ,'INSERT INTO dbo.' + @tablename
                   ,'('
                   ,'    ' + @targetcol
                   ,')'
                   ,'SELECT *'
                   ,'FROM OPENJSON(@jsondata)'
                   ,'WITH ('
                   ,' ' + @mapping
                   ,');'
);
EXEC sp_executesql
    @stmt = @sql
   ,@params = N'@jsondata NVARCHAR(MAX)'
  ,@jsondata = @json;
END;
Now that the stored procedure is finished, I can wrap up our Logic App.
Calling the Stored Procedure from the Logic App
I will remove the For each loop and the Execute a SQL Query action. I’ll add a new action of the SQL Server connector of the type “Execute stored procedure.” Select the server name, the database name, and the stored procedure I just created from the dropdowns. The designer will automatically load the parameters of the procedure. I will map these against the dynamic content of the previous actions. The final configuration is shown in Figure 35.
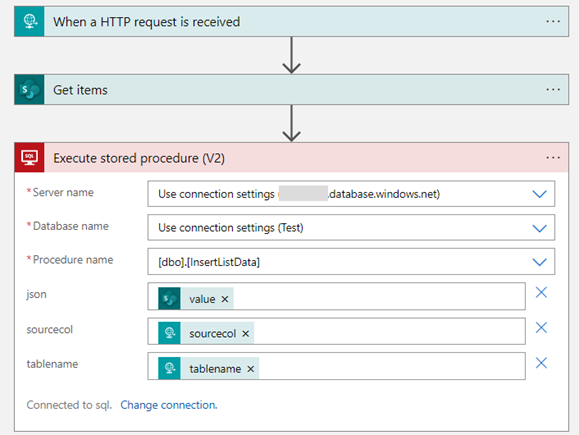
The Logic App is reduced to a simple workflow: it’s triggered by an HTTP call with some parameters in the request body. It fetches data from a SharePoint List and passes all this info to a SQL Server stored procedure, which parses the JSON and stores the data into a table.
If you’re more a .NET developer than a SQL developer, you can replace the stored procedure with an Azure Function for example. Anything that can parse JSON can do the trick.
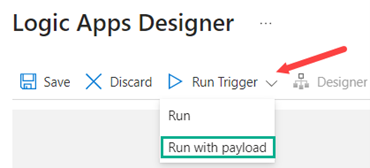
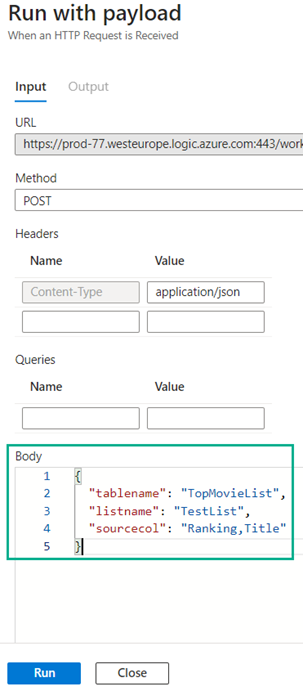
Now I’ll test my Logic App. In the designer, I’ll choose to execute the Logic App with a “payload,” which basically means you can specify the request body for the HTTP trigger.
In a pop-up sidebar, I can enter the JSON payload.
If I click Run, the Logic App will not run in the designer (which might be a bit confusing). I must go out of the designer, and then back to the Logic App overview page in the Azure portal. There I can view the last executions of the Logic App in the Runs history. Make sure to hit refresh if you don’t see any executions.
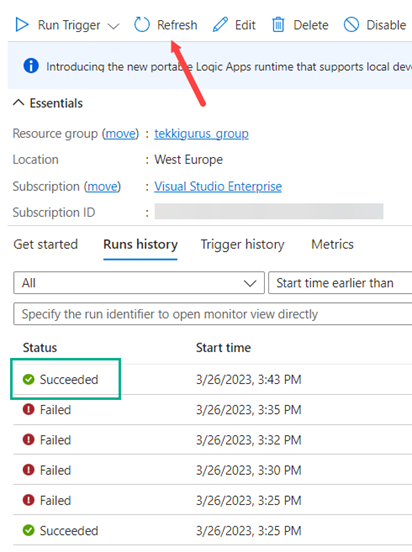
There are a couple of failed executions because the OPENJSON failed with an error saying it couldn’t convert “1.0” to an integer. This is weird, as the ranking column is defined in the SharePoint List as an integer. However, in the output of the Get items action the ranking is an actual integer, but when the JSON is passed to the stored procedure, the Logic App runtime “evaluates” the JSON to see if any symbols should be escaped. Apparently, the numbers are converted to decimals (thus 1 becomes 1.0). To mitigate this, the data type in the destination table should be NUMERIC(3,0) instead of INT.
Embedding the Logic App into a Metadata-driven Framework
I now have a Logic App that can extract data from any SharePoint List, send the results to a SQL Server stored procedure which will then insert the desired data into a table. The Azure Function can be called from any kind of application able to make an HTTP POST request. Let’s illustrate the concept with an Azure Data Factory pipeline.
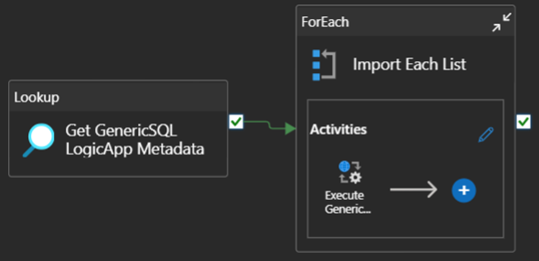
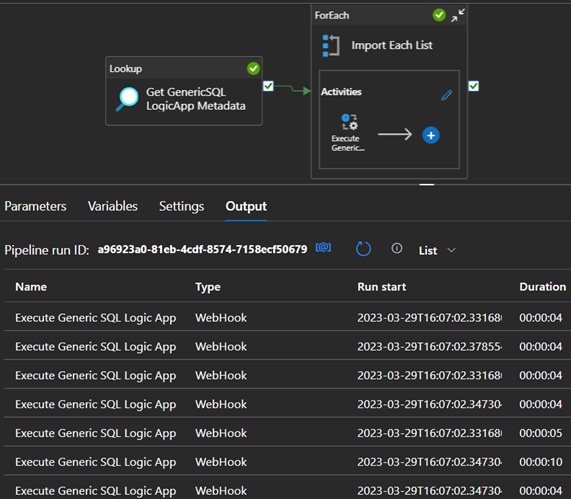
In Figure 39 you can see a pipeline with a Lookup activity. This activity executes a SQL statement to retrieve the metadata from a table. This metadata contains the names of the SharePoint Lists I want to retrieve, the names of their columns and the names of the destination tables. This information is passed to a ForEach activity, which will loop over (in parallel) over this set of data. For each execution a set {SharePoint List, Source Column Names, Destination Table Name} is passed to the inner pipeline.
This inner pipeline contains a Webhook activity (or a Web Activity; both can do HTTP requests). Just as in a Logic App workflow, I can configure this activity with dynamic content. As a result, I can get a parameterized call to my Logic App. If the metadata set contains 10 lists, the ForEach loop will execute 10 iterations.
The concept of a data-driven pipeline is further explained in the blog post Dynamic Datasets in Azure Data Factory.
Conclusion
In this article, I’ve introduced you to the concept of a metadata-driven Logic App. I’ve made an introduction to Logic Apps themselves, showed how you can create one yourself and then expanded it to a dynamic workflow. I used some dynamic SQL in a stored procedure to make this all happen. As a result, I have one single Logic App which can be triggered by an Azure Data Factory pipeline for example, and it can transfer multiple SharePoint Lists to multiple destination tables.
As a result, I only need to create one Logic App, which makes maintenance and deployments much easier. Need to load an extra SharePoint List into your database? It’s just one line of metadata.

Koen Verbeeck
Koen Verbeeck is a seasoned business intelligence consultant working at AE in Belgium. He has over a decade of experience in the Microsoft Data Platform, both on-premises as in Azure. Koen has helped clients in different types of industries to get better and quicker insights in their data. He holds several certifications, among which the Azure Data Engineer cert. He’s a prolific writer, having published over 250 articles on different websites and hundreds of blog posts at sqlkover.com. He has spoken at various conferences, both local and international. For his efforts, Koen has been awarded with the Microsoft MVP data platform award for many years.