Building Windows Boot Media

Windows boot media provides an alternate way to boot a Windows PC. You’ll use such media primarily to repair or work on an existing Windows installation, or to clean install Windows instead. For a clean Windows installation, no existing Windows installation is needed. Therefore, this technique works on PCs with no operating system installed (sometimes called a “bare-metal” installation for that reason).
Windows boot media is a catch-all term that refers to any device (or medium) from which Windows can boot. That usually means a USB flash drive (UFD), but may also include other USB-attached storage devices such as solid-state drives (SSD)s or hard disks. For those with older gear, it also includes DVD and Blu-ray optical discs.
The Windows Boot Conundrum
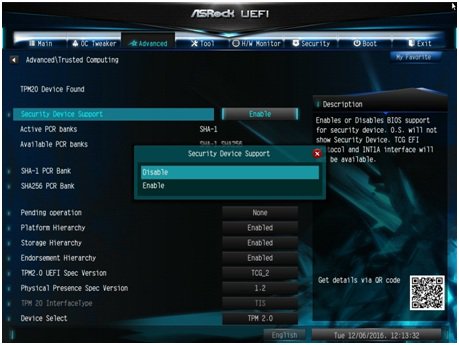
There can sometimes be issues in booting a Windows PC from USB media. Before I talk about the three primary tools for building Windows boot media, here are some pointers on how to make best use of Windows boot media. Indeed, it may not work at all unless you jump through some necessary hoops. By default, when secure boot is enabled, PCs (especially of the notebook or laptop variety) won’t boot from a drive that doesn’t match its secure boot settings. Thus you may have to get into your PC’s BIOS/UEFI and set Secure Boot to Disabled before the machine lets you boot from an alternate device – namely, the USB drive with the Windows boot media you’ve created. This UEFI setting for my test machine’s Asrock motherboard appears in Figure 1.

View Full Size
If you select the bootable media device in your Alternate boot option in the PC’s BIOS/UEFI and it doesn’t do anything, you probably need to disable Secure Boot before you can use the USB drive for one of its intended purposes. I ran into this on every laptop machine I used (all Lenovo ThinkPads) while working through the instructions in this story. If you’re in the same situation, try the same approach.
In Windows Settings, use the Recovery page to request Windows Advanced Startup, as shown in Figure 2. (To access, from Start, select Settings, and then select Recovery.)
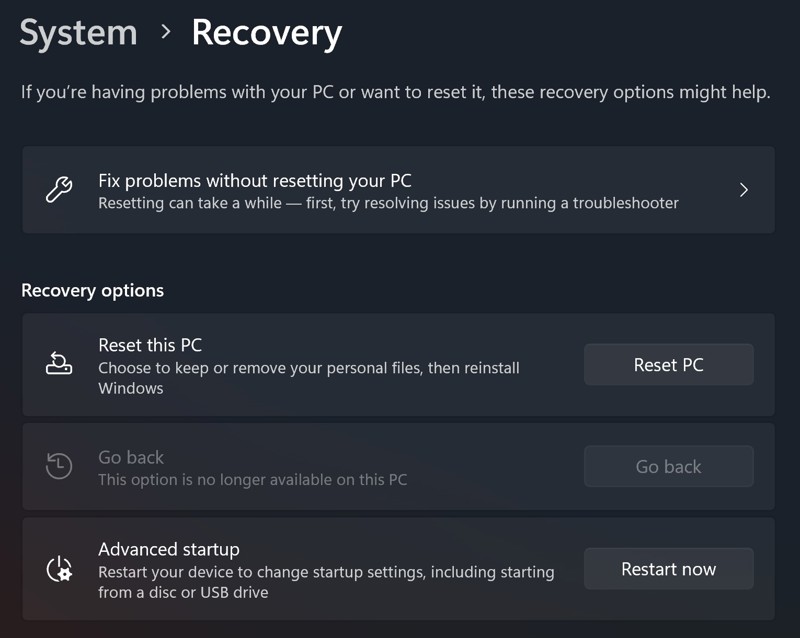
This immediately reboots the PC into WinRE, from which you can pick an alternate boot device (such as your bootable USB media). This will also work if the BIOS/UEFI allows the device you select to boot. (Otherwise, you’ll have to jump into BIOS/UEFI and disable secure boot.) I prefer using the BIOS/UEFI boot manager to this approach because Windows gives USB devices opaque names when prompting you to select your boot device. (Most of the time it worked from a device named USB-FDD, which stands for USB Floppy disk device, even though it’s a USB flash device. Go figure!)
Meet the Tools
You’ll now learn about three primary tools for building Windows boot media. The three tools of focus are:
- Windows Media Creation Tool (MCT): This is a downloadable executable file available on both the Download Windows 10 and the Download Windows 11 web pages. As you might expect, the former creates media for Windows 10, and the latter for Windows 11. Interestingly, the Windows 10 tool is named MediaCreationTool22H2.exe, while the Windows 11 tool is called mediacreationtool.exe. Both allow you to format and build a bootable USB drive or write an International Organization for Standardization (ISO) file for your chosen Windows version.
- Ventoy: Ventoy is an extremely clever GitHub and Gitee project. It takes a USB drive and creates two partitions. First, it creates a tiny bootable Extensible Firmware Interface (EFI) File Allocation Table (FAT) partition that’s a mere 32 MB. Second, it creates an Extensible File Allocation Table (exFAT) data partition that consumes the rest of the drive’s storage space. When you boot to Ventoy, it bootstraps itself from the small partition to read the contents of the second partition. It then shows you a list of images from that second partition and allows you to boot to any of them. It works like a charm. Ingenious!
- Rufus: Rufus is a utility that creates bootable USB media, given a target device and an ISO file from which to extract the files for the desired Windows version for installation and/or repair. The tool comes in portable and installer versions, so you can use it as best suits your needs. You select the target device, set up formatting and so forth, and it builds a boot drive for you. Rufus is flexible about partition schemes (MBR or GPT), file system types (FAT, exFAT, NTFS, and more) and does a good job in setting up usable, bootable USB devices. Some caution is warranted, though, as I’ll explain in the section that describes Rufus in more detail below.
Working With the Media Creation Tool
Download the Media Creation tool for either Windows 10 or Windows 11, and then run it. It guides you through a series of steps –accept license, choose target type (USB drive or ISO file), and choose target device. It then downloads and builds the bootable environment on the target device for your chosen Windows version. You can use it as soon as the process is complete. It takes a while (duration depends on target device type and speed), but it works quite well. It created a FAT32 partition on a nominal 16 GB UFD. Given the proper pre-boot contortions (turning off Secure Boot) and selecting the device as the boot source, it worked perfectly to get into the recovery environment and to perform a clean install.
Working With Ventoy
I confess: Ventoy is my favorite bootable media tool. Why? Because you needn’t worry about the size of the boot image file. For both Windows 10 and Windows 11, especially if you use Windows images with updates added (like the images that you can build at UUPdump.net), the install.esd file can exceed 4 GB. That rules out using FAT32 as the format style because it only allows up to 4 GB. Yes, I know, you can split such files into sub-units. But Ventoy supports using NTFS or exFAT as the format style for the partition where ISO files are kept, so you don’t need to worry about file size at all. And indeed, most ISO files these days exceed 4 GB for both Windows 10 and Windows 11. (The latest Windows 11 ISO is 5.8 GB; Windows 10 4.3 GB. Oops!)
But the real draw of Ventoy is amazing convenience. I use a 1 TB NVMe SSD inside a USB-C enclosure for my Ventoy drive. That gives me room for all the ISOs I might ever want to work from to boot my test and production PCs. My Ventoy drive has 29 ISOs in its NTFS partition, and there’s still 731 GB of free space available. Better yet, a USB NVMe drive runs at least 10X faster than a UFD, so copying large ISO files to and from that drive is much faster. So is boot-up, when I use the drive for repairs or clean installs. There’s no comparison, in fact.
Working With Rufus
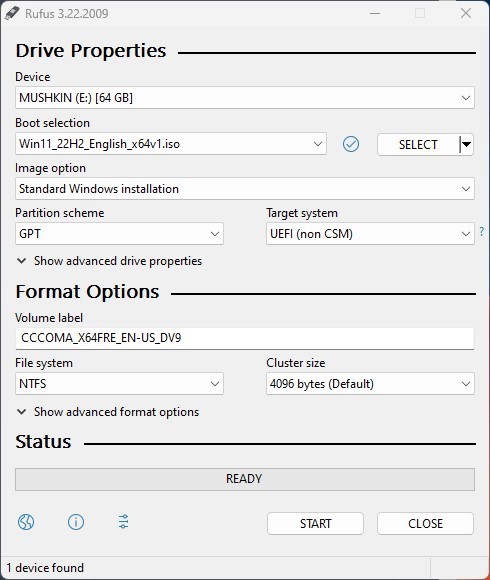
The Rufus interface, shown in Figure 3, is straightforward. From top to bottom, you need to specify the following:
- Device: Target bootable device
- Boot selection: The source file, which is usually a Windows ISO file
- Image option: Standard Windows installation or Windows to Go
- Partition scheme: GPT or MBR (This only matters for devices 2 TB or larger; smaller devices work equally well for either scheme. For Windows boot media devices, therefore, this hardly matters.)
- Target system: UEFI-only is called UEFI (non CSM); BIOS-only is called BIOS; a dual-capable system is UEFI (CSM). All my systems use the first option by default.
- Volume label: Generated by default based on image name, bittedness (32-bit or x86, or 64-bit or x64/AMD64), language, and more. I prefer to create more intelligible names – such as Win11-22H2, for example.
- File system: NTFS, FAT32 (Larger devices like the Mushkin 64GB UFD I used only offer NTFS; smaller devices offer only FAT32.)
- Cluster size: The default is usually 4 GB (4096 bytes); I’ve never had reason to mess with this.
| Source: Ed Tittel View Full Size
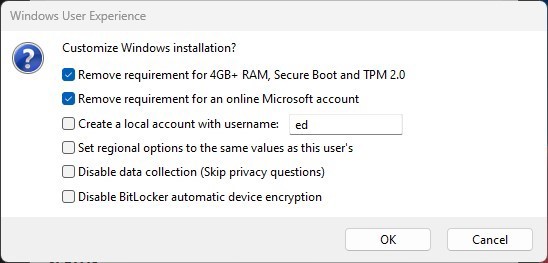
When I select Start, another dialog box appears, as shown in Figure 4.
View Full Size
As you can see, Rufus by default bypasses Windows 11 compatibility checks (first item in the checklist) and requirements for a Microsoft account (MSA), which is an email address associated with a Microsoft account. Other options include creating a local account (used instead of MSA), regional options data from current user account, privacy disabling, and BitLocker disabling. Some of these features are convenient – for those who want to install Windows 11 on older hardware, for example.
My major issue with Rufus also holds for the MCT. Neither one, unlike Ventoy, lets you pick a USB-attached SSD as the target device for boot-up. I’ve used Ventoy to target M.2 and NVMe devices, given the right USB enclosures. It will also accept USB-attached hard disks as targets, along with UFDs. Because of their size and speed advantages, my absolute favorite is Ventoy with a USB-attached NVMe SSD as the target. Can’t be beaten!
Use the Tool That Works for You
From an ease and simplicity standpoint, the Windows Media Creation Tool is the fastest and easiest way to create Windows boot media. As mentioned, my favorite tool is Ventoy because of its flexibility and convenience. That said, Rufus is also eminently usable when creating Windows boot media. Try them all, and use the one that you like best.

Ed Tittel
Ed Tittel is a long-time computing industry writer, consultant, and occasional expert witness. He’s the author of over 100 computer trade books, countless articles, and other stuff. For more info, please visit https://edtittel.com.