6 Steps to Synchronize SharePoint With File Explorer

Microsoft SharePoint is an effective tool for collaboration and file distribution in a team or organization. However, to get the most out of SharePoint, it is important to be able to access and manage your files directly from your local computer. In this article, I'll show you how to connect Microsoft SharePoint to File Explorer by using OneDrive, allowing you to easily access, edit, and share files with your team and organization. (To sync Microsoft Teams with File Explorer, see my earlier article 5 Steps to Synchronize Microsoft Teams with File Explorer.)
If your organization has access to Microsoft 365, you can use OneDrive to synchronize SharePoint with File Explorer. Using this synchronizing capability means you don’t have to save files in SharePoint and on your local machine. Simply use File Explorer to save your files and still have those files accessible through SharePoint. This means you can access these files while offline, and they will sync back to SharePoint when you come back online.
Follow These Steps to Synchronize SharePoint and File Explorer
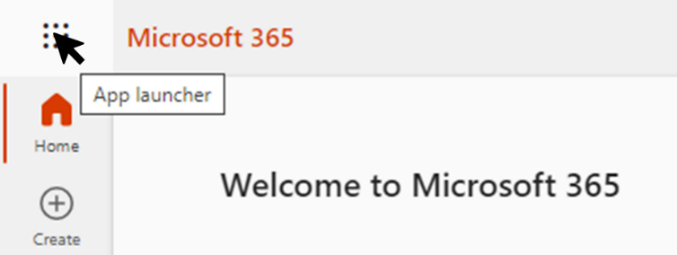
Step 1: Visit office.com. Sign in to your organization’s Microsoft 365. Once you have signed in, select the Microsoft 365 app launcher.
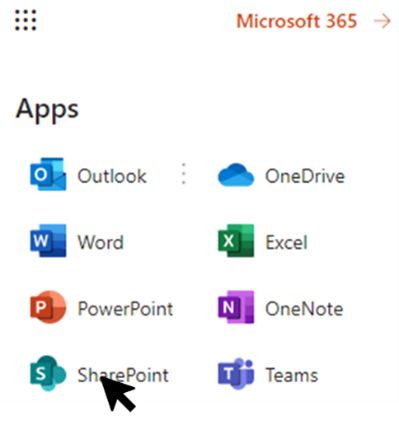
Step 2: Once the app launcher menu opens, navigate to the SharePoint app.
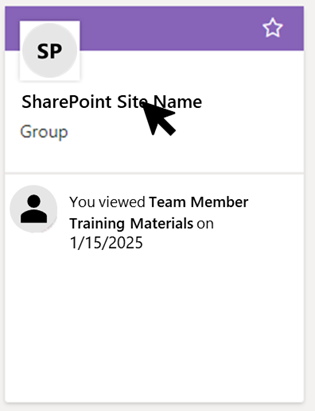
Step 3: Navigate to the SharePoint site name that you want to sync File Explorer to. You will need a SharePoint site to sync. If you don’t have a SharePoint site, either create one or request access to one.
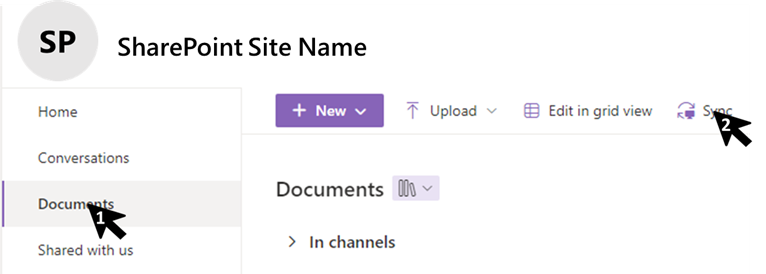
Step 4: Once you have accessed the SharePoint site, select Documents, and then select Sync. If you do not see a Sync option, then your organization has disabled this functionality. Contact your IT admin for more information.
Step 5: SharePoint will redirect you to OneDrive. If you are not signed into OneDrive, do so now. Otherwise, select Open. You can select the Always allow checkbox, but this is optional.

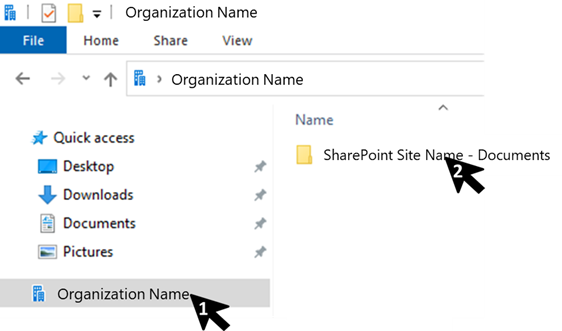
Step 6: You can now save files in SharePoint, and they will synchronize to File Explorer (and vice versa). To ensure that the sync has worked, open File Explorer and navigate to the file folder with your organization’s name.
Suppose you move to a different team, but you take the company-issued laptop with you to the new role and no longer use the previous SharePoint site. In a case like this, if you want to disconnect SharePoint and File Explorer, you can do so in File Explorer. Right-click on the folder name, and then navigate to Settings. In Settings, open the Account tab. You will see all the locations that are currently synchronizing. Select Stop sync on the locations that you want to disconnect.

Summary
You've learned how to connect Microsoft SharePoint to File Explorer by using OneDrive. SharePoint is now automatically saving and sharing files with File Explorer. If you need to sync another device, follow the steps again.
Step 1: Open the Microsoft 365 app launcher.
Step 2: Select SharePoint.
Step 3: Navigate to the SharePoint site.
Step 4: Open Documents, and then select Sync.
Step 5: Accept any dialog boxes (sign in to OneDrive).
Step 6: To ensure that the sync worked, open File Explorer.
TIP: To sync Microsoft Teams with File Explorer, see my earlier article 5 Steps to Synchronize Microsoft Teams with File Explorer.

Curtis Norman
Curtis is an accomplished healthcare analytics professional who enjoys solving complex problems utilizing data-driven methodologies. Curtis has done work for many hospitals and medical groups across the United States. His passion for healthcare was inspired by clinicians who attended to his daughter who was born prematurely, only weighing 1 lb 13 oz at birth. He is a vocal supporter of the Microsoft Ecosystem and effectively utilizes the Microsoft analytics suite in his daily work. Curtis is a well-respected Udemy Instructor who has created courses on various healthcare-related subjects including SQL, Finance, and healthcare data. His courses include – Intro to SQL using Healthcare Data, 101 Practice SQL Questions: Basic to Advanced, and Healthcare Revenue Cycle and Finance. During his leisure time, Curtis enjoys spending quality moments with his family and dog in the outdoors.